Category: LSCache

Learn more about LiteSpeed Cache plugin for WordPress, PrestaShop, XenForo, Drupal, Joomla, MediaWiki, WooCommerce, and more. Sites powered by LiteSpeed Web Server with LSCache may accelerate their web apps with extensions or rewrite rules.

In this category you will find tutorials, case studies, and useful information related to this popular cache solution.

  • Customer Showcase: LiteSpeed Cache Package Boosts WordPress Performance

    Customer Showcase: LiteSpeed Cache Package Boosts WordPress Performance

    LiteSpeed Cache Boosts WordPress Performance for Hostinger

    Our friends at Hostinger are here today, sharing how LiteSpeed Cache boosts WordPress performance on their hosting infrastructure. Without further ado, here they are in their own words! -LC

    Rockets have engines, electric guitars have amplifiers, and WordPress has LiteSpeed. We applied LiteSpeed cache solutions to help our customers make the most of their WordPress websites. The actual results convinced us – LiteSpeed did an excellent job. Now, we’re ready to prove it.

    It’s More Than a Plugin

    Most of our customers are familiar with LiteSpeed Cache as a WordPress plugin. Surprisingly, only a few know that LiteSpeed impacts an entire hosting ecosystem, starting with a web server, where the WordPress Cache plugin gets its power.

    We’ve deployed LiteSpeed Web Server (LSWS) on our hosting infrastructure. Customers can access it through our hPanel. LSWS saves the website’s resources without losing any speed and security. It doubles the capacity of the server memory and CPU.

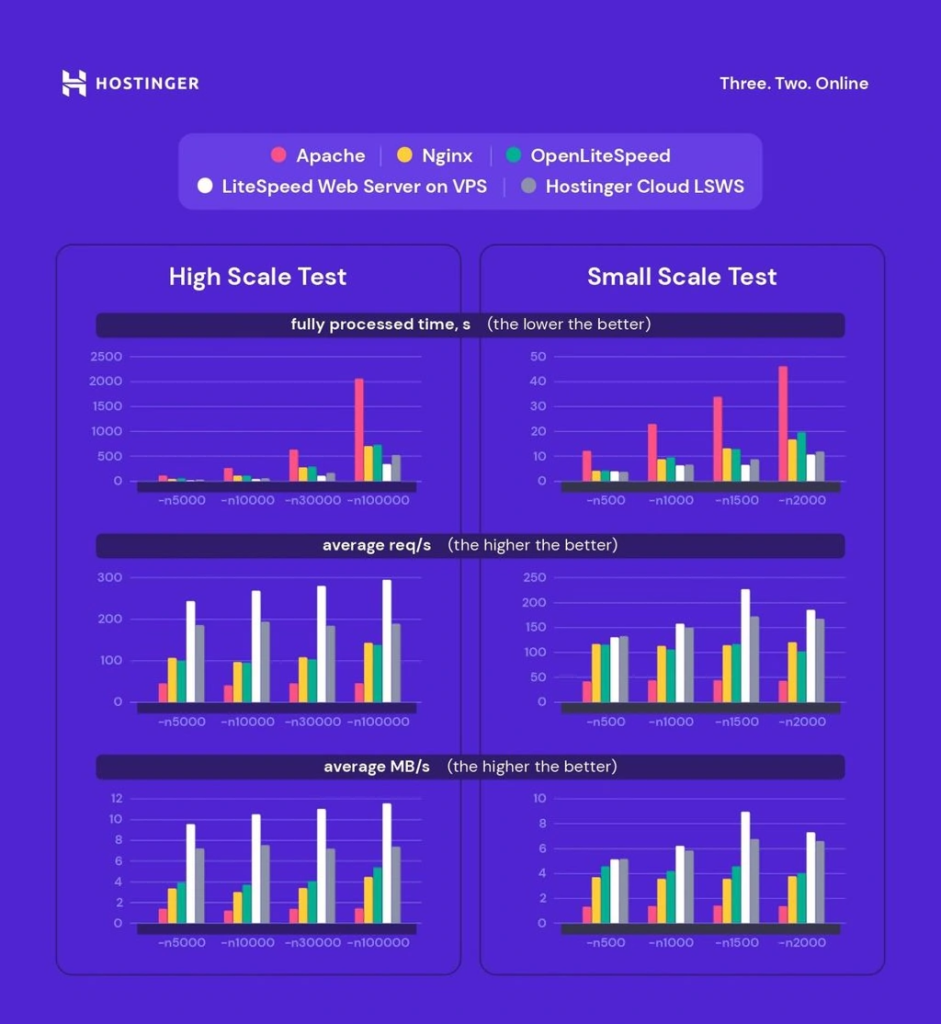
    As an Apache alternative, LSWS is performing up to 10 times better. And it’s lighter compared to Apache. We’ve run stress tests (high and small-scale) to see the difference between the three leading web servers (LiteSpeed Web Server, Nginx, and Apache). The results speak for themselves:

    LiteSpeed Boosts Performance for Hostinger

    More details about these results are available in our LiteSpeed cache plugin test tutorial.

    Give an Extra Boost with PHP Extensions

    Although LiteSpeed supports many PHP extensions, opcode caches are on the top of the list for WordPress developers (​​APCu, Xcache, Zend Opcache). Extensions accelerate PHP’s performance by being involved in the PHP execution life-cycle and storing the results of the compilation phase so the next time code can load instantly.

    LiteSpeed has a unique API (LSAPI). It ensures PHP communication with web servers. Usually, one has LSAPI automatically activated in the control panel. For our customers’ convenience, in hPanel, all PHP extensions suggested by LiteSpeed are already on. No action is needed, but we provide this tutorial on how to increase PHP memory, if desired.

    The Cherry on Top: WordPress Cache Plugin (LSCWP)

    This level of performance wouldn’t be possible without the main switcher to the engine – the LiteSpeed cache plugin installed on each WordPress website. We activate LSCWP on all Hostinger web hosting plans, so customers can be sure their websites are powered with LiteSpeed from day 1. There are different ways to adapt LiteSpeed cache to a website’s needs. With that in mind, we provide detailed descriptions of settings for Blog, eCommerce website, and online portfolio.

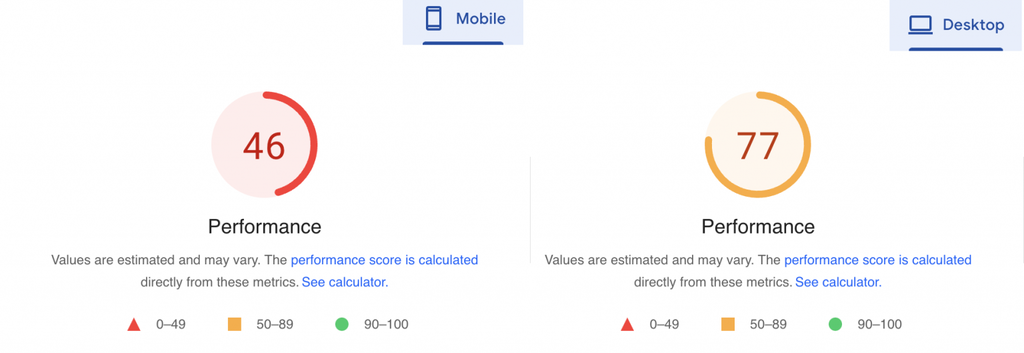
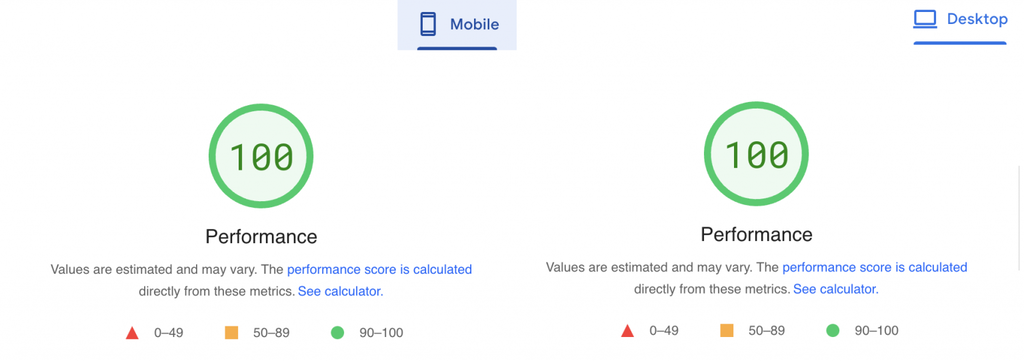
    Our LiteSpeed cache plugin test tutorial illustrates how it enhances the website’s performance. Here’s Google’s PageSpeed verdict.

    Before:

    WordPress Performance Before LiteSpeed Cache

    After:

    WordPress Performance After LiteSpeed Cache

    Impressive, right?

    QUIC.cloud + Cloudflare Integration

    Both QUIC.cloud and Cloudflare are reverse proxy content delivery networks (CDN). Unlike regular CDNs, they cache static files (images, CSS, JS, etc.) and dynamic HTML files. Combined, they provide a vast global network of about 270 points of presence (PoP). QUIC.cloud – 70 PoP and Cloudflare – 200. Those nodes operate like individual data centers storing your website’s data and letting visitors from different countries get a faster and more secure website experience.

    Why do you need both CDNs?

    Apart from being the new excellent CDN, QUIC.cloud does many other speed optimizations for WordPress sites like Low-Quality Image Placeholder generation, critical CSS generation, and so on. Because it comes as a part of the LiteSpeed Cache tool-set for website acceleration, it performs better with LSWS and is relatively easy to set up.

    How should you combine them?

    LiteSpeed recommends using QUIC.cloud for caching dynamic content and Cloudflare for static content. Cloudflare’s primary function is to deal with static content. But when both are turned to cache dynamic content, some conflicts may occur.

    Technically, you can use either of these CDNs for your WordPress optimization, but to achieve even better performance, we include both QUIC.cloud and Cloudflare in our web hosting plans. Setting them up in our hPanel is hassle-free.

    Conclusion

    As you see, LiteSpeed can improve WordPress performance at different levels of your website infrastructure: from the webserver to PHP extensions, from CDN to cache plugins. We chose LiteSpeed because of its advanced technological ecosystem and endless possibilities for customization.

    Hostinger users, who may not be as advanced in hosting, can reap the benefits of the LiteSpeed cache package while having peace of mind. When customers get their websites off the ground with Hostinger, we make sure all tools are integrated and ready to boost their Core Web Vitals.

    Our thanks to Hostinger for sharing their story in this Customer Showcase! Has your business experienced the LiteSpeed difference? If you would like to share your story with our readers, find me (@Lisa at Litespeed) on our Slack workspace, and we can discuss it. –LC

  • How to Fix Incomplete UCSS

    How to Fix Incomplete UCSS

    Fixing Incomplete UCSS

    Unique CSS (UCSS) is one of the Online Services provided for LiteSpeed Cache users through QUIC.cloud. We introduced it earlier this year in v4.0 of the WordPress plugin. UCSS provides a way to streamline CSS code for each page of your site. Because each page’s UCSS file contains only the code necessary to style that specific page, UCSS reduces bloat and speeds up load time.

    TIP: If you’re unfamiliar with UCSS, take a look at our introductory blog post. We go into more detail about this Page Optimization service there. Learn what it is, how to use it, pros and cons, etc.

    UCSS works out of the box for most sites, but once in a while there are sites where UCSS messes up the page styling. If you’re one of the unlucky ones in this situation, then chances are you have a problem with Incomplete UCSS. Today, we’re going to talk a little bit about that, and explain how to fix it, so that you can take full advantage of Unique CSS’s benefits.

    What Makes UCSS “Incomplete?”

    Here is how we generate UCSS:

    1. Scan a page’s HTML for all of the CSS selectors present.
    2. Save the related style definitions.
    3. Discard everything else from the original CSS file.

    The result is a compact CSS file that contains only what is needed to properly style that single page. UCSS may be “incomplete” if there are hidden selectors that the UCSS engine can’t detect during Step 1, when it scans the HTML.

    Some selectors only appear after user interaction (like scrolling, for example), and these make up the vast majority of Incomplete CSS cases. If you can locate these missing CSS selectors and add them to the UCSS Whitelist box, that should solve the problem. The UCSS engine will be instructed to include those definitions, even if it can’t detect the selectors on the page.

    The steps below will walk you through the process of locating the selectors, and then adding them to the list. But first, let’s review what a CSS selector is, so you know what you are looking for.

    What is a CSS Selector?

    CSS selectors are names that are used in HTML code to refer back to predefined CSS styles. In your page’s HTML, you will find them after id= or class=. Let’s look at a simple example.

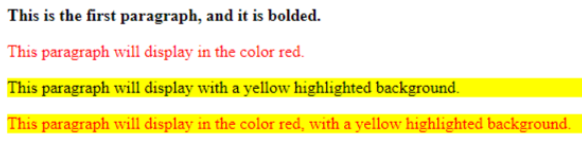
    Here’s a sample web page with four paragraphs displayed:
    Incomplete UCSS Example
    This is what the CSS styles for that page look like:

    .redp {
    	color: red;
    }
    
    .hilite {
    	background-color: yellow;
    }
    
    #firstp {
    	font-weight: bold;
    }
    

    And this is the page’s HTML:

    <p id="firstp">This is the first paragraph, and it is bolded.</p>
    <p class="redp">This paragraph will display in the color red.</p>
    <p class="hilite">This paragraph will display with a yellow highlighted background.</p>
    <p class="redp hilite">This paragraph will display in the color red, with a yellow highlighted background.</p>
    

    In this example, the CSS selectors are redp, hilite, and firstp.

    Now imagine if this page had a more complicated layout. What if the third and fourth paragraphs didn’t appear in the HTML code until we started to scroll? In that case, the UCSS engine would not detect the hilite selector in use on the page, and it would not be included in the resulting UCSS file.

    As humans though, interacting with and looking at the page, we can tell that the hilite style is actually important on this page. So, we add hilite to UCSS Whitelist in order to force the UCSS engine to include the hilite style in the UCSS file, even if it can’t detect it on use on the page.

    How to Fix Incomplete UCSS

    Now that you know what a CSS selector is, and what may cause it to go undetected by the UCSS engine, let’s look at how you can apply that to your own site’s incomplete UCSS issue.

    UCSS may be explicitly enabled in the Page Optimization > CSS Settings tab of the LiteSpeed Cache plugin, or it may only be used as part of Guest Mode / Guest Optimization. If you have not explicitly enabled Unique CSS, and are only using it as part of the GM/GO feature, then you will have one extra step at the beginning, and one extra step at the end. Everyone else can skip these first and last steps.

    Important First Step for Guest Mode Users

    Since UCSS is only activated on your site as part of Guest Mode + Guest Optimization, you will need to temporarily force LSCWP to use Guest Mode for all visits from your IP address. To do so, navigate to LiteSpeed Cache > General > Tuning, add your local IP address to the Guest Mode IPs list, and press the Save Changes button.

    Steps for Everyone

    1. Navigate to LiteSpeed Cache > Page Optimization > Tuning Settings where the UCSS Whitelist field can be found. Leave the page open there.
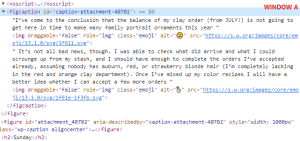
    2. Visit your website in a separate window, and have the developer tools visible. The problems in your website’s display should be visible in this window. We’ll call this Window A.
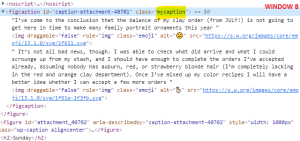
    3. Open another window with developer tools visible. This time visit your site, but append the /?LSCWP_CTRL=before_optm string to the end. For example, https://www.yoursite.com/?LSCWP_CTRL=before_optm. This will display your site without any of the optimizations, and it should look correct to you. We’ll call this Window B.
    4. In Window A, right click your mouse over the problematic area of the page and select Inspect from the menu.
    5. Do the same in Window B.
    6. Incomplete UCSS Example Incomplete UCSS Example
      Compare the contents of the two Inspect windows, line by line. Look for any selector that appears in Window B‘s Inspect detail but does not appear in Window A’s Inspect detail.
    7. Copy the missing selector and paste it into the UCSS Whitelist box.
    8. Repeat the previous two steps until you have found every missing selector from the problematic area(s) of the website.
    9. When you’ve finished adding selectors to the UCSS Whitelist, press the Save Changes button.
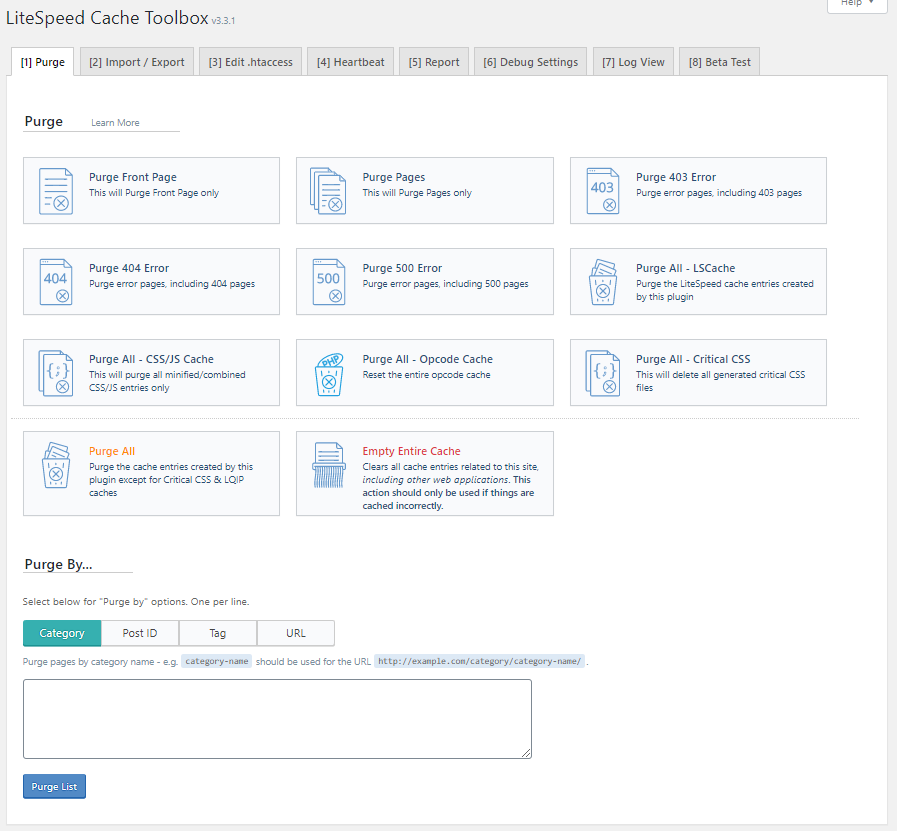
    10. From the WP-Admin Admin Bar at the top of the screen, hover over the LiteSpeed Cache symbol, and then click Purge All. Hover over the symbol again and click Purge All – UCSS.
    11. Return to your website in Window A, and reload the page. This will trigger a request to generate a new UCSS file.
    12. If you have time to wait, you can skip the next two steps, and let the cron generate the UCSS.
    13. To jump start UCSS generation, navigate to LiteSpeed Cache > Page Optimization > CSS Settings and look for the queue displayed under the Generate UCSS setting. Run the queue manually.
    14. Navigate to the LiteSpeed Cache Dashboard, find the queue displayed with Unique CSS and click Force cron. Wait a few minutes for UCSS to generate.
    15. Return to your website in Window A, and reload the page again. This time, the new UCSS file should be in use, and you should see an improvement in the display.
    16. If you see some improvement but there are still areas that are problematic, repeat the process: compare the two Inspect displays for Window A and Window B, and whitelist all of the problematic CSS selectors.

    Important Last Step for Guest Mode Users

    If you added your local IP address to the Guest Mode IPs list previously, remove it now and press the Save Changes button.

    Conclusion

    Unique CSS can be an excellent addition to your optimization toolbox, but sometimes it needs a small nudge in order to make it work. If this is the case for your site, try the steps outlined above to get UCSS working.

    If you’re still having problems, it may be some other CSS issue. Be sure to take a look at our CSS Troubleshooting documentation. We’ve shared all of the common problems and their solutions there. If you’re still struggling, after checking the docs, open a ticket with the QUIC.cloud team. They’ll be happy to help.

  • Generate Unique CSS with LSCWP v4.0

    Generate Unique CSS with LSCWP v4.0

    Unique CSS for WordPress

    Introduction

    Nearly every web page owes its aesthetics to a series of CSS files that are loaded with each page request. These CSS files define every possible style the pages on your site may need. However, not every page needs every style definition, and resources are often wasted parsing CSS code that is irrelevant to the current page.

    The new Unique CSS feature, available in v4.0 of the LiteSpeed Cache for WordPress plugin, allows you to discard unused CSS, and load only the necessary CSS definitions required to make the page display properly.

    Unique CSS

    Have you ever looked at the CSS files that are included with your WordPress theme and installed plugins? Chances are, there are several, and they are large. When you consider that they must contain every CSS definition for every variation of every page on your site, it’s no wonder.

    But parsing numerous large CSS files takes time, and when you consider that many of the styles defined in the file may not be appropriate for the page you are displaying, then you can see what a waste of precious time and resources it can be.

    Unique CSS aims to solve that problem by creating a separate single CSS file for each page of your site, where the only defined styles are the ones required to properly style that particular page.

    Impact on Page Speed Score

    Having Unique CSS for each page essentially means that there is no unused CSS ever. Unused CSS is one of the things Google, GTMetrics, and others warn you about when calculating page score. Because of this, Unique CSS generally improves page speed score.

    I tried UCSS on one of my sites.

    Page Score Before UCSS

    Page Score Before UCSS

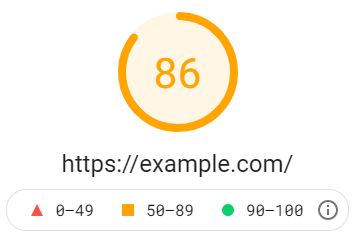
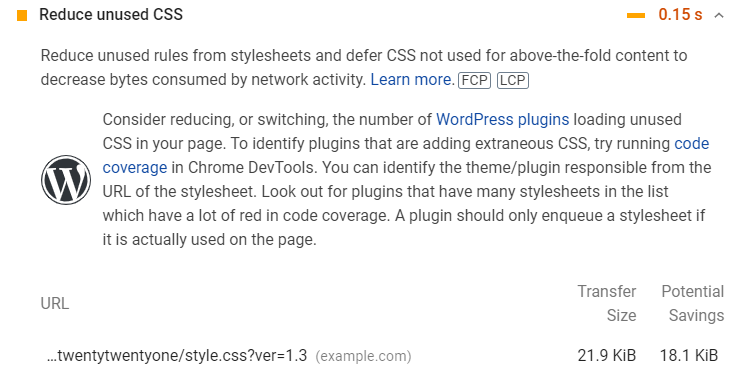
    Before UCSS, the site had a score of 86, and was warning that I could shave off 0.15s if I got rid of any unused styles. This is a small site with very little customization, and so the CSS wasn’t particularly large to begin with at 21.9KiB. But even so, it appeared that only 3.8KiB-worth of those definitions was useful CSS for the home page!

    Page Score After UCSS

    Page Score After UCSS

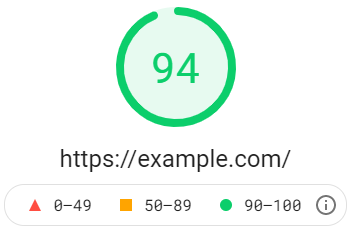
    After enabling Unique CSS, the page score increased by 8 points, and “Reduce Unused CSS” was no longer a suggestion. Instead it was listed under the things the site does right.

    How to Enable UCSS

    Unique CSS is a QUIC.cloud service, so you need to set up your Domain Key before you can use it. If you’re using any other QUIC.cloud services, you should already have a Domain Key, and don’t need to request one again. Unique CSS pulls from the same quota pool as Critical CSS. The two QUIC.cloud services are combined under the Page Optimization label.

    Enable Unique CSS Generation in LiteSpeed Cache

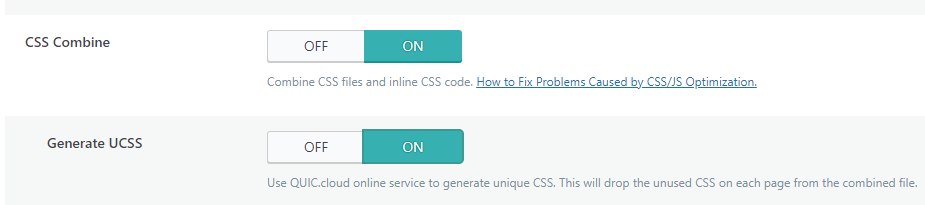
    From the WordPress dashboard, navigate to LiteSpeed Cache > Page Optimization > CSS Settings and set CSS Combine to ON. Then set Generate UCSS to ON. Save your changes.

    Next, turn on Cache Mobile. This is because Unique CSS for a mobile view will be different from that of a desktop view. Navigate to LiteSpeed Cache > Cache and set Cache Mobile to ON.

    Finally, Purge All, either from the Admin Bar or via LiteSpeed Cache > Toolbox > Purge, so that new cache files are created for each page. This is necessary so that each page’s HTML links to the correct combined Unique CSS file.

    From this point on, whenever someone visits a page on your site, the Unique CSS for that page will be served. If the UCSS has not yet been calculated, it will be added to a queue to be generated via cron.

    Difference Between UCSS and CCSS

    You may already be using our Critical CSS feature. Critical CSS, which is described in much more detail here, is designed to improve the display of above-the-fold content when loading CSS asynchronously.

    Unique CSS, on the other hand, is meant to improve performance when loading the full page by eliminating any irrelevant style definitions from the combined CSS file. Without unused definitions weighing it down, the CSS file is smaller, faster to transmit, and easier for the browser to parse.

    Disk Space

    UCSS can be a big advantage to your site, but it does come at the cost of disk space. If you have a site with 1000 pages, then you will potentially have 1000 different UCSS files to store. And if you enable Cache Mobile, as we strongly recommend you do, you’ll need to double that amount. If you have other cache varies to consider, the number of UCSS files generated can grow dramatically.

    Conclusion

    With Unique CSS, LiteSpeed serves your page with only the defined styles that are required to make it load properly. It’s an excellent way to speed up your site and improve your page score. If your disk space situation allows it, we recommend giving Unique CSS a try today!

    Have you tried Unique CSS yet? Let us know what you think!


    This content was last verified and updated in May of 2022. If you find an inaccuracy, please let us know! In the meantime, see our documentation site for the most up-to-date information.

  • Guest Mode in LSCWP v4.0

    Guest Mode in LSCWP v4.0

    Guest Mode for WordPress in LiteSpeed Cache

    First impressions are important. If your site loads sluggishly for a user’s first visit, you might not get another chance to impress them.

    Guest Mode for WordPress is a new feature introduced in the LiteSpeed Cache plugin as of v4.0. It was designed to load your site as quickly as possible for a user’s first visit.

    It’s not just human visitors that benefit from Guest Mode, though. Search engine bots and page speed checkers also get the fastest page load possible, leading to better search rank and improved page speed score.

    A User’s First Visit

    When someone drops by your site, there are a few things LiteSpeed server needs to learn about the new visitor. For example, if you are running a multi-lingual site, LiteSpeed might need to determine where the user is located. This is so that it may generate a page in that visitor’s native language. For an ecommerce site, LiteSpeed might need to figure out whether the page should have wholesale or retail pricing.

    It takes some time to make these decisions, and then more time to generate a new page from scratch, if one is needed.

    Guest Mode allows you to defer any decision-making, and immediately serve a default cached version of the requested page.

    How Guest Mode for WordPress Works

    A user’s first visit is different when Guest Mode is activated. Before trying to learn anything about the visitor, LiteSpeed server immediately serves a default version of the page from cache. This means, for this first visit only, there are no cache varies and no ESI. In other words, it doesn’t matter where, geographically, the user is coming from, what currency they prefer, what permissions they have to see particular content, or whether they have an account on your site.

    Everyone, for their first visit, will see the exact same cached version of the page. And it will be fast, since the system did not need to spend time reading cookies, looking for cache varies, or processing ESI. It just finds the simple page in cache and serves it.

    Once the HTML of the default cached page begins loading, an Ajax call is made. At this point, all of those factors that were originally ignored are processed, and the “correct” version of the page for that user, with cache varies, ESI, and all, is loaded.

    Of course, this means that there is a short delay between the default cached page being served and the correct content loading via Ajax. And on some complicated sites, this can mean that the wrong language, incorrect pricing, or other problematic content may be momentarily displayed. You need to decide if this is acceptable for the kind of content on your site.

    Guest Optimization

    You can take Guest Mode even further by using Guest Optimization. When this setting is enabled, not only is the default version of the page served from cache, but also the maximum level of page optimization and image optimization is enacted.

    This setting can greatly improve page speed score, as it will always serve a cached, highly optimized page when services like GTMetrix and PageSpeed Insights request it.

    Once the Ajax call loads the correct version of the page for your user, it will do so using the optimization settings that you have established for your site.

    It’s important to understand before you start using Guest Optimization, that not every site can handle “the maximum level of page optimization.” For some sites, page layouts may break, and functionality may be impaired. Please test fully before going all in with Guest Optimization.

    Impact on Page Speed Score

    The PageSpeed Insights bot (and others like it) is always considered a first-time visitor. If you have Guest Mode and Guest Optimization both enabled, the bot is served the fastest, most heavily optimized version of your page that exists. This can result in an improved score on Pagespeed Insights and other tools.

    For the following example, I ran my own personal website through Pagespeed Insights. I ran it once without Guest Mode and Guest Optimization enabled. Then I ran it once after I’d turned both options on.

    PageSpeed Mobile Score Before Guest Mode PageSpeed Mobile Score After Guest Mode

    The mobile version of my site, as you can see, had a pretty terrible score. By simply flipping the Guest Mode switch, the site went from bad to OK. Guest Mode and Guest Optimization got me 58 additional points! (Imagine how much better it would be if I took some time to do some further site optimizations.)

    PageSpeed Dektop Score Before Guest Mode PageSpeed Desktop Score After Guest Mode

    My desktop site started out in a better place than the mobile site, but there was still room for improvement. Guest Mode got me to a near perfect score.

    WARNING: if you are using page speed tools to look for problems on your site that need to be addressed, do not enable Guest Optimization. This feature may “mask” some site issues. So, while the page speed tool is showing you impressive results, your actual human users may be experiencing problems you don’t know about. Guest Optimization is best used after you’ve solved any user experience issues your site might have.

    How to Enable Guest Mode

    Guest Mode for WordPress Enable in LiteSpeed Cache

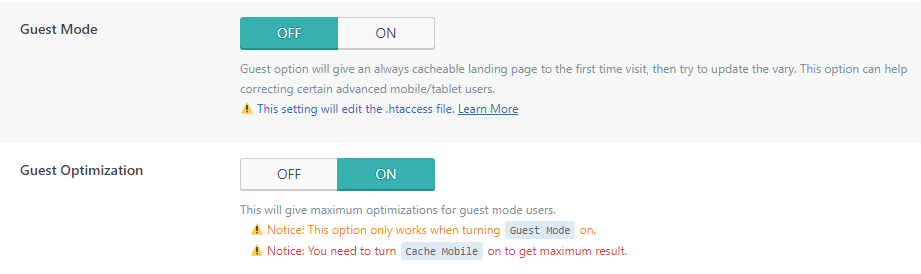
    From the WordPress dashboard, navigate to LiteSpeed Cache > General and set Guest Mode to ON.

    You can find Guest Optimization directly under the Guest Mode setting. It defaults to ON (though it is ignored for as long as Guest Mode itself is OFF). If you do not want to use Guest Optimization, set it to OFF.

    In order for Guest Optimization to have maximum effectiveness, you should also enable Cache Mobile (found in LiteSpeed Cache > Cache), this way you can take advantage of a set of optimizations that are ideal for desktop and a different set of optimizations that are ideal for mobile.

    By the way, if you are running a multisite network, you can find these settings under the Network Admin tab.

    Resource Usage With Guest Optimization

    There are a few things to consider before you enable Guest Optimization.

    As we’ve pointed out, Guest Optimization enables the maximum number of optimizations on your site, but it’s important to understand what that entails. If you are already using the following features, independent of Guest Optimization, then there will be no additional impact on your resources:

    Specific Impacts

    If you are not already using the features listed above, they will be enabled as part of Guest Optimization. So, you should know how they may impact disk space, server resources, even QUIC.cloud quota:

    • QUIC.cloud Quota Critical CSS, Unique CSS, and Viewport Images are enabled and generated, for those who have a Domain Key. The CCSS, UCSS, and VPI generation processes are QUIC.cloud services. If your domain is set up with QUIC.cloud, then these services will be performed. QUIC.cloud CSS Optimization quota will be deducted accordingly, as if you had manually enabled CCSS, UCSS, and VPI. In other words, Guest Optimization may use up your free CSS Optimization quota, or any quota you have purchased with QUIC.cloud credits.
    • Disk space / File usage If your hosting provider puts limits on disk space or on the number of files you can have, Unique CSS may be problematic. The whole point of UCSS is that every stylistic variation of every page on your site gets its own CSS file. For a large site, that could mean thousands of extra files and heavy disk usage.
    • Server Resources. If your site makes use of crawling, the number of crawlers can grow exponentially by the enabling of Mobile Cache and WebP Replacement. This has the potential to consume server resources you may not have to spare.

    Notes

    If you don’t have a QUIC.cloud domain key, then CCSS, UCSS, and VPI will not be generated, and the first two points will not apply to you. (But also, without these improvements, Guest Optimization will not be as strong as it would be with them.)

    Depending on your site’s configuration, Guest Optimization may not consume any additional resources at all. Or it may consume too many additional resources to be justifiable. The decision is yours, and will vary from site to site.

    Conclusion

    Want to make a good first impression on Pagespeed bots and real human beings alike? Guest Mode for WordPress is your handy new tool.

    Want to give it a try? There are two ways to get Guest Mode:

      • Manually upgrade your LiteSpeed Cache plugin to v4.0 today (enter master in LiteSpeed Cache > Toolbox > Beta Test and press Upgrade)
      • Wait for v4.1 to be available in the WordPress plugin directory (coming soon!).

    Have you tried Guest Mode and Guest Optimization yet? Let us know what you think!


    This content was last verified and updated in June of 2023. If you find an inaccuracy, please let us know! In the meantime, see our documentation site for the most up-to-date information.

  • Improving Page Experience with LiteSpeed

    Improving Page Experience with LiteSpeed

    Improving Page Experience with LiteSpeed

    As a site owner, you naturally want your visitors to have a seamless and successful visit that entices them to continue coming back. In May 2021, you were given an even better reason to improve page experience for your visitors: Page Experience became a factor in Google Search Rank.

    While it seems like something too subjective to measure, there are actually some metrics that go a long way towards quantifying page experience. Across the web, page experience is considered good when the page loads quickly, is responsive to user input, and is visually stable. These aspects can be measured through a series of metrics known as the “Core Web Vitals.”

    Today we will talk about these vital measurements, and give you tips to ensure your WordPress pages are delivering the optimal visitor experience.

    NOTE: While we are talking specifically about WordPress here, know that these strategies apply to all kinds of sites. The tools needed to implement our suggestions, though, may vary for other CMSs.

    Core Web Vitals
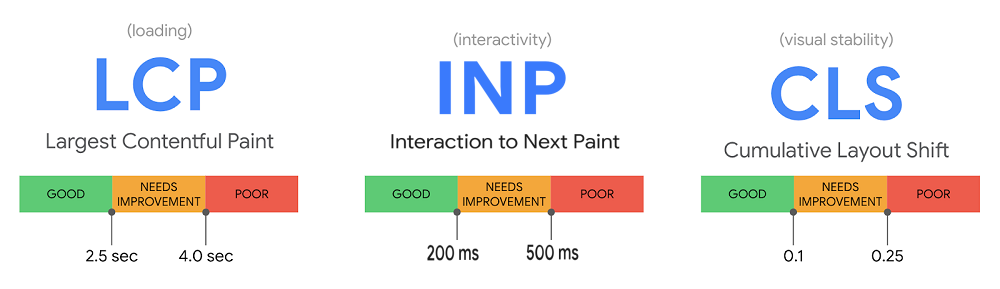
    Page Experience Core Web Vitals
    Google has defined a set of three Core Web Vitals. These measurements, when taken together, provide a way to quantify user experience and assign it a value.

    The Core Web Vitals measure page experience by focusing on aspects of loading, interactivity, and visual stability, respectively.

    Initially, the Core Web Vitals were Largest Contentful Paint, First Input Delay, and Cumulative Layout Shift, but in 2023, Google announced that it would be replacing First Input Delay with Interaction to Next Paint as of March, 2024.

    Let’s look at each metric one by one.

    Largest Contentful Paint (LCP)
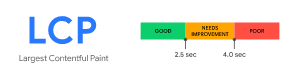
    Core Web Vitals Largest Contentful Paint

    LCP is a measure of loading performance. This is LiteSpeed’s specialty!

    More specifically, LCP measures how long it takes to load the largest element on a page. It’s considered a user-centric metric, because it estimates the perceived load speed. Generally speaking, when the largest element on a page has rendered, the page will be ready to use, even if there are still smaller (and potentially less important) items yet to load.

    There are primarily four things that impact LCP on your site:

    1. Server response time
    2. Render-blocking JavaScript and CSS
    3. Resource load time
    4. Rendering on the client side

    Chances are, each of these four elements can be improved for your site. Take a look:

    Server response time

    Action: Install LiteSpeed Cache for WordPress and enable caching.

    Page caching is a crucial tool in your arsenal against sluggish server response times. When your site is cached, it requires much less involvement from the WordPress backend, which translates into a faster site and a better experience for your site’s visitors.

    WordPress sites consist of dynamic pages that are built with PHP. The pages of a WP site don’t exist anywhere in the file system; they are constructed on-demand through PHP, and then served to the visitor as HTML. This can be a resource-heavy process, but page caching is an effective way of dealing with it. (You can learn more about this topic in our Caching 101 series.)

    Some other suggestions for improving server responsiveness include:

    • Optimizing your server
    • Using a CDN (like QUIC.cloud!) with nodes nearer to your visitors than your origin site

    Render-blocking JavaScript and CSS

    Action: Enable Load JS Deferred and Load CSS Asynchronously in the LSCache plugin.

    This is one of those solutions that page speed tools have been suggesting for some time. There is no need to load all of your JavaScript or CSS upfront. If you defer unnecessary JS and CSS until later, the above-the-fold content can render more quickly. You can defer both JS and CSS using settings in the Page Optimization section of the LSCache plugin for WordPress.

    Other suggestions, (all available in LSCache Page Optimization):

    Resource load time

    Action: Sign up for QUIC.cloud CDN, and/or optimize your images.

    A CDN such as QUIC.cloud is a smart idea, because it potentially minimizes the distance resources need to travel between server and client, which in turn makes the resources load faster.

    While minimizing the distance resources must travel is important, you could increase the impact by also reducing the size of the resources themselves. This is where image optimization comes into play. LiteSpeed offers an image optimization service through QUIC.cloud, which compresses images, making them faster to transport and faster to load. The service allows you to optionally enable the modern, more efficient image format, WebP, as well.

    Other suggestions:

    • Preloading some resources
    • Enabling file compression
    • Caching static and dynamic content

    Rendering on the client side

    Action: Optimize JavaScript usage

    Many modern sites use JavaScript to render pages entirely on the client side. In some cases, this can be problematic for Largest Contentful Paint, particularly if a large JS bundle is used and content is unable to be rendered until the JS execution completes.

    In addition to the JavaScript optimizations mentioned earlier, it could be helpful to break up large bundles, or switch to server-side rendering where possible.
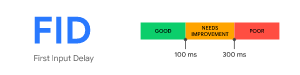
    First Input Delay (FID) – to be deprecated

    Core Web Vitals First Input Delay

    As mentioned earlier, FID is to be deprecated in March of 2024. Until then, it’s still considered one of the Core Web Vitals. FID measures your site’s responsiveness. How long does the site take to act when a button is pressed? For a good page experience, the interactive elements of your site should feel instantaneous and not sluggish. A low FID is important to user experience.

    JavaScript is usually the culprit here, too. Breaking up long tasks, switching to server-side logic, deferring JS execution, and other JS optimizations that you may have implemented to help with Largest Contentful Paint, will also be instrumental in improving the First Input Delay metric.

    Interaction to Next Paint (INP) – replacing FID
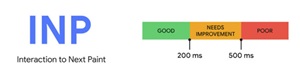
    Core Web Vitals Interaction to Next Paint

    Like FID, INP measures the responsiveness of a page. However, FID deals in first impressions, measuring only the user’s initial interaction. INP is a more comprehensive measurement, sampling the page’s responsiveness through the lifespan of the user’s visit.

    INP observes mouse clicks, touchscreen taps, and keyboard taps, and measure how long it takes for the page to return a visual response.

    To improve INP, you need to optimize input delay, event callbacks, and presentation delay. For example, a user presses a Submit button. How long does it take for the submitting action to begin? And how long before the browser paints Submitting... on the screen?

    Again, these interactions are usually powered by JavaScript, which means the best way to minimize the time they take is to optimize your JavaScript. This is not a trivial task, if your website is highly interactive, and it may take a lot of repetitive work to find and mitigate all of the bottlenecks. It is worth the effort, though, as a low INP means a snappy page, and a more pleasant user experience.

    Cumulative Layout Shift (CLS)
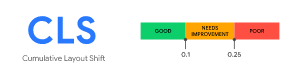
    Core Web Vitals Cumulative Layout Shift

    CLS measures the visual stability of a page. How much do elements move around while the page is loading? CLS should be low to avoid the possibility of accidental clicks, or losing one’s place while reading, which can be frustrating for a user.

    In general, CLS is impacted by these items:

    • Lack of size attributes on images and videos
    • Insertion of content above existing content
    • Use of animation properties that trigger layout changes

    Here are some strategies for improving CLS:

    Lack of size attributes on images and videos

    Action: Make sure all images, videos, and iframes have size attributes.

    Generally speaking, text loads first on a page, and then the images and videos start filling in wherever they belong. If space for these resources is not reserved ahead of time, then the text moves around to accommodate the resources as they load. To avoid this, in your theme, and in your posts, all added images, videos, and iframes should explicitly list their sizes in the HTML code.

    If you don’t want to do this manually, try LiteSpeed Cache’s Add Missing Sizes option in the Page Optimization > Media Settings section. If enabled, LSCache will detect any resources with missing size attributes, calculate the appropriate sizes, and add them to the dynamically generated HTML before caching the page.

    Insertion of content above existing content

    Action: Use static-size containers around variable-size items

    This type of issue happens a lot when you have advertisements on your site, particularly ones where you let the ad service decide what size ad to stick in the spot. For example, you may have a banner ad at the top of your page, but it might at any time display a Leaderboard, Large Leaderboard, or Billboard sized ad. By not specifying a size ahead of time, any content that appears below the ad will be pushed down when the ad displays.

    You can fix this problem by creating a container for that ad, which will display at the same time the text loads. When the ad renders, it will fit inside the box (and if it doesn’t fit, you can prevent it from exceeding the allotted space with an overflow: hidden attribute).

    Use of animation properties that trigger layout changes

    ACTION: Switch to transform animations.

    Some CSS properties trigger a re-layout, which can cause page resources to move around undesirably. Instead of using CSS triggers – and there are a lot of them – try transform, which does not trigger any geometry changes or painting on the page.

    Other Page Experience Metrics

    Your pages should be in good shape, if you master the Core Web Vitals, but there are other metrics that inform page experience, and you don’t want to ignore them:

    Mobile Friendliness

    Can your site be read and interacted comfortably with on a mobile device? These days, with so many internet users accessing content on the go, Google has adopted a “mobile first” philosophy. So, if your mobile site is functionally impaired, it will undoubtedly impact your page experience score and rank. You can evaluate your site’s mobile friendliness with Google’s Mobile-Friendly Test.

    Safe Browsing

    It probably goes without saying that your page should not contain malware, social engineering, or other malicious and deceptive content. You can check Google’s Security Issues report to be sure your site is clean.

    Secure Connections

    Serving your site over a secure connection with HTTPS is more important than ever. Google penalizes insecure sites in terms of page rank, so if you want to rank, you need to be secure.

    If you’re running LiteSpeed Web Server, which comes with secure HTTP/2 and HTTP/3 connections enabled out of the box, then you’re good. You can use the HTTP/3 Check tool to verify that your site supports HTTP/3 connections, or see our instructions to test for HTTP/2.

    No Intrusive Interstitials

    Interstitials include pop-up ads that cover the content, inline promotional material that appears above the fold, or any advertising that otherwise must be dismissed or scrolled past before the user can access the site’s actual content. Your site should be clear of such elements and your content easily accessible.

    Conclusion

    Improve Page Experience with LiteSpeed

    Of course, there is more to search rank than page experience. First and foremost, you need to provide content that answers the searcher’s question. But everything else being equal, a superior page experience can be the factor that puts your page ahead of that of your closest competitors.

    As you have seen, our end-to-end WordPress solution provides excellent tools – LiteSpeed Web Server, LSCache Plugin, and QUIC.cloud CDN – to help you improve page experience.

    If you are not a WordPress user, LiteSpeed Web Server with LSCache can still be of value to you. We have cache plugins for many other CMSs, or you can use LSCache without a plugin.

    With LiteSpeed, you can address problems with Core Web Vitals, and improve page experience for your users while simultaneously working your way to the top of the Google Search Results!


    This content was last verified and updated in November of 2023. If you find an inaccuracy, please let us know! In the meantime, see our documentation site for the most up-to-date information.

  • LiteSpeed Cache Profiles

    LiteSpeed Cache Profiles

    LSCache Profiles for WordPress

    Introducing LSCache Profiles for WordPress: the easiest way to optimize your website using Litespeed Cache

    Litespeed Cache Profiles are a pre-tuned set of options, which can be used for optimizing any WordPress site using Litespeed Cache.

    Choose Your Profile

    Profiles come in 4 stages:

    1. Basic
    2. Advanced
    3. Aggressive
    4. Extreme

    Basic

    This profile has the bare minimum of features enabled, and is good for any website.

    This profile sets the following:

    1. Default options enabled
    2. TTLs (Times to Live) set high
    3. Browser Cache enabled

    Download Link – https://lscache.io/LSCWP_Profiles/LSCWP_Basic.data

    Advanced

    This profile has the safest options enabled, and takes a balanced approach to aggressiveness and optimization. It will work well with most WordPress and WooCommerce websites. A free Domain Key is required to use this profile.
    This profile includes everything from the Basic Profile, plus enables the following settings:

    1. Image Optimization for all Images in the Media Library (both Original and WebP)
    2. CSS, JS and HTML Minification
    3. CSS & JS HTTP/2 Push
    4. Font Display Optimization
    5. JS Defer for both external and inline JS
    6. DNS Prefetch for static files
    7. Gravatar Cache
    8. Remove Query Strings from Static Files
    9. Remove WordPress Emoji

    Download Link – https://lscache.io/LSCWP_Profiles/LSCWP_Advanced.data

    Aggressive

    Fairly experienced WordPress Administrators should be able to use this profile, though testing is a must. Because of its aggressive nature, you might be required to exclude a few resources from CSS/JS Combine, and you might need some advanced configuration for Critical CSS and Localization. A free Domain Key is required to use this profile.
    This profile includes everything from the Advanced Profile, plus enables the following settings:

    1. CSS & JS Combine
    2. Asynchronous CSS Loading with Critical CSS
    3. JS Localization with most commonly used 3rd party JS
    4. Lazy Load for Iframes

    Download Link – https://lscache.io/LSCWP_Profiles/LSCWP_Agressive.data

    Extreme

    This profile includes ESI which can supercharge your WooCommerce store. It might require some help from a developer to integrate ESI properly. In addition, some images like Logos and slider images might require exclusions from Lazy Load. A free Domain Key is required to use this profile.

    This profile includes everything from the Aggressive Profile, plus enables the following settings:

    1. LazyLoad for Images
    2. ESI

    Download Link – https://lscache.io/LSCWP_Profiles/LSCWP_Extreme.data

    Applying a Profile

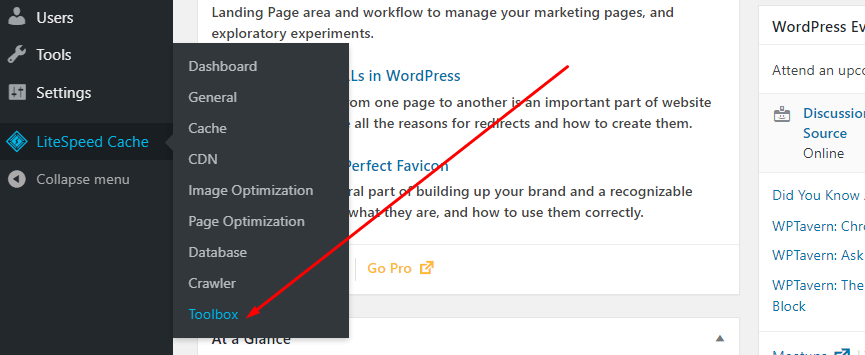
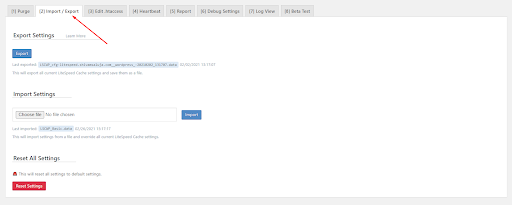
    Navigate to Litespeed Cache > Toolbox > Import/Export and back up your current settings by pressing the Export button.

    Apply the downloaded profile by using the Choose File option. Click Import to upload and apply the new settings.
    Note: Changing profiles currently also resets your Domain Key. We plan to fix this in a future release, but until then, please navigate to the General section, and click on Refresh Domain Key to get your updated domain key.

    Frequently Asked Questions

    I am new to Litespeed Cache, which profile should I apply?

    We recommend using the Advanced Profile as it takes a balanced approach to Optimization and Speed, and you shouldn’t need to manually tweak any settings. That said, if you experience difficulty, you can always revert to your previous settings, or try the Basic Profile.

    Can I modify Litespeed Cache settings after setting up this profile?

    Yes, it is absolutely possible to edit any options after applying this profile. Profiles are just an easy way to give you a good base optimization to start with. Most complex websites will need more fine-tuning to achieve their best possible score.

    If my website breaks after applying a profile, Is it possible to change back to the setting I was before?

    Yes, but only if you have previously saved a backup of your settings as instructed. A backup will provide you with a config file of your own website, which you can restore later if needed. Alternatively, you can always use the Basic Profile, which has the default settings.

    How should I get more fine-tuning specifically for my website?

    You can start with the Advanced Profile, and then go through the options in the Page Optimization section to see what more you’d need. Then try to enable them one-by-one to get the best for your website. You can also order our Paid Support Service to have LiteSpeed do the optimization for you.

    Are there any known bugs?

    Yes. The Domain Key removes itself when you apply a new profile, and requires you to manually refresh your domain key from the General settings. We plan to patch this issue in an upcoming version.
  • Cache Engine Enhancements

    Cache Engine Enhancements


    LiteSpeed Web Server v6.0 is here! Among other cutting edge features, this update introduces a few enhancements to the LSCache Engine. These changes, including POST response caching, and improved PURGE/REFRESH by URL, were designed to provide greater flexibility in managing your customized web application caches.

    POST Response Caching

    Previously, only GET responses were cacheable, but as of LSWS v6.0, you will be able to cache POST responses as well.

    To take advantage of this feature, two things need to happen:

    1. POST caching must be enabled at the server level: In the WebAdmin Console, navigate to Cache Policy Configuration and set Enable POST Cache to Yes.
    2. The response header must include X-LiteSpeed-Cache-Control, which is used to indicate that the response is cacheable.

    Cache Tags via Rewrite Rules

    Cache tags are the mechanism used by LiteSpeed’s cache engine to group content together and enable intelligent purging of related cache objects. Traditionally, tags have been assigned via the X-LiteSpeed-Tag response header, but v6.0 will allow you to do it with rewrite rules.

    Rewrite rules can set cache tags for any cached response that hasn’t already been tagged, like so:

    RewriteRule /cached/url - [E=Cache-Tag:exampletag]
    

    If tags have already been assigned by response header, the rewrite rule will be ignored.

    To assign multiple tags to the cached response, the tags must be within quotes:

    RewriteRule /cached/url - [E=”Cache-Tag:tag1,tag2”]
    

    Enhanced Purge/Refresh by URL

    LSCache’s earlier purge-by-URL feature only purged a single matching cache object. If there were varying copies of the URL, like in the case of mobile and desktop views, only one of those copies would be purged.

    In v6.0, the request URL will be treated as a special cache tag. It will always purge all varying copies of the same URL, and may also be used to purge cache objects for the same URL with different query strings.

    The methods for purging by URL will not change. You may continue to use the PURGE or REFRESH request methods, or the X-LiteSpeed-Purge response header. Additionally, the lsws/admin/misc/purge_cache_by_url script is still available to send a PURGE/REFRESH request, but the client IP must be trusted.

    Examples Using the X-LiteSpeed-Purge Response Header

    Purge /url/to/be/purged, including varying copies if any exist:

    X-LiteSpeed-Purge: /url/to/be/purged
    

    Purge /url/to/be/purged, including any copies with query strings (regardless of what that string may be):

    X-LiteSpeed-Purge: /url/to/be/purged?*
    

    This won’t work with wildcards or Regex patterns. The only acceptable use of * when purging by URL, is to signify “any query string” as in the example above. In other words, do not use /url/prefix* to purge all URLs starting with /url/prefix. If you must purge a group of URLs in this manner, you should use an explicit cache tag. In other words, assign all relevant URLs starting with /url/prefix a particular tag, and PURGE/REFRESH that tag.

    Stale purge /url/to/be/purged, including any copies with query strings:

    X-LiteSpeed-Purge: stale, /url/to/be/purged?*
    

    Stale purge is equivalent to a REFRESH request type. It enables an out-of-date cache object to be served to users while a fresh copy of the page is in the process of being cached. This is useful on busy sites, where there could be hundreds of requests for a page before the caching process has completed. In these cases, it may be better to serve out-of-date content from cache than to attempt to fill such a volume of requests with uncached content.

    Conclusion

    With POST response caching, the ability to add rewrite-rule-based cache tags, and improvements to purge-by-URL, LSCache is upping its game yet again. A tradition of excellence in web app acceleration continues!
    Get a trial license and try LiteSpeed Web Server v6.0 today!

  • LiteSpeed Cache vs. WP Fastest Cache
    LiteSpeed Cache vs. WP Fastest Cache

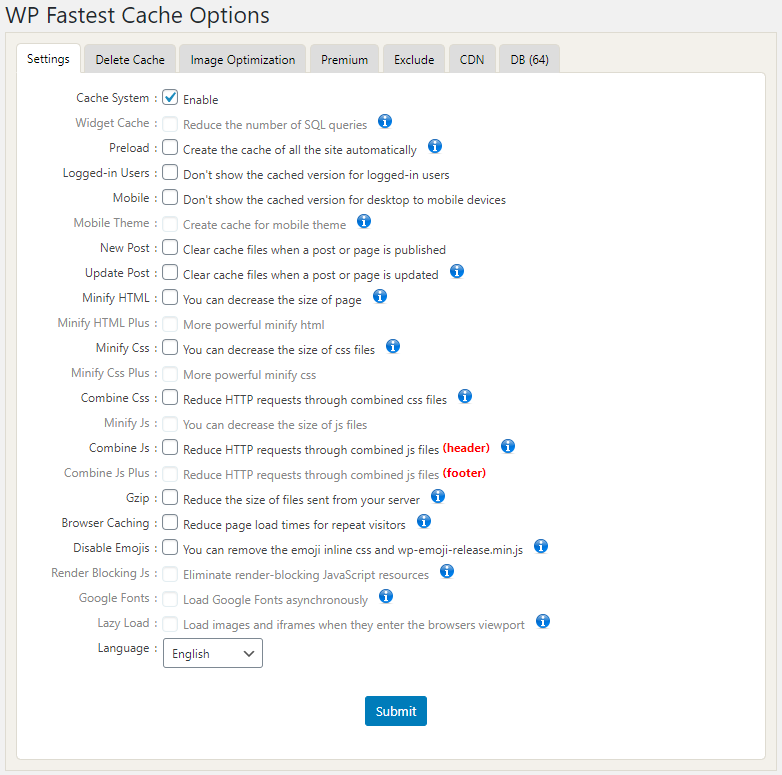
    It can be difficult to choose a cache plugin for your WordPress site, when they all have so many features. Hopefully today we can make that task somewhat easier for you by comparing the capabilities of two popular plugins, each with over a million active installations: LiteSpeed Cache vs. WP Fastest Cache.

    LiteSpeed Cache vs. WP Fastest Cache

    Let’s start by discussing each plugin’s caching capabilities, ecommerce compatibility, optimization, online services, and costs.

    Caching

    There are many types of caching that can be done with WordPress, but when you talk about WP cache plugins, you are generally referring to “full page cache.” Page caching is essential for improving the performance of WordPress sites, as it allows static snapshots to be generated and saved for the dynamically-generated page. It is significantly faster to serve a snapshot than it is to wait for WordPress and PHP to assemble content dynamically. In most cases, a WP page is exactly the same every time it is requested, and so it makes sense to serve saved content rather than going through the expensive process of building the page. Visitors to a cached page are given a much-improved user experience than those who visit an uncached page.

    How Caching Works

    In the simplest of cases, a single cache object can be generated for each page on the site, and this saved content can be delivered to every visitor. It gets more complicated when you factor in pages with private content, or customization based on things like the visitor’s location or type of device used to access the site (but we’ll discuss those scenarios further down the page).

    WP Fastest Cache

    WP Fastest Cache makes use of rewrite rules in a site’s .htaccess file to completely bypass PHP and serve static HTML. This is the recommended way to cache a WP site. It is preferred to avoid PHP because of its expensive overhead.

    LiteSpeed Cache

    LSCache also uses a site’s .htaccess file to define caching behavior, though there is one important difference: the plugin itself does not actually do any caching. Basic LSCache functions are carried out by LiteSpeed Web Server’s built-in cache module. The plugin is provided as an easy way for WordPress to communicate with the cache engine, but it doesn’t execute any of the caching tasks, and the cache files themselves are not stored within the WordPress file structure.

    Purging Cache on Demand

    Both WPFC and LSCWP expect you to define an expiration time or TTL (Time to Live) for content. This is the amount of time for which cached content is considered fresh. Sometimes, though, content must be purged from the cache before it reaches its natural expiration.

    WP Fastest Cache

    If a post is modified or a comment is posted, the static HTML copy of the post page is automatically deleted. Admin users have the choice of configuring the plugin to additionally clear all cached content, or clear just the home page, post categories, post tags, and post pagination.

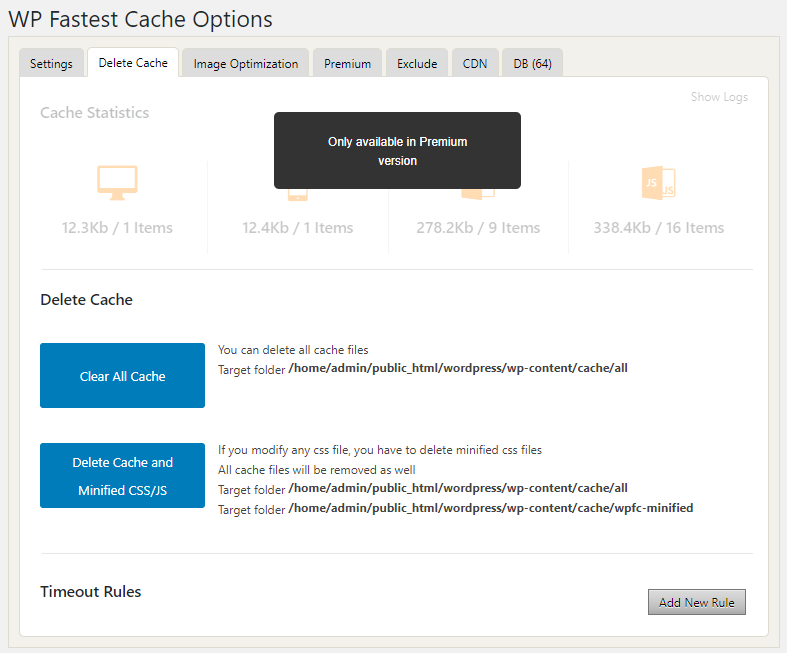
    It is also possible to purge the entire cache or just a single page on demand.

    LiteSpeed Cache

    LSCWP also purges the static HTML copy of any post that has been modified, but it uses its server connection to implement a tag-based system. This system identifies related content that must also be purged. In this way, there is never too much or too little removed from the cache.

    It is also possible to manually purge the entire cache or a single page, if desired.

    Handling Expired and Purged Cache

    No matter which plugin you use, there will be a cache directory on your server that continually fills up and takes up space. Let’s look at how each of the plugins cleans up after itself.

    WP Fastest Cache

    With WP Fastest Cache, the expired or purged content in the cache folder is copied to a temp directory and deleted later, in order to avoid taxing the system.

    LiteSpeed

    LiteSpeed’s garbage collection works at the server level. Because tags are tracked and stored in shared memory, the server has an efficient way of determining when a page needs to be deleted from cache. When the LiteSpeed server receives the purge header, it simply marks the related tags as “purged” but does not actually delete the files on the file system. This is to avoid heavy disk I/O while serving the response.

    LiteSpeed Server will deal with the outdated entries during non-busy CPU cycles and delete files in small batches with minimum side effects.

    Cache Varies

    Both plugins allow multiple public cache versions of a single page, for certain situations. This is referred to as a “cache vary.”

    WP Fastest Cache

    The only cache vary implemented by WPFC is one for device type, and it is only available for premium users. WPFC Premium will store a separate mobile view if necessary.

    The basic version of WPFC caches a single copy of the page that must be shared between desktop and mobile viewers. If the mobile view is significantly different than the desktop version, you can configure the plugin to serve uncached content to mobile viewers.

    Logged-in and non-logged-in users share a single cached copy of the page. If there is personalized content for logged-in users, then you can configure the plugin to serve uncached content to logged-in users.

    LiteSpeed

    LSCache can save multiple cache files per page. and they may be based on any number of things, from device type (mobile vs. desktop), currency, and geolocation, to the values stored in cookies on the user’s device.

    Additionally, LSCache can distinguish between public cache and private cache, which means logged-in users may see cached pages with their own personalized content. For sites where the content differs by user role (as opposed to individual user), cache varies may be used to store different versions of public cache for each user role.

    Cache Preloading and Rebuilding

    WP Super Cache and LiteSpeed Cache both have some version of a cache crawler, whose job it is to find uncached pages and store them. This minimizes the possibility of a visitor having to wait for any pages to be dynamically assembled.

    WP Fastest Cache

    For WPFC, the preload process starts to work when the cache is cleared, and then stops once it has traversed the site. BY default, the preload process runs every 5 minutes, but you can customize this by running a manual preload with a cron job.

    Alternatively, you can configure preload to restart immediately after completing, so that there is always a process running, looking for uncached content, and caching it.

    LiteSpeed

    LiteSpeed Cache’s crawler simulates a non-logged-in desktop user visit by default, just like WPFC, but may be configured to crawl as a mobile user as well. Additionally, for sites that employ user-group-based cache varies (i.e. retail customers vs. wholesale customers), or cookie-based varies (i.e. visitors with an affiliate cookie), the cache may be crawled simulating a logged-in user from any particular user group, or a user with a particular cookie. If you have the resources available, you could theoretically have dozens of crawlers going at once, simulating all sorts of user interactions.

    LSCWP’s crawler configuration allows you to choose frequency, duration, and a number of other settings to allow the crawl to have minimal server impact.

    Compression

    Both plugins cache and serve compressed content. WPFC supports gzip compression, while LiteSpeed supports both gzip and brotli.

    eCommerce

    When you run an online shop, there are necessarily going to be pages (and sections of pages) that can’t be stored in the public cache. Shopping cart pages and last-viewed product widgets, are good examples of this.

    Handling Private Content with WP FastestCache

    WPFC deals with the problem of personalized content by excluding it from the cache. WooCommerce Cart, My Account, and Checkout pages are automatically detected and excluded from caching. Other eCommerce solutions would need to have their pages manually excluded from caching.

    Handling Private Content with LiteSpeed

    LSCWP allows you to cache WooCommerce and other pages that contain both public and private content. With ESI (Edge Side Includes), holes are punched on a public page, and are filled with shopping cart data and other private content. Then, the mixed-content page can be served to the shopper, fully cached.

    This hole-punching behavior is built into LSCache and is automated for WooCommerce, and some other popular plugins. Conveniently, ESI can be configured by site admins for use with any widget or one-part shortcode. LiteSpeed also can turn nonces into ESI blocks, allowing them to expire sooner than the pages they are on. This is especially useful with contact forums, but has other applications as well.

    Developers may choose to have their plugins support ESI natively through the LiteSpeed API.

    Optimization

    If you use site evaluation tools, like Google’s PageSpeed Insights, or GTmetrix, you’ll want a nice selection of optimization features in order to implement the tool’s suggested site improvements.

    Both WPFC and LScache offer many optimization tools, including CDN support, database optimization, minification and combination of JavaScript and CSS, HTTP/2 push, lazy load, and a variety of other popular optimization features, as shown in the table below.

    Note that WP Fastest Cache provides some of these features only under the Premium plan.

    Online Services

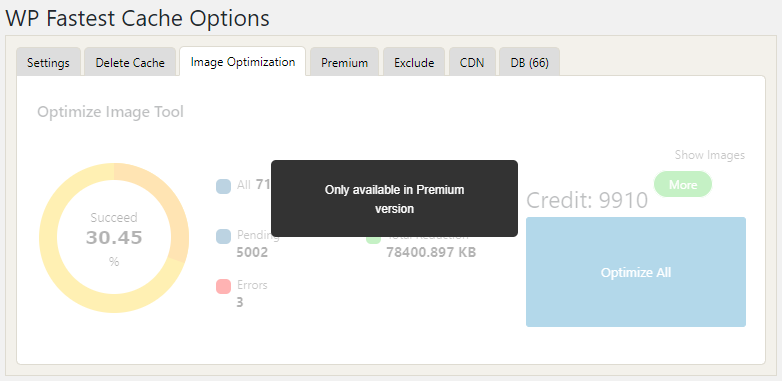
    WP Fastest Cache offers image optimization in its premium version, and requires payment through a credit system, one credit per image.

    LiteSpeed Cache offers Image Optimization, Critical CSS Generation (CCSS), and Low Quality Image Placeholder Generation (LQIP). All services have a free tier, but require payment for heavier use. LiteSpeed performs these services remotely on QUIC.cloud servers so as not to put any extra load on yours.

    Cost

    WP Super Cache has a free version, and a premium version that, as of this writing, costs a one-time fee of $49.99 for one license, up to $175.00 for five licenses.

    The LiteSpeed Cache plugin is also free, however a LiteSpeed web server is required in order to use the server-side cache, and there may be costs there, depending on your needs. There is a free, open source version (OpenLiteSpeed), or you can get an Enterprise license. License pricing ranges from Free for single site owners, to $96/month for large hosting companies, with several levels in between. QUIC.cloud is a new option. It’s a CDN that allows you to use all of the LSCache plugin features regardless of which server you are running on. The CDN comes with a free tier, but requires payment for heavier use.

    Feature Comparison

    Take a look at a side-by-side comparison of plugin features:

    Feature LiteSpeed Cache WP Fastest Cache*
    Cache Features
    Full-Page Cache
    Tag-Based “Smart Purge” X
    Tight Integration With Server X
    Private Cache X
    Edge Side Includes (ESI) X
    Widget Cache ✓ (Covered under ESI) $
    Crawler ✓ (Preload)
    WordPress Multi-Site Support
    Cache Logged-in Users
    Cache Separate Mobile View $
    Cache Vary on User Group X
    Cache Vary on Geographic Location, Currency, etc X
    Cache REST API X
    Purge Selected URLs on a Schedule
    Browser Cache Support
    Other Optimization Features
    Content Delivery Networks (CDNs)
    Database Optimization $
    CSS Minify
    CSS Combine
    CSS HTTP/2 Push X
    Critical CSS Generation X
    JavaScript Minify
    JavaScript Combine
    JavaScript HTTP/2 Push X
    Load CSS Asynchronously X
    Load JavaScript Deferred $
    HTML Minify
    Exclude Selected URI’s from Optimization
    Remove Query Strings X
    Remove Google Fonts X
    Lazy Load Images $
    Lazy Load iframes $
    Responsive Placeholders X
    Wildcard Usage in CDN Support X
    Image Optimization $
    WebP Generation $
    Plugin Cost FREE FREE and PAID versions
    Support Cost FREE FREE

    * WP Fastest Cache feature list is based on what we found listed publicly on the WP Fastest Cache website
    ** Some features require a Licensed copy of a LiteSpeed Web Server with Cache Module

    Conclusion

    Both LiteSpeed Cache for WordPress and WP Fastest Cache are strong contenders, but LiteSpeed is a clear winner when it comes to the ability to cache more scenarios (eCommerce, logged-in users, situations requiring cache varies, etc.).

    If you’d like to try LiteSpeed Cache, drop by our website to learn how to get started!

  • LiteSpeed Cache for WordPress v3 FAQ

    LiteSpeed Cache for WordPress v3 FAQ

    LiteSpeed Cache for WordPress v3 FAQ
    Earlier this year, LiteSpeed was pleased to introduce Version 3 of our LSCache plugin for WordPress. It was a long time coming, but we hope you will agree that it was worth the wait. Version 3 brings a collection of new features, a refreshed user interface, and a better way to access premium services.

    All of this change naturally brings some questions with it, and with this FAQ, we will address the most common of these.

    Where did X setting or function move to?

    Version 3 introduces a whole new user experience with a completely redesigned interface. There is no longer a Settings section or a Manage section. Instead, there are several new sections that are based on function.

    If you’re looking for something that used to be in the Manage section, try Toolbox first. You’ll find Purge, Report, Database Optimization, Import/Export, and Debug there, among other things.

    You’ll find CSS/JS and Media settings in Page Optimization

    Here is the documentation for V3, where you should be able to find anything you need. If you don’t want to wade through all of the documentation, start with the Beginner’s Guide for the basics.

    What is new in the plugin?

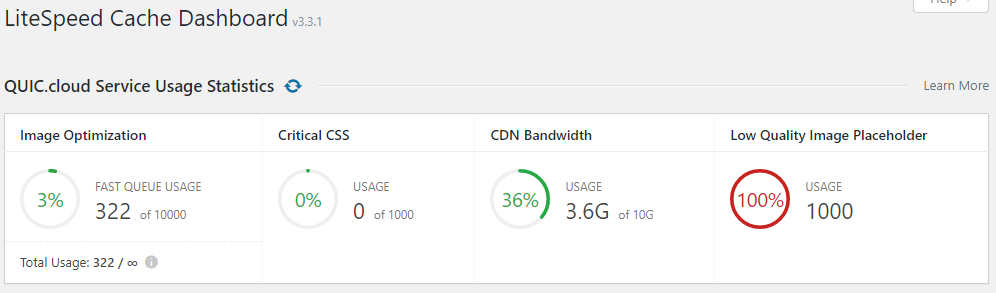
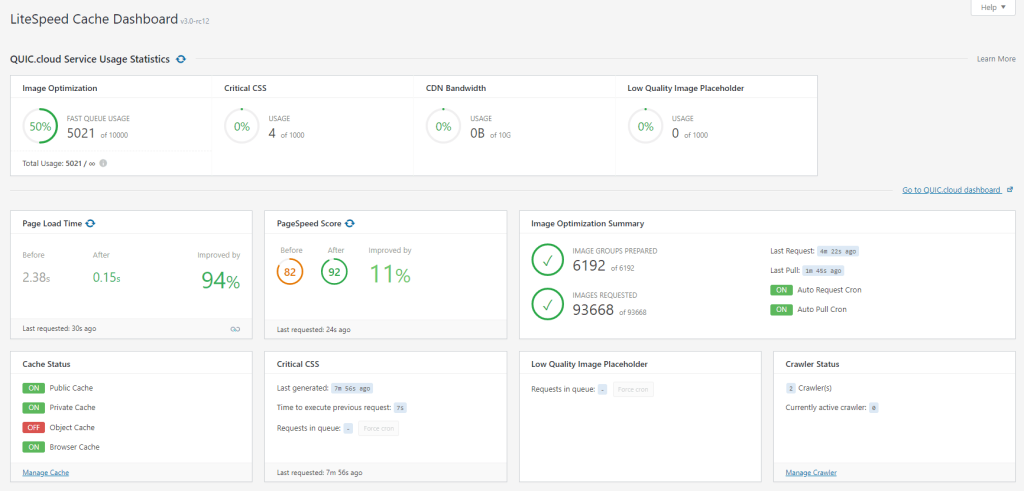
    The first plugin screen is the new Dashboard section. The Dashboard allows users to keep track of their page speed and page score, crawler progress, and QUIC Cloud service usage (more on that last one later).

    There are new settings, and functionality, too. Here are a few of the highlights by section:

    Cache

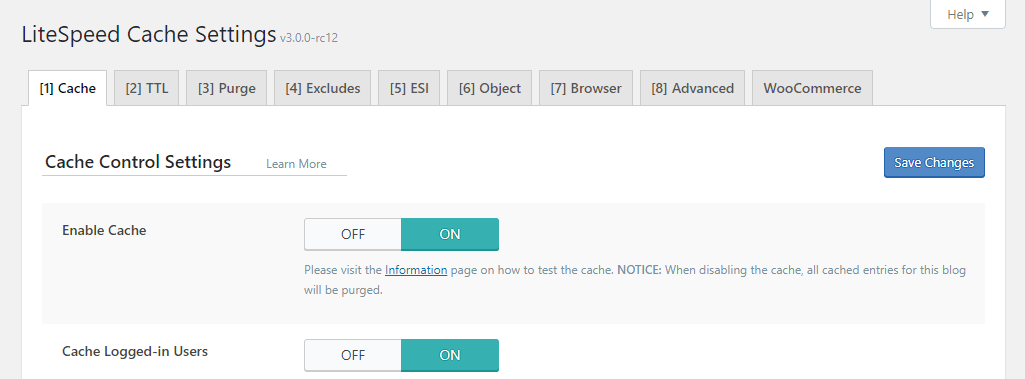
    The Cache section houses settings for our signature LiteSpeed server-level page cache, along with Browser Cache settings and Object Cache configuration.

    Improvements to this section include a new Purge Stale setting to allow stale pages to be served in lieu of fresh content, if a new cache copy has not yet been generated. Additionally, under the ESI tab, you will find the new ESI Nonces setting, which we discussed in depth in a recent blog post.

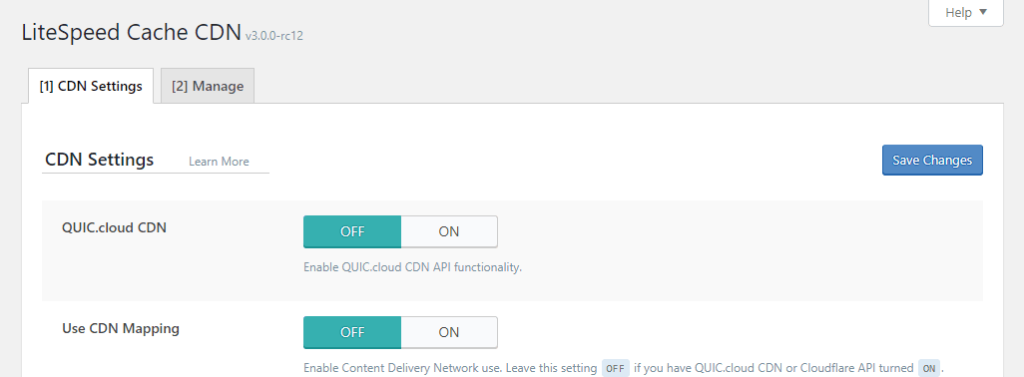
    CDN

    CDN settings and management have been moved together, and a few improvements have been made including a new HTML Attribute to Replace setting, which gives you more fine-grained control over CDN integration on your site.

    Page Optimization

    The old Optimize and Tuning settings tabs have been reorganized into a new Page Optimization section with multiple tabs that break settings down logically by type of optimization (CSS, JS, Media, etc.).

    We’ve made a lot of updates to this section, including the new Low Quality Image Placeholder (LQIP) service, JPG quality control, local Gravatar caching, improvements to Lazy Load, font handling, CSS and JS optimization improvements, and more.

    Database

    Improvements to Database Optimization include a new Table Engine Converter tool, database summary, and configuration option.

    Crawler

    Several tabs were added to the Crawler section to allow more fine-grained control of the sitemap and blacklist. Additionally, multiple domains are now supported.

    Toolbox

    The new Toolbox section houses Import/Export, Debug settings, Environment Report, and more. A new tab gives you expanded control over WordPress Heartbeats.

    What is QUIC Cloud?

    If you have used any of LSCache’s online services in the past, then you are familiar with the process: a request is made from the LSCache plugin, the work is completed on one of our remote servers, and the results are returned to your site via cron.

    Image Optimization, Critical CSS Generation, and the new Low-Quality Image Placeholder all work this way.

    Starting from Version 3, these remote servers have a name: QUIC Cloud

    QUIC Cloud access is controlled with a Domain Key that you can generate with one click from the LiteSpeed Cache > General > General Settings tab. Once the Domain key is generated, you can use Image Optimization and the other online services as usual.

    Do I need a QUIC Cloud account to use LSCache?

    No. A QUIC Cloud account is not required. Your site may use the QUIC Cloud services anonymously, if you wish.

    There are benefits to linking your WordPress domain to a QUIC Cloud account, though. These include a QUIC Cloud dashboard that gives you more information about and control over the services you have enabled, and the ability to purchase credits that can be redeemed for service power-ups.

    What services does QUIC Cloud provide?

    Currently, QUIC Cloud services include Image Optimization, Critical CSS Generation, Low-Quality Image Placeholder, and a cutting-edge CDN made exclusively for WordPress sites. An Unused CSS service is under development.

    Do I have to use QUIC Cloud services if I want to use the LSCache plugin?

    No. All QUIC Cloud features are strictly opt in.

    Do I have to pay for Image Optimization now?

    Those of you who have been using Image Optimization and Critical CSS Generation for free for the last few years may be concerned that this usage is suddenly going to cost you money, but this may not be the case. The credit system was designed to keep services mostly free for light and moderate usage, and for those who are already LiteSpeed customers.

    We’ve implemented a tier system. All QUIC Cloud users are given a monthly allowance of free credits. Those in the first tier (Apache and nginx users) get the smallest amount of credits. OpenLiteSpeed users get five times as many credits as the first tier, and LiteSpeed Enterprise users get ten times as many credits as the first tier. And coming soon, an even higher tier reserved for those users who have purchased hosting from a LiteSpeed Partner.

    Please note that credit tiers and counts are accurate as of this writing, but are subject to change. Your QUIC Cloud dashboard will have the most up-to-date information regarding credits and pricing.

    Let’s look at it on a per-service basis.

    Image Optimization

    If you are happy with your current image optimization usage, nothing has to change for you.

    Image optimization via the standard queue is free to use for everyone, for as many images as you like.

    With Version 3, we have introduced a Fast Queue, which processes images more quickly than the original standard queue. Access to the Fast Queue is controlled with credits.

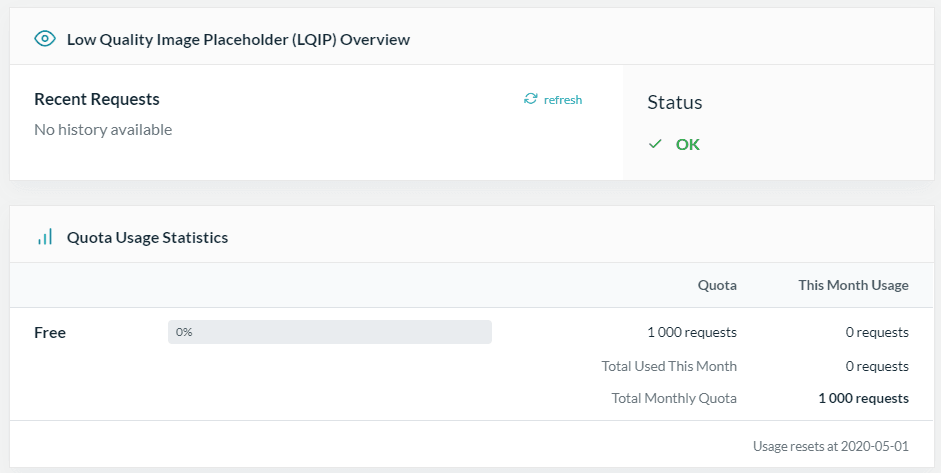
    Everyone gets enough credits for between 1000 and 20,000 Fast Queue images per month, depending on the site’s tier. If this is not enough, more credits may be purchased or (coming soon) earned through social sharing.

    Critical CSS Generation (CCSS)

    Everyone gets enough credits for between 100 and 2000 Critical CSS requests per month, depending on tier. If this is not enough, more requests may be purchased with credits

    Low-Quality Image Placeholder (LQIP)

    Everyone gets enough credits for between 100 and 2000 Low-Quality Image Placeholder requests per month, depending on tier. If this is not enough, more requests may be purchased with credits.

    Are all QUIC Cloud services still in beta?

    No. The QUIC Cloud CDN is in beta, but all other services are production-ready. We expect to have the CDN out of beta by the fourth quarter of 2020.

    What is a Domain Key, and why do I need one?

    Once you’ve updated the LiteSpeed Cache plugin to v3, navigate to LiteSpeed Cache > General > General Settings and generate a Domain Key, if there isn’t already one there. This key is what allows your WordPress site and QUIC Cloud to securely communicate with each other. If you want to use any QUIC Cloud service, you will need a Domain Key.

    Please note that the Domain Key is also used to control the optional notifications (LiteSpeed Cache > General > General Settings > Notifications), so if you have them enabled, but you don’t have a domain key, you will see warnings.

    Do I have to upgrade to Version 3?

    For security purposes, it’s always a good idea to keep your WordPress plugins up-to-date. That said, if you have some reason for wanting to continue using LSCWP v2.9.x, you may do so. However, the v2.9.x plugin is not compatible with the new QUIC Cloud servers, and the legacy servers are being phased out..

    If you wish to continue using Image Optimization or CCSS services, you will need to upgrade to Version 3.

    Why are my API or CLI commands no longer working?

    LiteSpeed Cache API hooks and filters have changed in Version 3. Please see our complete API documentation.

    The same goes for LiteSpeed’s WordPress CLI functions. Please see our CLI documentation.

    We apologize for any inconvenience these changes may have caused!

    Where can I get more help?

    It makes us happy to finally have Version 3 out there in the world being used by so many of you. As always, we are open to suggestions, and we are here if you have any questions or difficulties. Find us on the WordPress Support Forum, or the #wpcache channel in our Slack Workspace. Or, for more in-depth one-on-one help, create a ticket from your QUIC Cloud dashboard.

    Happy Caching!

  • The Power of ESI Nonce

    The Power of ESI Nonce

    How to Cache WordPress Nonce

    Nonces are a major cause of headaches for site owners who wish to cache their content. Expiring nonces are often responsible for quirky behavior, including broken forms and 403 errors. Usually the solution is to consider any page with a nonce to be uncacheable. And sometimes it is recommended to set the entire site TTL to be the same as a nonce’s: twelve hours. These solutions are not ideal.

    With LiteSpeed’s ESI Nonce functionality you can fully cache WordPress nonces and the pages they belong to. It’s a powerful tool that can make nonce-related headaches a thing of the past.

    What is a Nonce in WordPress?

    The word “nonce” is derived from the phrase “number used once,” although that’s not an entirely accurate way of describing them. Nonces are not really numbers, nor are they used only once. They’re actually a hash made up of numbers and letters, and they can be used multiple times within their limited lifetimes.

    Nonces make certain WordPress activities more secure. A nonce is generated for a particular user, and only that user is allowed access to it. After the nonce expires, it can no longer be used by anyone.

    Nonces can be applied to all sorts of things, like form submissions and post previews.

    You can learn more about nonces in the WordPress Codex.

    What is ESI in LSCache?

    ESI is short for “edge side includes” and it refers to a feature that allows you to cache mixed content on a single page. Most frequently, ESI is used to “punch holes” in a public page and insert private content into those holes. But ESI can actually be used in any situation where some content must be cached using different parameters than the rest of the page. This includes situations where content expiration times differ.

    You can learn more about LiteSpeed’s ESI implementation in this blog article.

    Why Combine Nonces and ESI?

    When a site is cached, the pages on the site have a set time to live (or, TTL). After that TTL passes, the page expires in the cache. Sites often set a long TTL, in order to minimize the amount of uncached content a user will encounter.

    Nonces, on the other hand, have a relatively short TTL, usually twelve hours. As such, they often expire before the rest of the content on the site. This can be problematic for the pages that use them. Plugins that provide form functionality, in particular, are subject to nonce-related cache conflicts. Without ESI, pages generated by these plugins must be considered uncacheable.

    By converting a nonce to an ESI block, you allow the nonce to expire independently of the site TTL, all while maintaining security, and avoiding cache conflicts. Pages that were once considered uncacheable can now be sped up with the rest of the site.

    How to Use LSCache’s ESI Nonce Feature

    If you know the name of the nonce that you wish to turn into an ESI block, LiteSpeed Cache makes it possible to do so with a few clicks.

    How to Cache WordPress Nonce

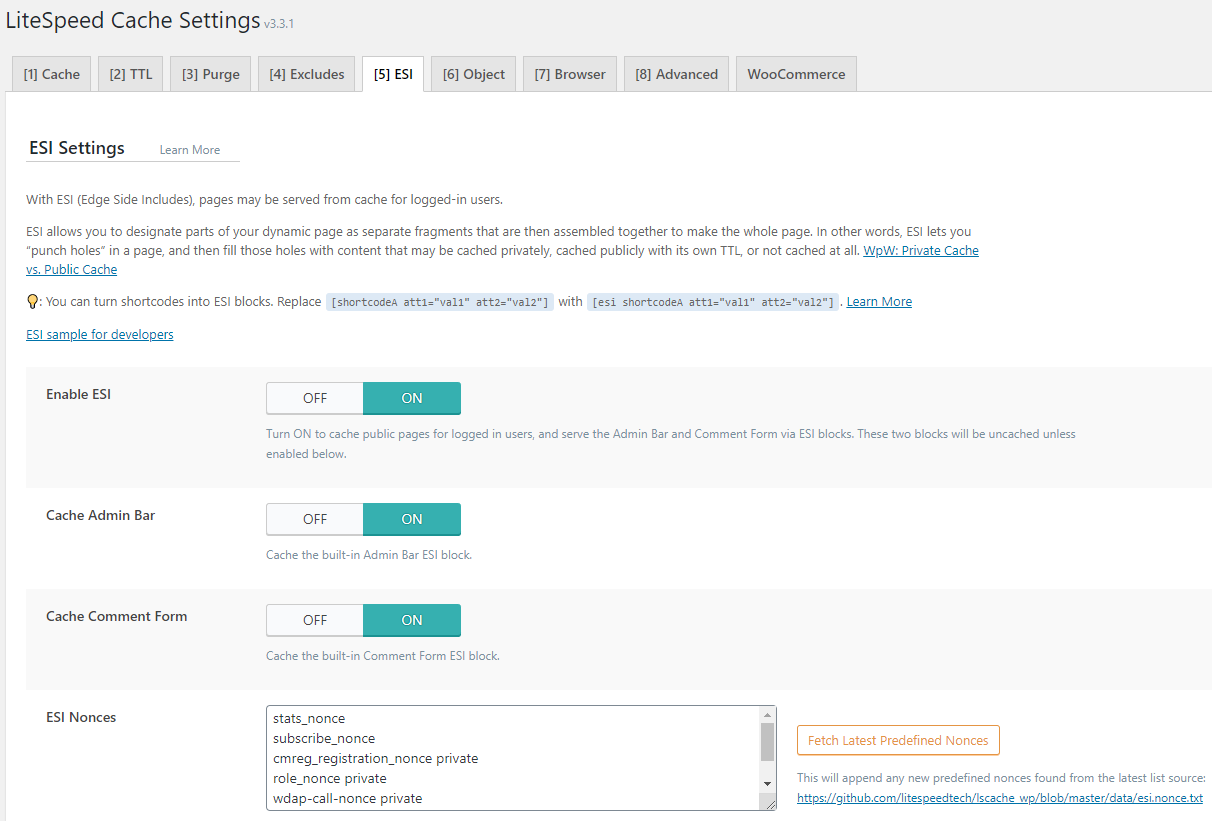
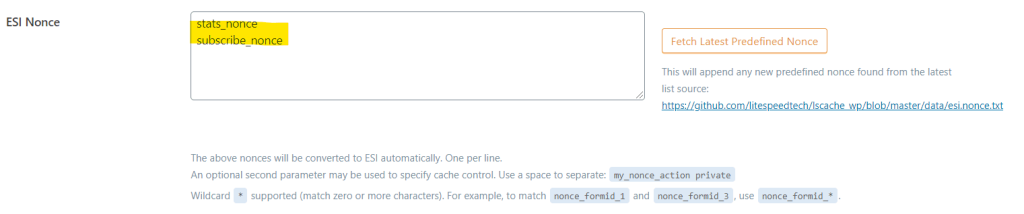
    Navigate to LiteSpeed Cache > Cache > ESI and locate the ESI Nonce field. Here you can list nonces, one per line, that should automatically be converted to ESI blocks.

    Wildcards are accepted, which is helpful if you are using a plugin that defines a lot of nonces with the same prefix or suffix. For example, if My WordPress Plugin had three nonces called mwpp_1, mwpp_2, and mwpp_3, you could enter mwpp_* and all three nonces would become ESI blocks.

    ESI Nonces are public by default, but you can define them to be private by added a space and the word “private” after the nonce name, like so: mwpp_1 private.

    Predefined Nonces

    LiteSpeed has predefined the following nonces as ESI blocks, so you don’t need to set them up manually:

    Divi Theme Builder

    • et-pb-contact-form-submit
    • et_frontend_nonce
    • et_ab_log_nonce

    WooCommerce PayPal Checkout

    • _wc_ppec_update_shipping_costs_nonce private
    • _wc_ppec_start_checkout_nonce private
    • _wc_ppec_generate_cart_nonce private

    User Switching

    • switch_to_olduser_<ID>

    Caldera Forms

    • caldera_forms_front_*

    How to Cache WordPress Nonce

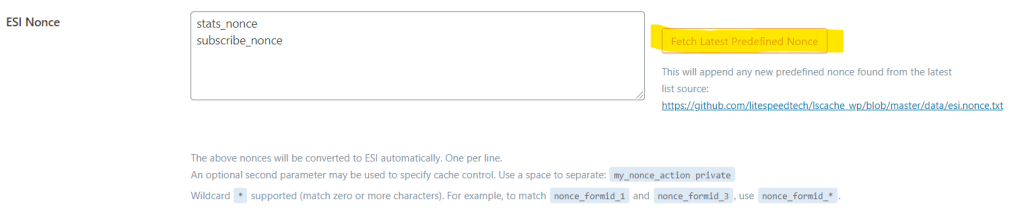
    Additionally, LiteSpeed has recently begun maintaining an editable list of known third party plugin nonces here. Press the Fetch Latest Predefined Nonce button, and the nonces from the list will be automatically appended to the nonces you have already listed in the ESI Nonce box. This allows you to easily convert every nonce on the list into ESI blocks. If you have a nonce that you would like to be included in this list, and you are familiar with GitHub, you can add the nonce to our list yourself and submit a Pull Request.

    If you don’t know the name of the nonce(s) your plugin uses, try asking the plugin author. You should also suggest they add their nonces to our predefined list.

    After entering your nonces in the ESI Nonce field (whether manually or with the button), save your changes and purge the cache (LiteSpeed Cache > Toolbox > Purge > Purge All LSCache). ESI Nonces will be cached for 12 hours and then expire, regardless of the TTL used by the rest of your site.

    What About OpenLiteSpeed?

    If you are an OpenLiteSpeed user, you probably know that OLS does not support ESI. And so, naturally, OLS does not support ESI Nonces.

    OpenLiteSpeed users who want ESI Nonce functionality should look into QUIC.cloud. QUIC.cloud gives you the full functionality of the LiteSpeed Cache for WordPress plugin, including ESI Nonce. Check out QUIC.cloud for more details.

    There is another option, which is less ideal than ESI, but still effective. Nonces have a 12 hour TTL, so as long as the pages they appear on also have a 12-hour-or-less TTL, the nonces will still work. You can set the TTL for your entire site, or you can do it just for the pages with nonces.

    To change the site TTL, navigate to LiteSpeed Cache > Cache > TTL, and set Default Public Cache TTL to 43200 seconds or less.

    To change the TTL for specific pages instead, navigate to LiteSpeed Cache > Cache, and add the page URIs, one-per line, to the Force Cache URIs box. After each page add a space and 43200. For example, you can have the following pages and TTLs listed:

    /blog/contact 43200
    /store/request-a-catalog 43200
    

    Conclusion

    Nonces are used by many plugins and by the WordPress core itself. A cached site is a fast site. And by treating these nonces with a different set of cache rules than the pages they appear on, your site can remain more fully and accurately cached.

    If you’d like to try LiteSpeed Cache, drop by our website to learn how to get started!