Category: LSCache

Learn more about LiteSpeed Cache plugin for WordPress, PrestaShop, XenForo, Drupal, Joomla, MediaWiki, WooCommerce, and more. Sites powered by LiteSpeed Web Server with LSCache may accelerate their web apps with extensions or rewrite rules.

In this category you will find tutorials, case studies, and useful information related to this popular cache solution.

  • Extension Showcase with ecomDATA

    Extension Showcase with ecomDATA

    LiteSpeed Cache Plugin for JTL Shop

    Our friends at ecomDATA are here today, to share news of their new LiteSpeed Cache plugin for JTL Shop. This new plugin is available to all JTL Shop owners, regardless of what hosting company they use to host their shops. Without further ado, here is ecomDATA in their own words! -LC

    Great news for JTL Shop owners: We are thrilled to introduce the LiteSpeed Cache Plugin for JTL Shop, exclusively available through ecomDATA. This plugin seamlessly integrates JTL stores with LiteSpeed Web Server’s superior ESI support, providing the ultimate caching solution for your online store. It significantly reduces server load and allows your JTL Shop to load up to 10 times faster!

    About LiteSpeed Cache for JTL Shop

    JTL Shop communicates with LiteSpeed Web Server and LiteSpeed Cache Plugin to save and serve static copies of dynamic web pages. This powerful combination significantly reduces your shop’s page-load time, enhancing the overall shopping experience for your customers.

    As the content in your shop changes, LiteSpeed Cache Plugin offers the flexibility to accurately cache and purge every page. By utilizing Edge Side Includes (ESI), you can punch holes for personalized content on public pages. The static content that remains consistent across visitors is stored in the cache. When the next user accesses the same page, the cached content is promptly delivered, with only the holes needing to be filled in with data specific to that visitor.

    Advantages

    Simple Installation Process

    You can effortlessly obtain the plugin from the JTL Extension Store and install it with a single click. Afterward, activation is all that’s needed to complete the installation of the free version (guest mode only). For more advanced configurations, explore the features offered by LiteSpeed Cache PRO.

    Reduced Server Load

    The LiteSpeed Cache Plugin reduces server load, enabling you to efficiently serve a larger number of visitors using the same hardware.

    Faster Page-Load Times

    LiteSpeed Cache Plugin allows up to 10 times faster loading times for your JTL shop. With this plugin your store achieves an impressive Time To First Byte (TTFB) as low as 20ms, whereas other JTL shops typically range from 200-1500ms for this metric.

    Enhanced SEO Ranking

    Google favors shorter Time To First Byte (TTFB) intervals. Faster loading times not only lead to more content customers but also prolong their stay on your website. Consequently, a reduced TTFB can positively impact your Google ranking.

    LiteSpeed Cache PRO Features

    • Both Public and Private Cache
    • Cache for Logged-in Users
    • Caching for Shopping Cart
    • Server-Level Full-Page Cache
    • Tag-Based Caching and Purge
    • Advanced Configurations and Template Mapping
    • Edge Side Includes (ESI)
    • Cache Blacklist
    • Built-in Crawler
    • Multiple Languages
    • Integrated into LSWS, OLS and Web ADC

    Please note that this LiteSpeed Cache Plugin is designed for JTL Shop 5. The free version can be used with OpenLiteSpeed Web Server, the pro version requires LiteSpeed Enterprise Web Server.

    A more detailed description of LiteSpeed Cache Plugin can be found on our LiteSpeed Cache Page. Installation and configuration instructions can be found in our Installation Manual.

    LiteSpeed Cache Plugin for JTL Shop

    Our thanks to ecommDATA for sharing their story in this Showcase! Have you created a tool that LiteSpeed users may want to know about? Has your business experienced the LiteSpeed difference? If you would like to share your story with our readers, find me (@Lisa at Litespeed) on our Slack workspace, and we can discuss it. –LC

  • LiteSpeed Cache Security Patches

    LiteSpeed Cache Security Patches

    LiteSpeed Cache for WordPress Security Patches

    Last year, we were made aware of two distinct vulnerabilities in the LiteSpeed Cache for WordPress plugin. We patched these vulnerabilities right away, in v5.7 and v5.7.0.1 respectively.

    To protect your WordPress sites, please update to the latest version of the LSCache plugin immediately. (As of this writing, the latest version is v6.1.)

    If you’d like to know more about these vulnerabilities and their impact, read on.

    Stored XSS vulnerability

    The first issue, reported by the WordFence team, was a stored cross-site scripting vulnerability that could be exploited by authenticated users via the ESI shortcode functionality. Users with contributor-level and above permissions could potentially inject arbitrary web scripts into pages via the ESI shortcode. These scripts would have been executed whenever a user requested the page.

    Impact

    Only a small portion of our four million users would have been affected by this vulnerability: those that have ESI enabled, and also have authenticated users with permissions at the Contributor level or higher. ESI is disabled by default.

    We recommend those impacted sites upgrade to the plugin version 5.7 or higher to patch this vulnerability.

    Timeline

    • August 14, 2023: WordFence alerted us to the issue.
    • August 16, 2023: We made a patch and made it available to power users and testers as a GitHub commit
    • October 10, 2023: We released v5.7 to the WordPress repository
    • October 24, 2023: We added v5.7 to the list of stable releases in our control panel plugins

    Broken Access Control vulnerability

    The second issue, reported by the Patchstack team, was a broken access control vulnerability that could be exploited by unauthenticated users via the LSCWP API. Attackers could use certain API functions to access attachment URLs and details, and also change the nameserver configuration.

    Impact

    Because the vulnerability could be triggered by unauthenticated users, all four million installations would have been affected.

    We recommend that every site should upgrade to the plugin version 5.7.0.1 or higher to patch this vulnerability.

    Timeline

    • October 17, 2023: Patchstack alerted us to the issue.
    • October 19, 2023: We made a patch and made it available to power users and testers as a GitHub commit
    • October 25, 2023: We released v5.7.0.1 to the WordPress repository
    • October 26, 2023: We added v5.7.0.1 to the list of stable releases in our control panel plugins

    More Information

    We thank WordFence and Patchstack for bringing these issues to our attention. We have long since patched both vulnerabilities, so if you are keeping your LiteSpeed Cache plugin up-to-date, there is nothing you need to do. If you have not updated in a while, we strongly recommend doing so today.

  • LiteSpeed Cache v6.0 for WordPress

    LiteSpeed Cache v6.0 for WordPress

    Introduction

    LiteSpeed Cache v6.0 for WordPress is here, and we’ve got a bunch of behind-the-scenes improvements, a few bug fixes, and some nifty new features. You can see the full release log here, but today we’re going to focus on these great new settings and features:

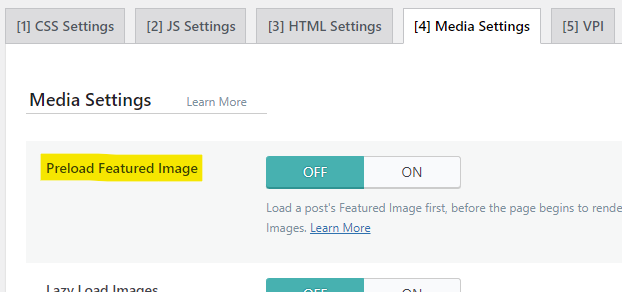
    • The Preload Featured Image setting in Page Optimization > Media
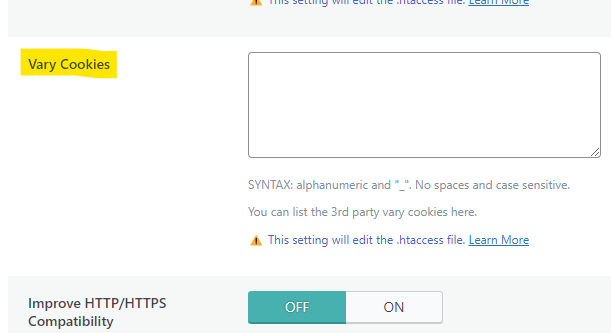
    • The Vary Cookies setting in Cache > Advanced
    • The new Crawler commands for the WordPress Command Line Interface (WP-CLI)
    • Parallel Pull, an improved method of pulling images for Image Optimization

    Preload Featured Image

    When you instruct a browser to “preload” a resource, that resource is added to the front of the processing queue, and is loaded even before the browser begins to render the page. By preloading a resource, you can potentially eliminate it as a render-blocking element.

    You can enable the new Preload Featured Image setting to allow your posts’ Featured Images to be preloaded in browsers that support it. This user-experience enhancement ensures that browsers display your most important image right away, with no waiting.

    We’ve disabled this setting by default. To enable it from the WordPress Dashboard, navigate to LiteSpeed Cache > Page Optimization > Media Settings, and set Preload Featured Image to ON.

    NOTE: As of LSCWP v6.2, the Preload Featured Image option has been removed and the functionality folded into the ViewPort Images service. Any image that is detected to be a viewport image for a post is now automatically preloaded.

    Vary Cookies

    Before we talk about the new Vary Cookies setting, it’s helpful to understand the concept of cache varies in general, and the part that cookies play in that.

    LiteSpeed Cache stores and retrieves cache objects using a Cache Key. An optional component of the cache key is the “vary string.” It’s this vary string that allows you to save multiple cache objects from the same URL. This is useful in a number of situations including those where the desktop and mobile views of a page are different, or where the currency displayed on a page varies by the visitor’s geographical location.

    When you instruct the LiteSpeed Cache Engine to vary on a cookie, you are telling the Cache Engine to look for the cookie name, and then create cache varies based on the value of that cookie.

    So, for example, let’s say you have a membership plugin that shows one set of shop prices to members and a different set of prices to non-members, and the behavior is governed by a _member cookie. The cache engine could vary on the value of _member. It would store two copies of your shop page in cache: one for “yes” and one for “no”. Or maybe the cookie has three potential values: “full,” “trial,” and “no.” In that case the cache engine could store three copies of the page.

    LiteSpeed Cache can vary on any cookie you wish, and potentially create a separate version of the page in cache for each value of the cookie.

    If you have a situation like this, you can instruct LiteSpeed Cache to vary on any cookie that you wish. Navigate to LiteSpeed Cache > Cache > Advanced and add the name of the cookie to the Vary Cookies setting. If you want to vary on multiple cookies, enter them one per line.

    NOTE: Be careful not to vary on any cookie that uses a unique ID for each user as a value. This can potentially create an infinite number of copies of each page, and that will eat up your cache storage very quickly.

    Why is this new setting a big deal?

    Before Vary Cookies was added to the LiteSpeed Cache plugin, you could have defined some vary cookies for your site with a few lines in the .htaccess file. By adding the setting to the plugin, your defined vary cookies are now passed along to QUIC.cloud CDN.

    This is a big deal, because it means that your cookie-based cache varies exist at the CDN level. No other CDN can serve multiple cached copies of the same page based on a cookie value. But as of LSCWP v6.0, QUIC.cloud CDN can!

    CLI Crawler

    LiteSpeed Cache v6.0 comes with some new commands for the WordPress CLI. Now you can  control the crawler from the command line!

    WP-CLI is accessed with the wp command, and all crawler instructions begin with litespeed-crawler, so a complete WP-CLI crawler command would look like:

    wp litespeed-crawler <instruction> <parameters>
    

    There are five functions available:

    • List: list or l
    • Enable: enable <crawler-id>
    • Disable: disable <crawler-id>
    • Start: run or r
    • Reset: reset

    For more information about the new CLI crawler functionality, and how to use each function, take a look at our documentation.

    Parallel Pull

    Do you use the Priority Line or Jumbo Group power-ups that are available for Image Optimization? If so, you may notice your pulled images sliding back into your WordPress more speedily than they used to.

    This is due to Parallel Pull. Normally, when the cron pulls your optimized images back to your site, it downloads them one at a time. But users of those two power-ups now can expect multiple images to download at one time, potentially decreasing the time it takes to receive a batch of optimized images.

    There is nothing you need to do to enable this behavior. It is on by default when you subscribe to Priority Line or Jumbo Group.

    NOTE: These Image Optimization power-ups have been disabled as of September 1, 2024 in preparation for a new and improved Image Optimization service coming soon.

    Conclusion

    We’re always excited to bring you a new set of features and enhancements, and this release is no different. Install LiteSpeed Cache v6.0 for WordPress today and try it for yourself!!

  • Managing Cacheability With LSCWP API

    Managing Cacheability With LSCWP API

    LSCWP API Cache Tags

    The LiteSpeed Cache plugin for WordPress includes an API that you can use to customize cache behavior. If you’re a developer, the LSCWP API will help you to achieve LiteSpeed compatibility within your plugins. If you’re a site owner who enjoys customizing every little aspect of your site, maybe you have some unique reason to use one of our API hooks in your child theme’s functions.php file.

    Whatever your actual purpose is, today we’re going to look at three LSCWP API cache hooks and show you how to use them to control the cacheability of a page:

    • litespeed_control_set_nocache
    • litespeed_control_set_cacheable
    • litespeed_control_force_cacheable

    Plus, we’ll look at a couple of bonus hooks that are useful for setting cache scope:

    • litespeed_control_set_private
    • litespeed_control_force_public

    To cache, or not to cache

    First, let’s look at how LSCWP decides which pages to cache and which pages not to cache.

    By default, the wp action hook is run on each page of a WordPress site, after the query has been parsed and the post has been loaded, but before template functionality is executed. (There may be exceptions to this rule, but we’ll talk about that later.)

    LSCWP considers all pages that have had the wp action run on them to be cacheable. Essentially, every page is cacheable. Unless it falls into one of these categories:

    • It is an admin page
    • It is a POST request
    • is_trackback() is true
    • is_search() is true
    • No theme is used

    Site administrators may also set some content to be non-cacheable, so LSCWP checks the values of the settings in LiteSpeed Cache > Cache > Excludes, and considers a page non-cacheable if:

    • The URI is found in the Do Not Cache URIs list
    • The URL has a query string found in the Do Not Cache Query Strings list
    • The post has a category found in the Do Not Cache Categories list
    • The post has a tag found in the Do Not Cache Tags list
    • The request has a cookie found in the Do Not Cache Cookies list
    • The request has a user agent found in the Do Not Cache User Agents list
    • The request is being made by a user whose role is checked in the Do Not Cache Roles list

    This is enough for most admins, but maybe you have a special case that you want to handle programmatically. Or maybe you have written a plugin that generates its own pages and doesn’t follow the usual wp action hook conventions. What do you do then?

    You use LSCWP’s cache control API hooks.

    Cache control API hooks

    Mark the current page as cacheable

    If your plugin generates pages and does not invoke the wp action hook, then LSCWP may not know that the page should be cached. Use the litespeed_control_set_cacheable action with a ‘reason’ parameter, like so:

    do_action(
    	'litespeed_control_set_cacheable',
    	'The lady doth protest too much, methinks.'
    );
    

    Note that if the page fits one of the criteria specified in the the plugin’s Cache > Excludes settings, then the page may ultimately be set as non-cacheable, despite this hook.

    Mark the current page as non-cacheable

    The litespeed_control_set_nocache action is the opposite of the previous one. Use it in your plugins or snippets to inform LSCWP not to cache the page.

    do_action(
    	'litespeed_control_set_nocache',
    	'And flights of angels sing thee to thy rest!'
    );
    

    Force the current page to be cacheable

    The litespeed_control_force_cacheable action informs LSCWP to cache the page, and it will override anything the user may enter in the Cache > Excludes settings.

    do_action(
    	'litespeed_control_force_cacheable',
    	'if it be not to come, it will be now'
    );
    

    What have I done?

    With all the settings and API hooks available, it can be difficult to know whether the current page is set to be cached or whether it is non-cacheable. Use the litespeed_control_cacheable filter to get a definitive answer.

    apply_filters( 'litespeed_control_cacheable', false );
    

    BONUS

    Once you set a page as cacheable, you might want to further define the scope of that cache. Do you want to store the cache object in a logged-in user’s private cache, or do you want all visitors to view a publicly cached copy? By default, LSCWP caches pages publicly. Use these action hooks to explicitly define cache scope:

    do_action(
    	'litespeed_control_set_private',
    	'Listen to many, speak to a few.'
    );
    
    do_action(
    	'litespeed_control_force_public',
    	'Brevity is the soul of wit.'
    );
    

    Conclusion

    We hope this is helpful to you plugin developers and site tinkerers out there. If you want to learn more about LSCWP’s API hooks, take a look at our API Reference.


    Thank you to Tynan Beatty for his numerous contributions to this post, including all of the sample code!

  • Serving Static Content Through a Subdomain

    Serving Static Content Through a Subdomain

    Serving Static Content Through a Subdomain

    Serving static content from a subdomain can provide multiple benefits, including better website performance and optimization. It can allow you to offload your images to a CDN, or allow you to serve a specific file extension through a different domain.

    But how does this work with the LiteSpeed Cache Plugin for WordPress (LSCWP)? Let’s take a closer look.

    LSCWP allows you to offload static content such as images, JavaScript, and CSS files or any file extensions you define, so that they are served from a subdomain.

    This involves two main steps:

    • Setting up the subdomain on your Hosting Server
    • Configuring LSCWP to use the new subdomain

    Step 1: Create a Subdomain

    Setting up a subdomain to serve static content is a simple process that can be done with all hosting panels or even on custom servers if you’re an experienced system admin.

    The goal here is to point the subdomain exactly to the same directory as the main website, so that it can access static files correctly.

    Here’s an example of how to set up your subdomain using cPanel:

    1.1 Create a subdomain in cPanel

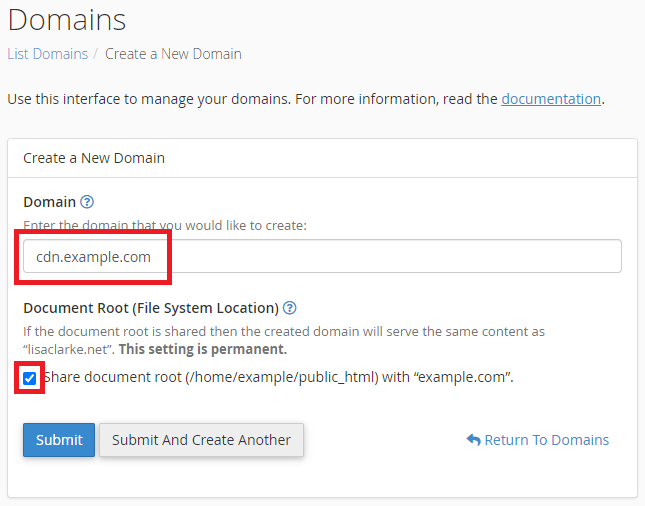
    Create a subdomain in cPanel

    1. Log into cPanel using the account where you wish to add the subdomain.
    2. Click Domains under the Domains section.
    3. Click the Create A New Domain button.
    4. Enter the subdomain name (cdn.example.com) in the Domain text box.
    5. Select the Share document root (/home/username/public_html) with “example.com” option. Using a shared document root for a subdomain can be useful when serving static content because it allows you to easily manage and update your static files without duplicating them across multiple directories.
    6. Click the Submit button.

    1.2 Add CORS Headers

    For your subdomain to be able to serve files that are originally meant for your domain, most common browsers will ask you to set up CORS headers for your domain.

    Setting up a CORS header can be a bit complex depending on your stack. On Litespeed Enterprise, which has full .htaccess support, you can add this line to your .htaccess:

    Header add Access-Control-Allow-Origin "*" 
    Header add Access-Control-Allow-Methods: "GET,POST,OPTIONS,DELETE,PUT"
    

    Note: These are only basic CORS instructions. You should consider consulting with your developer and/or hosting provider before implementing CORS.

    Step 2: Instruct Litespeed Cache to replace your URLs

    LiteSpeed Cache CDN Settings

    From the WordPress Dashboard, navigate to LiteSpeed Cache > CDN.
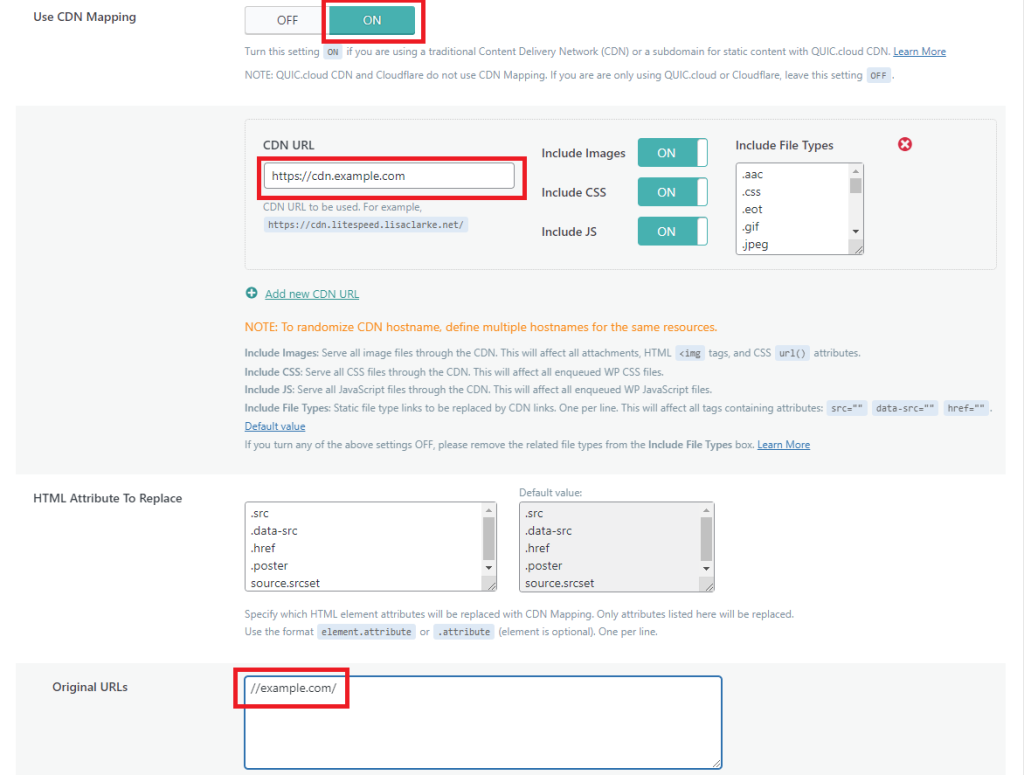
    Set up CDN mapping to use the new subdomain, like so:

    1. Set Use CDN Mapping to ON
    2. Set CDN URL to cdn.example.com
    3. Put //example.com/ in the Original URLs box.
    4. Save changes

    Verify

    Finally, you will need to test your website to ensure that everything is working correctly. Visit your website in a browser, view the site’s page source, and verify that images and other static files are being served from cdn.example.com.

    Troubleshooting

    URL’s are replaced in the website source, but images don’t load on the website.

    Please check Step 1, and ensure that you have set up the subdomain correctly to serve your static files.

    URL’s are not replaced in the website source.

    Please check the Original URLs setting in LSCWP. Ensure you have set it correctly and it is the same as your WordPress site.

    Some resources are not replaced but some are.

    Please check the Extensions list in the LSCWP CDN Mapping settings to verify the file extensions.

    Conclusion

    Routing your static content using CDN Mapping from your main domain using LiteSpeed Cache for WordPress is a great way to improve your website’s performance and reduce server load. By offloading your static content to a subdomain, a CDN or a different server, you can deliver your website’s images, stylesheets, and other assets to your visitors more quickly, while also reducing the bandwidth and server resources needed to serve these files.

  • Customized Cache Tags With LSCWP API

    Customized Cache Tags With LSCWP API

    Customized Cache Tags With LSCWP API

    LiteSpeed Cache, the powerful cache engine that ships with all LiteSpeed server products, features the clever “smart purge” technology. This system uses tags to group pages together based on a particular set of rules. This grouping then allows them to all be purged together at one time after a single triggering event. In the LiteSpeed Cache plugin for WordPress, this tagging system is at work behind the scenes, using the rules of WordPress publishing to know exactly when to purge posts, pages, products, categories, and more.

    But imagine that you have a plugin, or some customized behavior for your WordPress site, and you would like to be able to group pages together in your own special way, so that they may be purged by your own unique triggering event. How cool would that be?

    Well, it turns out, you can build this functionality into your plugin with the tag-based actions of the LSCWP API.

    LSCache Tags

    Before we get into creating your own custom tags, let’s look at LSCWP’s built-in tagging behavior.

    Here’s an example that shows the “smart purge” system in action:

    You have the following post on your WordPress site:

    • Title: Unique American Towns
    • Category: United States

    People visit your site, and LiteSpeed caches all of the pages that your visitors read, including the Unique American Towns post page.

    Later, you edit that post, change the Title and add a second Category:

    • Title: Unique North American Towns
    • Category: United States, Canada

    Since there have been changes to the post, the following pages are purged from the cache according to the rules set up in LSCWP admin:

    • The post itself
    • The front page and/or home page of your site
    • The author archive page
    • The post type archive page
    • The monthly archive page
    • The United States and Canada category pages

    You can change the rules to purge even more pages than this (or fewer), if it’s appropriate for your website.

    This purge tag functionality is very powerful. It means that LSCache can do a targeted purge like we saw above, removing the edited post, as well as every other page that is influenced by that post. Without a tagging system, we would have to either purge too little (just the post) or too much (all of the site’s pages).

    This functionality allows you to specify relatively long TTLs (Times to Live) for your pages, knowing that LSCache will step in and purge any pages that are affected by recent activities.

    Customized cache tags with LSCWP API

    Now imagine you have your own plugin that generates its own content using custom URLs. LSCWP will cache those pages, but it has only the most basic concept of when to purge them: it will purge the pages when the TTL is reached (that is, when the cache expires).

    If your plugin was using custom cache tags, you could group pages together, and purge them together before they expire, using whatever logic makes sense for your plugin.

    Here’s a simple example: Let’s say you have a widget with a countdown for the number of days remaining until a big event that your site promotes. The widget only changes once per day, but when it does, you would want to purge any page where the widget is displayed. Using the following LSCWP API hooks, this is possible:

    Add a custom $tag to the cached page:

    do_action( 'litespeed_tag_add', $tag );
    

    Purge all pages tagged with the custom $tag:

    do_action( 'litespeed_purge', $tag );
    

    Example

    Here’s a more in-depth example that shows you how to create a basic set of functions which will create a form, and cache or purge that form based on the form’s input values.

    Basic Plugin

    For this plugin, we’ll use a query string parameter called greet, which will store the visitor’s name.

    <?php
    /**
     * Plugin Name:  LiteSpeed Cache API Tag Demo
     * ...
     */
    namespace LscwpApiTagDemo;
    defined( 'WPINC' ) || exit;
    add_action( 'init', function () {
    	if ( ! isset( $_GET['greet'] ) ) {
    		return;
    	}
    	$visitor = $_GET['greet'];
    	# ...
    

    Dynamic Tag Name

    We create a custom tag based on the value of the greet parameter. So, if our URL was https://.example.com/?greet=Lauren, our custom tag would be LscwpApiTagDemo\greet.lauren, and we would add that tag to the current page.

    add_action( 'init', function () {
    	if ( ! isset( $_GET['greet'] ) ) {
    		return;
    	}
    	$visitor = $_GET['greet'];
    	$tag =
    		__NAMESPACE__ . '\greet.'
    		. mb_strtolower( $visitor, 'UTF-8' );
    	$visitor = stripslashes( $visitor );
    	do_action( 'litespeed_tag_add', $tag );
    	# ...
    

    Greeting Content

    We replace WordPress’s content loop with our greeting.

    add_action( 'init', function () {
    	# ...
    	add_action( 'loop_start', 'ob_start', 0, 0 );
    	add_action( 'loop_end', function () use ( $visitor ) {
    		ob_end_clean();
    		?>
    		<article class="page entry">
    			<div class="entry-content">
    				<?php greet( $visitor ); ?>
    			</div>
    		</article>
    		<?php
    	}, 0, 999 );
    } );
    

    Greeting Function

    We display a message and include a form that accepts a reply.

    function greet( $visitor ) {
    	?>
    	<h2><?php
    		printf( esc_html__( 'Howdy, %1$s!' ), $visitor );
    	?></h2>
    	<form method="get">
    		<input name="greet" type="hidden"
    			value="<?php echo $visitor; ?>">
    		<label for="reply">
    			<h3><?php esc_html_e( 'Care to Respond?' ); ?></h3>
    		</label>
    		<input id="reply" name="reply" type="text" value=""
    			placeholder="<?php
    				esc_html_e( 'Type your reply here ...' );
    			?>">
    		<button type="submit"><?php
    			esc_html_e( 'Send' );
    		?></button>
    	</form>
    	<?php
    }
    

    Reply Content

    We revise our main function to add a condition that displays alternative content if the user replied to our greeting.

    add_action( 'init', function () {
    	# ...
    		?>
    		<article class="page entry">
    			<div class="entry-content">
    				<?php
    				if ( isset( $_GET['reply'] ) ) {
    					reply( $visitor );
    				} else {
    					greet( $visitor );
    				}
    				?>
    			</div>
    		</article>
    		<?php
    	}, 0, 999 );
    } );
    

    Reply Function

    We display a thank you note and show that we remember the user’s reply.

    function reply( $visitor ) {
    	?>
    	<h2><?php
    		printf( esc_html__( 'Thank you, %1$s.' ), $visitor );
    	?></h2>
    	<h3><?php
    		esc_html_e( "I'll always remember your kind words." );
    	?></h3>
    	<?php
    	$reply = stripslashes( $_GET['reply'] );
    	if ( ! empty( $reply ) ) {
    		?>
    		<blockquote><?php
    			echo esc_html( $reply );
    		?></blockquote>
    		<?php
    	}
    	# ...
    

    And we add a Forget about me … button that will trigger a cache purge targeting every item associated with the visitor’s name.

    function reply( $visitor ) {
    	# ...
    	}
    	?>
    	<form method="post" action="<?php
    			echo drop_query_var(
    				$_SERVER['REQUEST_URI'],
    				'reply'
    			);
    		?>">
    		<input name="reset" type="hidden">
    		<button type="submit"><?php
    			esc_html_e( 'Forget about me ...' );
    		?></button>
    	</form>
    	<?php
    }
    

    Putting It All Together

    We update our main function once more, so that any page tagged LscwpApiTagDemo\greet.lauren will be deleted if the button is pressed.

    add_action( 'init', function () {
    	# ...
    	$tag =
    		__NAMESPACE__ . '\greet.'
    		. mb_strtolower( $visitor, 'UTF-8' );
    	$visitor = stripslashes( $visitor );
    	if ( isset( $_POST['reset'] ) ) {
    		do_action( 'litespeed_purge', $tag );
    	}
    	do_action( 'litespeed_tag_add', $tag );
    	# ...
    

    Behavior

    So, here’s how that looks in action.:

    Lauren visits the site and provides her name. LiteSpeed doesn’t find the page in cache, so the page is generated, served to Lauren, and cached:

    https://example.com/?greet=lauren
    	x-litespeed-cache: miss
    

    She fills in the form saying, Hello world. LiteSpeed doesn’t find the page in cache, so the page is generated, served to Lauren, and cached:

    https://example.com/?greet=Lauren&reply=Hello%20world
    	x-litespeed-cache: miss
    

    She fills in the form again saying, I love LiteSpeed. LiteSpeed doesn’t find the page in cache, so the page is generated, served to Lauren, and cached:

    https://example.com/?greet=LAUREN&reply=I%20love%20LiteSpeed
    	x-litespeed-cache: miss
    

    Note that the greet parameter is not case sensitive. Our plugin converts it to lowercase before setting the $tag value..

    She goes back to the form again saying, Hello world one more time. LiteSpeed does find the page in cache, so the cached page is served to Lauren:

    https://example.com/?greet=Lauren&reply=Hello%20world
    	x-litespeed-cache: hit
    

    Lauren goes back and presses the Forget about me … button, which triggers a purge of every page where LscwpApiTagDemo\greet.lauren is a tag.

    Because of this, when she goes back to the form and repeats I love LiteSpeed, the page is not found in the cache.

    https://example.com/?greet=LAUREN&reply=I%20love%20LiteSpeed
    	x-litespeed-cache: miss
    

    Conclusion

    As you can see, the API tag functions are a powerful way to customize the caching and purging behavior of your plugins. Without the API, your plugin would have to maintain its own record of which pages need to be purged from the cache when some event mandates it, and then send individual purge requests for each of those pages.

    Using LiteSpeed’s API hooks takes this burden off of your plugin and allows you to let the cache engine do the work.

    For more information about customized cache tags with LSCWP API and other API functions, please see our documentation.


    Thank you to Tynan Beatty for his contributions to this post, including the sample plugin code.

  • WordPress Cloud Image FAQ

    WordPress Cloud Image FAQ

    WordPress Cloud Image FAQ

    LiteSpeed cloud images allow you to spin up a high performance web server and applications in three minutes or less! These images are available from several providers, including DigitalOcean, Vultr, Google Cloud Platform, AWS, Azure and Alibaba Cloud, and they come with a variety of web applications, the most popular of which is WordPress.

    So let’s say that you’ve chosen a provider, and installed an OpenLiteSpeed and WordPress cloud image. You’re up and running, but maybe you have questions. Well, you are in the right place, because we have answers! Here are some of the common things that people like you want to know:

    Where are the WordPress files stored?

    After your cloud image installation is complete, the WordPress files can be found in the Document Root, which is set to /var/www/html.

    Can I complete the script later?

    Sure. If you don’t want to finish the setup script right now, you can press CTRL-C to exit the script. The next time you log in from the SSH console, the script will automatically pick up where you left off. You can CTRL-C as often as you need to. The script will prompt you at every future login until you complete the setup.

    How do I secure phpMyAdmin?

    There are three ways to secure phpMyAdmin: Change the URL, allow only specific IP addresses, and require a password. You can use any of these options, and you can use more than one of them, if you like.

    Change your phpMyAdmin URL

    In the WebAdmin Console:

    • Navigate to WebAdmin > Virtual Hosts > Context
    • Change URI from /phpmyadmin to the URI of your choice

    Only allow specific IP addresses

    In the WebAdmin Console:

    • Navigate to WebAdmin > Virtual Hosts > Context > phpmyadmin
    • Change Access Allowed from * to a comma-delimited list of allowed IP addresses and subnets
    • Set Access Denied to *

    Require a password

    Log into the SSH console and create a password file, like so:

    $ sudo touch /usr/local/lsws/conf/PASS
    $ sudo chown lsadm:lsadm /usr/local/lsws/conf/PASS
    

    In the WebAdmin Console:

    • Navigate to WebAdmin > Virtual Hosts > Security
    • Click + under Realm List then set Realm Name to example
    • Set User DB Location to /usr/local/lsws/conf/PASS
    • Click /usr/local/lsws/conf/PASS to create a user and password
    • Navigate to WebAdmin > Virtual Hosts > Context > phpmyadmin
    • Set Realm to example

    How do I create additional virtual hosts?

    OpenLiteSpeed comes with a single virtual host named example. There are two ways to create additional virtual hosts: with a script, and manually.

    With a script

    This method will automatically set up Listener, VirtualHost, Force SSL, Let’s Encrypt, and WordPress. You can run the script either in Interactive Mode, or from the CLI.

    Interactive Mode

    Use the following commands to download and run the script:

    wget https://raw.githubusercontent.com/litespeedtech/ls-cloud-image/master/Setup/vhsetup.sh
    chmod +x vhsetup.sh
    bash vhsetup.sh
    

    Or just run the script without downloading it:

    /bin/bash <( curl -sk https://raw.githubusercontent.com/litespeedtech/ls-cloud-image/master/Setup/vhsetup.sh )
    

    CLI Mode

    Use the following commands to download and run the script:

    wget https://raw.githubusercontent.com/litespeedtech/ls-cloud-image/master/Setup/vhsetup.sh
    chmod +x vhsetup.sh
    bash vhsetup.sh -d www.example.com -le admin@example.com -f -w
    

    Or just run the script without downloading it:

    /bin/bash <( curl -sk https://raw.githubusercontent.com/litespeedtech/ls-cloud-image/master/Setup/vhsetup.sh ) -d www.example.com -le admin@example.com -f -w
    

    Some tips:

    • In the example, we use -le admin@example.com. When you do this, be sure that your domain is already pointing to the server, and to substitute your own email address.
    • We also use -w. This requires that your environment has PHP, SQL service, and SQL root password.

    Manually

    Our OpenLiteSpeed knowledge base has full instructions for creating new virtual hosts manually. See Create Virtual Hosts on OpenLiteSpeed.

    Can I use LiteSpeed Enterprise with the Cloud Image?

    Sure. You can upgrade from OpenLiteSpeed to LiteSpeed Enterprise at any time. We have a script that will take care of this for you, though we do suggest that you try the script on a test server first. Also, you can get help by using the -H parameter when you run the script.

    Use this command:

    /bin/bash <( curl -sk https://raw.githubusercontent.com/litespeedtech/ls-cloud-image/master/Setup/ols2ent-v2.sh )
    

    The script will:

    1. Generate a LiteSpeed Enterprise configuration file from your OpenLiteSpeed config file
    2. Ask you for a valid license key (enter the word Trial if you would like to start with a 15-day trial license)
    3. Back up the OpenLiteSpeed config file and uninstall OpenLiteSpeed
    4. Install LiteSpeed Enterprise and load the config file

    Conclusion

    We hope we’ve answered all of your burning questions, but if there’s anything else you want to know, take a look at our comprehensive documentation. Or drop by our Slack community (first timers, click here for an invitation) and ask your question in the #openlitespeed or #wpcache channel!

    Thanks to Eric Leu for his contributions to this post.

  • Presets in LSCWP v5.3

    Presets in LSCWP v5.3

    Presets in LSCWP v5.3

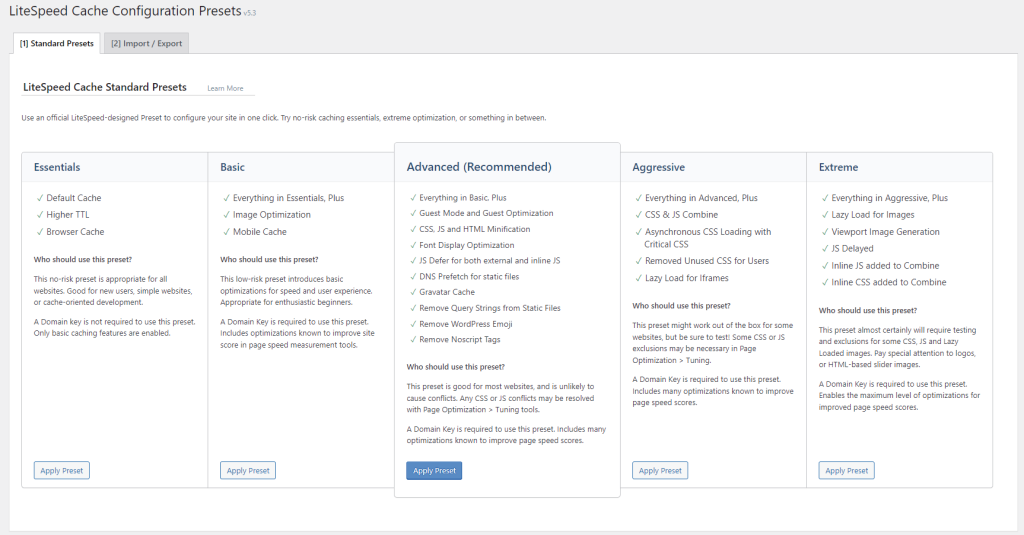
    Introducing LSCache Presets for WordPress: the easiest way to optimize your WordPress site using the Litespeed Cache plugin.

    Litespeed Cache Presets are a pre-tuned set of options, which can be used for optimizing any WordPress site using Litespeed Cache. You can configure your ideal level of optimization with just a few clicks!

    How to use a LiteSpeed Cache preset

    LSCache Presets for WordPress

    In the WordPress Dashboard, you can find Presets under the LiteSpeed Cache menu. If you don’t see it, make sure you’re using v5.3 or higher of the plugin.

    To use a preset, press the appropriate Apply Preset button on the Standar Presets tab, and answer OK when prompted to continue. Your old settings will be backed up, and the new preset settings will be applied.

    Be sure to test your site and make sure everything is working as expected. This is especially important if you’ve chosen one of the more aggressive presets. If the settings in the preset causes a problem for your site, you can revert back to your previous settings via the History section at the bottom of the tab.

    How to revert back

    The History section appears on the Standard Presets tab if you have previously applied a preset. Every time you apply a preset, a new entry is added to the history, along with a link that will allow you to revert back to the previous settings.

    Simply click the link, and everything will return to the way it once was.

    How to Manage Presets from the CLI

    Coming soon, if you’re using the WordPress CLI, you will be able to apply presets and restore backups using the litespeed-presets command and its three options: apply, get_backups, and restore.

    Examples

    Apply the “Basic” preset:

    $ wp litespeed-presets apply basic
    

    Get a list of available backups:

    $ wp litespeed-presets get_backups
    

    The backups displayed via get_backups all have numerical references. Restore the backup that has reference number 1667485245:

    $ wp litespeed-presets restore 1667485245
    

    Look for CLI Preset support in an upcoming version of LiteSpeed’s WordPress plugin.

    How to choose a preset

    Presets are listed in order of risk and skill level. If you are new to caching, and you prefer to “set it and forget it” then stick with Essentials or Basic. On the other hand, if you are a seasoned pro, or you’re an adventurous tinkerer, you might want to try one of the presets at the end of the list.

    Here is a basic overview of the official LiteSpeed preset collection. (You can take a look at our presets documentation, if you’d like the full details for each preset.)

    Essentials

    This preset enables caching, sets a higher default TTL (time to live) , and enables browser cache. These are easy, low-risk ways to improve your site’s loading time.

    Essentials will never break your site’s formatting, and will not require any tweaking whatsoever. Even if (or, maybe especially if) you have no experience with caching, you can apply this preset with confidence.

    Basic

    Basic enables everything that Essentials does, but it adds image optimization to speed up image loading time, and mobile cache to allow you to cache a mobile version of your website that may be different than the desktop version.

    This preset is appropriate for enthusiastic beginners who want to ease into a basic level of optimization. You shouldn’t have to make any adjustments to your settings in order to make this work. Image optimization is a QUIC.cloud service, so you will need a domain key in order to make this work. If you don’t have one, the plugin will prompt you and show you how to get one. The domain key and the image optimization service are both free.

    Advanced

    Here’s where things start to get more complicated. Advanced enables everything in Basic, and then adds a large number of page optimization features. While this plugin potentially requires some maintenance from you, it has the potential to greatly improve your site’s page speed score.

    Page optimization features sometimes highlight incompatibilities among CSS or Javascript used on your site. The incompatible files need to be excluded from optimization. If you enable this preset, you should be comfortable setting up CSS or JS exclusions via the plugin admin.

    A domain key is required.

    Aggressive

    Added to the Advanced features are CSS and JS Combine, Critical CSS, Unique CSS and more. CCSS and UCSS are both QUIC.cloud services which may incur fees, and domain key is required.

    These features are excellent for page speed scores, and they really speed up your site. But they also have considerable potential to require intervention. Only use this preset if you are comfortable looking for conflicts and excluding files from optimization.

    Extreme

    As you might expect from a preset called Extreme, this one enables the maximum level of optimization possible. Page speed sites love sites with all of these optimizations.

    As with previous presets, a domain key is required, as is some expertise. These settings are likely to introduce CSS or JS conflicts, especially if you have a lot of plugins or a complicated theme.

    Frequently Asked Questions

    I am new to Litespeed Cache, which preset should I apply?

    We suggest trying the Advanced preset because it takes a balanced approach to optimization and speed. You shouldn’t need to manually tweak many settings, but if you do experience difficulty, you can always revert to your previous settings, or try the Basic preset.

    Can I modify Litespeed Cache settings after setting up this preset?

    Yes, it is absolutely possible to edit any options after applying a preset. Presets are just an easy way to get started. They give you a good base optimization to start with, but many complex websites will need more fine-tuning to achieve their best possible page score or user experience.

    If I don’t like a preset I’ve applied, can I undo it?

    Yes! Please see How to revert back above.

    How can I get more fine-tuning specifically for my website?

    Presets are a simple way to get started, but if your site design is complicated, or you just don’t want to get your hands dirty with WordPress admin, LiteSpeed offers a Paid Support Service. We’ll be happy to do the optimization for you.

    Video

    Prefer to see how it’s done? We’ve demonstrated all of the steps in this video:

    Conclusion

    These Standard Presets, which were developed by our LiteSpeed team, provide a simple way to apply preconfigured optimization settings for every comfort level. But this is just a start!

    Eventually, we hope to include Presets that have been submitted by members of our community to cover a wide variety of site styles and needs.

    In the meantime, give our Standard Presets a try, and let us know what you think!

  • LSCWP 5.0: Auto CDN Setup

    LSCWP 5.0: Auto CDN Setup

    Automatic QUIC.cloud Setup in LiteSpeed Cache v5.0 for WordPress

    Version 5.0 of the LiteSpeed Cache for WordPress plugin has arrived, and it provides a simple automated process to get you started with QUIC.cloud CDN!

    Whether you prefer to stay in the driver’s seat and follow our existing manual onboarding procedure, or you’d like to let the plugin take the wheel, the end result is the same: your WordPress site powered by LiteSpeed Cache and QUIC.cloud CDN!

    Please Note: As of March, 2025, and Version 7.0 of the LiteSpeed Cache plugin, the CDN setup process has been simplified and completely changed. As such, we’ve rewritten the instructions below to reflect the new way of getting started with QUIC.cloud CDN.

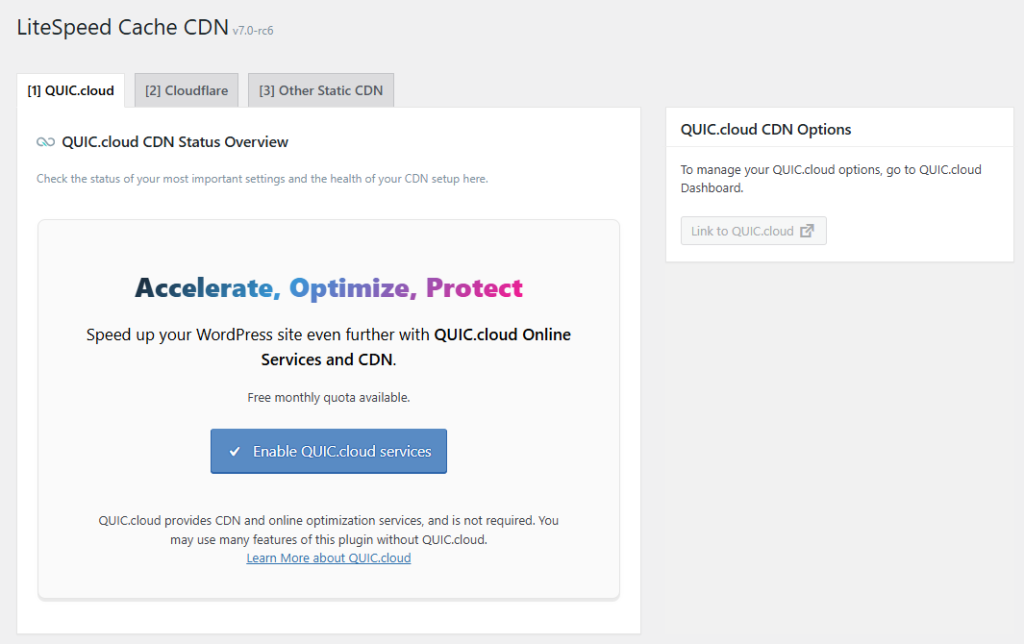
    Enable QUIC.cloud services

    Enable QUIC.cloud services

    We’re going to assume that this domain isn’t connected to QUIC.cloud yet, and that you are seeing an Enable QUIC.cloud services button. If this is not the case, and you have already connected your domain, you can skip a lot of what is in this blog post. You might prefer to check out the documentation, starting at the Enable QUIC.cloud CDN section.

    Press the Enable QUIC.cloud services button. QUIC.cloud will attempt to detect your server type and IP. Wait a few moments for this to complete.

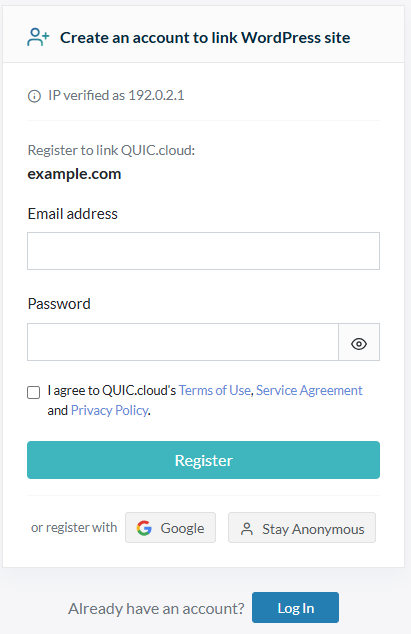
    Create a QUIC.cloud Account

    Next, you’ll be prompted to create a QUIC.cloud account to link to your WordPress site.

    (If you already have a QUIC.cloud account for another domain, there is no need to create a new account. You can have multiple domains in your QUIC.cloud account. Log in to your existing account, and this domain will be added.)

    Create a QUIC.cloud account

    Enter your email address, choose a password, agree to the QUIC.cloud terms and conditions, and click Register. Check your email for a validation message from QUIC.cloud, and confirm your account by clicking the activation link within.

    Your QUIC.cloud-WordPress connection is complete!

    Set up the CDN

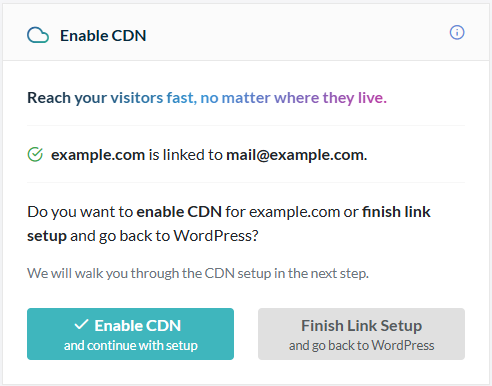
    Next, you’ll be prompted to choose whether to enable the CDN or finish linking without the CDN.

    Set up the CDN

    Click the Enable the CDN button.

    Point your DNS to QUIC.cloud

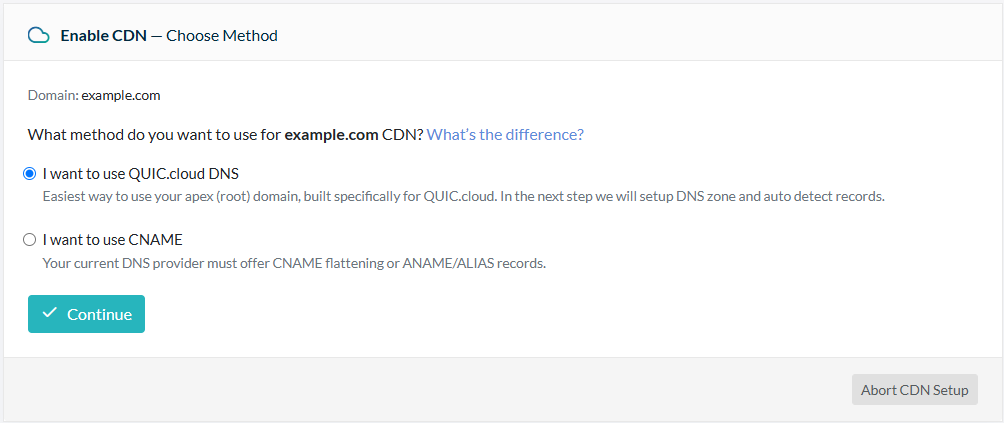
    If you plan to use QUIC.cloud CDN, you must point your domain’s DNS in our direction. You can either do this by updating CNAME records, or by switching to our own QUIC.cloud DNS service.

    For the purposes of this blog post we are going to assume you wish to use QUIC.cloud DNS. If this is not the case, please see QUIC.cloud’s DNS documentation for other options.

    Point your DNS to QUIC.cloud

    Select I want to use QUIC.cloud DNS and press Continue.

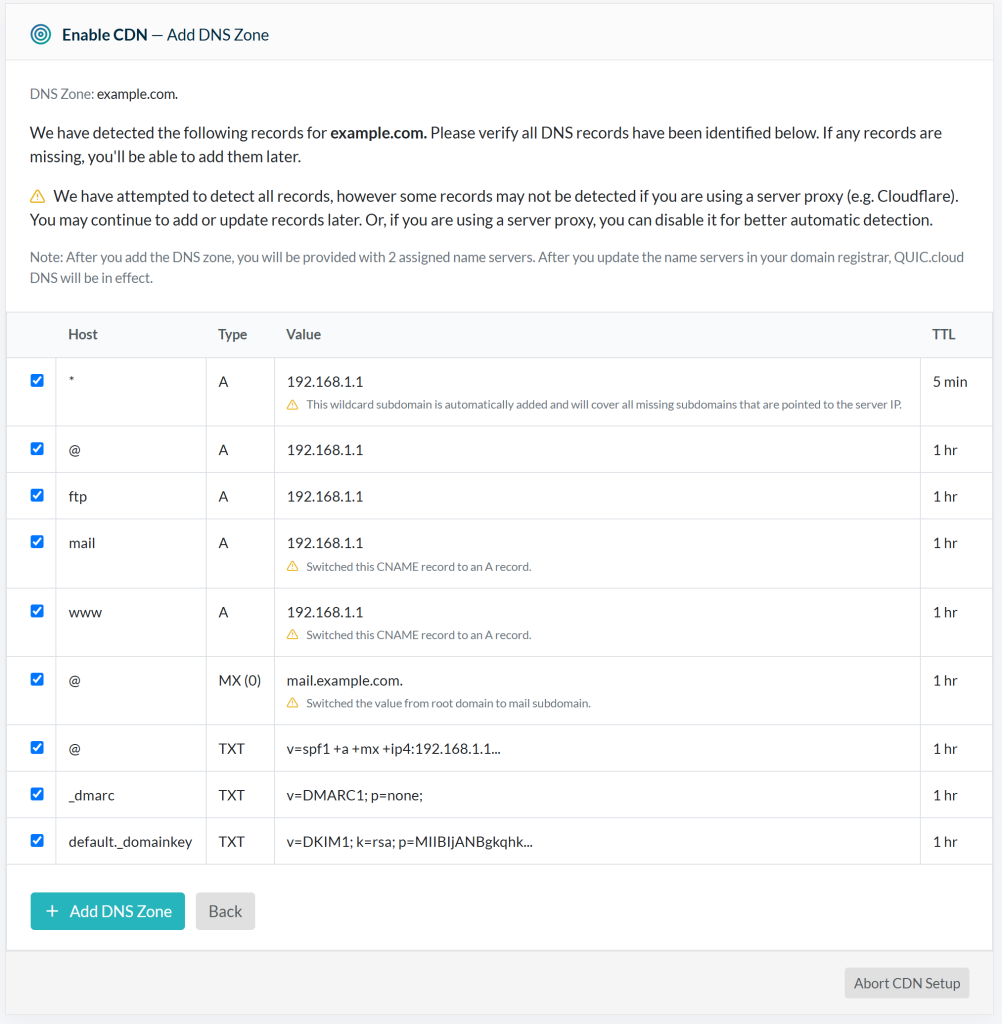
    Import existing DNS records to QUIC.cloud

    QUIC.cloud will attempt to detect your domain’s DNS records and import them. Please be patient while it works, and don’t close the window during this time.

    Import existing DNS records to QUIC.cloud

    Once detection is complete, you will be asked to confirm that your DNS information is correct. Accept all of the detected records, or uncheck any that you no longer need, and click the Add DNS Zone button.

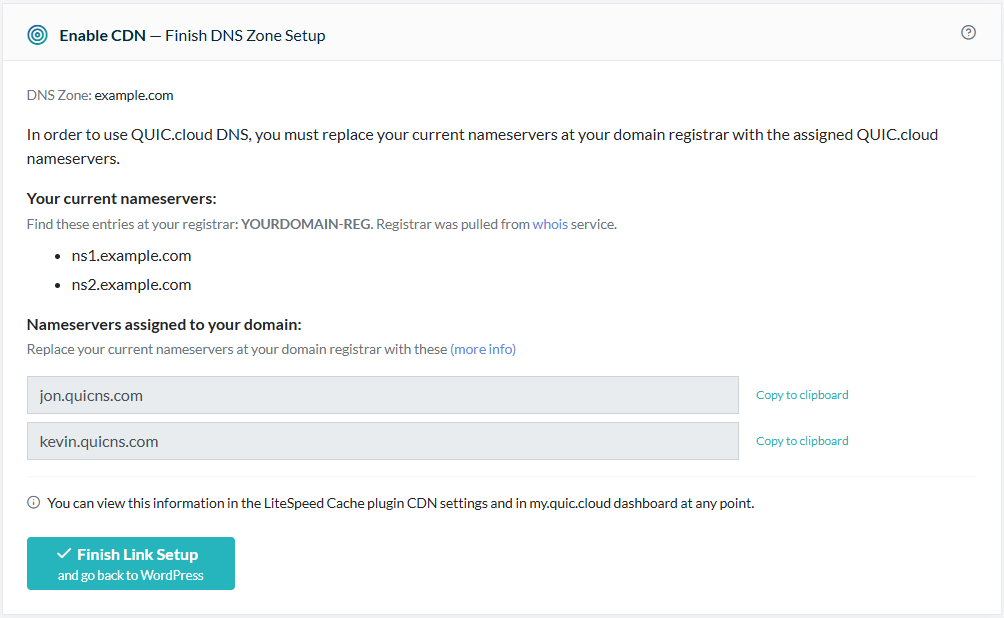
    Update your nameservers

    Once your DNS records have been imported into QUIC.cloud, you will need to instruct your domain registrar where to find your DNS records.

    QUIC.cloud will attempt to verify that your nameservers are correctly set up at your domain registrar.

    Your domain registrar is the provider you purchased your domain name from. Sometimes this is the same as your hosting provider, but that is not always the case. Make sure that you are in the right place before you change anything!

    Log in to your domain registrar. Look for the area of their site which allows you to manage Nameservers. It may be called “DNS Zone” or “Manage DNS” or something similar. Your previous DNS provider’s nameservers should still be on file. You’ll see them listed under NS1, NS2, and possibly NS3 and NS4 as well.

    Update your Nameservers

    Change the NS1 and NS2 records, to match those displayed in the dialog box under Nameservers assigned to your domain. In this example, that would be jon.quicns.com and kevin.quicns.com. If your domain registrar has additional records (NS3, NS4, etc.) erase those values. You should now only have QUIC.cloud-provided NS records at your domain registrar.

    Click the Finish Link Setup and go back to WordPress button.

    Verify DNS

    After the above steps are complete, you can check the status of your domain’s DNS with a tool like DNSChecker.org. There are typically delays due to DNS caching, but if your DNS has still not propagated after 24 hours, please open a support ticket and we’ll look into it.

    Allowlist QUIC.cloud IPs

    You’re almost finished! In order for QUIC.cloud to perform its services, it needs to be able to communicate with your origin server. Some server-level and application-level firewalls may interfere with this communication. If you have one of these firewalls in place, you will need to make sure it is allowing QUIC.cloud IP addresses.

    Please see Adding QUIC.cloud IPs to Allowlist for more information.

    All Done!

    Congratulations! You are now using QUIC.cloud CDN!

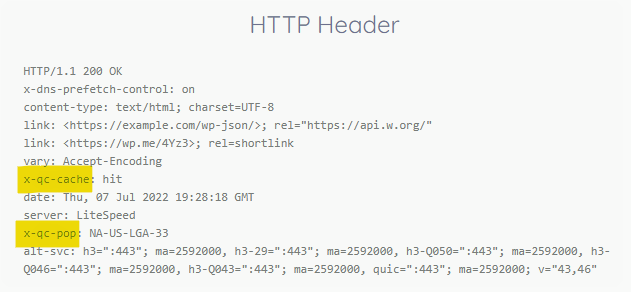
    You can use the HTTP/3 Check tool to verify that your site is being served by QUIC.cloud and supports the latest cutting edge Internet protocols. Look for the x-qc-pop header to locate the QUIC.cloud node that served the request, and the x-qc-cache header to determine whether the page was cached at the node.

    You can keep an eye on your bandwidth usage and tweak your CDN settings in your QUIC.cloud Dashboard.

    This content was last verified and updated in April of 2025. If you find an inaccuracy, please let us know! In the meantime, see our documentation site for the most up-to-date information.

  • LSCWP 5.0: Viewport Images Service

    LSCWP 5.0: Viewport Images Service

    Viewport Images Service LSCWP 5.0

    LiteSpeed Cache v5.0 for WordPress is here, and along with it comes a new QUIC.cloud service: Viewport Images, also known as VPI!

    VPI joins QUIC.cloud’s other WordPress optimization services: Critical CSS (CCSS), Unique CSS (UCSS), Low-Quality Image Placeholders (LQIP), and Image Optimization.

    The Viewport Images service was introduced as a way to improve user experience on lazy loading sites.

    The Lazy Load Problem

    Do you have Lazy Load Images enabled for your website? If so, then you know that the transmission of each image is delayed until it is needed, loading as it scrolls into the viewport. This is mainly a good thing, because it saves bandwidth and improves your page’s speed.

    Lazy load’s biggest flaw is in the treatment of above-the-fold imagery. That first screenful of content may have several gray boxes appearing where the images should be, for as long as it takes for the rest of the page’s content to load. Depending on your site design, it may not give the best first impression to postpone image rendering.

    The LiteSpeed Cache plugin has already provided a few handy ways to cope with this:

    • Responsive Placeholder lets you change the Responsive Placeholder Color from gray to something that fits your site design better. Maybe you’d like pale green boxes, for example.
    • LQIP Cloud Generator lets you replace the solid-color placeholders with extremely blurry fast-loading versions of the original images. I use this with my own personal site, because I think it’s fun for the placeholders to resemble the images that belong in those spots

    These remain viable options. But there will still be a few moments before all of the content has loaded, where placeholders are standing in for your imagery. No matter how nice those placeholders will be, it still means that your page may look somewhat incomplete.

    The VPI Solution

    In a perfect world, all images would be lazy loaded except for those that are already in the viewport when the page initially loads. Those images should be excluded from lazy loading. That is what VPI does.

    The VPI service examines a URL, and determines which images are visible on a 1300×900 pixel screen for desktop views, and which images are visible on a 480×800 screen for mobile views. It returns a list of those images to the LiteSpeed plugin, and LiteSpeed then excludes them from lazy load next time it caches that URL.

    The result is a page that is fully rendered above the fold, while every image below the fold continues to behave as before. Your site retains its good page speed score, while your human visitors enjoy a complete first screenful of content.

    The QUIC.cloud Connection

    VPI is a QUIC.cloud service. If you have never used any previous QUIC.cloud services for your domain, you will need to navigate to the General page of the LiteSpeed Cache plugin. On the General Settings tab, click the Request Domain Key button in the Domain Key setting, and wait a few minutes for it to generate.

    Once you have your domain key, you are ready to start using VPI.

    VPI is one of three QUIC.cloud Page Optimization services. CCSS and UCSS are the other two. QUIC.cloud allows you to use the page optimization services for free to a certain extent each month. Once your free quota runs out, you can either wait until the next month for it to regenerate automatically at no cost, or you can purchase more. There’s more information about how that works at QUIC.cloud.

    How to use VPI

    To get started using VPI, navigate to Page Optimization > Media Settings in the LiteSpeed Cache plugin, and enable Lazy Load Images if you haven’t already. Save your settings and visit the VPI tab.

    VPI Viewport Images Settings

    There you will find two settings:

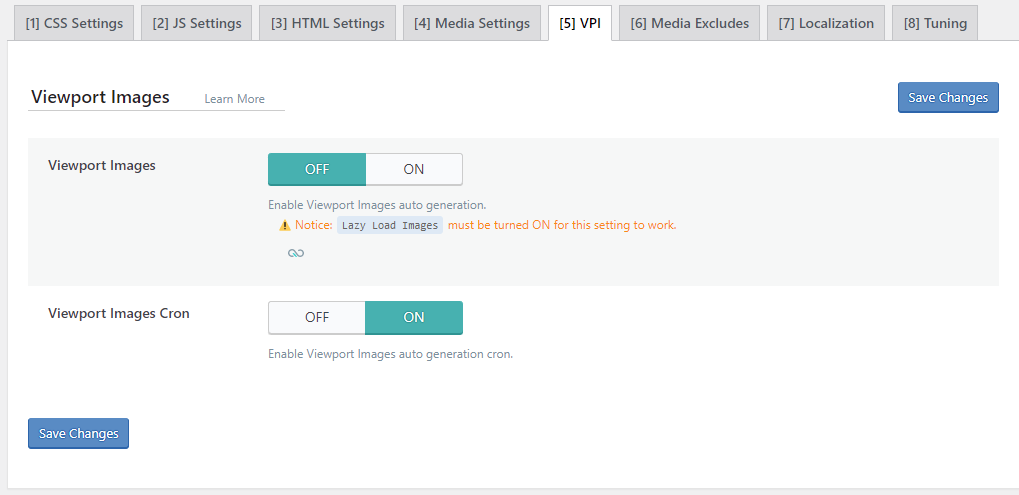
    • Viewport Images: This setting defaults to OFF. Turn it ON to enable the VPI service.
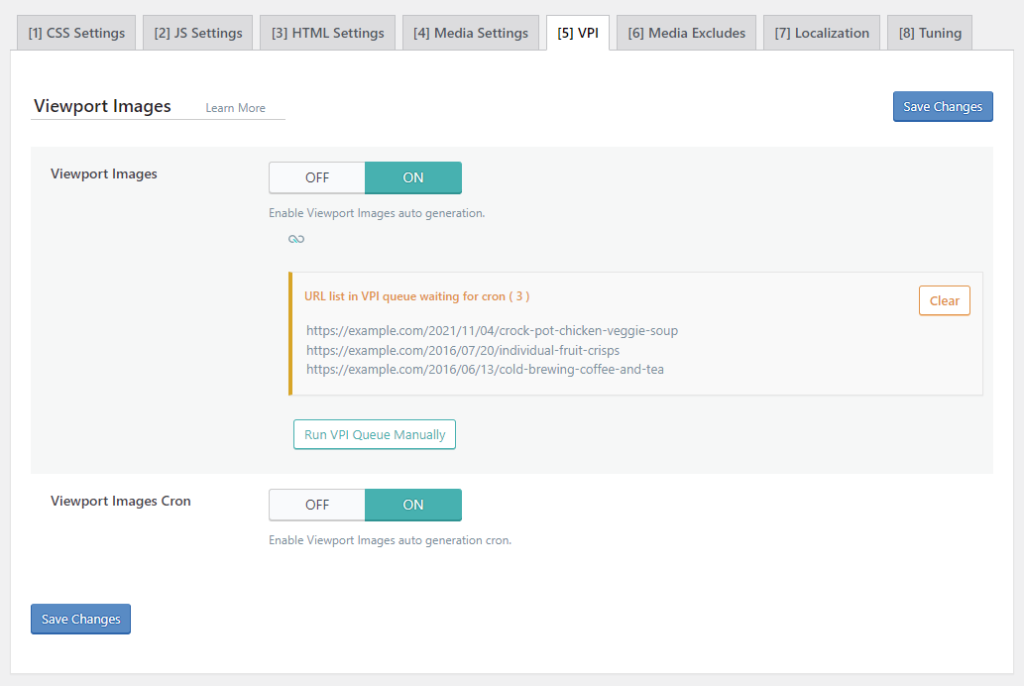
    • Viewport Images Cron: When Viewport Images is enabled, and this setting is set to ON, Viewport Images will be generated in the background via a cron-based queue. If you disable this setting, then you will need to process the VPI queue manually. You can do so by pressing the Run VPI Queue Manually button that will appear on this page when there are URLs in the queue. Or, you can do it on the Dashboard as described later.

    VPI Viewport Images Settings

    The VPI queue is populated as people begin to visit the pages on your site. When a page is loaded, if no VPI is yet defined, the page will be added to the queue for background processing. If the page already has VPI defined, then it will not be added to the queue.

    That’s all you need to do to start using VPI, but there are a few other handy things to know.

    Tweaking VPI Post-by-Post

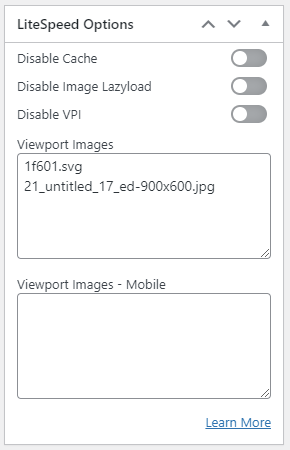
    WordPress editors (both the Classic Editor and Block Editor) have a new metabox called LiteSpeed Options. This allows you to easily tweak some settings on a post-by-post basis.

    LiteSpeed Metabox in WordPress Editor

    If the post has already been processed for VPI, you will see entries in one or both of the Viewport Images boxes. You can manipulate these values any way you like. Remember, any image listed in these settings will not be lazy loaded. You can:

    • remove images that you do want lazy loaded
    • add your own list of images that you want to exclude from lazy loading for this URL
    • clear the boxes and force a VPI recalculation

    If the post has not already been processed for VPI, both settings will be empty. If you want to, you could add images to the Viewport Images and/or Viewport Images – Mobile box manually. LiteSpeed will respect these values and will not send the post out for VPI processing.

    Monitoring VPI Usage

    VPI usage is reflected in the LiteSpeed Cache Dashboard, along with other QUIC.cloud services.

    Dashboard LiteSpeed Cache for WordPress

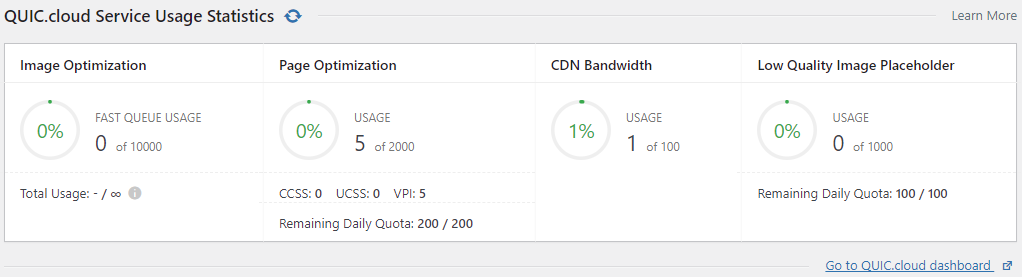
    Take a look at the Page Optimization column in the QUIC.cloud Service Usage Statistics section. It displays the number of requests sent, how many you have left for the month, and how many you have left for the day. If you have purchased additional quota, you will see that here, too.

    Dashboard LiteSpeed Cache for WordPress

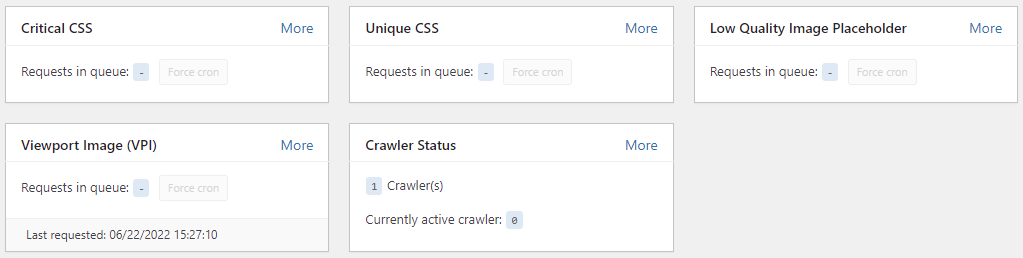
    Scroll down to the Viewport Image (VPI) box to manage the queue. You can see if you have any URLs in the queue and the date and time of the last request. If you have entries in the queue, the Force Cron button will become available. Press it if you want to process those requests immediately.

    Conclusion

    Lazy Load is a terrific tool. It allows visitors to begin using your site immediately. There is no need to wait for all of the page’s images to transfer. The new Viewport Images service is the proverbial cherry on top of your domain’s lazy load sundae. VPI allows your site to reap the benefits of lazy load, while presenting a polished and professional above-the-fold experience for all of your visitors.

    Upgrade to LiteSpeed Cache v5.0 for WordPress, and try VPI today!