Category: LSCache

Learn more about LiteSpeed Cache plugin for WordPress, PrestaShop, XenForo, Drupal, Joomla, MediaWiki, WooCommerce, and more. Sites powered by LiteSpeed Web Server with LSCache may accelerate their web apps with extensions or rewrite rules.

In this category you will find tutorials, case studies, and useful information related to this popular cache solution.

  • LiteSpeed Cache and WPML now Compatible!

    LiteSpeed Cache and WPML now Compatible!

    LSCache and WPML are Compatible

    We are pleased to announce LiteSpeed Cache for WordPress is now compatible with WPML, the WordPress Multilingual Plugin!

    This is good news for our global audience, many of whom speak and write in multiple languages. No longer do you need to choose between reaching a wider audience and having a faster website.

    WPML gives you the ability to communicate in multiple languages from a single WordPress installation. You can learn more about that at wpml.org.

    LiteSpeed Cache accelerates your WordPress site through a powerful server-side cache, and a suite of additional optimization functions. Visit our website to read about all of the features, and compare LSCWP to other WP cache plugins.

    The LiteSpeed Cache and WPML plugins cooperate by pairing WPML’s language switcher with LiteSpeed’s cache vary technology. As a result, for any given page, LSCache now stores separate copies for each page in each requested language.

    This means, if your home page is available in English and Spanish, and the first visitor to the page speaks English, they will be served the English version of the page from cache. If another visitor comes along and uses the language switcher to change the content to Spanish, they will be served the Spanish copy of the page from cache.

    There are no special settings required in either LSCache or WPML to make this collaboration work. It’s all automatic.

    If you have any questions about this, leave a comment! We’re happy to help.

  • The Best Online WordPress Communities

    The Best Online WordPress Communities

    Best Online WordPress Communities

    Today we’ve asked our friend Johnny Nguyen to share with us some of his favorite message boards, groups, and forums for WordPress enthusiasts. Johnny is a WordPress performance-hosting expert, and is active in the WP community, providing helpful WordPress guides at wpjohnny.com. He also offers ultra-fast WordPress hosting at johnnyvps.com.

    Whatever your level of WordPress experience, if you’re looking to make connections, get help, or to share your own knowledge, one of these online communities should be right up your alley!

    Without further ado, here’s Johnny!

    Why go it alone when you can learn and share with new friends?

    No matter what level you’re at (beginner or expert) or what aspect of WordPress you’re in (designer/developer/marketer), there are many communities for you to meet like-minded folks. Below are a handful of my personal favorites and the reasons why I like them!

    Best Online WordPress Communities: Hosting

    Hosting Groups/Forums

    Why belong to Hosting Groups or Forums? Because every website should be built on a solid foundation, which is solid hosting. Otherwise, you’ll never know if your site issues are coming from your website code or your web server. Sure, you can do what most people do, which is hop on a cheap shared hosting plan from Godaddy, SiteGround, or A2. But you could also join some groups and learn more about the best performance hosts and why. Your site may be small today but one day you’ll grow into a bigger plan and it’s good to know how to look for them.

    WordPress Hosting (Facebook group)

    The simplest and easiest place to get a pulse on what’s popular in the WordPress hosting world. Who’s good, who’s not. Which stacks (Apache/Nginx/hybrid/LiteSpeed) are the best and why. You should be careful that many reviews out there are quite subjective. Somebody might tote one company as the best because they migrated from an awful host previously. Another person might bash a good company because they didn’t know how to manage their own site.

    You should also be careful to take note of the commenter’s skill level and use scenario. Expert command-line users may hate on cPanel, or newb users will complain that developer-grade tools are too hard to use.

    WebHostingTalk.com aka WHT (website forums)

    This is probably the old and most official way to get lots of webhosting information but it can be terribly overwhelming. It can also be information overload for the average user. This is only recommended for real Linux/Unix geeks, hosting businesses, admins maintaining servers, or just plain curious folks who like to read a lot.

    WHT is more of a place to find alternate solutions rather than simple answers. You’ll find solid arguments going back and forth for every user scenario, with expert opinions backing both sides. Throw in the rapidly-outdating pace of technology and you’re never sure what the best answer is at any specific moment. Honestly, WHT could confuse you more than anything.

    LowEndTalk.com (website forums)

    A cleaner version of WHT, for fast and quick answers about server administration than actual full-on discussions (although that happens, too). I also like their cleaner UI, and it feels much easier and less bloated than WHT’s overly gray design.

    LowendBox (website forums)

    This is a great place to find current deals on the latest VPS plans and webhosting tools. Do I recommend this for average users and busy people trying to run their online business? ABSOLUTELY NOT! This for finding throwaway VPS boxes to do experimental testing before deploying onto your production sites. Meet lots of like-minded experimental folks here and also get the dirt on what different companies are doing. Which companies are shady, which companies are over-selling their true capacity and such matters.

    Best Online WordPress Communities: Themes

    Theme Groups/Forums

    In WordPress, theme houses are run like little religious cults. Every framework community truly believes their theme is the absolute best foundation for a high-quality WordPress site. This is a great place to meet other people using the same theme and sharing little hacks and tricks to customize their theme. You’ll also find incredible inspiration and community showcases pushing the limits of what your theme can do.

    If you’re ever out of your league and need to hire someone to work on your site, it is highly recommended to choose someone familiar with your theme!

    Genesis/StudioPress (website forums)

    Genesis is the #1 framework for WordPress, probably since 2012 or maybe even before that. Why? Clean code is the main reason. It’s truly high-performance, fast, and easy to work with. It was THE high performance theme even back before WordPress performance was a trending topic. Many developers preferred it (and still do to this day) because it was not only clean and fast but easy to work with and customize.

    Genesis struck a nice balance between just enough basic features that a theme should have (like speed, SEO, accessibility, and customization) without so much CSS/JS bloat that the site ran slow or felt cumbersome to customize. Unfortunately, Genesis popularity waned a little over the years as more power started falling into the hands of average users. Now page builders are the favored tool even though many developers still prefer hard-coding from scratch with a framework. Anyway, that’s a whole other can of worms to debate about.

    Genesis/StudioPress forums are the best place to find help for typical Genesis theme problems. The forums are full of information and you’ll probably find many posts from users with the same problem as you. Read around and figure things out on your own! Great for newbies and those wanting to find lots of information. Many of these groups also discuss every aspect of WordPress, not always only about their respective themes.

    Genesis (Slack group)

    A great place to hang out among many professional web developers, also famous theme & plugin developers, and even the core Genesis/WordPress team. It’s fun to play fly-on-the-wall here and bookmark all of the incredible resources they share back and forth.

    I would not recommend this place for newbies as the pros don’t like to spell everything out for beginners. It is assumed that everyone here knows the basics of using WordPress and delving into common files like wp-config.php, or knowing which directories to look inside for typical problems.

    GeneratePress (Facebook group)

    An incredible theme just every bit as high-performance and customizable as Genesis and it even offers a free version. Their freemium model has done well to attract both beginner users as well as developers (unlike pure premium themes like Genesis/Thesis).

    I not only like this theme but the fun healthy spirit of this group. Many levels of users resolving each others problems and having fun with Facebook.

    Astra (Facebook group) and OceanWP (Facebook group)

    Like GeneratePress, these are also freemium theme groups. Many users and lots of discussion going back and forth about every aspect of WordPress. These groups are great for beginners as the questions and help tend to revolve around beginner stuff. If you are NOT a beginner and/or you know how to code, you may find these groups kind of repetitive as the same basic questions get asked over and over.

    Best Online WordPress Communities: Page Builders

    Page Builder Groups/Forums

    The other religion in WordPress is the page builder groups. The birth of the page builder has probably been the biggest innovation in WordPress lately. While expert users and developers may hate it for putting too much power in the hand of beginner users or creating compatibility issues, beginners for the most part have absolutely enjoyed page builders. If anything, some people are even more loyal to their page builder than to their theme.

    I only list the Facebook groups for the 2 biggest page builders (and their communities). But I do feel it’s worthwhile to explore beyond them and discover the uniqueness of Oxygen, Brizy, DIVI, and others.

    Elementor (Facebook group)

    Probably the trendiest page builder out there. Whatever new website design trend there is, Elementor will probably be the first to cater to it. This is great if you’re a newbie user who wants to copy all of the latest design effects. This group is also good if you just plain like Elementor (obviously) and how it works. Meet other Elementor users and see what fun things you can do with your website design without learning how to code.

    BeaverBuilder (Facebook group)

    BB is probably the most stable page builder for WordPress. It doesn’t always keep up with the latest design trends but it’s super solid, easy to work with, very stable and mature. Of course, you will always have people who feel the opposite about the 2 groups…or point to some critical issue about one page builder or the other.

    Best Online WordPress Communities: Development

    Development groups

    These are all good all-around Facebook groups to join and talk about anything involving WordPress. Thanks to their broad coverage of WordPress, you can talk about anything WordPress without worry of annoying people who only want to hear about a theme/plugin/etc.

    WP Builds (Facebook group)

    Friendly group with many small business users likely doing what you’re doing, trying to build a successful WordPress site and grow their business. Lots of practical advice on not only WordPress, but on running a business in general. You’ll learn about best plugins, best practices, and also helpful business tips. Very friendly community and great pay-it-forward mentality here.

    Advanced WooCommerce (Facebook group)

    Great for finding expert help for your WooCommerce issues. WooCommerce is one hell of a beast and seems prone to always causing conflicts or breaking your site on the latest update. Go here to see how all the other pros are dealing with it.

    WordPress Speed-Up (Facebook group)

    Fantastic group to learn everything there is about website performance. It’s basically thousands of users (experts and newbies alike) nerding out on every possible tactic to speed up their site. Find out about the best hosting, CDN, caching, asset optimization, and other WordPress speed optimization tactics. Be careful, speeding up sites can be incredibly addictive! First you drop your site from 5 seconds to 1 second. Then from 1 second to 500ms. Then try to get even below 500ms. The addiction never ends!

    Best Online WordPress Communities: Marketing

    Marketing groups

    Make Money with Web Design (Facebook group)

    (or any other “online marketing” or “digital marketing” group)

    These are great for you to learn the ropes to running an online business. Things like negotiating with clients, setting a fair pricing strategy, the right copy. You can also share your URL with other members for feedback on your logo or web page design. It’s also just fun to see what everyone else is doing and what tools they’re using to get things done.

    While many of these groups don’t explicitly say WordPress, it’s practically assumed that just about everyone in there is using WordPress. (Typically, Shopify or other communities will specify the word “Shopify” in their group name.)

    Membership Mastermind (Facebook group)

    This is far from the only membership group out there. There are several. I noticed membership-business related groups tend to have some advantage from the other usual communities. One is they have more serious small business owners who are trying to reach customers. You may find this especially refreshing compared to the usual WordPress groups filled with newbies and wannabe entrepreneurs looking for the next get-rich-quick scheme.

    You may also like that membership-related groups tend to be much more balanced between male and female members. Females can be simply nicer, more respectful, and don’t have the typical ego-driven attitudes you find in male-dominant communities.

    Facebook Ads Hacks (Facebook group)

    This is especially useful for learning the latest tips and tricks for maximizing your Facebook ad campaigns and also to learn which plugins other members are using.

    Our thanks go out to Johnny for sharing his expertise here today. What a great list!

    So, what about you? Do you have a favorite online group that the LiteSpeed community would like? Tell us about it in the comments!


  • Notes From the Road: WordCampNYC

    Notes From the Road: WordCampNYC

    WordCampNYC 2018 - Essential Steps to a Superior PageSpeed Score

    Our team attended WordCamp NYC this past Saturday. Eric Leu gave a well-attended talk entitled “Essential Steps to a Superior PageSpeed Score.” We’ve embedded the slides from that talk below. Or, you can see it directly at SlideShare.

    Our team enjoyed spending time with the WordPress community this weekend. We look forward to doing it again soon.

    WordCampNYC 2018 - Essential Steps to a Superior PageSpeed Score

    Here at LiteSpeed, we are passionate about accelerating the Internet. If you attended the talk, and are curious about the free LiteSpeed Cache plugin for WordPress, visit our website to learn more about it! We hope that you learned something from this presentation. Please feel free to comment with any questions you may have! Or join our Slack community to connect with us and with other LiteSpeed enthusiasts.

  • Crawling Your PrestaShop or Magento 2 Store

    Crawling Your PrestaShop or Magento 2 Store

    Cache Crawler for PrestaShop and Magento 2

    We recently released two new crawler scripts: one for Magento 2 stores using LiteMage, and another for PrestaShop stores using LSCache.

    The LSCache/LiteMage crawler, travels its way through your sitemap file, refreshing pages that have expired in the cache. The purpose is to keep the cache as fresh as possible while minimizing visitor exposure to uncached content.

    Why Crawl Your Store?

    Well, first let’s look at how cache plugins store pages without a crawler. A user request kicks off the whole process. The cache is empty until users start sending requests. The first time a visitor requests a page, the request hits the backend. PHP code is invoked to generate the page, the page is served to the user, and then the page is stored in cache for next time.

    That’s a fairly time-consuming process for the server.

    Now, let’s look at what happens when a crawler builds the cache. When the crawler requests a page, the request hits the backend. PHP code is invoked to generate the page, but because of the special header that lets LSWS know that this is a crawler that initiated the request, the full page doesn’t need to be served. It is simply stored in cache.

    Additionally, with the crawler refreshing expired pages at regular intervals, the chances that a user will encounter an uncached page is significantly diminished. This makes for a faster site.

    So, now that you’re sold on the idea, let’s look at how it’s done.

    Please Note: The concepts behind the PrestaShop cache crawler script and the Magento 2 cache crawler script are the same, and so the instructions are very similar. Where they differ, we’ll put PrestaShop on the left, and Magento 2 on the right.

    Before You Begin

    There are a few things you need to do before you can begin to use the new script.

    • You must be using LiteSpeed Cache for PrestaShop or LiteMage 2 for Magento 2. Follow those links to install and enable the relevant extension.
    • The crawler must be enabled at the server level, or you will see the warning message Server crawler engine not enabled. Please check.... If you are using a shared hosting server, please contact your hosting provider, or see our instructions.
    • Prepare your site’s XML sitemap using the tool of your choice.

    Generate a Sitemap

    If you haven’t yet generated your sitemap, you can use an online sitemap generator such as XML-Sitemaps.com.

    After the crawl is finished, click DOWNLOAD YOUR XML SITEMAP FILE and put it where the crawler script can access it.

    If you’d prefer to do it from within your site, both PrestaShop and Magento 2 have modules that can generate XML sitemaps.

    PrestaShop Magento 2
    The Google Sitemap module is quite popular for Prestashop, and it’s fast.

    For PrestaShop v1.6, the Google Sitemap Module is installed by default.

    For v1.7+, it needs to be installed from source:

    • Download and rename file to gsitemap.zip
    • Navigate to Modules and Services
    • Click Upload a Module and drag the file to into the box to install

    Configure the sitemap as desired and press Generate Sitemap. You can find the URL of your new sitemap displayed in the Your Sitemaps section.

    Magento 2 has a builtin module for generating a sitemap and it’s fast.

    • Navigate to Magento Admin > Stores > Settings > Configuration > Catalog > XML Sitemap
    • Set Generation Settings > Enabled to Yes
    • Navigate to Magento Admin > Marketing > Seo & Search > Sitemap
    • Click the Add Sitemap button.
    • Set Filename = sitemap.xml and Path = /
    • Click the Save & Generate button

    A sitemap.xml file will be generated in your Magento 2 document root.

    Using the Cache Crawler Script

    Download the crawler script from the appropriate link below, and then change the permissions so that the file is executable, like so:

    PrestaShop Magento 2
    Download, then chmod +x cachecrawler.sh

    Usage: bash cachecrawler.sh https://www.example.com/sitemap.xml

    Download, then chmod +x M2-crawler.sh

    Usage: bash M2-crawler.sh https://www.example.com/sitemap.xml

    The crawler scripts take some parameters:

    • -h to display help
    • -m for when Desktop & Mobile have different themes
    • -i NUM to change the default interval from 0.1s to NUM.

    Changing the Crawl Interval

    How often do you want to re-initiate the crawling process? This depends on how long it takes to crawl your site and your Public Cache TTL. The default TTL is one day (24 hours). Let’s say you want to run the script by cron job every 12 hours.

    Add the following to your crontab to run twice a day, once at 3:30am and once at 3:30pm:

    PrestaShop Magento 2
    30 3/15 * * * path_to_script/cachecrawler.sh https://www.example.com/sitemap.xml -m -i 0.2 30 3/15 * * * path_to_script/M2-crawler.sh https://www.example.com/sitemap.xml -m -i 0.2

    You can use an online crontab tool to help you to verify time settings.

    Verifying the Crawler is Working

    When using the browser developer tool, load a page where the TTL has expired. On the first view after the crawler runs, you should see:

    PrestaShop Magento 2
    X-LiteSpeed-Cache: hit X-LiteSpeed-Cache: hit,litemage

    The cache hit indicates that the crawler cached the page for you. If the crawler were not running, you’d have gotten a cache miss.

    Any questions about our new crawler scripts? Let us know in the comments!
  • JT: Using ESI in Joomla with LSCache

    JT: Using ESI in Joomla with LSCache

    Joomla Tips: Using ESI in Joomla

    Welcome to another installment of Joomla Tips!
    Today’s topic is: Using ESI in Joomla

    Last week we discussed private cache for your Joomla site. Today we’re going to take that a step further and explore ESI, or “Edge Side Includes”. ESI takes the concepts of public cache and private cache, and combines them in a way that allows you to serve cached content flexibly and to more of your visitors, both logged out and logged in.

    Please note: ESI is not supported in OpenLiteSpeed. You must be using LiteSpeed Enterprise in order to take advantage of ESI functionality.

    What is ESI?

    ESI is a markup language. It allows you to designate parts of your dynamic page as separate fragments that are then assembled together to make the whole page. ESI lets you “punch holes” in a page, and then fill those holes with content that has different caching requirements than the rest of the page.

    For instance, ESI blocks can have different TTLs and be purged by events that are completely separate from the page they are on. Additionally, ESI blocks can contain private content even when the page they are on is publicly cached. This flexibility allows you to cache more of your site for more of your visitors. ESI is a an important aspect of any ecommerce caching strategy.

    How do ESI and Public/Private Cache Work Together?

    ESI allows you to disassemble a full page and treat the pieces differently from each other.

    LiteSpeed Web Server allows you to store content in either the public cache or a private cache.

    These two elements combine to give you something very powerful: a system that can break apart a page into public and private pieces, cache each piece appropriately, re-assemble the full-page content from the relevant caches, and then serve it to a user without ever hitting the PHP backend.

    That is pretty amazing!

    Using ESI in Joomla: Punched holes in paper

    Examples

    Let’s look at a few common scenarios where ESI is helpful.

    Example #1: The Login Module

    Let’s say your site has a login module on every page. You are logged in, and you visit your site’s home page, which is in the public cache.

    Without ESI: Your request must invoke PHP, because the login module contains private content, and as such this page (and every other page on your site, for that matter) cannot be served to you from public cache.

    With ESI: Most of this page is served to you from the public cache, but the login module is served to you from your private cache. There is no need to invoke PHP.

    Other Thoughts: Technically in this scenario, you could skip ESI and use logged-in caching for every page, but private cache storage adds up, particularly if you have a busy site, or a lot of pages on your site. Using ESI here means that the only thing you need to store in private cache for each user is the contents of a single module.

    Example #2: The Latest Articles Module

    Let’s say you have a large site with mostly static content that rarely changes. The “Latest Articles” module appears on each page.

    Without ESI: Every time a new article is published, every single page in the site must be purged so that the module displays up-to-date data. Re-populating the entire cache requires a crawler to run, or visitors to hit all of the pages of the site.

    With ESI: All of the pages in the site can remain cached with a nice long TTL, while the Latest Article module is the only thing that needs to be purged. Re-populating that one bit of the cache requires just one visitor to request any page one time.

    Other Thoughts: Using an ESI widget for this allows us to keep most pages in cache for a long time, while letting the module change as often as it needs to. If we weren’t using ESI for this, we’d be putting a lot of unnecessary load on the server, and increasing the chances that visitors to the site would encounter uncached content.

    Enabling and Configuring ESI

    When you enable ESI, you allow holes to be punched for content that will either be privately-cached, publicly-cached with its own TTL, or not cached at all.

    While leaving an ESI block uncached is an option, it is not recommended. An uncached module will need to invoke PHP each time that it is requested. PHP uses a lot of resources and slows down your page considerably. If you can avoid hitting the PHP backend, you should.

    Using ESI in Joomla: Advanced configuration screen

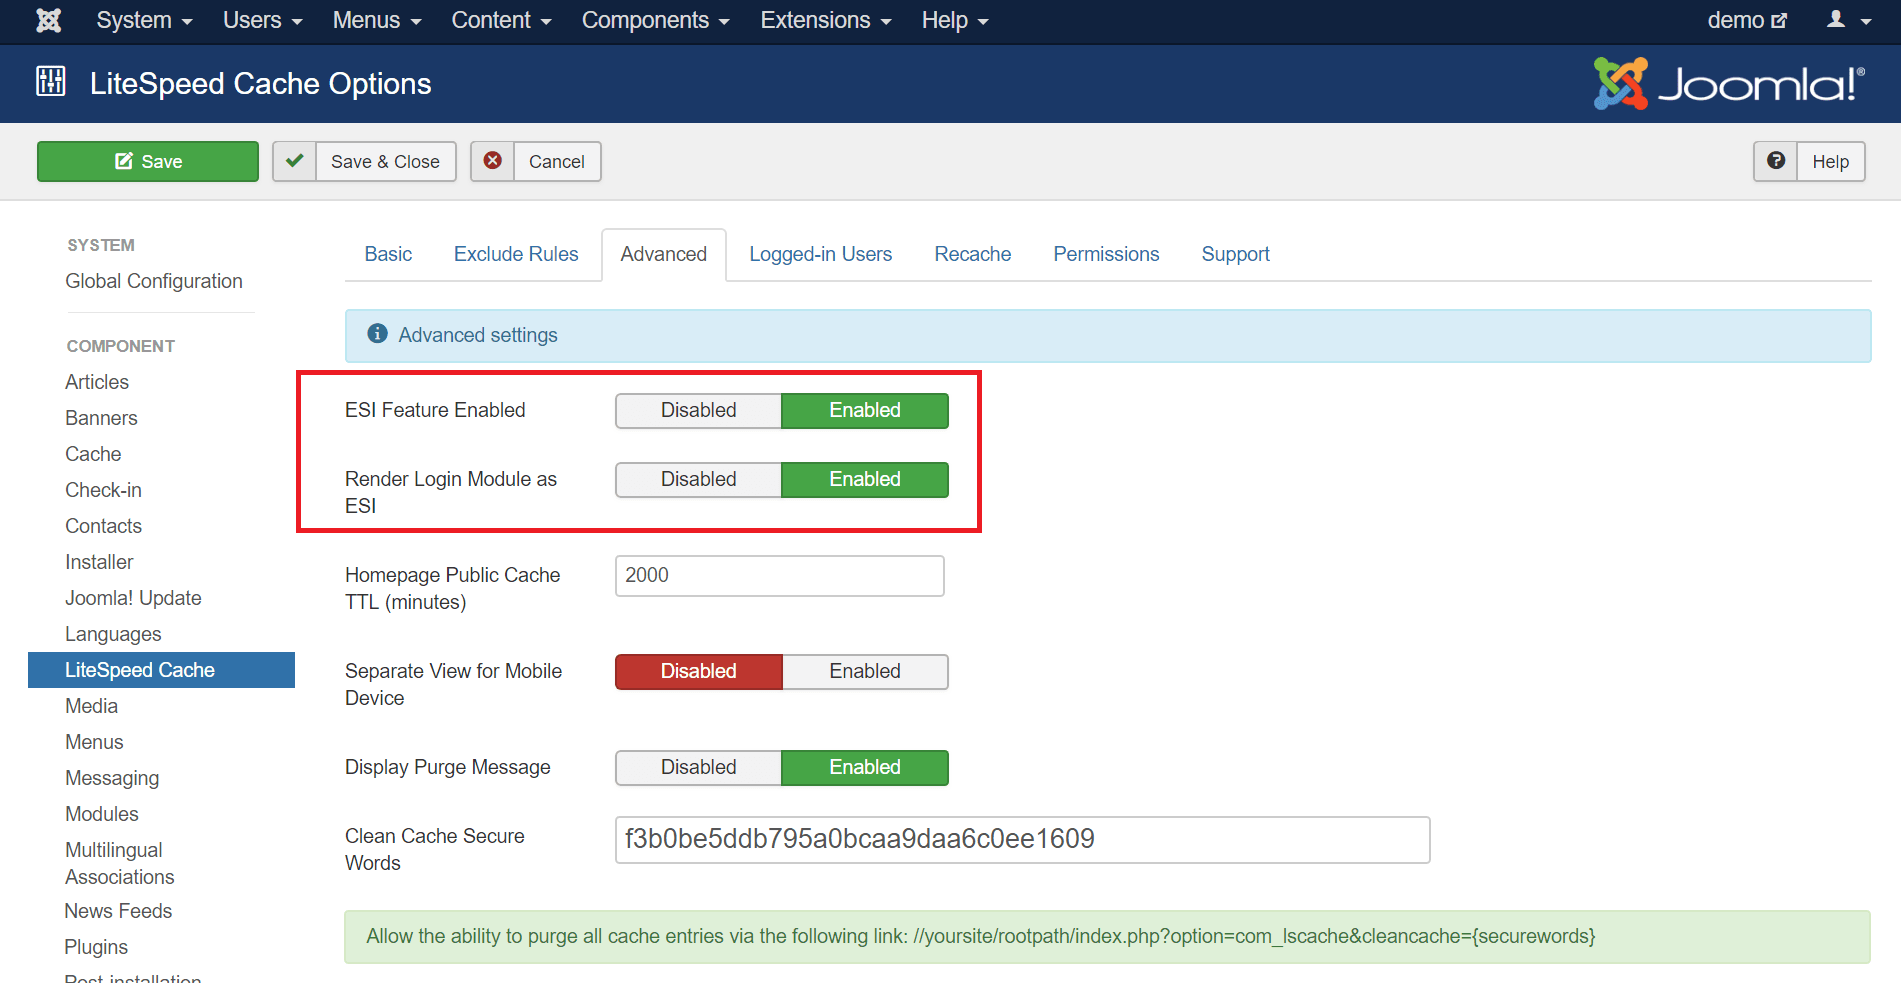
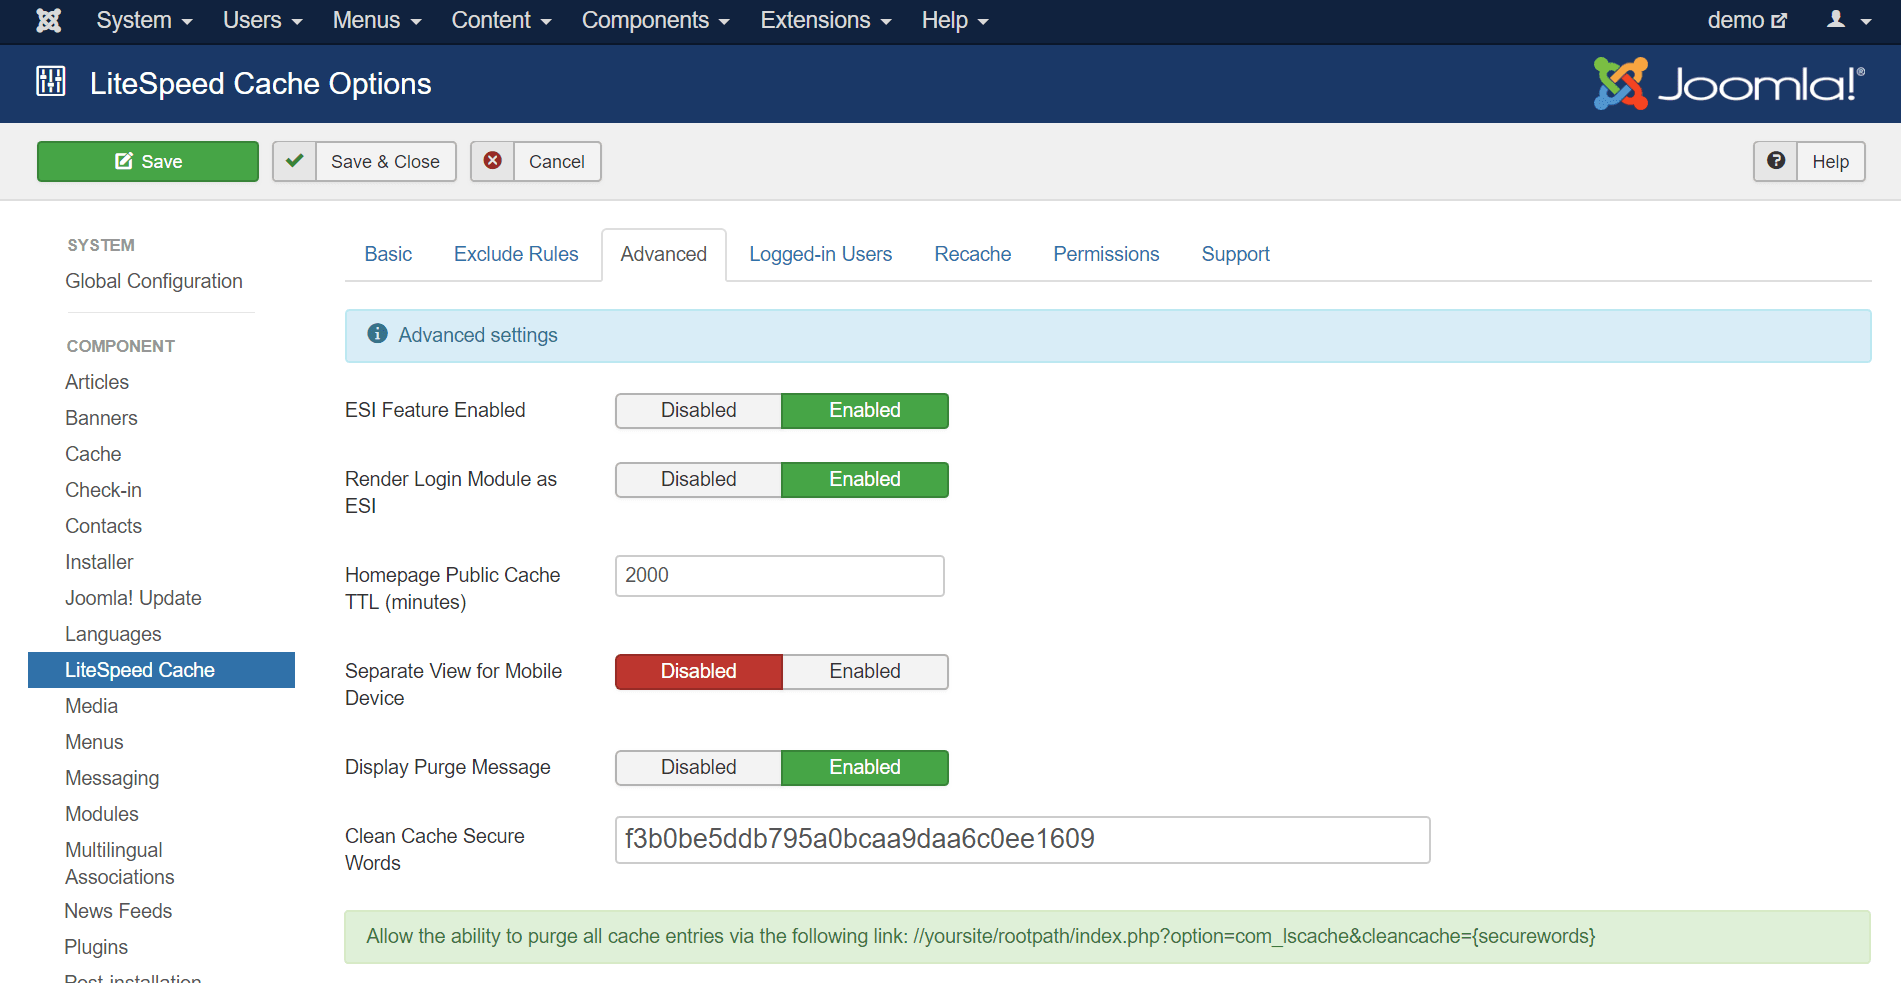
    To enable ESI, navigate to System > Global Configuration > LiteSpeed Cache and click the Advanced tab. Verify that ESI Feature Enabled is set to Enabled. It should be on by default.

    You can also set Render Login Module as ESI to Enabled here, although we are going to take care of that in the LiteSpeed Cache Settings (ESI Module Settings) screen below.

    Rendering Modules as ESI

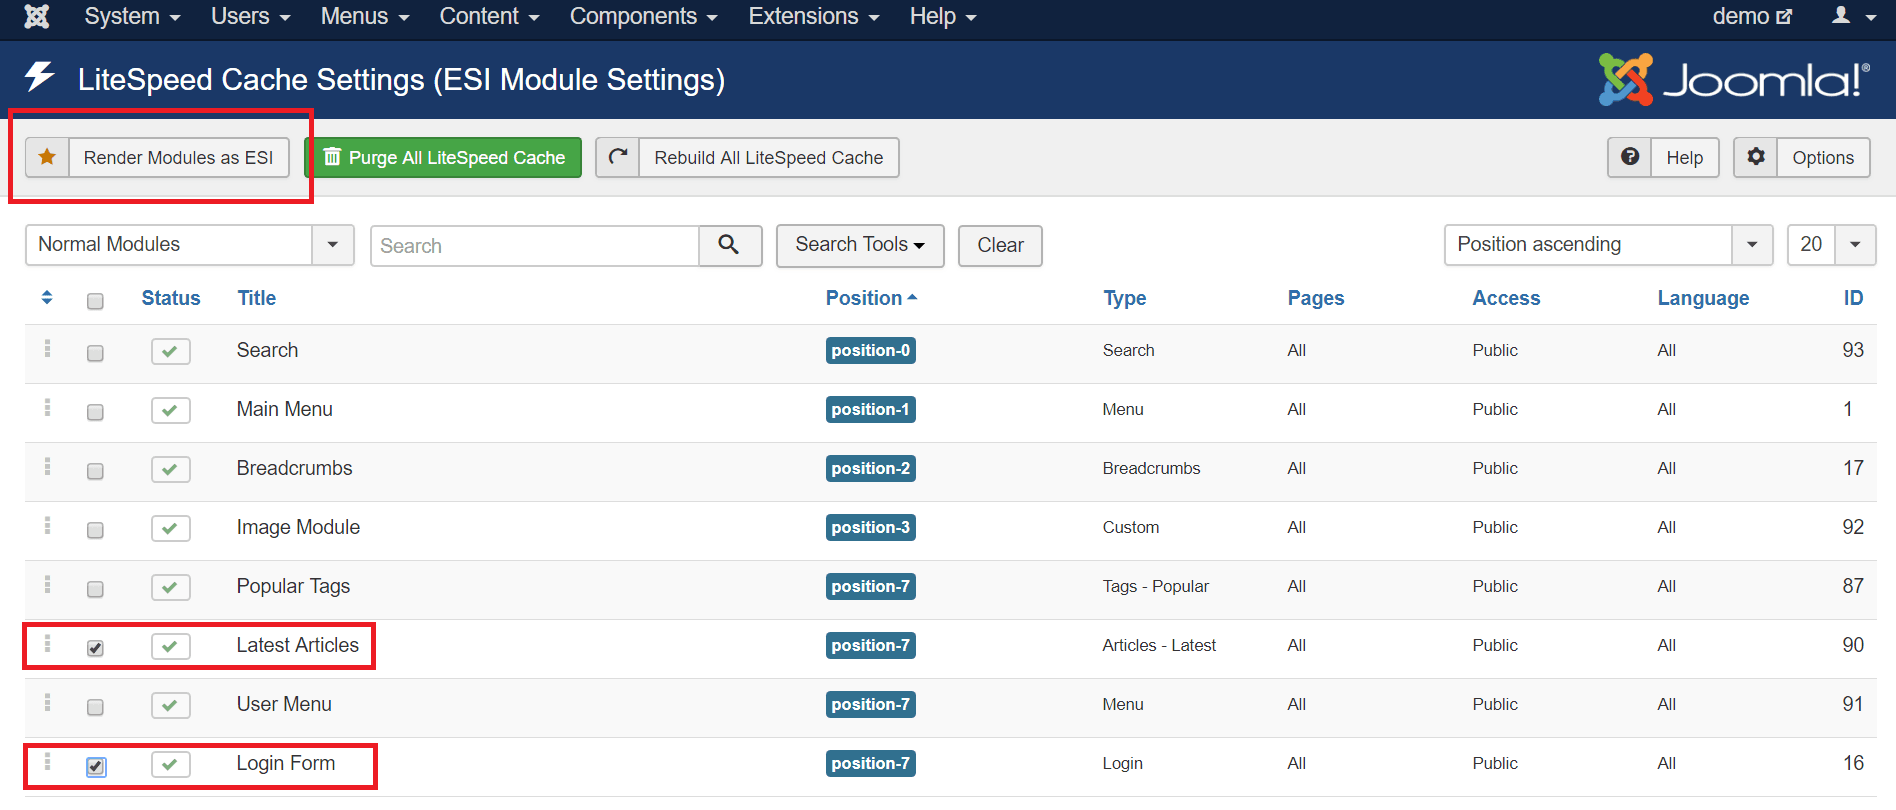
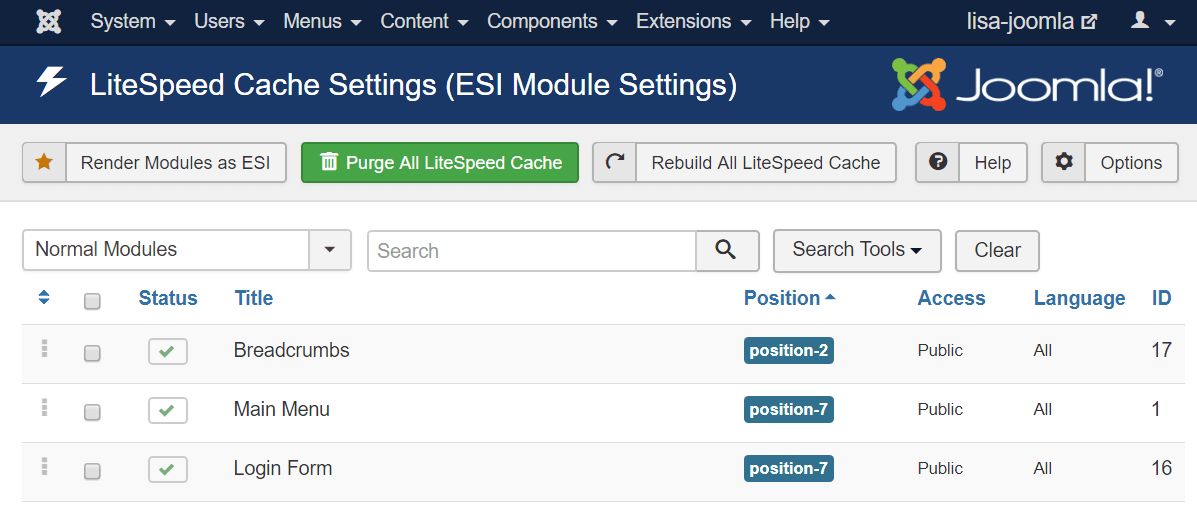
    Any module can be an ESI block if you want it to be. Modules are perfectly-suited to it. They are already self-contained bits of code. Navigate to Components > LiteSpeed Cache.

    Using ESI in Joomla: Module settings screen before

    Select the modules that you would like to render as ESI blocks. The following types of modules are good candidates for ESI:

    • Any module that displays personalized information
    • Any module that displays something different for logged in and logged out users
    • Modules whose content changes very frequently compared to the rest of the site

    In this example, we’ve chosen the Login Form and User Menu, but you can choose any modules that make sense for your particular installation.

    Press the Render Modules as ESI button.

    Using ESI in Joomla: Module settings screen after

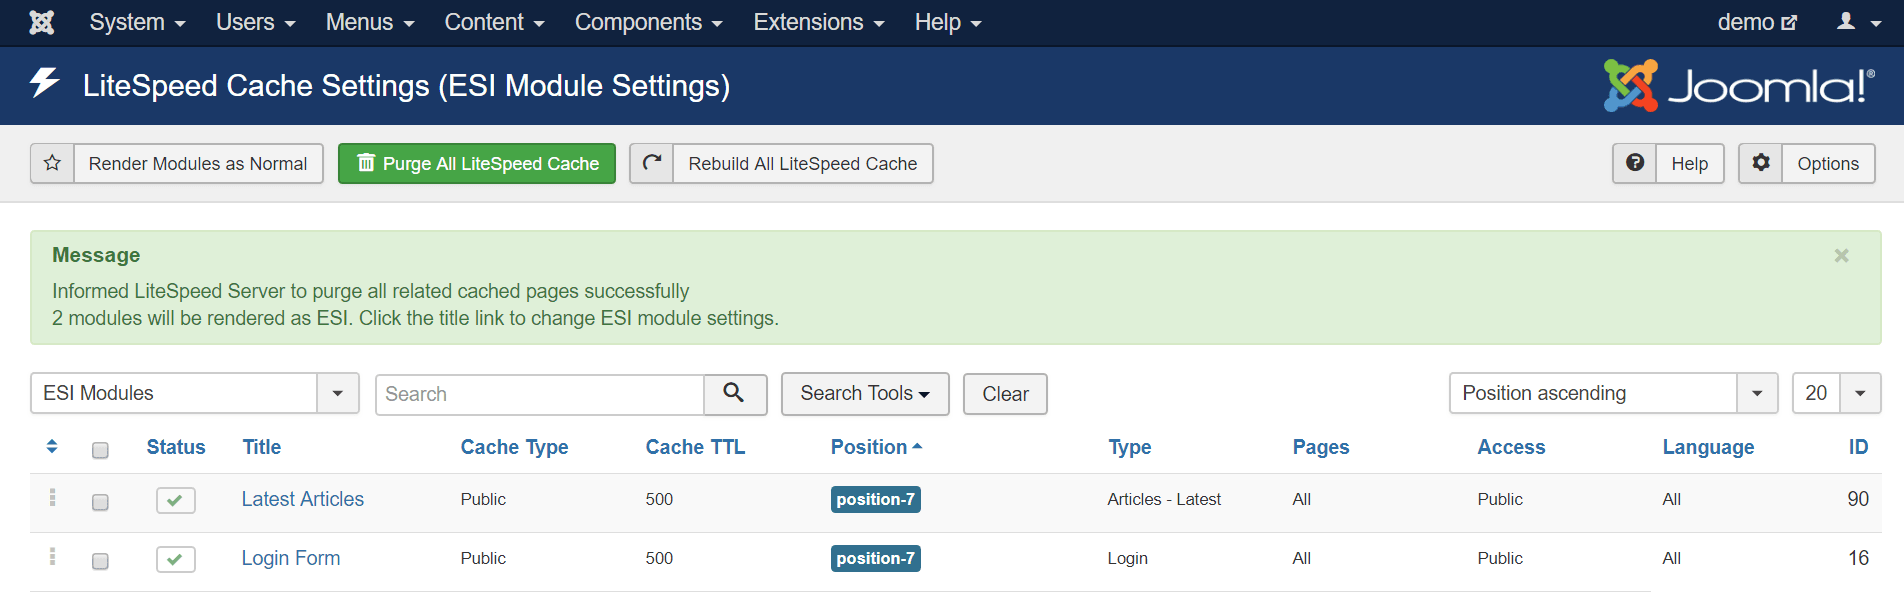
    The display will change to show only ESI Modules. At this point, you can click on a module name to configure the ESI settings for that module, like so:

    Using ESI in Joomla: ESI Module cache settings

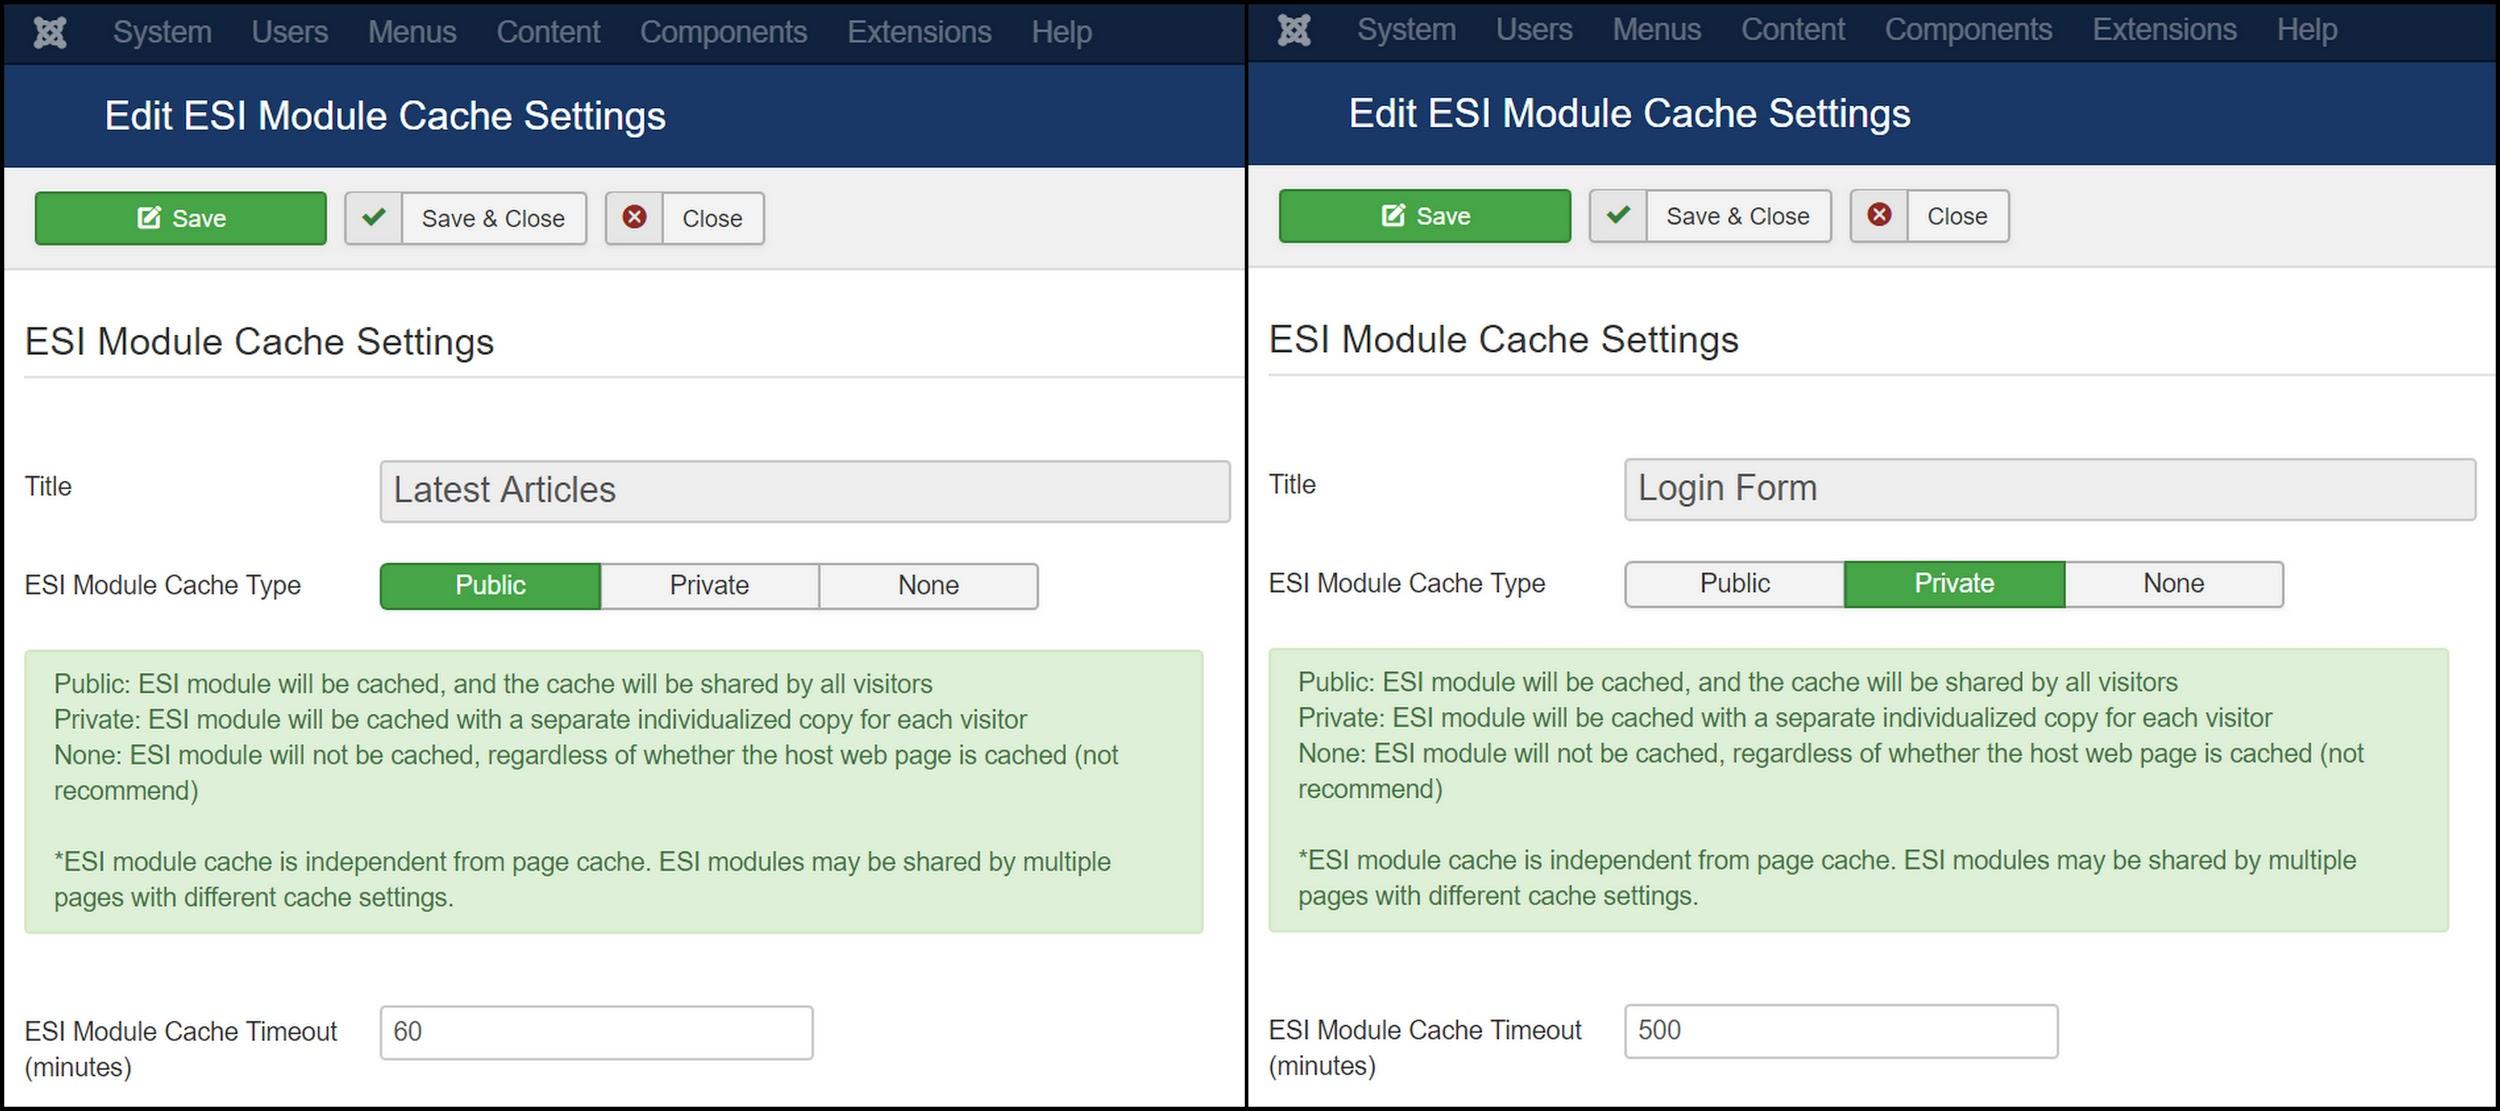
    The important fields here are ESI Module Cache Type and ESI Module Cache Timeout, and how you set them depends entirely on the function of the module.

    Let’s look at the two modules we are setting up. We’re using ESI with them for two completely different reasons, and so we will configure them differently. These are the same two modules from our previous examples.

    Using ESI for Frequently Changing Content

    We can use an ESI module to display frequently-changing content on pages that rarely change.

    The “Latest Articles” module always contains public content, so we can set the ESI Module Cache Type to Public. We want to use ESI for this module because we have an active site with new content being added every hour or so. We set ESI Module Cache Timeout to ‘60’ minutes, so that the module stays up to date with the more recently published articles.

    Now we are free to set the site’s Public Cache TTL to something more appropriate for a site with rarely-changing pages, like a week (or 10080 minutes).

    Using ESI for Private Content on a Public Page

    We can use an ESI module to punch a hole for private information on a public page.

    The “Login Form” module says one thing when the user is logged out, but contains personalized content when the user is logged in. For that reason, we should set the ESI Module Cache Type to Private. We can leave the other settings at their defaults.

    Then, when a user logs in, there is no need to serve them everything from private cache. We can serve all of the pages from public cache, and simply punch holes for the private content stored in the “Login Form” module.

    Conclusion

    So what do you think? Would you like to give ESI a try on your site?

    ESI allows you the flexibility to cache more of your site in a variety of complex situations. With pages that mix-and-match private/public cache or differing TTLs, you can serve cached content to a larger percentage of your users, and keep everything running quickly and smoothly.

    P.S. Want to know more technical details about ESI? Check out the official specs.

    Disclaimer: The information contained in this post is accurate for LSCJoomla v1.2.0 [release log]. If you are using a newer version of the plugin, some details may have changed. Please refer to our wiki for the latest!

    Have some of your own ideas for future Joomla Tips topics? Leave us a comment!

    While you’re waiting for the next installment, here are a few things you can do:

  • JT: Caching Logged-in Users in Joomla

    JT: Caching Logged-in Users in Joomla

    Joomla Tips: Caching Logged-in Users in Joomla

    Welcome to another installment of Joomla Tips!
    Today’s topic is: Caching for Logged-In Users in Joomla

    In our first issue of Joomla Tips, we introduced the LiteSpeed Cache for Joomla plugin, and explained how to easily configure the basic settings. These settings are perfectly sufficient for Joomla sites where there is no ecommerce, and the majority of visitors do not log in to the site.

    In such simple installations, a single cached copy of each page is sufficient, because all visitors will be seeing the same content anyway. But what about sites where there is a significant population of visitors with user accounts? Under the default configuration, logged-in users are not served from cache. This behavior is easy enough to change, and today we’ll show you how.

    Enabling Logged-in Caching

    In order for your logged-in users to also experience the same acceleration benefits as your logged-out visitors, you need to be able to serve them pages from the cache.

    Caching Logged-in Users in Joomla: Logged-in Users Configuration Screen

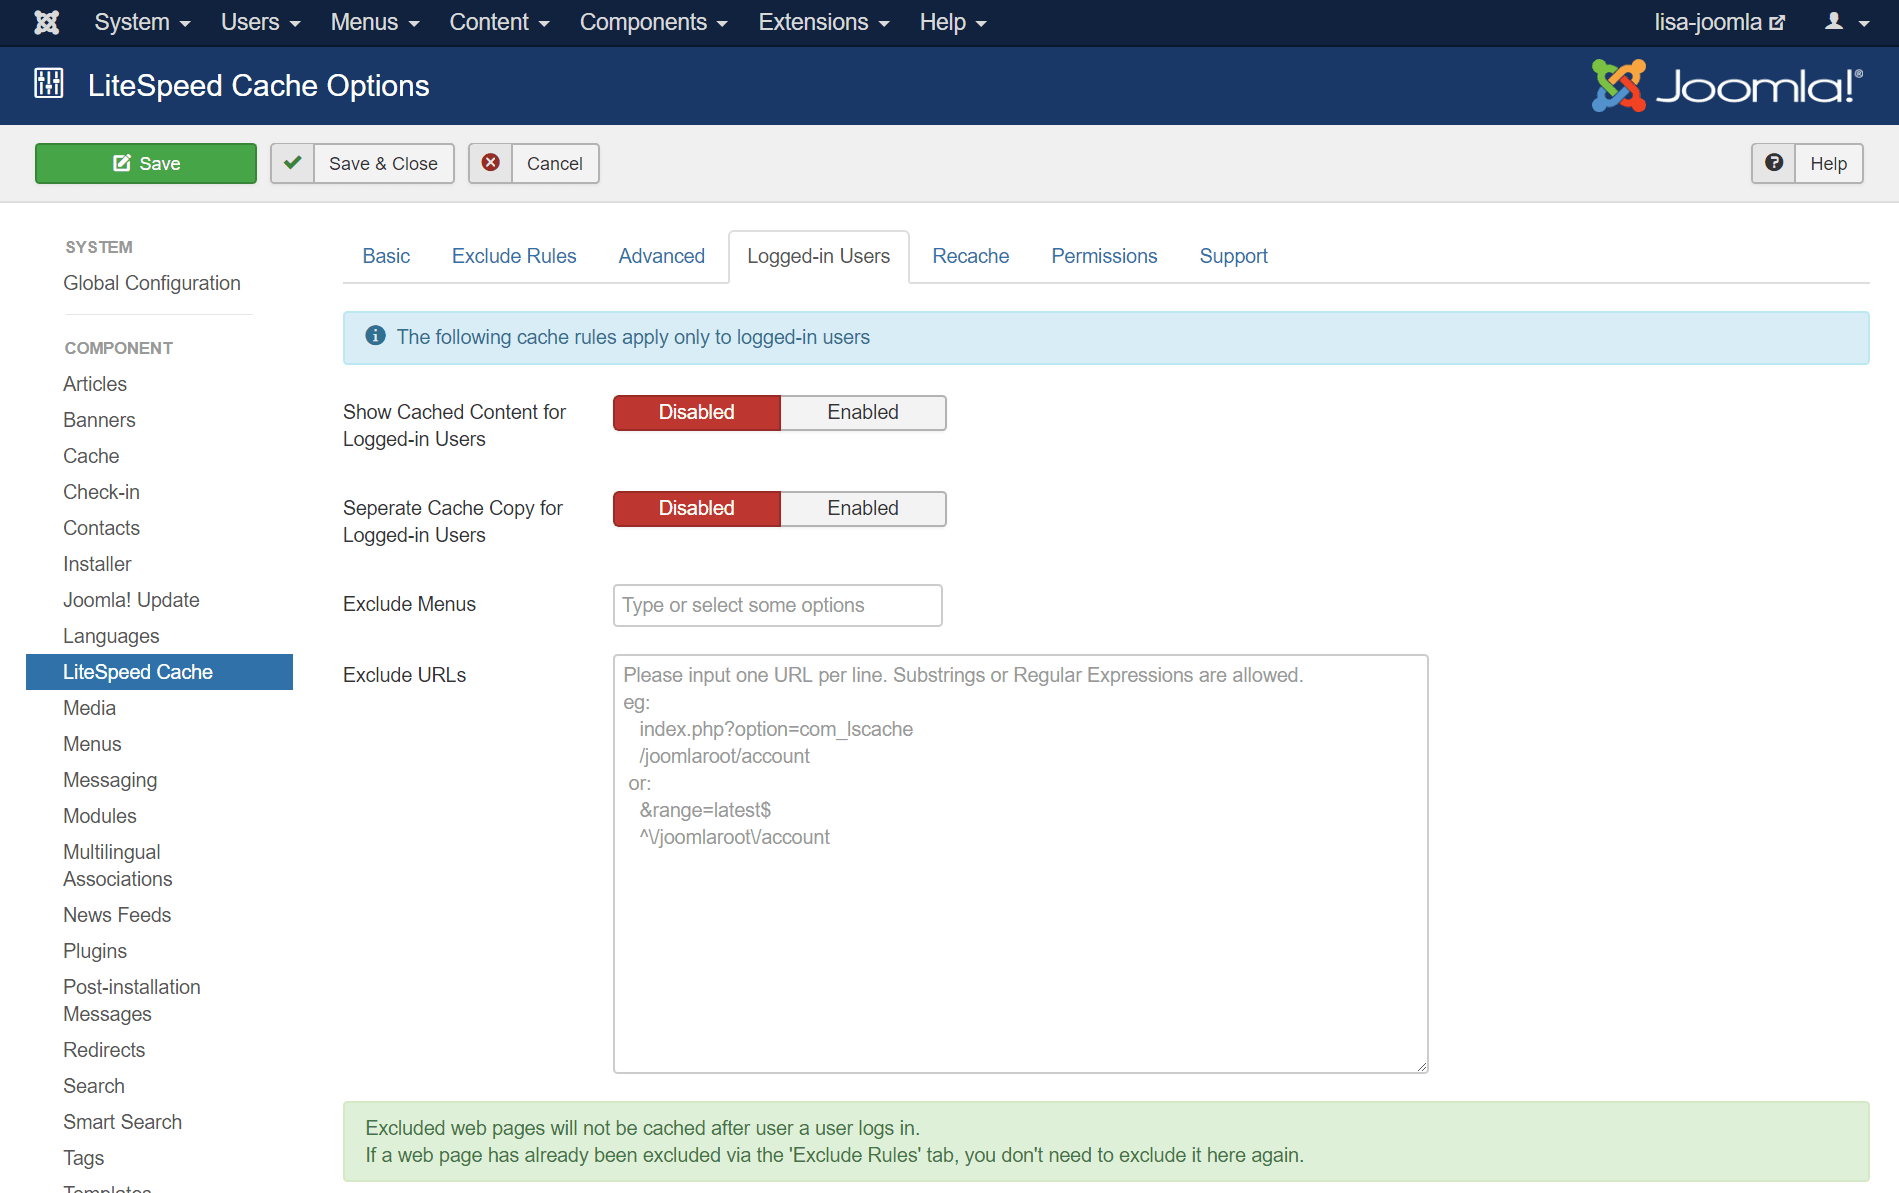
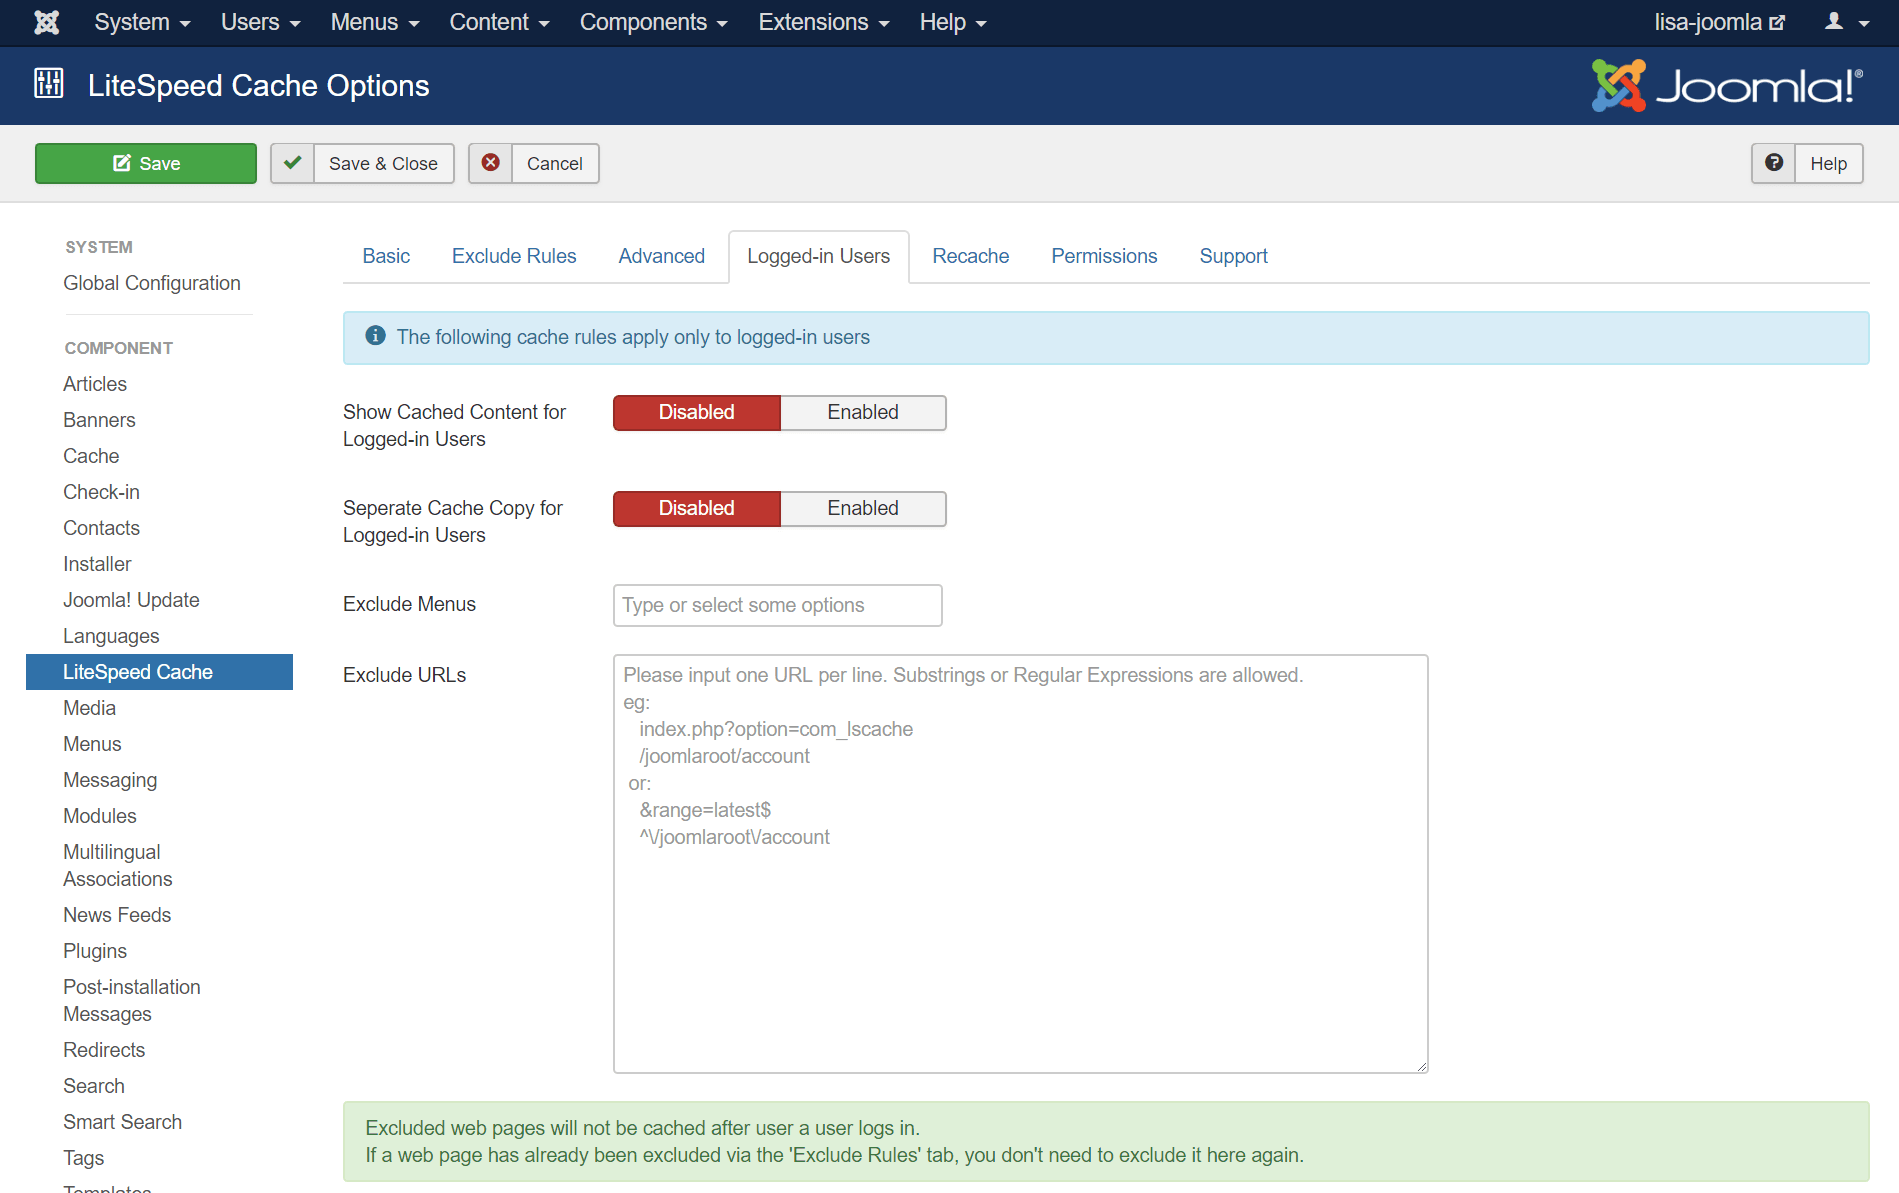
    Navigate to System > Global Configuration > LiteSpeed Cache and click the Logged-in Users tab. Set Show Cache Content for Logged-in Users to Enabled.

    If you save the settings here and purge the existing cache, you will indeed be serving all future logged-in visitors from cache. Just be aware that logged-in users will be getting the same publicly cached copies of pages as the non-logged-in users are getting. This may or may not be appropriate for your needs.

    If you need to cache individualized content for logged-in users, there are two ways of doing so:

    • Full pages served from private cache
    • ESI assembled pages where it’s mostly public, but holes are punched for private content

    Private Full Page Caching

    On the same configuration screen where you enabled cache for logged-in users, you can also enable private cache. Set Separate Cache Copy for Logged-in Users to Enabled, save the settings, and purge the cache.

    Once this setting is enabled, an individualized copy of any visited page is stored in private cache for each logged-in user that requests it. So, if there are 10 logged-in users, and 20 logged-out users looking at the home page, then there are 10 cached copies of the home page stored in private cache (an individualized copy for each logged-in user), and 1 copy of the home page stored in public cache for the logged-out users to share.

    Caching Logged-in Users in Joomla: Princeton Historical Society Please Come In

    How do you know whether to enable or disable this setting? Enable it when you have personalized content on a page, like a special blog post, or a shopping cart. You can safely leave this setting disabled if your logged in users don’t see any personalized content on the page, or if all personalized content appears within ESI modules.

    ESI

    With ESI (aka Edge Side Includes), you “punch holes” for private content in publicly cached pages. This makes sense if you have a site where nearly all of the content is public, but there is private content appearing within some of the modules. It’s also highly recommended for ecommerce sites.

    There is a lot we can say about ESI, so we’ll save it for its own post.

    Summary

    You can use the settings on the Logged-in Users configuration page to enable caching for logged-in users. For a site without personalized content, you can serve to them from public cache. And for a site where logged-in users see different content than those that are not logged in, you have the ability to serve to them from private cache.

    Next week we’ll talk about ESI, and how those settings can help you to be even more flexible, and allow you to accurately cache your entire site for all of your visitors!


    Disclaimer: The information contained in this post is accurate for LSCJoomla v1.2.0 [release log]. If you are using a newer version of the plugin, some details may have changed. Please refer to our wiki for the latest!

    Have some of your own ideas for future Joomla Tips topics? Leave us a comment!

    While you’re waiting for the next installment, here are a few things you can do:

  • WpW: Critical CSS and LiteSpeed Cache

    WpW: Critical CSS and LiteSpeed Cache

    WordPress Wednesday: Critical CSS and LiteSpeed Cache

    Welcome to another installment of WordPress Wednesday!
    Today’s topic is: Critical CSS and LiteSpeed Cache

    Chances are, if you’ve played around with LiteSpeed Cache for WordPress’ optimization features in the past, you may have encountered the dreaded FOUC, or “Flash of Unstyled Content.” This is caused when the browser loads a page’s content before it loads the styles defined for that content. The browser doesn’t know yet how the content should look, and momentarily displays the content without any formatting at all. This behavior is a side-effect of loading CSS and HTML asynchronously. It’s a common problem, but it has a solution, and that is what we’re going to explore today.

    Disclaimer: The information contained in this post is accurate for LSCWP v4.5.0.1 [release log]. If you are using a newer version of the plugin, some details may have changed. Please refer to our documentation for the latest!

    What is Critical CSS?

    Your web browser needs two things in order to properly display a page:

    • HTML, which includes the content, function and structure of the elements on the page
    • CSS, which determines how those elements look when they are displayed

    In an unoptimized site, all of the CSS that is linked to in the HTML header is loaded before the HTML body. This approach, however, can lead to a lot of waiting. And so site scoring services (like PageSpeed) recommend that you load CSS asynchronously. Essentially, what this does, is to load the content and the styling separately, without making one wait for the other before continuing.

    Critical CSS and LiteSpeed Cache: FOUC and Normal Display

    But this can cause a problem. When page content is loaded before the CSS that styles it, you get FOUC. Basically, you see the text and maybe the images, too, but instead of displaying in the format you expect, the site momentarily looks like something straight out of 1994.

    So, how can you load CSS asynchronously and avoid the unstyled content? Critical CSS.

    Stylesheets can be large and complex, which is why it takes so long to wait for them to load. However, only a fraction of the styles is necessary for displaying above-the-fold content. It’s that fraction which is called “Critical CSS.” We can quickly load the Critical CSS first, and then, when the rest of the CSS and HTML are loaded together asynchronously, the browser already knows how to display the content that is initially visible.

    LSCache has three settings that define how Critical CSS is handled in WordPress.

    How LSCache Handles Critical CSS

    From the WordPress Dashboard, navigate to LiteSpeed Cache > Page Optimization > CSS Settings. You’ll find the relevant settings about halfway down the page.

    LSCache Critical CSS

    Load CSS Asynchronously

    This option defaults to OFF. When it is OFF, web pages load the normal way, where the browser loads the CSS from the HTML header before continuing on to display the content in the HTML body.

    When you turn this option ON, CSS and HTML will be loaded at the same time. The page should load more quickly this way. In order to avoid the FOUC problem, the LSCache plugin automatically connects with QUIC.cloud to generate Critical CSS in the background via a cron job.

    The QUIC.cloud Connection

    Critical CSS is one of QUIC.cloud’s Online Services, and a certain number of CCSS calculations are provided for free to LSCache users every month. You can learn more about QUIC.cloud’s role in this process in our documentation, and you can learn more about possible costs on the QUIC.cloud website.

    CCSS Per URL

    This option defaults to OFF, which means that all Critical CSS files are generated by Post Type. In other words, there is one CCSS file for all posts, one for all pages, one for all products, and whatever kind of posts you may have on your blog.

    If you turn this option ON, then a Critical CSS file will be generated for every single post. This option generates many more files, so only use it if the styling for individual posts within a single type varies dramatically.

    Inline CSS Async Lib

    Use this setting to speed things up a bit and avoid render blocking by the CSS Asynchronous Library. It defaults to OFF.

    A Few More Details

    Critical CSS and LiteSpeed Cache: Computer on a Desk

    A Purge All command will not delete any generated Critical CSS.

    It’s not always necessary to Purge All anyway. It’s better to target your purges to what actually needs to go. Purge All doesn’t take Critical CSS, but it does take optimized CSS and Javascript along with it. Consider using Purge All – LSCache, if all you need is to clear the cache. That option leaves everything else, including CCSS, intact.

    If you intend to regenerate CCSS, then you can use the Purge All – Critical CSS button. Just be aware that regeneration will cost you QUIC.cloud credits.

    Please note, you may need to add QUIC.cloud’s Online Service IPs to your firewall’s allowlist.

    If you have any questions about this, please leave a comment, visit our forum, or drop by our Slack community.


    Have some of your own ideas for future WordPress Wednesday topics? Leave us a comment!

    Don’t forget to meet us back here next week for the next installment. In the meantime, here are a few other things you can do:


    This content was last verified and updated in March of 2022. If you find an inaccuracy, please let us know! In the meantime, see our documentation site for the most up-to-date information.

  • JT: The Beginner’s Guide to LSCache for Joomla

    JT: The Beginner’s Guide to LSCache for Joomla

    Joomla Tips: Beginner's Guide to LiteSpeed Cache for Joomla

    Welcome to the first installment of LiteSpeed’s Joomla Tips!
    Today we are sharing a Beginner’s Guide to LiteSpeed Cache for Joomla!

    If your Joomla site is powered by LiteSpeed Web Server, you have a very powerful new tool at your disposal: the LiteSpeed Cache plugin for Joomla. LSCache is a high-performance, open source, user friendly cache plugin, and you don’t have to be a site optimization expert to use it.

    How it Works

    Joomla sites consist of dynamic pages that are built with PHP. The pages of a Joomla site don’t exist anywhere in the file system; they are constructed on demand through PHP, and then served to the visitor as HTML. This can be a resource-heavy process, and the LiteSpeed Cache for Joomla plugin is one way of dealing with it.

    When Joomla dynamically generates the static HTML page, LSCache communicates with LiteSpeed Web Server to store a copy of it. Once the static copy exists in the cache, then that copy can be served to future visitors, eliminating the expensive Joomla PHP process for all but the first visitor to request the page.

    When your site is cached, it requires much less involvement from the Joomla backend, which translates into a faster site and a better experience for your site’s visitors.

    Enable the Plugin

    We’re going to assume you (or your hosting provider) have already installed the plugin and configured LSCache at the server or virtual host level. If you need instructions for that, you can see our wiki. Don’t forget to deactivate all other full-page cache plugins, including “System – Page Cache” and “JotCache,” as well.

    NOTE: You can still use other types of cache (like object cache), but only one page cache can be used at a time, so you’ll need to disable the others, if you want to use LSCache.

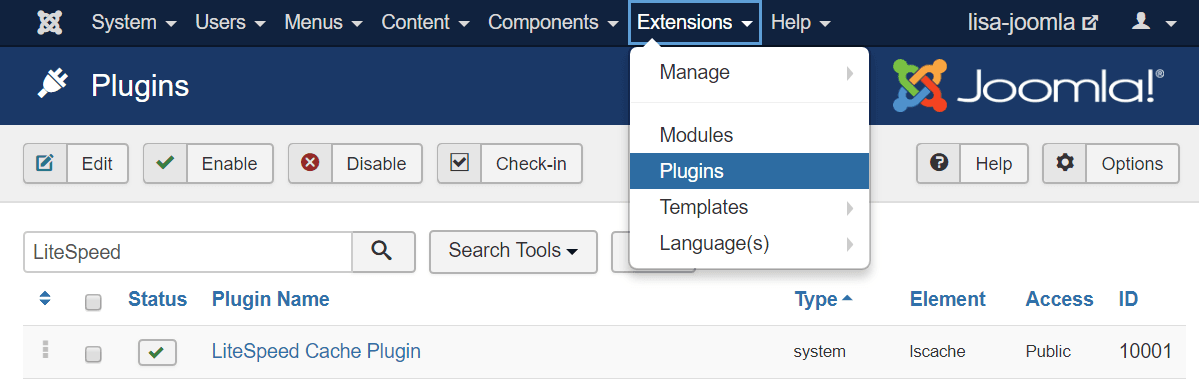
    From your Joomla Administrator menu, navigate to Extensions > Plugins. If you have a lot of plugins listed, type LiteSpeed into the search box to bring up the LiteSpeed Cache Plugin.

    Beginner's Guide to LiteSpeed Cache for Joomla: Enable the Plugin

    Look for the green check mark next to the plugin name. This indicates that the plugin is installed and enabled. If you see a red X instead, click the red X to enable the plugin. Once you’ve done that, the green check mark should appear, and you are good to go.

    Configure the Plugin

    Beginner's Guide to LiteSpeed Cache for Joomla: Cat in a Box

    LiteSpeed Cache works with most Joomla setups right out of the box. “Out of the box,” of course, is a figure of speech. Software rarely comes in a box anymore, which is great for the environment, but maybe not so great for your cat, who just loves cardboard boxes…

    The point, of course, is that LSCache for Joomla usually just works. It can often be enabled and ignored. There’s usually no need to play around with the settings, unless your site has atypical needs.

    Just the same, let’s go over some of those settings, so that you can use them if you want to.

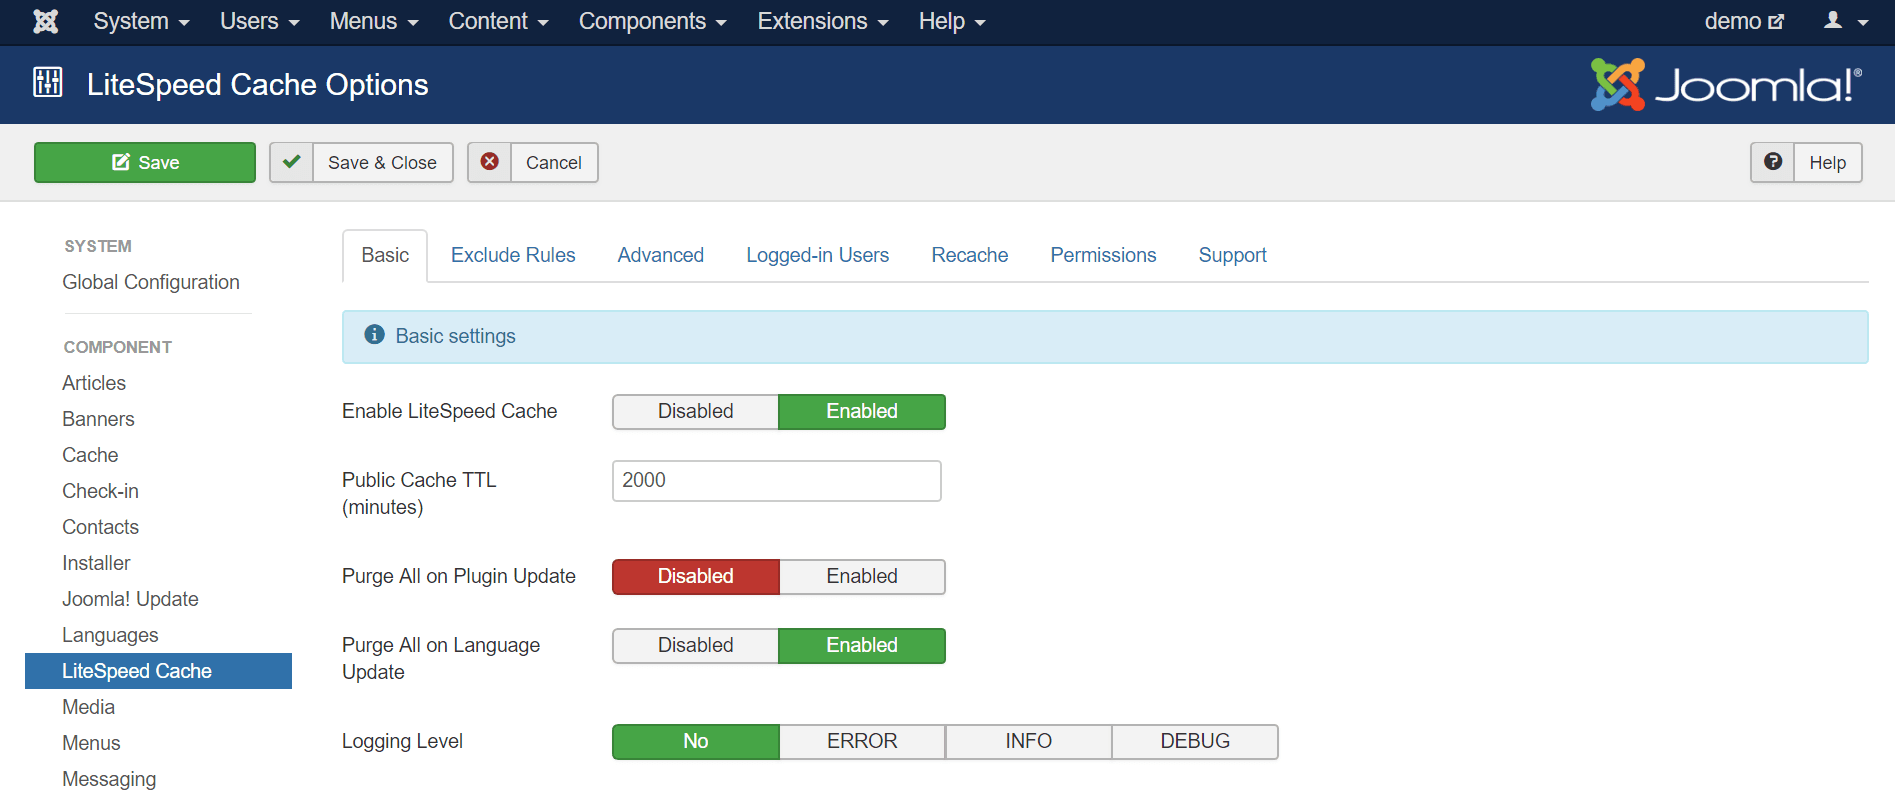
    Navigate to System > Global Configuration > LiteSpeed Cache to access the plugin’s settings. The first tab is for Basic settings.

    The Basic Tab

    Beginner's Guide to LiteSpeed Cache for Joomla: The Basic Tab

    Here is where you enable or disable the caching functionality of the plugin (not to be confused with enabling the plugin itself, which we did earlier), and set a few parameters for the way it should behave.

    Enable LiteSpeed Cache

    By default, caching is already enabled once you install and enable the plugin. If you need to stop caching your site for whatever reason, you can press Disable to turn it off. Simply press Enable to get it back up and running again.

    Public Cache TTL

    “TTL” stands for Time to Live, and it refers to the length of time a web page is valid within the cache. The default is 2000 minutes, but if you have a site that updates frequently, you might want to make that number smaller. Similarly, if you have a site that is fairly static and rarely changes, you can make that number much larger.

    Note: LSCache’s “smart purge” technology allows you to confidently set a high TTL, knowing that if content changes during that time, the cache will automatically be purged for any pages that are relevant to that change. We’ll explore that concept in more detail in a future Joomla Tips article.

    Purge All on Plugin Update

    If you are concerned that plugin updates are going to change some of the pages of your site (thereby causing the cached copies to become outdated), then you should enable this setting. It’s disabled by default, because usually plugin updates have minimal effect (if any) on the displayed content.

    Purge All on Language Update

    This is similar to the previous setting, except it refers to language updates, and it is enabled by default.

    Logging Level

    You can leave logging off in most cases. It’s handy to turn on logging when you are trying to diagnose a problem. If you’ve contacted our support team for help with an issue, chances are we’ll ask you to turn on logging and we’ll also tell you which level would be appropriate.

    Any time you turn on logging, it should be temporary, as logs can eat up disk space pretty quickly.

    All Other Tabs

    The other tabs may be ignored, unless you are feeling experimental, or you are using your Joomla installation for ecommerce. We’ll discuss them in detail in future issues of Joomla Tips. For now, here’s a short overview explaining the purpose of each tab.

    Exclude Rules

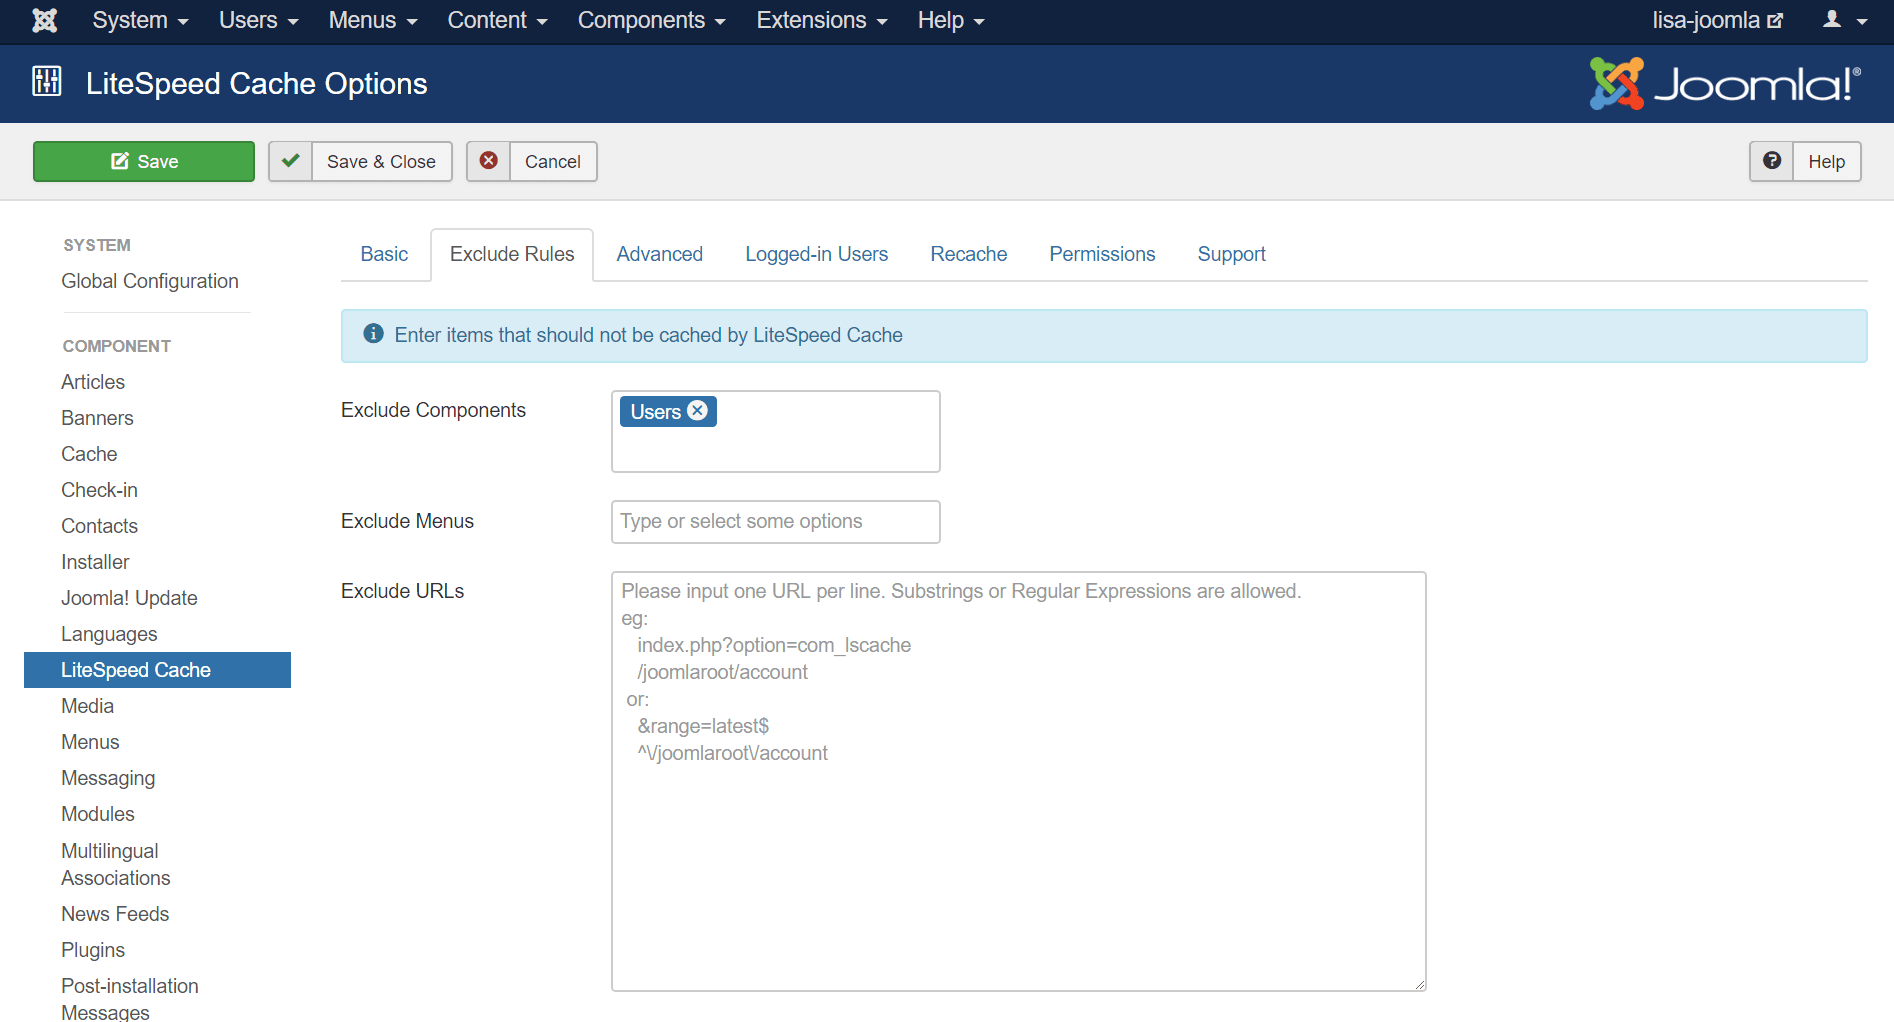
    Beginner's Guide to LiteSpeed Cache for Joomla: Exclude Rules

    This tab allows you to specify Joomla components, menus, and URLs that should not be cached.

    Advanced

    Beginner's Guide to LiteSpeed Cache for Joomla: Advanced Tab

    You can set up ESI here (a must if you are trying to cache an ecommerce site), give yourself the ability to clear the cache from a secure link outside of Admin, set a different TTL for the homepage, and set up LSCache to save separate views for mobile and desktop.

    Logged-in Users

    Beginner's Guide to LiteSpeed Cache for Joomla: Logged in Users Tab

    These settings pertain to caching for users who are logged in. By default caching for logged-in users is disabled.

    Recache

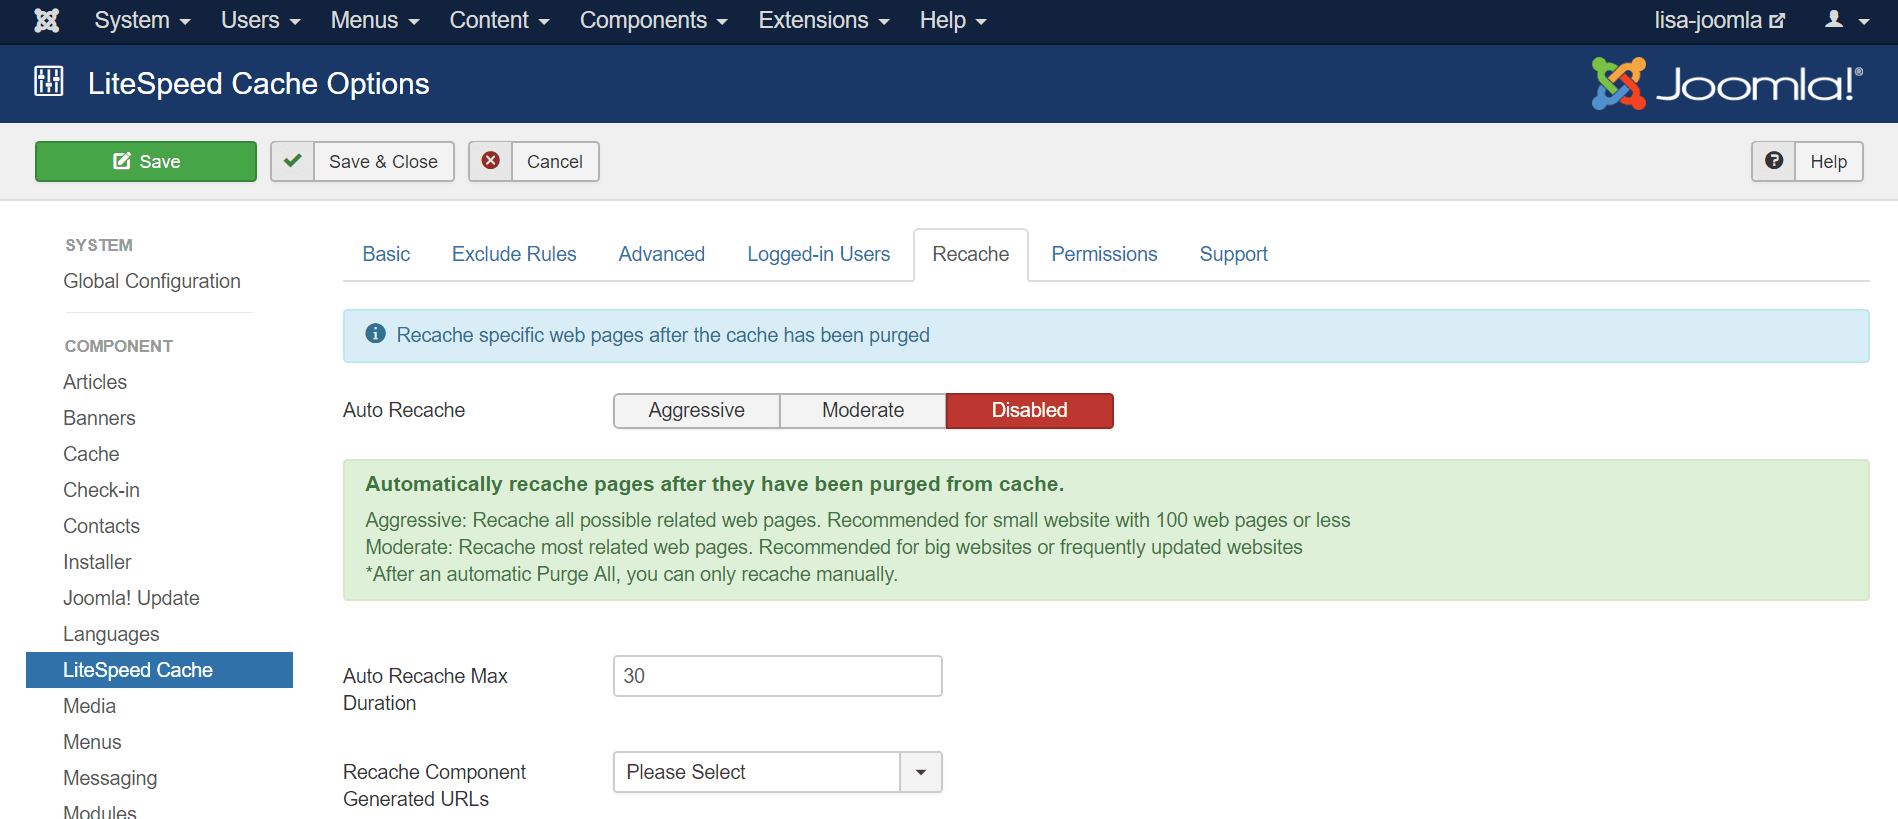
    Beginner's Guide to LiteSpeed Cache for Joomla: Recache Tab

    Usually, when a page is purged from the cache, it remains uncached until a visitor comes along and requests the page. With Auto Recache enabled, LiteSpeed will automatically re-cache those purged pages, which means that your site’s visitors will have a lower chance of ever encountering uncached content.

    Permissions

    This is your standard Joomla permissions page, and every setting defaults to Inherited.

    Support

    You can refer to this page if you need support. It includes some handy links.

    Manual Purge

    In a perfect world, you could enable caching and never look at the plugin again. In the real world, though, things happen, and you might need to manually purge the cache now and then. Here’s how:

    Beginner's Guide to LiteSpeed Cache for Joomla: Manual Purge

    Navigate to Components > LiteSpeed Cache, and press the green Purge All LiteSpeed Cache button. All of the entries currently stored in the cache will be cleared.

    If you want to re-populate the cache after that, you can do so via the Rebuild All LiteSpeed Cache button.

    And that is all you need to know to use LSCache for Joomla successfully as a beginner! There may come a time when you would like to explore ESI, or Logged-in cache (both very powerful features, especially for ecommerce). We’ll be talking all about those options in a future Joomla Tips, so stay tuned!

    Disclaimer: The information contained in this post is accurate for LSCJoomla v1.2.0. If you are using a newer version of the plugin, some details may have changed. Please refer to our wiki for the latest!

    Have some of your own ideas for future Joomla Tips topics? Leave us a comment!

    While you’re waiting for the next installment, here are a few things you can do:

  • Joomla Benchmarks: LiteSpeed vs. Apache

    Joomla Benchmarks: LiteSpeed vs. Apache

    The LSCache for Joomla Module is one of our newest cache plugins. We recently teamed-up with Svend Gundestrup to generate a series of new benchmarks using one of his Joomla sites in Denmark. Svend takes a scientific approach to benchmarking, which we’ll discuss in detail after we show you the test results.

    We should mention that Svend performed all tests on his own, without any compensation from LiteSpeed, and using equipment he purchased himself.

    Benchmarks

    Return Load Tests were run using four different methods:

    • AB from within the test server
    • AB from an external server in the same region
    • Pingdom
    • GTMetrix

    Additionally, one set of Initial Load Tests was performed:

    • Pingdom

    Each type of test was run 20 times per server, making a total of 100 benchmarks for each server+cache setup. We’ll share the details in the Specifics of Testing section below.

    The goal was to compare performance between the following servers and cache solutions on a highly optimized Joomla website in a production environment, with a valid SSL certificate. We tested the following two servers+cache solutions:

    • Apache event MPM + php-FPM + Memcached + JotCache (memcached)
    • LiteSpeed Web Server + LSCache for Joomla

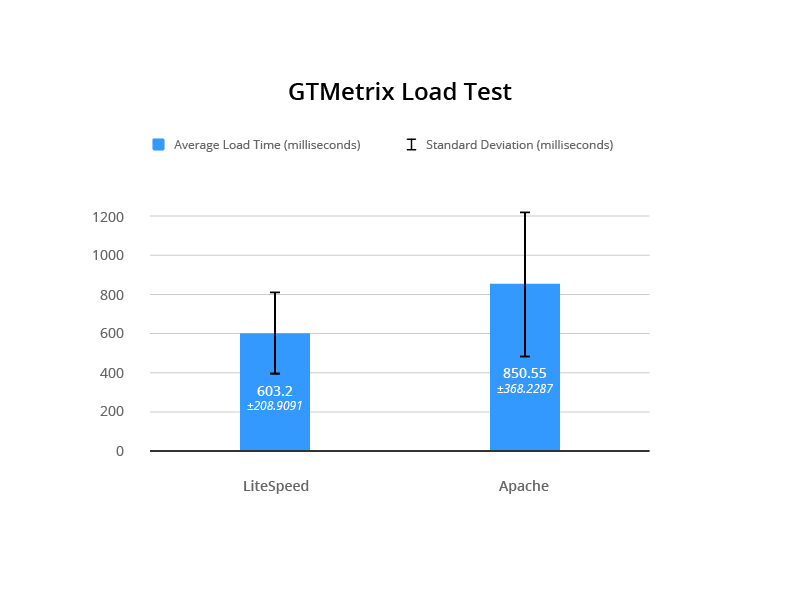
    Each results graph shows the average speed in milliseconds. Additionally, Svend has included some figures that help to evaluate the results from a statistical perspective: standard deviation (SD), F-test, and T-test. We’ll talk more about what those numbers mean in the Definitions section below.

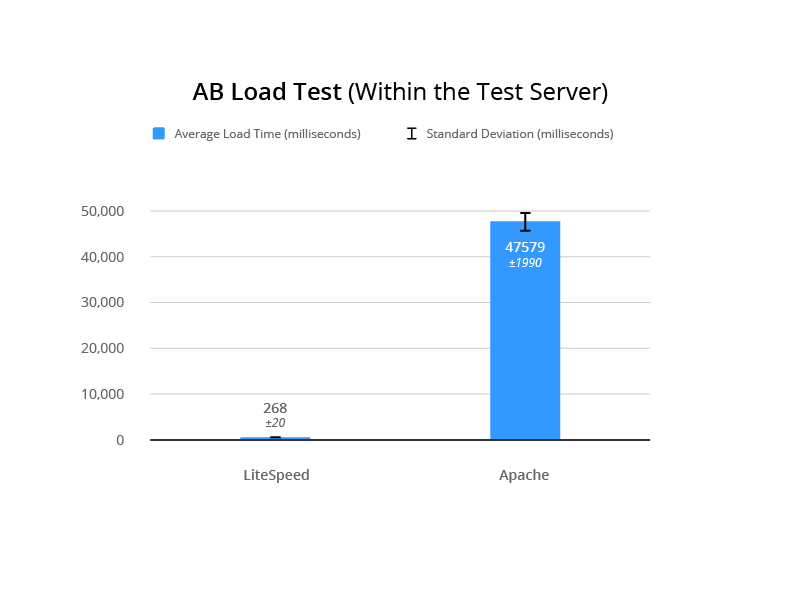
    AB Test #1 (within the test server)

    This AB load test was performed on the test server itself. The following command was used:

    ab -k -n 1000 -c 100 -H "Accept-Encoding: gzip,deflate" -l https://www.lite.lungekursus.dk/
    

    LSCache for Joomla Benchmarks: Internal AB Load Test
    F-Test 0

    T-Test 6.12E-49

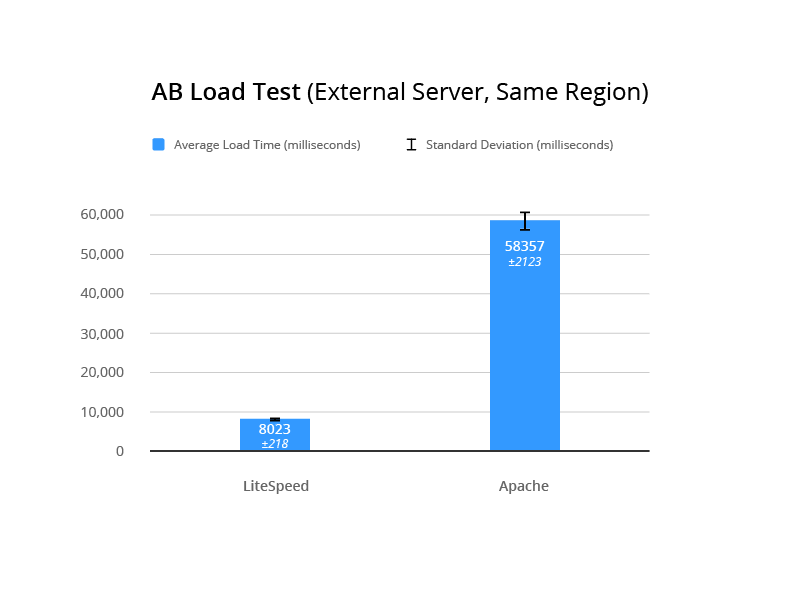
    AB Test #2 (external server, same region)

    This AB load test was performed from a server external to the test server. The following command was used:

    ab -k -n 1000 -c 100 -H "Accept-Encoding: gzip,deflate" -l https://www.lite.lungekursus.dk/
    

    LSCache for Joomla Benchmarks: External AB Load Test

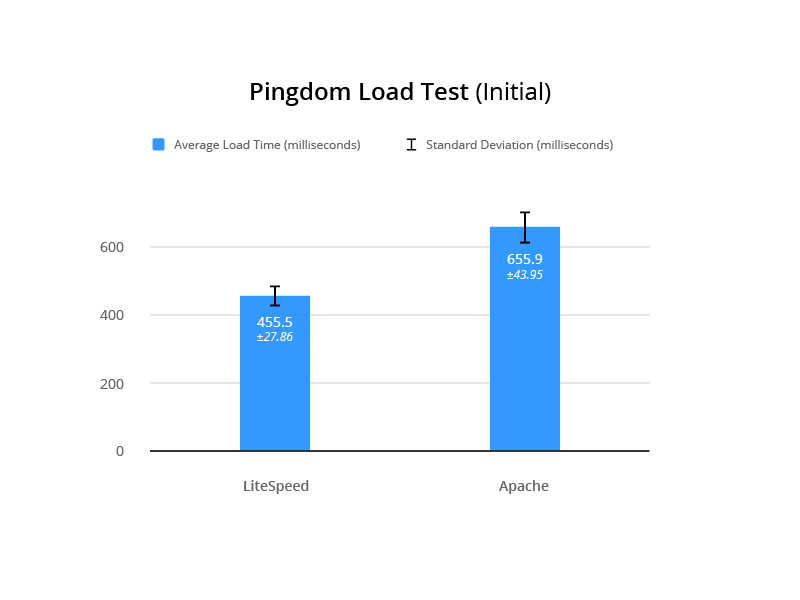
    Pingdom Speed Test

    This test was run from Sweden to the test server in Amsterdam.

    For the Initial Load Testing, the following command was run:

    sudo /etc/init.d/php7.2-fpm restart && sudo /etc/init.d/apache2 restart
    

    For each iteration, Svend cleared the cache, restarted the server from the command line, and then verified that the cache was missed to prove that caching would have no effect on the results.
    LSCache for Joomla Benchmarks: Pingdom Initial Load Test
    F-Test 0.05369249473

    T-Test 7.63E-20

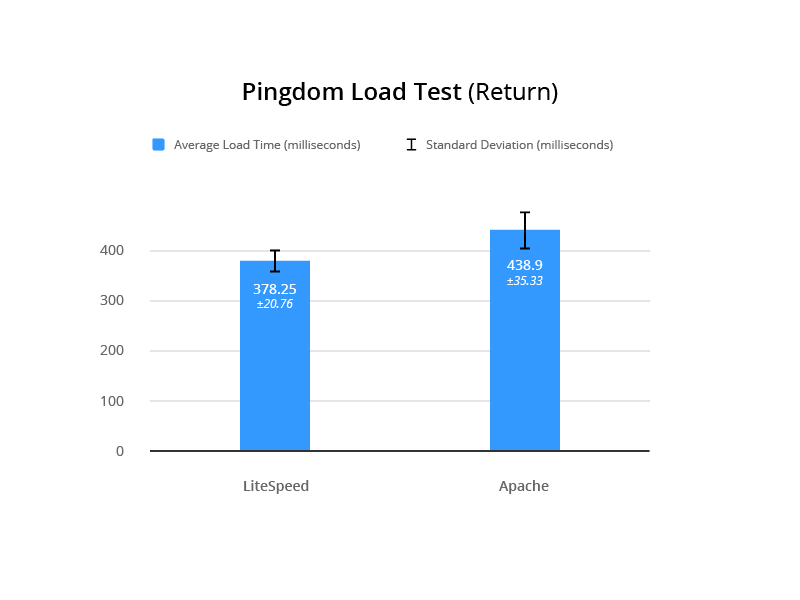
    For the Return Load Testing, the server was restarted once, all caching was cleared, and Svend loaded the website to verify a cache hit. The server was not reset in between tests.
    LSCache for Joomla Benchmarks: Pingdom Return Load Test
    F-Test 0.02524102277

    T-Test 4.05E-08

    GTmetrix

    Measuring time to fully load in the UK from the test server in Amsterdam.
    LSCache for Joomla Benchmarks: GTMetrix Load Test
    F-Test 0.01739569946

    T-Test 6.40E-03

    Test Environment

    Common To Both

    Digital Ocean server: 4GB, 80SSD, 2vCPU, based in Amsterdam, with a target audience in Denmark

    Config Server Firewall, IDS, Tripwire, MySQL, Fail2Ban

    Joomla 3.8.7, JCH Optimizer Pro, Joomla Admin (with security enabled), JA Builder template

    Apache

    Apache 2.4 with event MPM running

    PHP FPM 7.2.4.1

    Memcached

    JotCache (Memcached)

    LiteSpeed

    LiteSpeed Web Server 5.2.7

    LSCache for Joomla 1.1.1

    PHP 7.2.2-2+Xenial

    Specifics of Testing

    Each test was run as follows:

    1. service lsws stop
    2. ps -ef | grep httpd (to make sure LSWS is not running)
    3. service apache2 start
    4. ps -ef | grep apache2 (to make sure Apache is running)
    5. Enable JotCache (all plugins and dependencies)
    6. Run 20 iterations of each test
    7. service apache2 stop
    8. service lsws start
    9. Disable JotCache (and associated plugins)
    10. Enable LiteSpeed Cache
    11. Look for x-litespeed-cache: hit/miss response header to ensure LSCache is working.
    12. Run 20 iterations of each test

    Note: the .htaccess files remained unchanged during the testing

    Definitions

    Return Load Test: Load testing where the first load is discarded. This type of testing makes sense for evaluating a page cache, as the cache is not primed until the first page load triggers it.

    Initial Load Test: Load testing where the server is restarted after each test. The purpose is to test the initial first page load of the server without influence from memcached or lscache. It’s essentially the opposite of Return Load Testing, and measures the performance of the server and PHP.

    Standard Deviation: Abbreviated in our charts as SD, standard deviation measures the variation among individual test results from the mean result. A smaller standard deviation is preferable because it indicates some consistency in the test results. A higher SD indicates that the server speed is unstable. (Wikipedia)

    F-Test: Compares two sets of results and returns a number (p-value). If the p-value is high, there is not a significant difference between the two sets of results. So, for our testing, we want to see a low p-value, indicating that there is indeed a significant difference between the performance of the two servers. (Wikipedia | Google Sheets)

    T-Test: Determines if two sets of results are significantly different from each other. There are different types of T Tests, and which one you use is determined by the p-value returned by the f-test. We are looking for a low t-test value to indicate a strong probability that LiteSpeed is faster than Apache. (Wikipedia | Google Sheets)

    Why Standard Deviation?

    Svend performed all of these tests and made all of the calculations. He feels it is important to take a proper, statistically-sound approach to benchmarking. This approach involves comparing speed, loading, and repeated loading on a real website and a real server that handles IDS, security, and so on in an actual production environment.

    For each server tested, Svend calculated the standard deviation of the results. The SD indicates the stability of the test results. If you have a low SD, you are essentially saying “this server performs consistently in these tests.” A high SD means that the results for that server are erratic and inconsistent. In these tests, the SD calculated for LiteSpeed results was always much lower than that calculated for Apache results, leading to the conclusion that LiteSpeed Web Server is the more consistently performing server.

    Why F Tests and T Tests?

    Being more consistent doesn’t necessarily make it a better performer, however. And so Svend ran f-tests on most of the datasets above. The f-tests generated a p-value, which could be used to determine whether there was truly a significant difference between the two servers’ benchmark results. In every case, the p-value indicated that the test results of the two servers were significantly different from each other.

    Now that he knew that there was definitely a difference, he needed to calculate the probability that one server would outperform the other. He ran t-tests on the dataset. The tests returned low values in all cases, which indicated a strong possibility that LiteSpeed is faster than Apache.

    Why Follow This Process?

    You might be wondering if all of this is necessary. After all, you can simply look at the data and see that LiteSpeed’s numbers are always better than Apache’s. While that might be true, the statistical approach gives you a way to scientifically quantify the significance of the differences between the two servers.

    According to Svend, “I am tired of seeing ‘we did these 5 tests, on a completely blank system, that was not optimized for the system or the website prior to testing.’ It’s like testing a placebo to treat pneumonia. No wonder the antibiotics are working. It’s about testing and comparing, to find if the new antibiotic is better than the old (standard treatment). You need to do a lot more than 5 tests, both to be sure the results are correct, but also to see how much the test results differ over time.”

    These tests definitively show:

    • LiteSpeed is faster than Apache.
    • Speed varies much less with LiteSpeed than with Apache, meaning it is consistently faster.
    • Even in the initial load speed (where cache is not a factor) LiteSpeed outperforms Apache.

    Care to have a look at the original test results? Check out the Google Sheet.

    About Svend

    Svend Gundestrup is an MD in his last year to become a specialist in Pulmonology. He runs a specialized website for education within the pulmonology field in Denmark, catering to Danish pulmonologists and registered nurses. In addition to his medical duties, Svend runs a consultant firm that specializes in IT, IT security and IT development, and also EPIC healthcare in Danish Hospitals. His website audience requires speed, stability, and interoperability between desktop, laptop, tablet, and mobile phone.

    Svend is married with two kids, and has been playing with and building computers since the days of the 386 with coprocessor. Fluent in linux, OSX, and Windows, Svend has been creating websites as co-projects for many years, working with mambo and later Joomla.

    This blog post was a team effort. Thanks to Svend for executing the tests, providing an explanation of his process, and helping me proofread. And thanks to Mark Zou for the helpful graphics illustrating each test.
    –Lisa

    Want to try LSCache for Joomla for yourself? Download the module.

  • WpW: LiteSpeed Cache and the GDPR

    WpW: LiteSpeed Cache and the GDPR

    WordPress Wednesday: LiteSpeed Cache and the GDPR

    Welcome to another installment of WordPress Wednesday!
    Today’s topic is: LiteSpeed Cache for WordPress and the GDPR

    We discussed this in general terms a few days ago, but today we’re going to talk specifically about the WordPress plugin, and give you a few more details.

    As site owners, no doubt you are aware of the EU’s new GDPR. And if you are not, you should probably read this. And soon, because it becomes enforceable in 2 days.

    The GDPR applies to companies that collect data, and companies that process data. In the context of our cache plugins, YOU would be the data collector for your site, and LiteSpeed would be one of your data processors.

    LiteSpeed Technologies values your users’ privacy, and we want you to know that the use of our plugin should not have any effect on your ability to comply with the GDPR.

    Our software does not directly process any personally identifiable information from visitors to your site. However, LiteSpeed Cache for WordPress does brush up against personal data in a few ways, and we’re going to talk about those today.

    LiteSpeed Cache for WordPress and the GDPR: Private area sign on a fence

    Caching

    Each of our cache plugins potentially stores a duplicate copy of every web page on display on your site. The pages are stored locally on the system where LiteSpeed server software is installed and are not transferred to or accessed by LiteSpeed employees in any way, except as necessary in providing routine technical support if you request it. All cache files are temporary, and may easily be purged before their natural expiration, if necessary, via a Purge All command.

    In other words, LSCache software has access to whatever personally-identifiable data is already visible on your site, but it has no need to actually look at that data. LiteSpeed stores a copy on your server for fast access, and you may delete that copy whenever you like.

    Image Optimization and Reports

    In addition to caching, our WordPress plugin has an Image Optimization feature. When optimization is requested, images are transmitted to a remote LiteSpeed server, processed, and then transmitted back for use on your site. LiteSpeed keeps copies of optimized images for 7 days (in case of network stability issues) and then permanently deletes them.

    Similarly, LSCWP has a Reporting feature whereby a site owner can transmit an environment report to our server so that we may better provide technical support. We don’t currently have a deletion schedule for this data, but we probably will in the future. In the meantime, we’d be happy to remove your report data upon request.

    It’s important to realize that neither of these features actually collects any visitor data. Only information about your own site and server setup is included. I mention them here because we’ve had questions about them before. But really, image optimization and reporting shouldn’t have any impact on your ability to comply with the GDPR.


    LiteSpeed Cache for WordPress and the GDPR: Sign about owl sleeping habits on a fence

    Your Privacy Policy

    WordPress has a new Privacy menu in the Admin area that allows you to easily generate a Privacy Policy for your site. If you choose to use that tool, you will see that some plugins include their own paragraphs that you may insert into your policy. LiteSpeed provides the following small blurb that you may use, if you like:

    This site utilizes caching in order to facilitate a faster response time and better user experience. Caching potentially stores a duplicate copy of every web page that is on display on this site. All cache files are temporary, and are never accessed by any third party, except as necessary to obtain technical support from the cache plugin vendor. Cache files expire on a schedule set by the site administrator, but may easily be purged by the admin before their natural expiration, if necessary.


    NOTE: The LiteSpeed privacy blurb will be available in the Privacy Policy tool starting with LSCWP v2.2.6. The update should be available later this week. Until then, you can add the above text manually, if you wish.

    Keep up to Date!

    You can find our full GDPR Statement and Privacy Policy on our site. That document will always be the most up-to-date source for privacy information. Be sure to refer to it for the official word.

    If you have further privacy questions or concerns, please leave a comment, or contact us!

    Have some of your own ideas for future WordPress Wednesday topics? Leave us a comment!

    Don’t forget to meet us back here next week for the next installment. In the meantime, here are a few other things you can do: