Category: LSCache

Learn more about LiteSpeed Cache plugin for WordPress, PrestaShop, XenForo, Drupal, Joomla, MediaWiki, WooCommerce, and more. Sites powered by LiteSpeed Web Server with LSCache may accelerate their web apps with extensions or rewrite rules.

In this category you will find tutorials, case studies, and useful information related to this popular cache solution.

  • WpW: Happy Anniversary!

    WpW: Happy Anniversary!

    WordPress Wednesday: Anniversary

    I’ve had a lot of writing on my schedule recently, and I’m afraid that I was unable to finish today’s WordPress Wednesday topic on time. I didn’t want to let this week go by, though, without acknowledging our anniversary!

    Yep, it’s been one year since we started sharing tips and tricks related to our WordPress plugin. That’s roughly fifty tutorials and informational posts! Whew. Thanks for coming along with us on this ride. We always appreciate your feedback, comments, and questions, so keep them coming.

    I’ll be back next week with some new content, but in the meantime, how about I share a few previous posts that are particular favorites of mine?

    • The Beginner’s Guide to LiteSpeed Cache for WordPress: New to the plugin and not sure where to start? If you’re the type that finds eight tabs worth of settings a bit overwhelming, you’ll appreciate this primer. Spoiler alert: it’s entirely possible to use LSCache without knowing what any of those settings even do!
    • Caching 101 and LiteSpeed Caching 101: If you’ve ever wondered how WordPress caching works, and how LiteSpeed Caching in particular works, then you’ll like these informational posts.
    • Choosing Between Public Cache, Private Cache, and ESI: I like this one a lot, and not just because I got to use my pretty papers and hole punches to illustrate it 🙂 No, the beauty of this post is that it differentiates between some concepts that people often find confusing.

    I link to those four articles a lot when I’m providing customer support, so maybe some of you who haven’t seen them yet will also find them helpful!

    I’ll be back next week with a brand new topic.

    Happy Caching!

    Have some of your own ideas for future WordPress Wednesday topics? Leave us a comment!

    Don’t forget to meet us back here next week for the next installment. In the meantime, here are a few other things you can do:

  • WpW: Dropping Query Strings in LSCache

    WpW: Dropping Query Strings in LSCache

    WordPress Wednesday: Query Strings You Can Ignore

    Welcome to another installment of WordPress Wednesday!
    Today’s topic is: Query Strings You Can Ignore

    As you may know, LSCache is a server-level cache, meaning the basic cache functions are actually carried out by LiteSpeed Web Server. Sometimes certain cache settings are configured at the server level. This allows the settings to apply to all of the server’s web apps that use LSCache.

    I mention this because even though this discussion is taking place in the context of WordPress, it applies to everywhere you use LSCache on your server! So, even if you are not a WordPress user, if you have LSCache installed in any of your other web apps (like PrestaShop and MediaWiki, to name a few) these instructions can still apply to you.

    Query Strings You Can Ignore: bowl full of coffee beans

    Query Strings and Caching

    As far as LiteSpeed Cache is concerned, these two URLs are different, and are cached separately:

    http://www.example.com/coffee.html?grind=wholebean&roast=light
    http://www.example.com/coffee.html?grind=drip&roast=dark
    

    Technically, both refer to the same coffee page, but the output is different depending on the values of the query strings. One URL displays a whole bean light roast, and the other displays a drip grind dark roast. To coffee shoppers, these are very different items.

    In this case (indeed, in most cases), saving separate copies is exactly what you want LSCache to do. Query strings are usually important to the content of the page, and so they are also important to caching that content.

    Ignorable Query Strings

    But not all query strings are relevant when it comes to generating dynamic content. For instance, the “utm” queries that are popular in Google Analytics:

    http://www.example.com/coffee.html?utm_source=google&utm_medium=email&utm_campaign=buymorebeans
    http://www.example.com/coffee.html?utm_source=google&utm_medium=banner&utm_campaign=coffeeiscool
    http://www.example.com/coffee.html?utm_source=twitter&utm_medium=tweet&utm_campaign=tweetabrew
    

    Just like in the previous example, these three URLs refer to the same page. But unlike before, the query strings do not influence the content that is displayed to the user. Their only function is to facilitate tracking for a variety of ad campaigns.

    Why does this matter?

    Why can’t you just let the cache fill up with these extra entries?

    Remember how caching works: the first user to visit a URL has to wait a while for the page to be generated, as it has not yet been cached. Subsequent visitors then get the cached copy served quickly to them.

    Now, imagine visitors are coming to your store from a each of the different ad campaigns you have set up:

    • Visitor #1 arrives at the coffee page after seeing the “Buy More Beans” campaign in his email.
    • Visitor #2 lands on the coffee page after being tempted by a “Coffee is Cool” banner.
    • And Visitor #3 finds the coffee page through a “Tweet a Brew” link on Twitter.

    All three visitors arrive at the exact same coffee page through three different URLs.

    If the URLs have all been cached separately, each visitor will be the first to request their particular URL, and as such, each will have to wait for that first page to be dynamically generated. None of them will get a cached copy of the page.

    On the other hand, if the ad campaign information has been dropped, and only one copy of the page is saved in the cache (i.e. http://www.example.com/coffee.html), then it’s only Visitor #1 who must wait for the first page load. Visitors #2 and #3, and everyone else who comes after them, will reap the rewards of caching.

    And it’s safe to simply ignore the query strings because they have already served their purpose by the time the server gets involved.

    Caching the URLs individually, with query strings intact, causes more of your visitors to be exposed to slow page loads, and results in more work for the WordPress backend.

    That is why it matters.

    Other query strings you can ignore

    Of course, ignorable query strings are not limited to the “utm” variety. There are other known queries that can be ignored, such as Google AdWords’ Google Click Identifier, aka “gclid.” And there’s nothing stopping you from doing your own kind of tracking with a made up query like ?mysitenav=sidebar, which could (for example) help you gain insights about your visitors’ clicking habits within your site.

    Any of these query strings can be dropped from the URL without changing the content that is displayed. Therefore, they can also be dropped when saving and retrieving the page from the cache.

    Query Strings You Can Ignore: pourover coffee grounds

    Configuring Query String Cache Rules

    So, how do you instruct LiteSpeed Web Server to ignore certain query strings? You have two options:

    • Configure it for WordPress only, from within the plugin.
    • Configure it server-wide to apply to all of your LSCache-enabled web apps.

    WordPress Plugin Level

    From the WordPress Dashboard, navigate to Litespeed Cache > Settings > Cache and scroll down to the Drop Query String setting.

    In this box, you can list the strings you want to ignore, one per line, using wildcards if desired.

    So, to ignore all of the “utm” query strings, the Google Click ID “gclid” query, and your own custom “mysitenav” query, you could enter the following in the box:

    utm*
    gclid
    mysitenav
    

    Press the Save Changes button, and you’re done.

    LiteSpeed Web Server Level

    If you’d like to configure LSWS to drop certain query strings on a server-wide (or virtual-host-wide, or even site-wide) basis, you can use the Apache-style CacheKeyModify configuration directive.

    You’ll need LiteSpeed Enterprise v5.2.3 or higher, and you’ll need access to modify its configuration. If you don’t have the ability to configure LSWS, please ask your hosting provider to add the directive for you. More environment-specific directions are available on our wiki.

    As mentioned, you can use this directive in the server level configuration, at the virtual host level, or in a site’s .htaccess, and it looks like this:

    <IfModule Litespeed>
    CacheKeyModify -qs:utm*
    </IfModule>
    

    Upper level configurations are inherited by lower levels. If a lower level adds more rules, they are in addition to those of the upper level. If a lower level doesn’t want to use the upper level’s configuration, the “clear” parameter should be used before adding the new rules.

    The CacheKeyModify directive can be used multiple times, but it does not support more than one parameter at a time. Each parameter gets its own line, like so:

    <IfModule Litespeed>
    CacheKeyModify clear
    CacheKeyModify -qs:utm*
    CacheKeyModify -qs:gclid
    CacheKeyModify -qs:mysitenav
    </IfModule>
    

    Place a snippet like that in the appropriate configuration file, and you’re good to go!

    Query Strings You Can Ignore: pourover coffee grounds closeup

    Conclusion

    You can save yourself a real cache-induced headache by dropping certain query strings. Think about all of the situations where people are directed to your site with tracking code attached to the URL: mailing lists, ad campaigns, social media… Caching separate copies of such pages is unnecessary. Plus, it’s a waste of precious resources, and a potential speed bump for your visitors.

    Take advantage of LiteSpeed’s ability to drop query strings, and streamline your cache!

    Have some of your own ideas for future WordPress Wednesday topics? Leave us a comment!

    Don’t forget to meet us back here next week for the next installment. In the meantime, here are a few other things you can do:

  • WpW: Understanding Cache Storage

    WpW: Understanding Cache Storage

    WordPress Wednesday: Managing LiteSpeed Cache Storage

    Welcome to another installment of WordPress Wednesday!
    Today’s topic is: Managing LiteSpeed Cache Storage

    Today, we’re going behind-the-scenes of the LiteSpeed Cache for WordPress plugin, and we’re going to discuss the physical storage of your cached content. That is, where it lives in your file system, how LiteSpeed Web Server manages it, and how you can manage it yourself, if you wish.

    How Caching Works

    When a page is cached through the LSCache plugin, a static copy of that dynamically-generated page is saved in the cache root directory. The location of the cache root directory varies from hosting environment to hosting environment, and it may be overridden at setup time. For instance, a cPanel user’s default cache root is /home/username/lscache/. This gives that user control over it, and keeps it out of reach of others.

    If you don’t know the location of your cache root, and you’d like to, you should contact your hosting provider.

    As your site is cached, either through visitor request or through the crawler, LiteSpeed Web Server fills up the cache root directory with static copies of all of those requested pages, until all of the site’s cacheable pages are stored.

    When using LSCache, you don’t have to worry about your cache storage maintenance. LiteSpeed Web Server does all of this for you in a light and efficient way. Once your cache is fully warmed up, the cache directory size will not grow any further.

    When Cache is no Longer Valid

    Managing LiteSpeed Cache Storage: A cache of buttons in three mason jars

    Eventually, every cached page will become invalid. This happens when a page reaches its given TTL (Time to Live), or sooner if it has been purged from the cache by hand or by an LSCache purge rule.

    When LSWS receives a purge request, it will simply mark the related cached objects as invalid. In order to avoid heavy disk operation, it does not delete the actual cache files on disk.

    Instead, cached pages are only deleted from the directory when they reach their natural TTL. This means that there may sometimes be expired or invalid items stored in the cache directory. This is ok, because LSWS is keeping track of which entries are still good and will only serve those. Invalid pages are never served, even if they are still physically stored in the directory.

    How LSWS Maintains Cache Storage

    To understand how LiteSpeed Web Server keeps the cache directory cleaned up, it’s helpful to first define some terms:

    • Cached Object: A cache entry stored in LSCache. A cached object maps to a URL plus an optional variation. For example, if one URL has a desktop view and a mobile view, there will be two cached objects for that URL: one for desktop, and one for mobile. A cached object can be full page content or content from an ESI block.
    • Cache Manager SHM: Shared memory that the cache manager uses to store all of the information about the cache entries. It is a memory-mapped file persistent to disk. The default location is /dev/shm/lsws, but you can point it to a RAM disk for faster access. Just keep in mind that the data on a RAM disk will be lost if your physical server reboots. (LSWS restart will not affect RAM disk storage.)
    • LRU: Least Recently Used cache replacement.

    Each cached object has a corresponding entry in the cache manager SHM. LSWS will check periodically (triggered by a timer) for expired cache entries based on the entries’ defined TTLs. LSWS will select a list of entries based on LRU, and delete the related cache files on disk. Each time this happens, the batch size is small enough that it will not affect the whole server performance.

    The clean-up process is based on TTL only, it does not check for purge events. Cached objects that were purged, will eventually be deleted when their natural TTL occurs, if they are not re-cached in the meantime.

    Do It Yourself

    Managing LiteSpeed Cache Storage: A cache of buttons in an open mason jar

    So, now you know that when you press the Purge All button, you will not see the cache storage folder get emptied. This is ok! You don’t have to worry about the actual files on disk. LSWS takes care that for you constantly and quietly behind the scenes.

    Even so, sometimes this cache directory maintenance can miss an entry or two. For this reason, LiteSpeed Web Server periodically runs a cron job to delete outdated cache files in server-level storage.

    This cron job does not, however, apply to virtual-host-level storage. If your virtual host has a custom storage location (meaning, it is not using server-level storage), then you might want to consider running your own periodic cleanup.

    You can simply delete your cache storage folder, or better yet, use our utility command:

    lsws/admin/misc/cleancache.sh
    

    Never try to re-create the cache storage folder manually. If it’s missing, LSWS will create it for you, in the path you have defined, and assign it the proper permissions.

    Please don’t delete the cache manager SHM file. If you delete that, you will have to restart LiteSpeed Web Server.

    Have some of your own ideas for future WordPress Wednesday topics? Leave us a comment!

    Don’t forget to meet us back here next week for the next installment. In the meantime, here are a few other things you can do:

  • WpW: Setting up Cloudfront in LSCache

    WpW: Setting up Cloudfront in LSCache

    WordPress Wednesday: CloudFront CDN and LiteSpeed Cache

    Welcome to another installment of WordPress Wednesday!
    Today’s topic is: Using Cloudfront with LiteSpeed Cache for WordPress

    Disclaimer: The information contained in this post is accurate for LSCWP v2.2.2 [release log]. If you are using a newer version of the plugin, some details may have changed. Please refer to our wiki for the latest!

    You can configure the LiteSpeed Cache plugin to work with almost any content delivery network. Today, we’ll show you how to set up CDN support, if you are using CloudFront.

    Set Up in CloudFront

    CloudFront CDN and LiteSpeed Cache: Setting up CloudFront

    Set up your CloudFront CDN according to the AWS instructions.

    Make a note of the Domain Name they give to you (i.e. d111111abcdef8.cloudfront.net).

    Enter that domain name directly into your browser and make sure that your site comes up. If it does, then everything is in working order, and you are ready to move on to the next step.

    Set Up in LSCache Plugin

    CloudFront CDN and LiteSpeed Cache: Setting up CDN Support in LSCache

    From the WordPress Dashboard, navigate to LiteSpeed Cache > Settings > CDN, and do the following:

    1. Set Enable CDN to ON
    2. Enter CDN URL. This is the Domain Name you received earlier from CloudFront.
    3. If CloudFront will be handling your image, CSS, or JS files, set the appropriate Include buttons to ON.
    4. If you set any of the above buttons to OFF, check the Include File Types box and make sure the relevant file extensions are not listed. For the example outlined in red above, Include JS is set to OFF and so we also need to remove .js from Include File Types
    5. Set Original URL to your site’s domain name (i.e. //example.com/wordpress).
    6. Save your changes.

    Verify

    In our example, Include CSS was set to ON and Include JS was set to OFF. To verify that everything is working as expected, we need to take a look at the Request URL in the headers and see from where both CSS and Javascript are being served.

    To do so, navigate to your site, and press F12 to bring up the developer tools in the Network tab. Reload the page.

    CloudFront CDN and LiteSpeed Cache: Verifying CSS

    First, check for CSS. Select the CSS tab, and then choose the first file listed to the left. Make note of the Request URL header. Is it coming from the CloudFront domain? If so, then CSS is being served correctly.

    CloudFront CDN and LiteSpeed Cache: Verifying JS

    Now, check for JS. Select the JS tab, and then choose the first file listed to the left. Make note of the Request URL header. Is it coming from your original domain? If so, then JS is being served correctly.

    Have some of your own ideas for future WordPress Wednesday topics? Leave us a comment!

    Don’t forget to meet us back here next week for the next installment. In the meantime, here are a few other things you can do:

  • WpW: The Purge All Hooks Setting

    WpW: The Purge All Hooks Setting

    WordPress Wednesday: Purging LiteSpeed Cache via WordPress Hooks

    Welcome to another installment of WordPress Wednesday!
    Today’s topic is: Purging LiteSpeed Cache via WordPress Hooks

    Disclaimer: The information contained in this post is accurate for LSCWP v2.2.2 [release log]. If you are using a newer version of the plugin, some details may have changed. Please refer to our wiki for the latest!


    Today we’re going to talk about a more advanced topic than usual. If you are unfamiliar with the concept of WordPress hooks and actions, then this may not be for you. If you want to learn more and then come back, that’s great, too. Here’s a really nice primer on the subject. You might also want to brush up on LiteSpeed Cache and how purging works.

    Purging LiteSpeed Cache via WordPress Hooks

    LiteSpeed Cache for WordPress is configured to automatically purge everything from the cache when certain WordPress hooks are run. For example: every time you change your theme (the switch_theme hook), or every time you create a new category or tag (the create_term hook), a purge_all action is triggered.

    By default, LiteSpeed runs a purge_all action any time any of the following WordPress hooks occur:

    switch_theme
    wp_create_nav_menu
    wp_update_nav_menu
    wp_delete_nav_menu
    create_term
    edit_terms
    delete_term
    add_link
    edit_link
    delete_link
    

    For most installations, this list of hooks is sufficient. Owners of highly-customized sites, however, may have reason to make changes to the list. We recently added a new setting that will allow you to do just that.

    Purge All Hooks

    Purging LiteSpeed Cache via WordPress Hooks: Polka Dot Cottage Crochet Hooks in a Row

    From the WordPress Dashboard, navigate to LiteSpeed Cache > Settings > Advanced. Scroll down to Purge All Hooks, and you will see the list of hooks that currently trigger purge_all actions for your site, entered one per line.

    You are free to edit this list. Remove hooks if you don’t want the cache purged, and add hooks if you want to automate more purges.

    Removing a Hook

    Let’s say you don’t want to purge the cache every time you create a new category.

    Remove the create_term hook from the list, and press the Save Changes button.

    (That was easy.)

    Adding a WordPress Hook

    This one is slightly more complicated, but only because you need to know the name of the hook you want to add.

    For example, if you want to purge the cache any time a new comment is posted, then you need to know that the WordPress hook for posting a comment is comment_post.

    Once you are aware of the name of the correct hook, you can insert it into the list on its own line.

    The WordPress Code Reference provides a list of available hooks. There’s a handy search function on the page, too, in case you don’t want to go through the list alphabetically.

    Adding a Plugin Hook

    Plugins can provide hooks, too, and there may be a situation where you want to hang a purge_all onto a plugin hook. Again, you’ll need to do a little research to find the name of the hook, but once you do, it’s a simple matter of adding it to the Purge All Hooks list.

    Let’s look at an example from our own plugin. You may have noticed that there are some tabs in the LiteSpeed Settings pages that suggest you should run a Purge All after you’ve changed those settings. Well, if changing the configuration is something you do frequently, why not automate that Purge All?

    For example, LiteSpeed Cache > Settings > Optimize warns “After changing Minify/Combine settings, please do a Purge All action.” All we need to do is find the hook that runs when you Save Changes on the Optimization page, and add that hook to the Purge All Hooks list.

    There is no hook specific to the Optimize page, but there is one that relates to nearly all of the ON/OFF switches on any of the Settings tabs: update_option_litespeed-cache-conf.

    Add that hook to the list, and a Purge All will occur any time you enable or disable a setting.

    Purging LiteSpeed Cache via WordPress Hooks: Polka Dot Cottage Crochet Hooks in a Jar

    Finding a plugin’s hooks may not be easy. You can hope that they’ve provided a complete list as part of their documentation (which is rare), you can ask in their support forum (if they have one), or you can pore through their source code and try to find them (if it’s open source).

    Here are some handy LiteSpeed plugin hooks. Most of these occur when individual settings (those not included in update_option_litespeed-cache-conf) are changed:

    update_option_litespeed-cache-vary-group
    update_option_litespeed-cache-exclude-optimization-roles
    update_option_litespeed-cache-exclude-cache-roles
    update_option_litespeed-optm-css
    update_option_litespeed-optm-js-defer-excludes
    update_option_litespeed-media-lazy-img-excludes
    update_option_litespeed-media-need-pull
    update_option_litespeed-env-ref
    update_option_litespeed-cache-drop_qs
    update_option_litespeed-cache-cdn_mapping
    update_option_litespeed-cache-dns_prefetch
    update_option_litespeed-cache-cloudflare_status
    update_option_litespeed-log_ignore_filters
    update_option_litespeed-log_ignore_part_filters
    update_option_litespeed-object_global_groups
    update_option_litespeed-object_non_persistent_groups
    update_option_litespeed-crawler-as-uids
    update_option_litespeed-adv-purge_all_hooks
    update_option_litespeed-cdn-ori_dir
    update_option_litespeed-media-webp_attribute
    

    Please be sure that you understand fully what any hook means before adding it to Purge All Hooks. After all, purge_all is a drastic step. It wipes out the entire cache. You don’t want to automate that task unless the hook truly warrants it!

    Changing Your Mind

    If you’ve added some hooks, and you don’t like the results, you can go back to the default configuration. Copy the list of hooks from the “Recommended Value” box into the Purge All Hooks setting and press the Save Changes. Everything should go back to normal.

    Have some of your own ideas for future WordPress Wednesday topics? Leave us a comment!

    Don’t forget to meet us back here next week for the next installment. In the meantime, here are a few other things you can do:

  • Benchmarking LSCache for Drupal

    Benchmarking LSCache for Drupal

    LiteSpeed Cache Module for Drupal Benchmarks

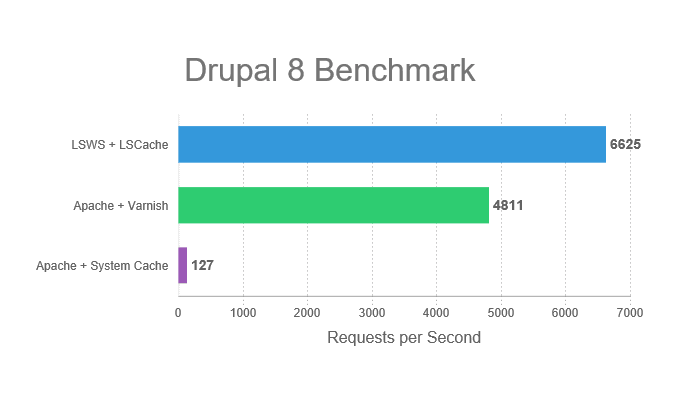
    We’re back with more benchmarks! This time, we’ve put our new LSCache module for Drupal 8 to the test. We compared LiteSpeed Web Server with LSCache, Apache with Varnish (Cachewall), and Apache with System Cache.

    Our testing consisted of burst tests and load testing, both of which are explained in more detail below.

    The Results

    Benchmark

    The following chart shows how many requests per second each server + cache solution combination processed during our burst tests. The larger the number, the better.

    As you can see, LiteSpeed Web Server + LSCache outperforms both Apache + Varnish and Apache + System Cache.

    Load Testing

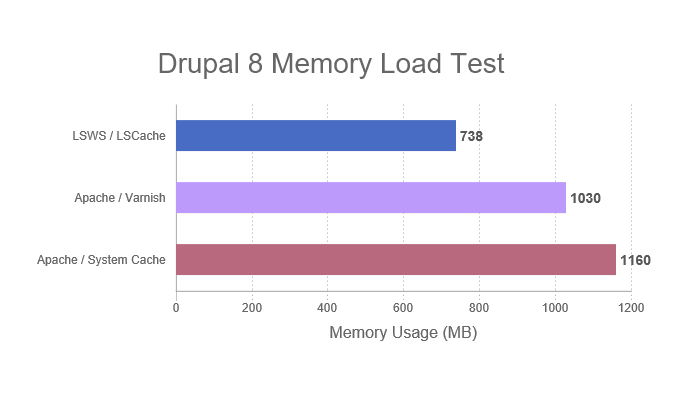
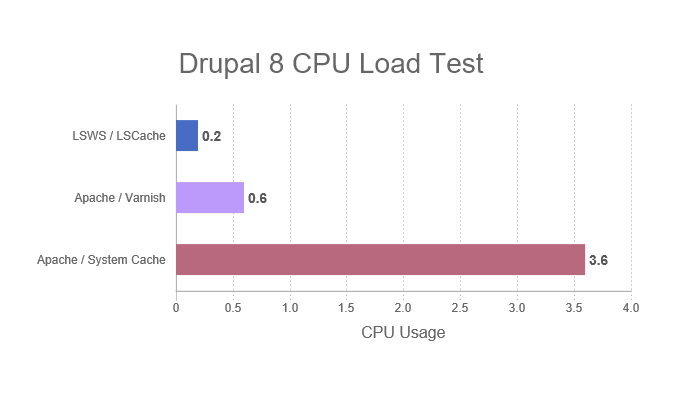
    The following graphs show the CPU and Memory usage during testing for each server + cache solution combination tested. For these measurements, a smaller number is better.

    LiteSpeed Web Server + LSCache consumed less memory and CPU than both Apache tests.

    Try it Yourself

    You can see the specs of our configuration and test environment below. Feel free to run the same benchmarks yourself and verify our results.

    These are the commands we used in all tests (Replace example.com/path with the location of your test subjects):

    Benchmark

    ab -n 10000 -k -H "Accept-Encoding: gzip,deflate" -c 100 example.com/path

    Load Testing
    LSWS+LSCache and Apache+Varnish:

    siege -c 100 -r 20 -d 6 example.com/path

    Apache+System:

    siege -c 100 -r 20 -b example.com/path

    NOTE: We used -d 6 instead of -b in two cases because we wanted to ensure that each server+cache was processing roughly the same number of transactions per second. The -d parameter allows you to specify a delay.

    Each test was run five times, and the average result was used for our graphs.

    Web Server Configuration

    Common settings for LSWS and Apache:

    • Keep-Alive ON
    • PHP 7.1.15
    • Zend OPCache ON
    • Max Connections 20
    • PHP Child 5

    Test Environment

    Software

    Web Server version:

    • LSWS: v5.2.5
    • Apache: v2.4.6

    Control Panel: cPanel: v68.0.36
    Operating System: CloudLinux 7.4, all accounts set to unlimited
    Server API version:

    • LSWS: LSAPI v6.11
    • Apache: FPM/FastCGI

    Cache version:

    Drupal version: 8.5

    Hardware

    • Web-Server: 1-CPU + 2G Memory
    • ab-Server: 4-CPU + 4G Memory
    • Network: 4.5G Bandwidth

    Conclusion

    We hope these results encourage you to give LSCache for Drupal 8 a try!

    If you run into any trouble or would like to share some feedback, drop by our forum. We’re here to help!

    And don’t forget, our Slack community is a great place to connect other LiteSpeed users. Check out the #drupal-cache channel while you’re there.

  • WpW: Testing for Compatibility with LSCache

    WpW: Testing for Compatibility with LSCache


    WordPress Wednesday: Is My Plugin Compatible With LiteSpeed Cache for WordPress?

    Welcome to another installment of WordPress Wednesday!
    Today’s topic is: Is My Plugin Compatible With LiteSpeed Cache for WordPress?

    Disclaimer: The information contained in this post is accurate for LSCWP v2.2.0.1 [release log]. If you are using a newer version of the plugin, some details may have changed. Please refer to our wiki for the latest!

    If you are wondering if a particular plugin is compatible with LiteSpeed Cache for WordPress, this guide can help you figure it out. We’ve tried to make these instructions as easy to understand as possible. You don’t need to be a developer in order to test for compatibility between two plugins. (Although, if you are a developer, you might find our article about the LSCache API to be more your speed.)

    NOTE: While you could perform these tests on a production site, we recommend using a test WordPress installation if you have one. This allows you to really take your time, and follow the steps carefully. Testing compatibility is not hard, per se, but it can be time-consuming. If you have to effectively take your production environment offline for the duration of the test, that can add pressure you don’t need!

    Before You Begin

    You may not have to do a test at all!

    1. Check our compatibility list. If the plugin appears there, then we’ve already tested it and we know it works.
    2. Check with the plugin author. They may already have tested for LSCWP compatibility.

    If you didn’t find any answers with the previous two ideas, not to worry. The vast majority of plugins is compatible with LiteSpeed Cache for WordPress.Here are a few rules-of-thumb. The plugin you want to test is probably compatible if:

    1. it doesn’t generate site content
    2. it doesn’t manipulate existing front-end content

    If the plugin generates or manipulates site content, it still may be compatible if:

    1. it generates or manipulates content that triggers the same purge events that are monitored by LSCWP
    2. it generates or manipulates content that follows the same caching rules that are followed by LSCWP

    If you’re still not sure, you’ll need to test for compatibility.

    Testing for Compatibility

    Since it’s cumbersome to keep saying “the plugin you want to test,” let’s call it “MyPlugin” for this example.


    Is My Plugin Compatible With LiteSpeed Cache for WordPress?

    In order to test for compatibility, we’ll first deactivate all plugins with the exception of LiteSpeed Cache. Then we’ll verify the LiteSpeed Cache is working. Once we’ve determined that it is, we’ll activate MyPlugin, and run through some basic scenarios, checking that the site looks and works as expected all along the way.

    NOTE: If you suspect that your theme may be conflicting with LiteSpeed Cache, it’s best to temporarily switch to a different theme for testing purposes. Try the WordPress Twenty Seventeen theme, which we know to be 100% compatible: Navigate to Appearance > Themes, hover over the Twenty Seventeen card, and press the Activate button.

    Deactivate

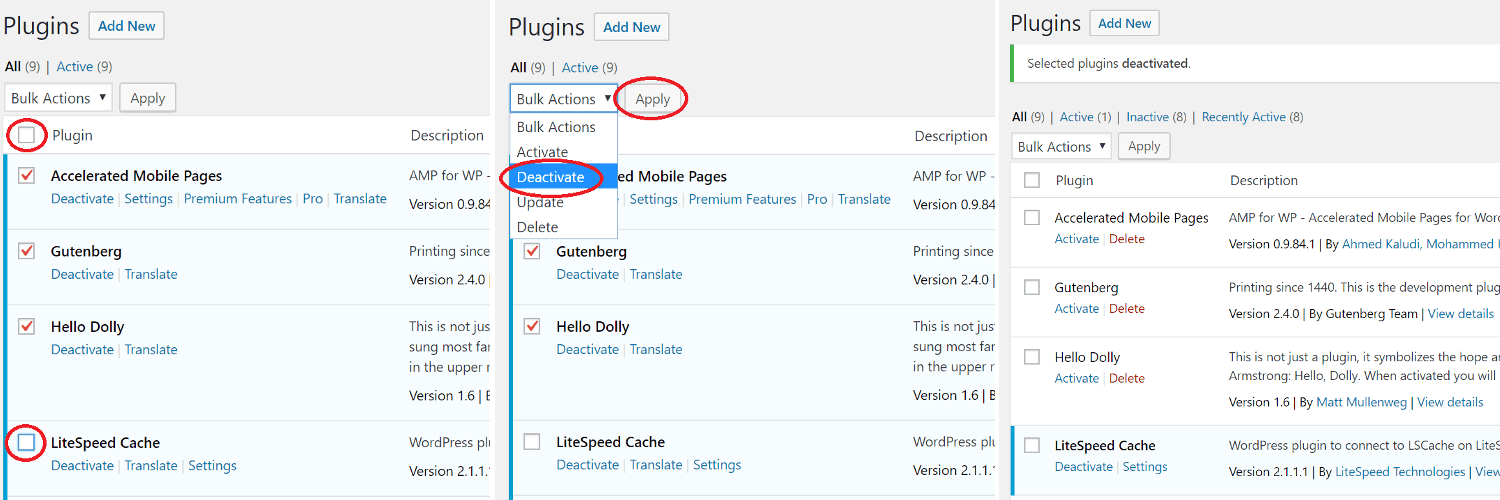
    Deactivate all plugins except for LSCache. Here’s how:

    Is My Plugin Compatible With LiteSpeed Cache for WordPress? Deactivate all plugins except LSCache

    From the WordPress Dashboard, navigate to Plugins, and click the checkbox next to the Plugins column as shown. All of the plugins will be checked. Un-check the box next to LiteSpeed Cache. Select Deactivate from the dropdown Bulk Actions box, and click the Apply button. All plugins, aside from LSCache will be disabled.

    Verify

    In whichever environment you are using (test or production), before activating MyPlugin, you should verify that LSCache for WordPress is working as desired. Here’s how:

    Is My Plugin Compatible With LiteSpeed Cache for WordPress? Verify LSCache is working

    1. Open an incognito window in your browser, and press F12 to bring up the developer tools.
    2. Navigate to your site.
    3. Refresh the page.
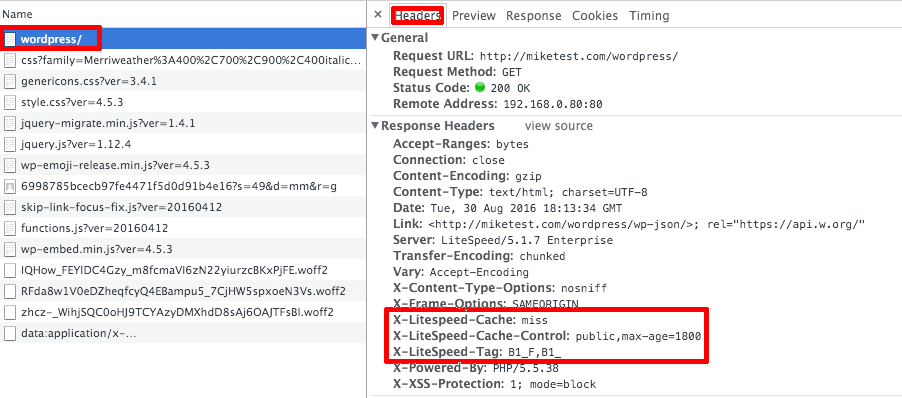
    4. Click the first resource under the Name column in the developer tool window. This should be an HTML file and the resource’s headers should appear alongside it, as in the image above. For example, if your page is http://example.com/wordpress/, your first resource should either be something like example.com/wordpress/ or wordpress/.
    5. In a different, logged-in browser, visit your WordPress Dashboard, navigate to LiteSpeed Cache > Manage and click the Purge All button.
    6. Reload the page in the first (incognito) browser and select the same resource again. You should see headings similar to:
      X-LiteSpeed-Cache: miss
      X-LiteSpeed-Cache-Control:public,max-age=1800
      X-LiteSpeed-Tag:B1_F,B1_
      

      These headings mean that the page has not yet been cached, but that LiteSpeed has now stored it for future use.

    7. Reload the page a second time in the incognito window, and you should see X-LiteSpeed-Cache: hit in the response header. This means the page is being served by the cache and LSCWP is configured correctly.

    Now that you know that LSCWP works for you on its own, it’s time to try it with MyPlugin.

    Activate

    Activate MyPlugin: Navigate to Plugins, locate MyPlugin in the list, and click the Activate link below the plugin name.

    Purge

    Purge the cache: Navigate to LiteSpeed Cache > Manage > Purge and press the Purge All button.

    TEST!

    This step varies, depending on how you use MyPlugin, and what it needs to be able to do. Run through your most common scenarios, and after each step, verify that MyPlugin is working as expected.

    If MyPlugin deals with any private information, run the through the steps twice: once logged-in, and once in incognito mode. When you visit the site incognito, be sure that you are not seeing any private information from your previous logged-in session.

    Questions to Ask Yourself:

    • Do the pages look like they should look?
    • Are cacheable pages being cached?
    • Are non-cacheable pages not being cached?
    • If there’s supposed to be private data on the page, are you seeing the correct private data?

    Some Examples

    • If MyPlugin is a forum plugin, run through the steps of creating an account, updating your profile, publishing a post, and submitting a comment. Check the cache and the display of private information at every step.
    • If MyPlugin is a social sharing plugin that counts shares, use it to share a post or a page to social media and then verify that the share count has increased.
    • If MyPlugin is a contact form plugin, use it to send yourself some feedback. Visit the form page again in an incognito window, and verify that you are not seeing any of your previous logged-in information.

    Document + Report

    If you encounter an issue that indicates the plugins are not working well together, document it. Take a screenshot, or copy the text of any error messages you may get. Visit the LiteSpeed Cache for WordPress support forum and share as many details as possible, including the above screenshots.

    Is My Plugin Compatible With LiteSpeed Cache for WordPress? Submit an environment report

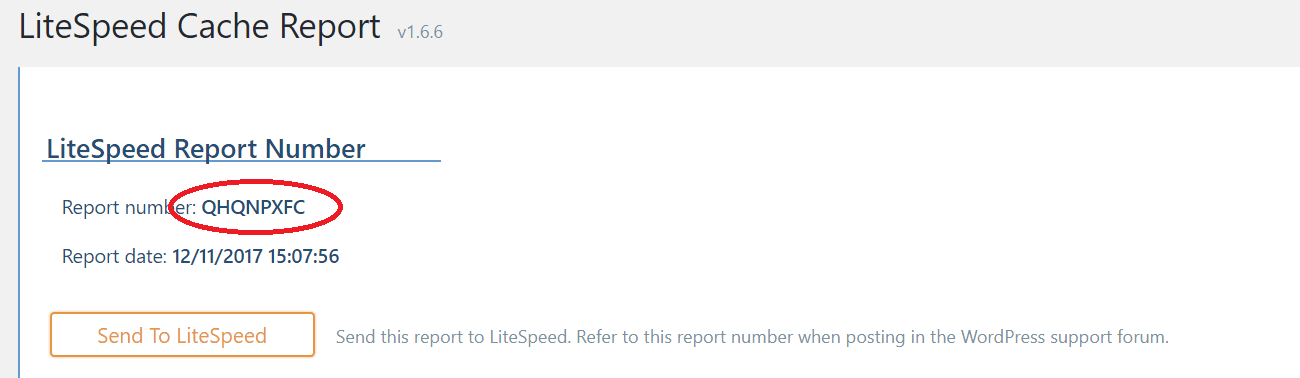
    It’s always helpful to include a copy of your Environment Report so that the support team can see your system settings. To do so, navigate to LiteSpeed Cache > Report and click the Send to LiteSpeed button. Then make note of the Report Number and include it with your forum post.

    Reactivate

    Once you are satisfied that everything works well, or you have documented and reported anything that doesn’t, you may re-activate all of the plugins, and restore your preferred theme.

    Testing Themes

    Sometimes the plugins all get along well, but there is something unexpected happening in the theme.

    To test theme compatibility, follow the same steps as above, with the following differences:

    • LiteSpeed Cache should be the only active plugin
    • The theme you want to test should be activated

    Have some of your own ideas for future WordPress Wednesday topics? Leave us a comment!

    Don’t forget to meet us back here next week for the next installment. In the meantime, here are a few other things you can do:

  • WpW: Using Jetpack’s Photon CDN With LSCache

    WpW: Using Jetpack’s Photon CDN With LSCache


    WordPress Wednesday: Jetpack’s Photon CDN and LiteSpeed Cache

    Welcome to another installment of WordPress Wednesday!
    Today’s topic is: Jetpack Photon CDN and LiteSpeed Cache

    Disclaimer: The information contained in this post is accurate for LSCWP v2.1.1.1 [release log]. If you are using a newer version of the plugin, some details may have changed. Please refer to our wiki for the latest!

    What is Photon?

    Automattic’s Jetpack plugin allows self-hosted WordPress blogs to use some of the functionality that is natively available to WordPress.com blogs. One of the available functions is a content delivery network (CDN) for images. Originally, this service went by the name “Photon,” but now it they simply call it “Jetpack Image CDN.” (Many people still refer to it as Photon, which is why I mention it.)

    Use of the image CDN is contingent upon your site being Jetpack-connected. If you disconnect Jetpack from your site, you are no longer allowed to use the image CDN.

    Using Jetpack Image CDN with LSCWP

    Jetpack’s Image CDN and LiteSpeed Cache for WordPress are 100% compatible and may be used together right out of the box.

    Normally we recommend enabling CDN support in the LiteSpeed plugin, and then uninstalling any CDN-specific plugin you may have had. That is not the case here.

    Because of Jetpack’s rule that Jetpack must remain connected to your site, you are not allowed to uninstall their plugin if you want to continue to use their image CDN.


    Jetpack’s Photon CDN and LiteSpeed Cache: Three Airplanes in Formation at an Air Show

    So, how do you make all of this work when you have both Jetpack and LiteSpeed plugins installed? It’s simple. You let Jetpack do its thing, and set up LiteSpeed to stay out of the way:

    1. Turn on the image CDN feature in Jetpack.
    2. Leave Enable CDN set to OFF in LiteSpeed Cache > Settings > CDN.

    LSCache for WordPress respects the settings of other CDN plugins, when LiteSpeed’s CDN support is turned off.

    A Note about Image Optimization

    LiteSpeed Cache has an Image Optimization service, but we don’t recommend you use it, if you have Jetpack’s Image CDN enabled. Jetpack’s CDN automatically does its own optimization, and will ignore the LiteSpeed-optimized images.

    Additionally, Jetpack has its own WebP replacement functionality, so do not enable LiteSpeed’s Image WebP Replacement setting in the Media tab.

    To Summarize

    If you want to use Photon, then LiteSpeed will respect that, as long as you leave LiteSpeed’s CDN and Image Optimization features turned off.

    One exception: if you have multiple CDNs in use (i.e., Jetpack for the images and, say, MaxCDN for other static content), you may enable LiteSpeed’s CDN support, but be sure to configure it only for the file types not served by Jetpack.

    Have some of your own ideas for future WordPress Wednesday topics? Leave us a comment!

    Don’t forget to meet us back here next week for the next installment. In the meantime, here are a few other things you can do:

  • WpW: LSCache for WordPress for Everybody!

    WpW: LSCache for WordPress for Everybody!

    Using the LSCache plugin without a LiteSpeed Server

    Welcome to another installment of WordPress Wednesday!
    Today’s topic is: Using the LSCache plugin without LiteSpeed Web Server

    Disclaimer: The information contained in this post is accurate for LSCWP v2.1 [release log]. If you are using a newer version of the plugin, some details may have changed. Please refer to our wiki for the latest!

    Did you know that this is our 45th WordPress Wednesday article? Yep! We’ve been at it for nearly a year now. Often during that time, we’ve explored LSCWP’s inner workings. We’ve frequently repeated how closely-connected the plugin is to LiteSpeed’s web server products, and how the plugin just does not work without the server!

    Well, surprise, surprise! This week marks a significant departure from that message…

    The Big News

    You no longer need a LiteSpeed Web Server to use LSCache for WordPress.

    Wait, what?

    Really. It’s true. We have taken some of the optimization features that are not related to caching, and made them available for use by anyone. No LiteSpeed server required.

    You will still, of course, need a LiteSpeed server with the LSCache module enabled in order to use the page-caching features of the plugin. This goes back to what we have talked about many times before: LSCache is a server-level cache, and the plugin provides an interface which you can use to control that cache. This is still true.

    But now we are welcoming users from all web server backgrounds to give LSCWP’s optimization features a try!

    Welcome to LSCache for WordPress

    Using the LSCache plugin without a LiteSpeed Server: Welcome to LiteSpeed

    If you’re new here, Welcome! Here’s a handy guide to the LSCWP optimization features as of this writing.

    The General Features may be used by anyone using any web server.

    The LiteSpeed Exclusive Features continue to require a LiteSpeed server with the LSCache module enabled. (If you want to try these features, why not get a 15-day LiteSpeed Web Server trial license?)

    General Features

    • Object Cache (Memcached/LSMCD/Redis)
    • Image Optimization (Lossless/Lossy)
    • Minify CSS, JavaScript, and HTML
    • Minify inline CSS/JS
    • Combine CSS/JS
    • Automatically generate Critical CSS
    • Lazyload images/iframes
    • Multiple CDN support
    • Load CSS/JS Asynchronously
    • Browser Cache
    • Smart preload crawler with support for SEO-friendly sitemap
    • Database Cleaner and Optimizer
    • PageSpeed score optimization
    • OPcode Cache
    • HTTP/2 Push for CSS/JS (on web servers that support it)
    • DNS Prefetch
    • Cloudflare API
    • Single Site and Multi Site (Network) support
    • Import/Export settings
    • Basic/Advanced setting view
    • Attractive, easy-to-understand interface
    • WebP image format support
    • Heartbeat control

    LiteSpeed Exclusive Features

    • Automatic page caching to greatly improve site performance
    • Automatic purge of related pages based on certain events
    • Private cache for logged-in users
    • Caching of WordPress REST API calls
    • Separate caching of desktop and mobile views
    • Ability to schedule purge for specified URLs
    • WooCommerce and bbPress support
    • WordPress CLI commands
    • Simple API system for each cache integration
    • Exclude from cache by URI, Category, Tag, Cookie, User Agent
    • HTTP/2 & QUIC support (QUIC not available in OpenLiteSpeed)
    • ESI (Edge Side Includes) support (Not available in OpenLiteSpeed)

    This list is subject to change in the future, so keep an eye on our wiki for the most current configuration. (All of these features, by the way, are documented in that wiki, too.)

    Remember, the LiteSpeed Cache plugin for WordPress is free and open source. Download it and give it a try today!

    Have some of your own ideas for future WordPress Wednesday topics? Leave us a comment!

    Don’t forget to meet us back here next week for the next installment. In the meantime, here are a few other things you can do:

  • WpW: Using LSCache with the WordPress CLI

    WpW: Using LSCache with the WordPress CLI

    Using LSCache with the WordPress CLI

    Welcome to another installment of WordPress Wednesday!
    Today’s topic is: Using LSCache with the WordPress CLI

    Disclaimer: The information contained in this post is accurate as of LSCWP v3.5.2 [release log]. If you are using a later version, the commands may have changed. Please refer to our documentation.

    WP-CLI is the command-line interface for WordPress. It allows you to perform many actions that would normally require you to visit the WordPress Dashboard in a browser. LiteSpeed’s WP-CLI commands that allow you to manage your cache simply from the command line, and with version 3.0 of our plugin, we have expanded these options considerably.

    This is just a taste of the commands available. For the full list, including CLI commands for QUIC Cloud services and debugging purposes, please see our documentation.

    Option Commands

    Use litespeed-option plus these commands to view and change LSCache’s configuration.

    • all allows you to see what options are available:
      wp litespeed-option all
    • export sends all of the options to a file:
      wp litespeed-option export
    • set allows you to change a particular option to a particular value. (It might be handy to export the options first, so that you know what each option is named, and what type of value is expected.):
      wp litespeed-option set cache-priv false
    • import configures LSCache according to the options in a specified file:
      wp litespeed-option import options.txt

    Purge Commands

    Use litespeed-purge plus these commands to purge specific entries from the cache.

    • network_list displays all of the site domains and IDs in a table:
      wp litespeed-purge network_list
    • all purges all cache entries associated with the WordPress installation. For networks, purges all cache entries for every site in the network:
      wp litespeed-purge all
    • blog purges all cache entries for a particular blog ID. For example, in a multisite install, purge only the shop.example.com cache (stored as blog id 2):
      wp litespeed-purge blog 2
    • tag purges the listed WordPress tags by ID. For example, purge the tag IDs 1, 3, and 5:
    • wp litespeed-purge tag 1 3 5
    • category purges the listed WordPress categories by ID. For example, purge the category ids 1, 3, and 5:
      wp litespeed-purge category 1 3 5
    • post_id purges all cache tags related to the listed WordPress Posts or Products by ID. For example, purge the post ids 1, 3, and 5:
      wp litespeed-purge post_id 1 3 5

    Have some of your own ideas for future WordPress Wednesday topics? Leave us a comment!

    Don’t forget to meet us back here next week for the next installment. In the meantime, here are a few other things you can do: