Category: LSCache

Learn more about LiteSpeed Cache plugin for WordPress, PrestaShop, XenForo, Drupal, Joomla, MediaWiki, WooCommerce, and more. Sites powered by LiteSpeed Web Server with LSCache may accelerate their web apps with extensions or rewrite rules.

In this category you will find tutorials, case studies, and useful information related to this popular cache solution.

  • Cache all of the Things with LiteSpeed

    Cache all of the Things with LiteSpeed

    Cache all of the Things: A LiteSpeed Cache Roundup
    You may be a fan of our LiteMage cache extension for Magento, or super enthusiastic about our WordPress cache plugin, but did you know that there is more to our cache story? Indeed. Chances are there is a LiteSpeed Cache plugin for your other favorite web apps, too.

    LSCache plugins, in general

    LSCache is a server-based caching module that is built directly into LiteSpeed Web Server. It saves static versions of dynamically-generated HTML pages in order to speed up subsequent access to those pages. In the beginning, LSCache was set up entirely through rewrite rules and configuration files. It required users to know a little something about their server backend, or to contact their hosting provider to set up caching for them. But more importantly, rewrite-rule caching is inflexible. As such, site owners had no ability to purge on demand, which meant they could only cache for a few minutes at a time, if they wanted to avoid serving stale content.

    Enter LiteSpeed Cache Plugins.

    LiteSpeed Cache plugins take the server-based LSCache functionality and give it a familiar interface, whether that be the WordPress Dashboard or the XenForo Admin Control Panel. Additionally, an LSCache plugin lets you define rules for managing your app’s cache, and then automatically updates the configuration files and rewrite rules on your behalf.

    By putting the LSCache controls into the web apps that site owners use every day, LSCache has become far more accessible and flexible. Site owners may now cache pages for far longer than a few minutes, and they may manage their caches with greater precision.

    As of this writing, LSCache is available in seven flavors! You are probably aware of one or two of these plugins. You may even be a power user. But why stop there? If you’re running all of your web apps on a LiteSpeed server, then you should take advantage of as many of these plugins as you can!

    LSCache plugins, specifically

    Cache all of the Things: A LiteSpeed Cache Roundup
    Every LSCache plugin is a conduit to the cache module of a LiteSpeed server, whether that be LiteSpeed Enterprise, LiteSpeed Web ADC, or OpenLiteSpeed. The server’s module does all of the work, while the plugin provides a simple way for a site owner to tell the server what to do. Because of this, most of our cache plugins have the same abilities. When there are differences, they are usually down to the abilities of the web app itself, or complexities involved in implementing a particular feature for that web app.

    Speaking of the abilities of the web app, LSCache plugins are unique among cache solutions because they have a connection to both the server, and to the app. A plugin can use that relationship to provide features that other cache solutions (or simple rewrite rules) can’t duplicate. We alluded to a prime example of this earlier: tag-based purge.

    Tag-based purge is a cache management tool that takes purge cues from events that occur within the app. For example, when a new post is created in WordPress, LSCache for WordPress tells the server’s LSCache module to purge every page that would be affected by a new post (i.e. the relevant category and tag pages, the home page, etc.).

    All LSCache plugins are free and open source. To learn more about the specific features supported by each, click the name of the plugin.

    Magento

    All content can be assembled from cache, even per-user, private blocks. Multi-store, multi-currency, and multi-user-groups are supported. There are two different versions of LiteMage available: one for Magento 1.x and another for Magento 2.x.

    WordPress

    • Name: LSCache Plugin for WordPress
    • Download: from LiteSpeed
    • Works With: WordPress.org
    • Required Server: LSWS Enterprise, OpenLiteSpeed, or LiteSpeed Web ADC
    • Cache logged-in users? Yes
    • ESI supported? Yes, except on OpenLiteSpeed
    • Cache Crawler supported? Yes

    In addition to the cache functions, our WordPress plugin also includes several optimization features, which makes it a nice all-in-one option for WordPress acceleration. Compatible with WooCommerce.

    XenForo

    • Name: LSCache Add-on for XenForo
    • Download: from XenForo v1.x or v2.x
    • Works With: XenForo 1.x or XenForo 2.x
    • Required Server: LSWS Enterprise, OpenLiteSpeed, or LiteSpeed Web ADC
    • Cache logged-in users? No
    • ESI supported? No
    • Cache Crawler supported? No

    This is a simple XenForo add-on that speeds up your public forum pages for non-logged-in users. There are two different versions of LSCache for XenForo available: one for XenForo 1.x and another for XenForo 2.x.

    Please note that as of this writing, the XenForo 2 add-on only supports rewrite-rule-based caching. Tag-based caching is forthcoming.

    PrestaShop

    • Name: LSCache Module for PrestaShop
    • Download: from LiteSpeed
    • Works With: PrestaShop 1.6 & 1.7
    • Required Server: LSWS Enterprise, or LiteSpeed Web ADC
    • Cache logged-in users? Yes
    • ESI supported? Yes
    • Cache Crawler supported? No

    The PrestaShop module is one of our newer cache plugins. Introduced last year, it is highly-customizable on a global or per-store level. Tag-based smart purge keeps the cache from becoming stale when product details change.

    MediaWiki

    • Name: LSCache Extension for MediaWiki
    • Download: from GitHub
    • Works With: MediaWiki 1.25+
    • Required Server: LSWS Enterprise, OpenLiteSpeed, or LiteSpeed Web ADC
    • Cache logged-in users? Yes
    • ESI supported? No
    • Cache Crawler supported? No

    This one is a straightforward little plugin that speeds up your MediaWiki site for both logged-in and non-logged-in users.

    Drupal

    • Name: LSCache Module for Drupal
    • Download: from GitHub
    • Works With: Drupal 8.x
    • Required Server: LSWS Enterprise, OpenLiteSpeed, or LiteSpeed Web ADC
    • Cache logged-in users? Yes
    • ESI supported? No
    • Cache Crawler supported? No

    This one is hot off the presses! It’s comparable to most of the others, in that it supports public cache, private cache, and ESI, and it features tag-based cache purge.

    Joomla

    • Name: LSCache Module for Joomla
    • Download: from GitHub
    • Works With: Joomla 3.x
    • Required Server: LSWS Enterprise, OpenLiteSpeed, or LiteSpeed Web ADC
    • Cache logged-in users? Yes
    • ESI supported? Yes, except on OpenLiteSpeed
    • Cache Crawler supported? No

    The Joomla plugin is another brand new release, and contains many of the LiteSpeed Cache features you already know and love.

    Go forth and cache!

    Hopefully you have found something new to try among our cache plugins! If you have a favorite web app that is not represented here, leave a comment. You never know… it might end up being next on our list.

    The LiteSpeed wiki contains everything you need to know when it comes to installation and configuration, so be sure to check there if you get stuck.

    Also? We have a Slack community for LiteSpeed users. Join up, leave feedback, help us test new features in development, and connect with your fellow LSCache plugin users!

  • Benchmarking LSCache for Joomla

    Benchmarking LSCache for Joomla

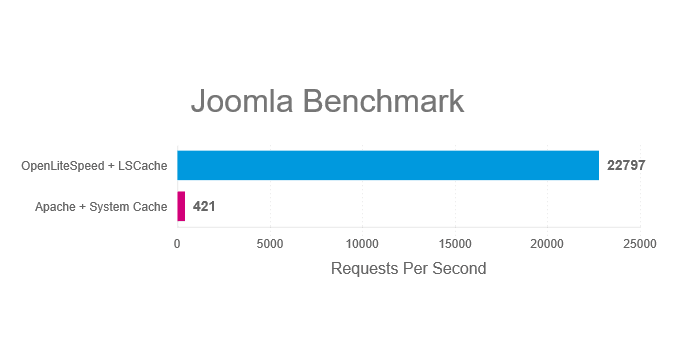
    We put our new LSCache extension for Joomla to the test, comparing OpenLiteSpeed and LSCache to Apache and Joomla System Page Cache. These are the results.

    Our testing consisted of burst tests simulating 10,000 requests over 100 concurrent users.

    The Results

    The following chart shows how many requests per second the two servers and cache solutions processed during our series of tests. The larger the number, the better.

    As you can see, OpenLiteSpeed + LSCache outperforms Apache + Joomla System Page Cache..

    Try it Yourself

    In the interest of transparency, we’re including the specs of our configuration and test environment below. Feel free to run the same benchmarks yourself and verify our results.

    This is the command we used in all tests (Replace example.com/path with the location of your test subjects):

    ab -n 10000 -k -H "Accept-Encoding: gzip,deflate" -c 100 example.com/path

    Each test was run five times, and the average result was used for our graphs.

    Web Server Configuration

    Common settings for both servers:

    • Keep-Alive
    • gzip
    • OPCache
    • PHP use socket
    • PHP version 7.1.2

    Additional OpenLiteSpeed settings:

    • Number of Workers 4
    • PHP_LSAPI_CHILDREN=20
    • LSAPI_AVOID_FORK=1

    Test Environment

    Software

    Web Server version:

    • OLS: v1.4.28
    • Apache: v2.4.6

    Server API version:

    • OLS: LSAPI v6.11
    • Apache: Apache 2.0 Handler

    Cache version:

    Hardware

    Both Client and Server specs:

    • Intel Xeon CPU E7- 4870 4 Core @ 2.40GHz
    • 4GB RAM
    • 120GB ZFS RAID-Z2 iSCSI Drive
    • CentOS 7

    Although we didn’t use one for our benchmarks, We recommend Solid State Drives (SSD) in production environments.

    Try LSCache for Joomla today, and tell us what you think!

  • WpW: Where to Go for LiteSpeed Cache Help

    WpW: Where to Go for LiteSpeed Cache Help

    WordPress Wednesday: Where to go for LiteSpeed Cache Help

    Welcome to another installment of WordPress Wednesday!
    Today’s topic is: Where to go for LiteSpeed Cache Help

    Someday you may need assistance with your LSCache for WordPress installation. Don’t worry, we are here to help!

    Where to go

    We have a few different support channels available, so it can be hard to know which one is appropriate.

    Wiki

    The first thing you should do when you have a problem is drop by our wiki. In the LSCWP section, we have defined every setting, described every function, and covered some common troubleshooting questions as well. There’s a lot of information there, and it’s likely you will find what you need, especially if your issue is a common one.

    Forums

    Although we do have LiteSpeed forums, we prefer to handle the WordPress cache support on the WordPress site. visit the official WordPress LSCache plugin forum to ask any questions you can’t solve from the wiki.

    Where to go for LiteSpeed Cache Help: Park Here sign

    While on the forum, take a look at other users’ questions. Maybe one of them has had your issue and was able to solve it. If you don’t find the answer on the forum, you can post a question yourself. It may be answered by a community member or by LiteSpeed staff.

    Ticket

    We strongly suggest that you try the wiki and the WP forum before you open a ticket.

    If you’ve exhausted the other options, or your question requires you to share information that you consider sensitive, our secure Ticket System is at your service. LiteSpeed customers may access the WHMCS ticket system directly through their customer login. If it’s your hosting provider that is our customer, you won’t have an account. You can send a message to bug at litespeedtech.com instead. Both methods end up in the same place for us.

    Premium Support

    We now offer a few paid support options for the more complicated issues. You can get all of the details about the tiers and conditions of premium support on our wiki. As a general rule of thumb, if we have to log in to your system to troubleshoot and diagnose the problem, then it’s a candidate for paid support.

    Don’t worry. If we find a bug in our code while investigating your issue, the fee is refunded.

    What to send us

    If you take the time to include a few of the following things in your support inquiry, we can assist you faster:

    • Link to your site: it’s helpful for us to try and see the reported behavior for ourselves.
    • Screenshots, if applicable
    • Report Number: This can give us a lot of very useful information. Navigate to LiteSpeed Cache > Report, press the Send to LiteSpeed button, make note of the “Report Number”, and then include the number with your inquiry so we can look it up.

    If your problem is tricky, it might be helpful to have a look at your debug log:

    1. If there is no Debug Log option in the LiteSpeed Cache menu, then you will need to enable logging. Navigate to LiteSpeed Cache > Settings > Debug and set Debug Log to ON, or Admin IP Only.
    2. Do what you must to reproduce the error.
    3. Navigate to LiteSpeed Cache > Debug Log
    4. Copy the most recent or relevant lines from the log and include them with your inquiry.
    5. Turn the debug log off, if you no longer need it.

    We enthusiastically support all of our software, so if you are struggling with LiteSpeed Cache for WordPress, please give us an opportunity to help you!

    Have some of your own ideas for future WordPress Wednesday topics? Leave us a comment!

    Don’t forget to meet us back here next week for the next installment. In the meantime, here are a few other things you can do:

  • WpW: Translating LSCache for WordPress

    WpW: Translating LSCache for WordPress


    WordPress Wednesday: Translating LSCache for WordPress

    Welcome to another installment of WordPress Wednesday!
    Today’s topic is: Translating LSCache for WordPress

    Hello, world travelers, jet setters, and polyglots! Today’s post is for you.

    You’ve probably noticed that LiteSpeed Cache for WordPress is written in English. We rely on our international users to help us translate the plugin for worldwide use. If you are fluent in a language other than English, and you’ve ever wanted to contribute your linguistic talents to an open-source project, we hope you’ll consider translating a few phrases for us.

    Only know English? If you’re one of our friends from the UK, Australia, New Zealand, South Africa, or Canada, we hope you, too, can help us to localize/localise our plugin with your own flavor/flavour of English 😉

    Translating LSCache for WordPress: Languages We NeedIs Your Language Needed?
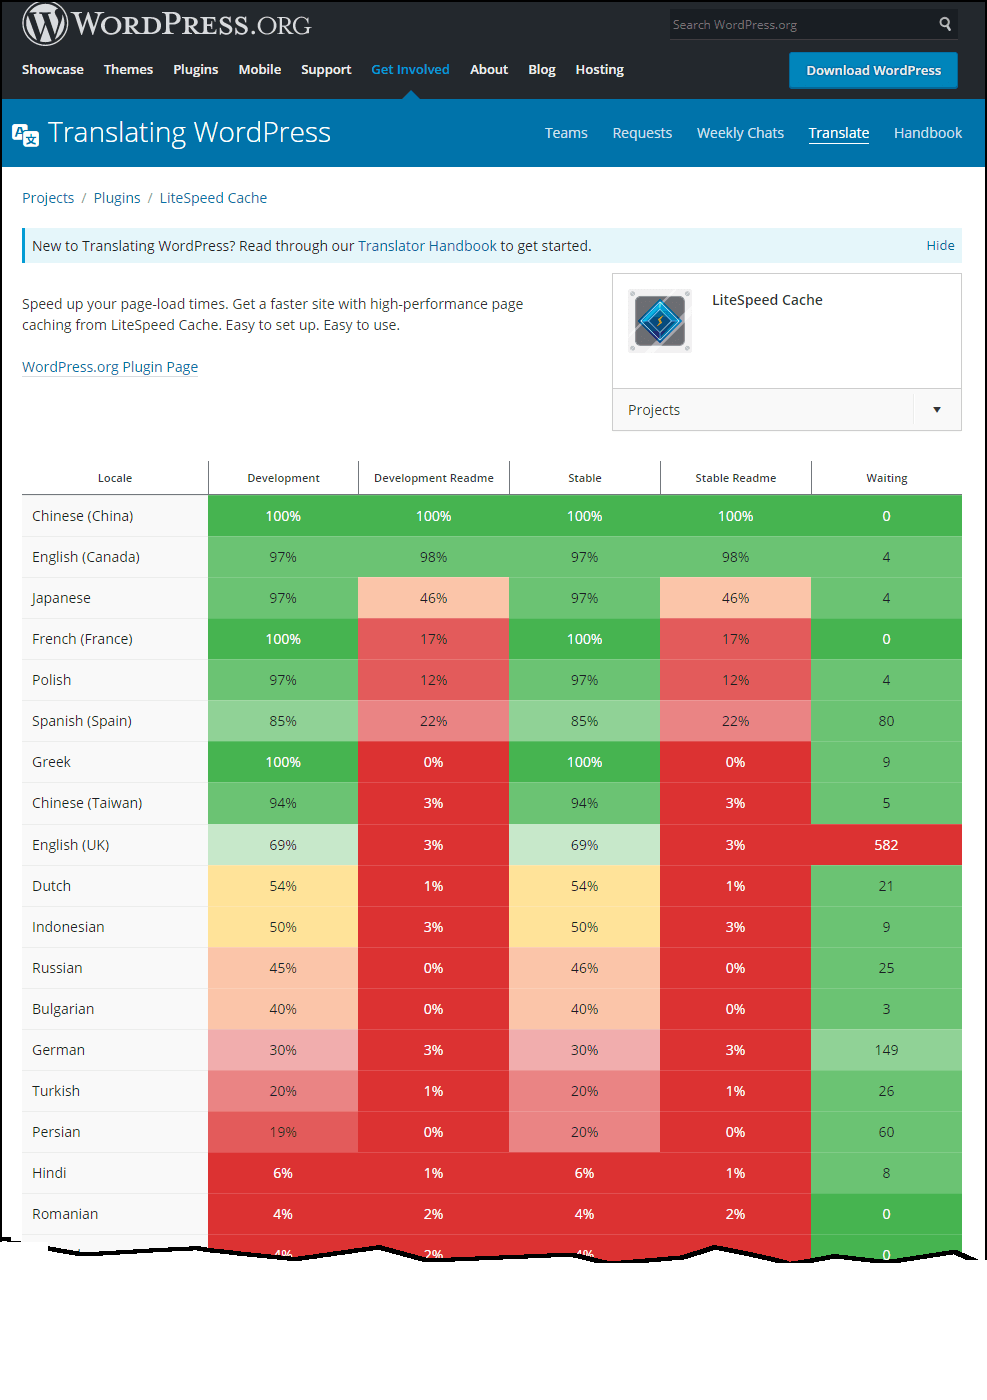
    We have a few languages very well covered, so you’ll want to check the Translating WordPress page for LiteSpeed Cache and look for your language (and geographic location if applicable). If there are red or yellow boxes next to the language, then your expertise is needed.

    As you can see, we have quite a few red boxes as of this writing (and several pages more of them past where the screenshot ends). The most important column is the “Stable” column. Languages with shades of red in the stable column have less than a third of the plugin translated.

    How to Submit a Translation

    All you need is a wordpress.org login. Once you are logged in, you can click the link and start translating at your own pace.

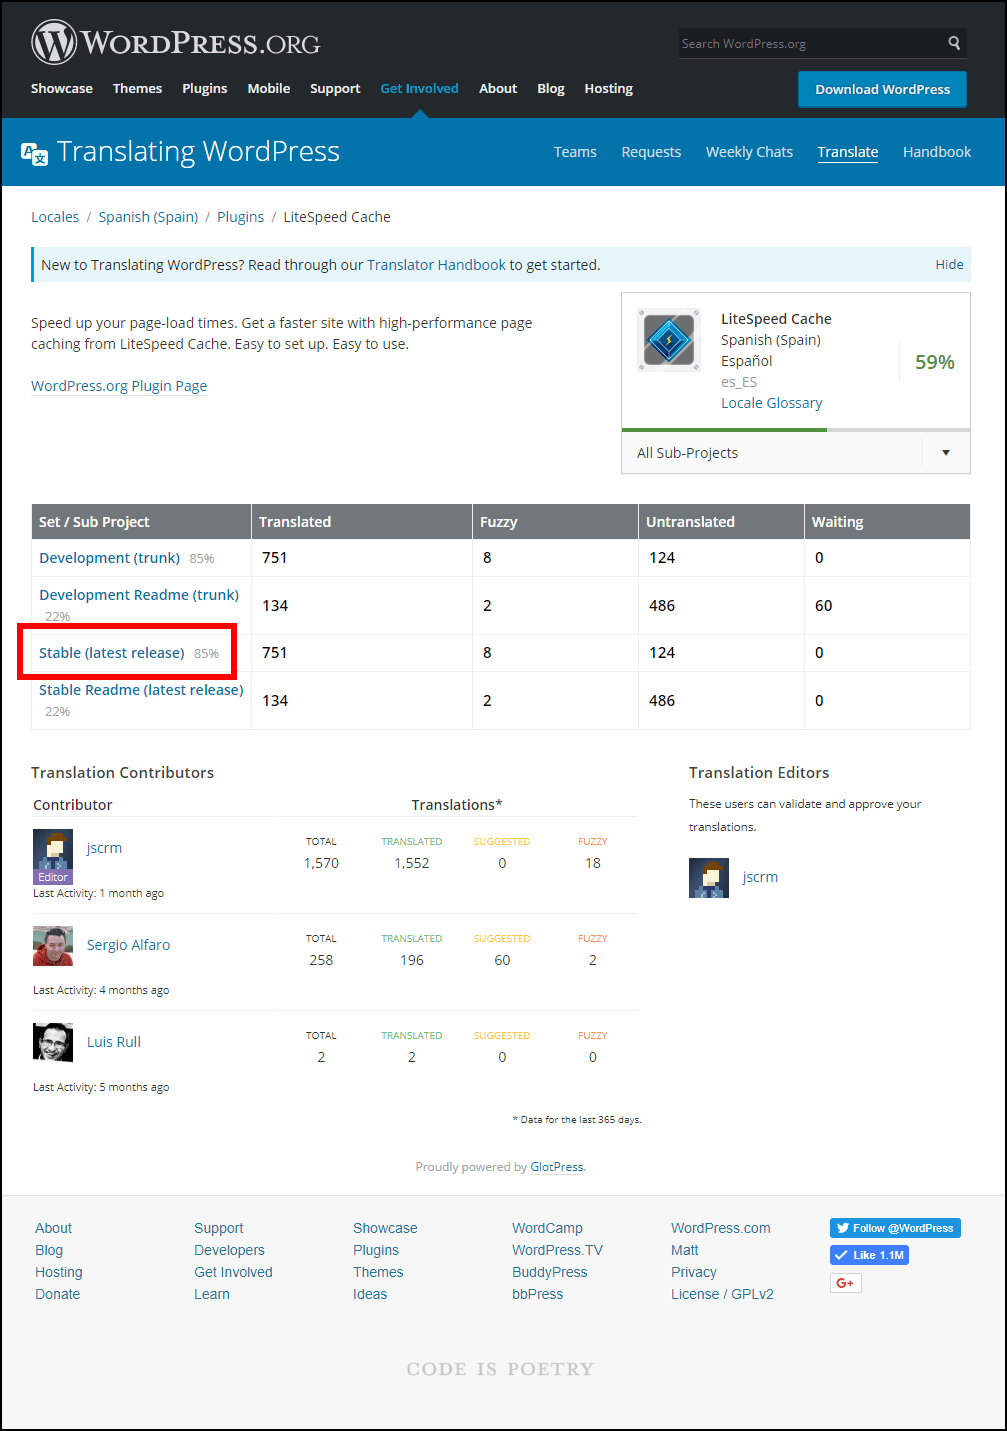
    The instructions will be the same for whichever language and geographic location you choose, but for simplicity’s sake, let’s say you’re from Spain and would like to contribute to the Spanish-as-spoken-in-Spain translation. Click Spanish (Spain) to be brought to the es_ES translation page.

    Translating LSCache for WordPress: Edit the Stable Release

    The most important section to work on first is Stable (latest release), so click on that to see what strings are still missing translation.

    Translating LSCache for WordPress: Entering a Translation

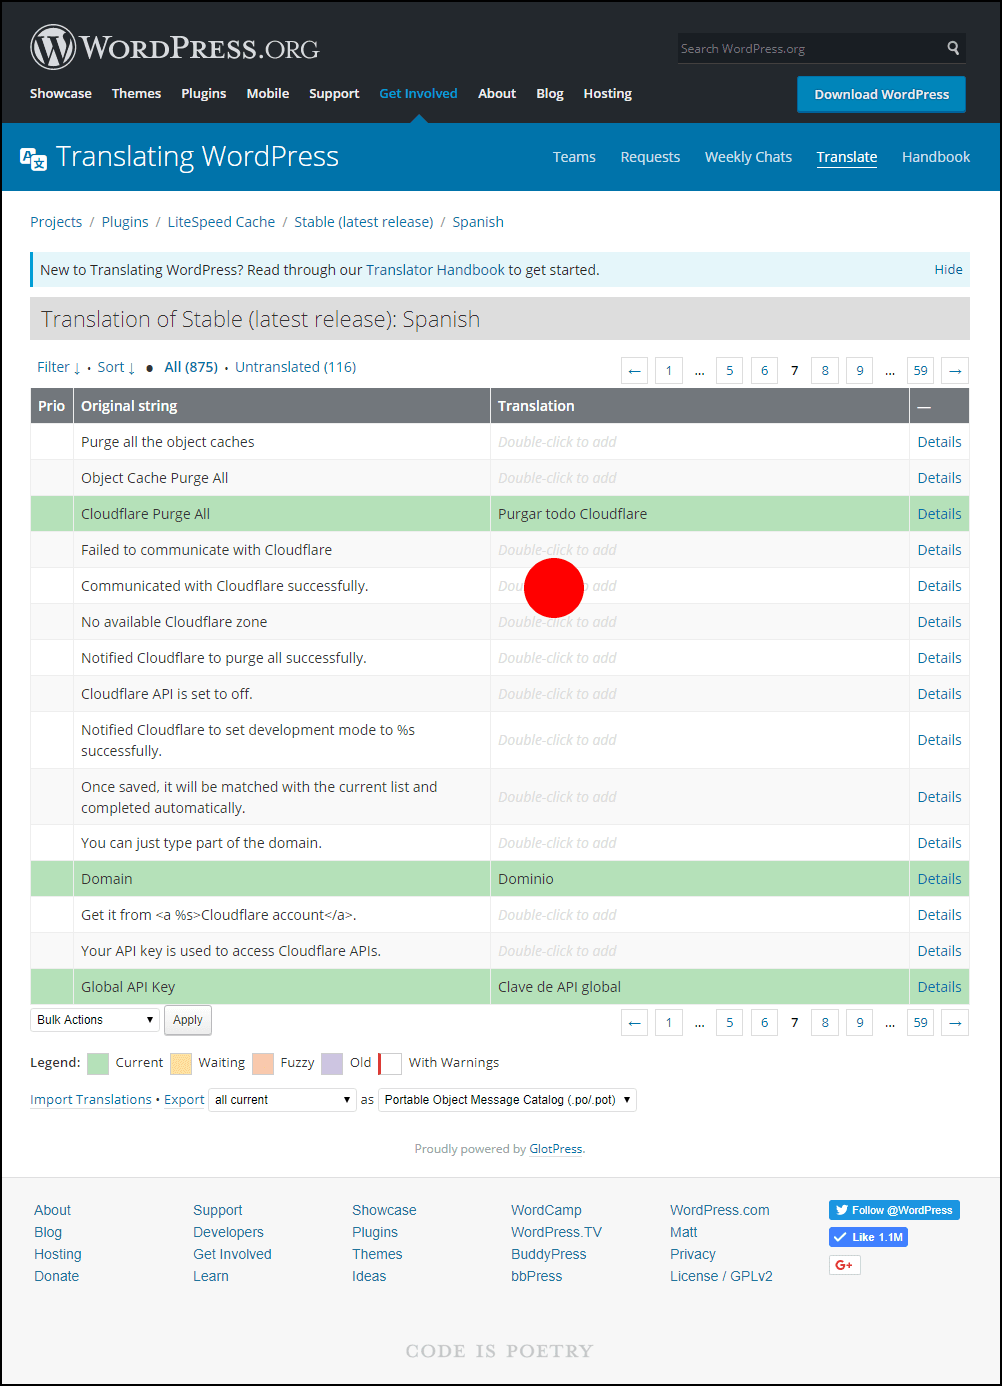
    You’ll be brought to a list of strings and their current translations (if any).

    This list, if it’s not well-populated, may look overwhelming. However, it is not required for you to translate every single string. You could spend half an hour and do thirty of them. Or ten. Or even just one. Every contribution, even a small one, gets us closer to full translation for your locale.

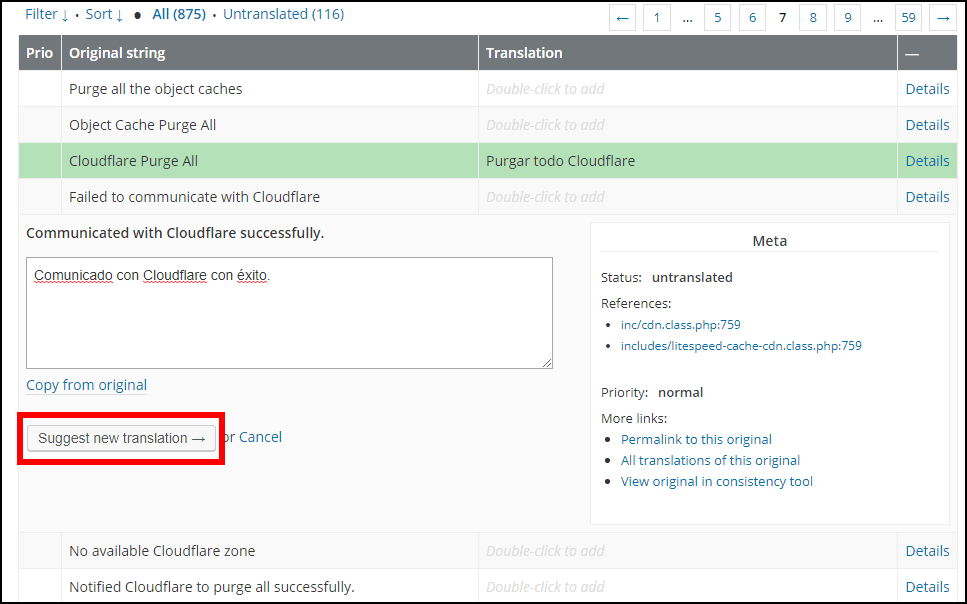
    When you see a string you’d like to translate (for example, Communicated with Cloudflare successfully), double click on the Translation column for that string, and enter your translation in the box.

    Translating LSCache for WordPress: Submitting a Suggestion

    Click the Suggest new translation → button. Congratulations, you have successfully translated your first string.

    Now What?

    All translations must be approved by an editor for your language before they are incorporated into the plugin.

    If you would like to be a translation editor for LSCache, just keep translating! We will notice you, and apply to wordpress.org to give you editor access. Additionally, we’ll add you to our Slack team, where you can communicate with our other editors, and be kept in the loop for new plugin updates and needed translations.

    Thank you for helping us make LSCWP accessible for a global audience!

    Have some of your own ideas for future WordPress Wednesday topics? Leave us a comment!

    Don’t forget to meet us back here next week for the next installment. In the meantime, here are a few other things you can do:

  • WpW: Simplifying the View in LSCache

    WpW: Simplifying the View in LSCache

    Simple LiteSpeed Cache Settings

    Welcome to another installment of WordPress Wednesday!
    Today’s topic is: Simple LiteSpeed Cache Settings

    Disclaimer: The information contained in this post was accurate for LSCWP v1.9 [release log], but is now out of date. We’re sorry, but LSCache no longer has this Basic/Advanced mechanism. If you are overwhelmed by all of the options, try Presets. Here is an article on how to use Presets. A good place to start is the “Essentials” preset, which enables some simple, low-risk caching settings. 

    Generally speaking, the more features you add to a piece of software, the more complicated the interface gets. Well, this week I’m going to tell you about a recent feature in LSCache for WordPress that actually makes the interface less complicated!

    The Non-Power User

    We get a lot of feature requests from power users, and it’s these requests that have helped drive so much of the innovation of the last several months.

    But there’s another type of user; one that we don’t often hear from. It’s the site owner who doesn’t want (or understand) all of those new bells and whistles. This type of user often will install the plugin, see twelve or thirteen overwhelming tabs of settings, and change his or her mind on the spot. Uninstall!

    We think it’s kind of a shame to lose people who might actually love our plugin, if they didn’t find it so overwhelming! So, it’s in that spirit that we share this new feature.

    If you’re one of those not-so-intrepid users, this one’s for you!

    Introducing Basic View

    Simple LiteSpeed Cache Settings

    Basic View is ideal for those who simply wish to enable the cache and not fiddle with any of the other optimization options. When you install and activate LSCWP, it starts in Basic View by default.

    Advanced View reveals eight more tabs, some with advanced cache settings, some with non-cache-related optimization features. If you will find the presence of these options to be overwhelming, you can click Basic View and forget all about them.

    Simple LiteSpeed Cache Settings

    You are free to switch between Basic and Advanced views as often as you like. You are in complete control.

    And that’s all there is to it! It’s a short-and-sweet WordPress Wednesday this week. If you want to know more, you can visit our Beginner’s Guide and get all of the up-to-date details about what is included in each view.

    And please don’t be a stranger! We like to hear ideas from all of our users, not just the ones who understand what “load CSS asynchronously” means 😁


    Have some of your own ideas for future WordPress Wednesday topics? Leave us a comment!

    Don’t forget to meet us back here next week for the next installment. In the meantime, here are a few other things you can do:

  • WpW: Limiting the LSCache Crawler

    WpW: Limiting the LSCache Crawler

    WordPress Wednesday: Limiting the LiteSpeed Cache Crawler

    Welcome to another installment of WordPress Wednesday!
    Today’s topic is: Limiting the LiteSpeed Cache Crawler

    Disclaimer: The information contained in this post is accurate for LSCWP v1.9 [release log]. If you are using a newer version of the plugin, some details may have changed. Please refer to our wiki for the latest!

    When we introduced the LiteSpeed Cache Crawler in our WordPress plugin last May, we told you that the crawler has the potential to consume significant system resources, if not configured with efficiency in mind. It was for this reason that we put the on/off switch in the hands of the hosting providers.

    Some hosts wanted the ability to allow their clients the use of a LSCWP crawler, but only if the providers had the ability to set some limits.

    We thought that was a great idea, and so today we’re going to talk about the new crawler-specific server variables that we created in response to this request.

    Why Limit the Crawler?


    Limiting the LSCache Crawler: Forest Tent Caterpillar Moth

    The settings in LSCWP’s Crawler tab have always been designed to minimize server impact. Site admins are encouraged to configure their crawler to be conservative in its usage of resources. That said, users are free to configure it however they like. Site admins on shared hosting could conceivably use crawler settings that bring a server to its knees if they wanted to, negatively impacting every other site on that server.

    With no safeguards in place to protect against the rogue site owner in the second scenario, many shared hosting providers have decided not to take a chance on enabling the crawler.

    But now, with these new server variables, we are giving hosting providers the ability to set some boundaries for the site owners. The idea being, if they can guarantee that no client can hog all of the resources, then there should be enough to go around.

    Exactly What Do These New Variables Limit?

    Currently hosting providers can potentially limit two of the crawler settings that are found in LiteSpeed Cache > Settings > Crawler.

    Delay

    This setting lets LSCache know how often to send a new request to the server. The longer the delay, the less load there is on the server, but the longer it takes to crawl. LSCache defaults Delay to 500 microseconds, but site admins may change the number to whatever they like.

    The CRAWLER_USLEEP variable puts a minimum allowed value on the Delay field. You can specify a large number, if you want to slow down all of the crawlers on your server and minimize their impact.

    For example, if you set CRAWLER_USLEEP to 1000 microseconds, then your site admins may set their own crawler delays to any number greater than or equal to 1000. All site crawlers across the server will never be allowed to run faster than 1000 microseconds between requests.

    Server Load Limit

    Server Load Limit keeps the crawler from monopolizing system resources. Once the load reaches this limit, the crawler will be terminated rather than allowing it to compromise server performance. LSCache defaults Server Load Limit to 1, which is fairly conservative, but site admins have the ability to crank it up as high as they like.

    With the following server variables, hosting providers can prevent site owners from setting the limit too high.

    • CRAWLER_LOAD_LIMIT sets a default value for the Server Load Limit field.
    • CRAWLER_LOAD_LIMIT_ENFORCE sets a maximum allowed value on the Server Load Limit field. While the previous variable is more of a suggestion, this is an enforced maximum.

    For example, if you set CRAWLER_LOAD_LIMIT to 3, then 3 will override the LSCache default of 1. If a site admin enables crawling without changing any of the settings, that site’s Server Load Limit will be 3.

    If you use CRAWLER_LOAD_LIMIT by itself, site admins are still free to change it to whatever they like. To prevent this behavior, and set a maximum Server Load Limit, you would use CRAWLER_LOAD_LIMIT_ENFORCE. Set it to 6, for example, and the site owners will not be allowed to exceed a Server Load Limit value of 6.

    How to Limit the Crawler

    Limiting the LSCache Crawler: Forest Tent Caterpillar Moth

    To use the server variables, add them one-per-line to the appropriate configuration file. For example:

    CacheEngine on crawler
    
    SetEnv CRAWLER_USLEEP 1000
    SetEnv CRAWLER_LOAD_LIMIT_ENFORCE 6


    The variables can be used server-wide or on a virtual-host basis, and are completely optional. We’ve incorporated the server variable instructions into our Enabling the Crawler instructions. Check that out to get specific directions for your control panel, for LiteSpeed native WebAdmin, or for no control panel at all.

    Hosting providers, we hope that these new variables will allow some of you to open up crawler usage to more of your clients!

    Site owners, if you’ve been unable to persuade your hosting provider to enable crawling, maybe this new ability to limit crawler impact will change their minds! Feel free to share this blog post with your host, or share a link to the crawler setup page on our wiki.

    Have some of your own ideas for future WordPress Wednesday topics? Leave us a comment!

    Don’t forget to meet us back here next week for the next installment. In the meantime, here are a few other things you can do:

  • WpW: Object Cache Support in LSCache

    WpW: Object Cache Support in LSCache

    WordPress Wednesday: Object Cache Support in LSCache

    Welcome to another installment of WordPress Wednesday!

    Today’s topic is: Object Cache Support in LSCache

    Disclaimer: The information contained in this post is accurate for LSCWP v4.5.0.1 [release log]. If you are using a newer version of the plugin, some details may have changed. Please refer to our documentation for the latest!

    You asked for it, and we delivered. LiteSpeed Cache for WordPress supports Object Cache!

    What is an Object Cache?

    An object cache stores the results of expensive and/or frequent database queries in a way that makes them easy to retrieve, and eliminates the need for repeated access to the database. Object caching greatly reduces the time it takes to retrieve query results.

    For example, WordPress stores your site’s options in the database. Site options include things like the site’s name and URL. Every time WP assembles a page for a visitor, it is necessary to access the database to read the site options. As you can imagine, these repeated queries for the same information represent wasted resources. With an object cache, you can query the database once, and save the results for a set period of time. During that time, whenever a page must be assembled, WordPress can get the site information from the object cache. Accessing object cache is a much less resource-intensive prospect than accessing a database.

    Some queries are time-consuming, and other queries are repeated frequently. Both of these scenarios can be improved by storing the query results in object cache.

    Note: If you have a site that is fully-cached by LSCWP, object cache won’t be invoked very often. Object cache is only necessary when WordPress is building a page through PHP. If PHP is not being called (and minimizing PHP usage is the goal with LSCache, after all) then there are no queries to process and therefore nothing to look up in object cache.

    How to set up Object Cache Support

    LSCWP doesn’t provide object caching directly. Rather, it supports your use of an external object cache such as Redis, Memcached or LiteSpeed’s drop-in Memcached replacement, LSMCD. Setting up object cache systems is outside of the scope of this tutorial, but you can find some useful information via the product links above or by visiting our documentation site.

    So, assuming you are already using one of these object caching methods, you can set up LSCWP support in the Cache Settings tab.

    Navigate to LiteSpeed Cache > Cache > Object. You will need to give LSCWP some parameters, including where your Redis, Memcached or LSMCD lives, which objects you’d like to have cached, and how long you want objects to remain in cache, among other things.

    LSCache Object Cache Settings

    Object Cache

    This entire integration is disabled by default. Select ON to enable it and then configure it via the settings, as described below.

    Status

    This is an informational area to let you know the status of your external object cache. If you are getting errors here, please see How to Debug your Object Cache Setup.

    Method

    Choose Memcached if using Memcached or LSMCD. Choose Redis if using Redis.

    Host and Port

    These settings refer to the hostname (or IP address) and port number used by your object cache. The default values of localhost and 11211 should work fine for you, if your cache is set up via a TCP connection. If you are using a UNIX socket, Host should be set to /path/to/memcached.sock (substitute the actual path used for your installation) and Port should be set to 0.

    Default Object Lifetime

    Choose a TTL for items stored in the object cache. We recommend using a relatively short time in order to avoid stale results. Default is 360 seconds.

    Username, Password, and Redis Database ID

    These settings may or may not be applicable, depending on your object cache setup. If you have SASL installed, fill in the appropriate credentials. If you are using Redis, enter your database ID. These measures will prevent cross-contamination in situations where multiple sites share one object cache.

    LSCache Object Cache Settings

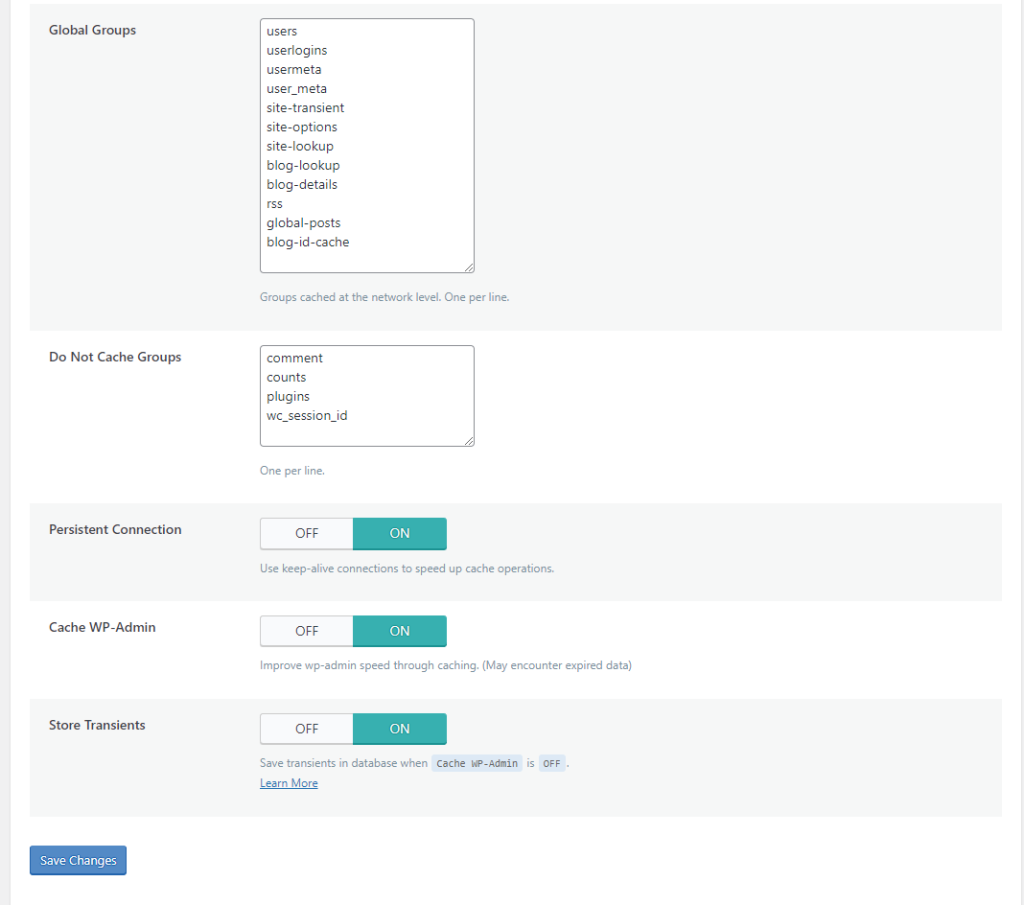
    Global Groups

    This is a list of groups that you want to cache at the network level. By default:

    users
    userlogins
    usermeta
    user_meta
    site-transient
    site-options
    site-lookup
    blog-lookup
    blog-details
    rss
    global-posts
    blog-id-cache
    

    Do Not Cache Groups

    These are groups that you do not want to include in object cache. By default:

    comment
    counts
    plugins
    

    Persistent Connection

    If enabled, the connection is kept alive in order to make Memcached faster. This is set to ON by default.

    Cache WP Admin

    If enabled, WordPress admin will be sped up, but at the risk of occasionally retrieving stale data from the object cache. This is set to ON by default.

    Store Transients

    When Cache WP Admin is set to OFF, transients have nowhere to go. Without transients, you don’t receive server status notices (such as XXXX has been completed successfully.). If you have disabled Cache WP Admin, then you can use Store Transients to get server notices. This is set to ON by default.

    Why do You Need LSCache for This?

    You may be wondering: what is the point of setting up object cache support in the LSCache plugin?

    So here’s the thing: you can’t use object cache without telling WordPress how to handle it. You need a plugin for that. You can install a single-purpose object cache plugin, or you can let LSCache facilitate the relationship between your object cache and WordPress.

    It comes down to this: would you rather install several plugins with many different interfaces to handle all of your optimization needs? Or would you rather have one optimization plugin that can handle it all? If you like the second option, then LSCache is your solution!

    Have some of your own ideas for future WordPress Wednesday topics? Leave us a comment!

    Don’t forget to meet us back here next week for the next installment. In the meantime, here are a few other things you can do:


    This content was last verified and updated in April of 2023. If you find an inaccuracy, please let us know! In the meantime, see our documentation site for the most up-to-date information.

  • WpW: Troubleshooting LSCache Optimization

    WpW: Troubleshooting LSCache Optimization

    WordPress Wednesday: Troubleshooting LSCache Optimization

    Welcome to another installment of WordPress Wednesday!
    Today’s topic is: Troubleshooting LSCache Optimization

    Disclaimer: The information contained in this post is accurate for LSCWP v1.8.1 [release log]. If you are using a newer version of the plugin, some details may have changed. Please refer to our wiki for the latest!

    So, you enabled optimization features in LiteSpeed Cache for WordPress, and your site display turned wonky. It’s a common problem, but it’s probably not, strictly speaking, an issue with the LSCache plugin. Instead, it’s more likely to be an issue with a single CSS or JavaScript file that doesn’t want to play nicely with Minification or Combination.

    Because these file anomalies are outside of the scope of LSCache’s free support, we would like to share this troubleshooting guide today to help you find that problematic file yourself and exclude it from optimization.

    (NOTE: If you really don’t want to do the detective work yourself you can hire us to do it for you.)

    Verify it’s an Optimization Issue

    Verify it's an optimization issue

    Before getting into the nitty gritty, let’s make sure that it really is an optimization issue. Turn off all optimization features, purge the cache, and check your site, like so:

    1. Turn off optimization. From the WordPress Dashboard, navigate to LiteSpeed Cache > Settings > Optimize and set all of the following to OFF: CSS Minify, CSS Combine, CSS HTTP/2 Push, JS Minify, JS Combine, JS HTTP/2 Push.
    2. Purge the cache. Navigate to LiteSpeed Cache > Manage > Purge and press the Purge All button.
    3. Check your site. Reload the page. Does it still look bad?

    It still looks bad

    If it’s still not displaying correctly, then the problem is not with LSCache’s optimization features.

    What happens if you turn of LSCache completely? Does the site look fine? If so, then some other feature of LSCache is interfering with your site. Visit our forum, and let us know what’s happening.

    If the site is still messed-up even after turning off LSCache, then the issue is related to something else on your site and we, unfortunately, can’t help. It’s probably a good time to contact your hosting provider.

    It looks good now

    Congratulations, you have confirmed that the issue lies somewhere in the optimization features. Now you have two options:

    1. Leave those optimization options turned off for good. This is an easy solution, and if you choose to do this, your site can still benefit greatly from caching even without optimization enabled. Remember, you don’t have to use combine and minify to use LSCache!
    2. Turn those options back on, do some troubleshooting to find the problematic file, and exclude that file from optimization. If you want to go this route, grab a cup of coffee, make yourself comfortable, and let’s get started!

    Troubleshooting LSCache Optimization

    Identify Whether it’s a CSS or JavaScript Issue

    The first step in finding the problematic file is determining whether we are looking at a JavaScript issue or a CSS issue.

    Let’s check JavaScript first:

    1. Re-enable the JS-related optimization functions, and leave the CSS functions disabled.
    2. Purge the cache again.
    3. View the page. How does it look?
    4. If it’s messy, then one of your JS files is problematic. Jump ahead to the next section.
    5. If it’s fine, then your JS files are also fine.

    If JavaScript wasn’t the culprit, then it’s probably CSS. Let’s make sure.

    1. Disable the JS-related optimization functions, and re-enable the CSS functions.
    2. Purge the cache again.
    3. View the page. How does it look?
    4. It should be messy, indicating one of your CSS files is problematic.

    Now that you know whether it’s CSS or JS, you’ll need to find the specific file that is causing the problem.

    Find and Exclude the Problematic File(s)

    For the purposes of these instructions, let’s assume you have a CSS file causing trouble. If, in fact, your issue is with JavaScript, you can still follow these same steps. Just imagine that the instructions say “JS” everywhere that they say “CSS.”

    In order to find the file that is at fault, first we need to get a list of all possible CSS (or JS) files. Once that is done, we will exclude the entire list of files from optimization, and then reintroduce them one-by-one until we’ve found our culprit.

    Get a List

    Get a List of CSS Files

    Using the browser’s Developer Tool, visit the Network tab, and click CSS to view only the CSS files. Reload the page. You should see a list of all of the CSS files in use by that page, listed in the Name column. Exclude everything on this list from optimization.

    You can exclude files by full URL or by partial path.

    If you need to see the full path of any one CSS file, click on the name of that file, and click Headers. You will find the full location of the selected file listed as Request URL.

    Test the List

    Test the List of CSS Files

    1. Enable all of the optimization functions you wish to use.
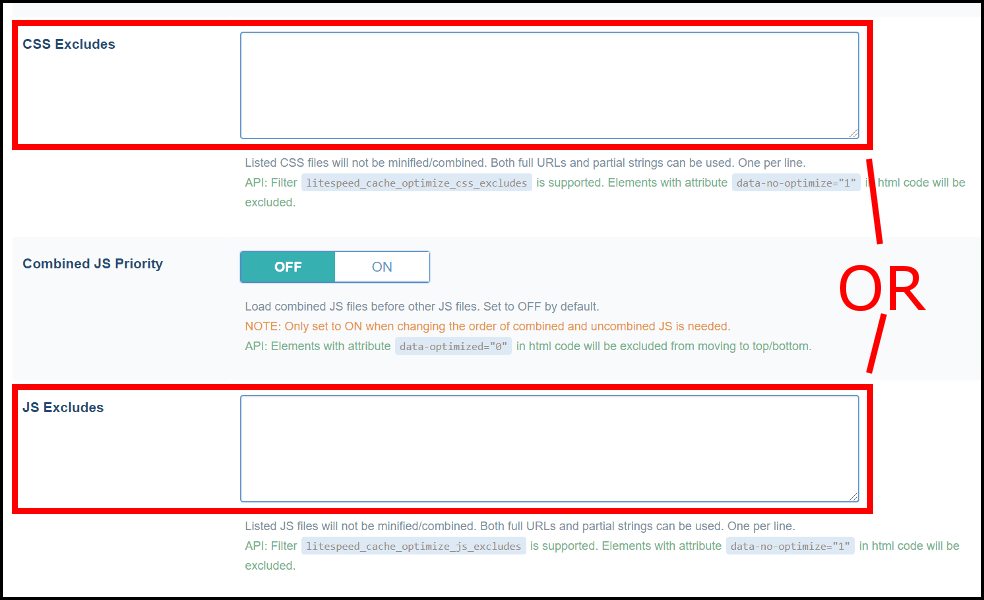
    2. Exclude all of the CSS files from optimization: Navigate to LiteSpeed Cache > Settings > Tuning and enter the files from your list, one-per-line, in the CSS Excludes box.
    3. Purge the cache and check the site. It should be displaying correctly.
    4. Remove one of the CSS files from the exclude list, and purge the cache.
    5. Check the site.
      1. If it still looks ok, then that file you just removed was not the problematic file.
      2. If the site looks broken, then you know you have found a problematic CSS file. Put it back in the box and leave it there.
    6. If there are more unchecked files, repeat from Step 4.

    At the end of this process your work should be done! Your site should look good, all of the optimization functions you wish to use should be enabled, and you should have one or more problematic CSS or JS files sitting the in the CSS Excludes or JS Excludes box and eliminated from future optimization. Success!

    Are any of these steps unclear? Have something you’d like to add? Leave a comment! If you’d like to see another example for how to troubleshoot optimization issues, see our wiki.

    Have some of your own ideas for future WordPress Wednesday topics? Leave us a comment!

    Don’t forget to meet us back here next week for the next installment. In the meantime, here are a few other things you can do:

  • WpW: Using Admin IP Commands with LSCache

    WpW: Using Admin IP Commands with LSCache

    WordPress Wednesday: Using Admin IP Commands with LSCache

    Welcome to another installment of WordPress Wednesday!
    Today’s topic is: Using Admin IP Commands with LSCache

    Disclaimer: The information contained in this post is accurate for LSCWP v1.8 [release log]. If you are using a newer version of the plugin, some details may have changed. Please refer to our wiki for the latest!

    What are Admin IP Commands?

    There is a spot in the LSCache for WordPress plugin settings where you can specify any IP address(es) belonging to your blog’s administrators. Then, if you visit your WP site from one of those listed IPs, LSCache will allow you to execute certain admin commands right from the site’s front-end using a special query string.

    These query strings are only executed when they come from a listed Admin IP. Otherwise, they are ignored.

    Specifying Your Admin IP(s)

    Specifying your Admin IP

    From the WordPress Dashboard, navigate to LiteSpeed Cache > Settings > Debug. Enter each Admin IP address, one per line, in the Admin IPs box. Once you save your changes, LSCache will allow visitors from any IP listed here to manage the cache from the browser’s URL bar.

    Using Admin IP Commands with LSCache

    WordPress Wednesday: Using Admin IP Commands with LSCache

    Once your Admin IPs are specified, you may use the ?LSCWP_CTRL= query string from the browser in order to trigger one of several actions. Please note that this query string and its parameters are case-sensitive, so they must be in ALL CAPS as seen here. The following parameters are available:

    NOCACHE

    NOCACHE – This is used to display the uncached version of a page. It does not purge the page from cache, or disable the cache for that page. It simply generates the dynamic version of the page as if it were not cached.

    Why would you want to use this? Perhaps you are running a test, and would like to verify that the cached version of a page is up-to-date. In separate tabs, you can open http://example.com/page/ and http://example.com/page/?LSCWP_CTRL=NOCACHE and compare the results.

    PURGE

    PURGE – This is used to purge all cache tags associated with a page, with the lone exception of the blog ID tag. (You would effectively purge the entire site, if you were to purge the blog ID cache tag.)

    A page can have several tags associated with it: the post id tag, category tags, tag tags, author tags, etc. Using the PURGE parameter will purge the page, and any other pages that contain the same cache tags. So, for example, imagine a page that describes a cold brew coffee method. It has the following categories: tutorials, coffee. It has the following tag: cold brew. If you enter the following URL:

    http://howtobeverage.com/coffee/making-cold-brew/?LSCWP_CTRL=PURGE


    LSCache will purge the making-cold-brew page, along with the tutorials category, the coffee category, and the cold brew tag.

    PURGESINGLE

    PURGESINGLE – This is used to purge the first cache tag associated with the page, presumably the post id tag. Using the above example, if we substituted PURGESINGLE for PURGE, LSCache would only purge the making-cold-brew cache tag. The related categories and tags would remain in cache.

    SHOWHEADERS

    SHOWHEADERS – This is used to show all the cache headers associated with a page. This may be useful for debugging purposes.

    And that’s it for this week! Isn’t it nice when a topic is short and sweet? Feel free to leave a comment if you would like clarification on anything we covered today!

    Have some of your own ideas for future WordPress Wednesday topics? Leave us a comment!

    Don’t forget to meet us back here next week for the next installment. In the meantime, here are a few other things you can do:

  • Customer Showcase: LSCache Provides All-in-One Optimization for WordPress

    Customer Showcase: LSCache Provides All-in-One Optimization for WordPress

    Customer Showcase: LSCache Provides All-in-One Optimization for WordPress

    Sergio Alfaro of the online shop Invitaciones y Tarjetas de Cumpleaños GRATIS needed a way to maximize his site’s performance without introducing third-party-plugin conflicts. LiteSpeed Cache for WordPress to the rescue! Below is the Invitaciones y Tarjetas de Cumpleaños GRATIS story as told by Sergio to LiteSpeed. Read on to see how LSCache Provides All-in-One Optimization for WordPress!

    Customer Profile

    • Store: Invitaciones y Tarjetas de Cumpleaños GRATIS located in Spain, EU
    • Hosting Provider: Mundiserver, using OVH server located in France, EU
    • WordPress Version: 4.9.1
    • LiteSpeed Cache Plugin Version: 1.8
    • Store Configuration: Standard WordPress installation
    • Average Traffic: 20,000 unique visitors/month with 45,000 page views/month
    • 3rd Party Plugins: LiteSpeed Cache, Yoast SEO, All in One WP Security, Complete Analytics Optimization Suite, Mailster, etc.

    The Invitaciones y Tarjetas Story

    Customer Showcase: Invitaciones y Tarjetas de Cumpleaños GRATIS

    The Challenge

    1. Maximize speed improvements without JS/CSS conflicts or third-party-plugin conflicts
    2. Avoid having to use a lot of plugins to optimize the website, manage the CDN, manage cache, etc.

    Before

    We used a “shared hosting” wordpress specialist hosted in Spain. I say “shared hosting” but really they were bigger dedicated servers with a small number of accounts assigned to each one and they used Cloud Linux to assign the resources.

    Our Setup

    The host provided:

    • 2GB RAM and 2 CPU cores
    • The host’s own WordPress plugin
    • nginx with Varnish
    • Strong rules to avoid WP hacking
    • Image optimization via a one-click server solution

    Along with the host’s own WP plugin, I used the premium WP Rocket plugin and tried the Autoptimizer plugin, too. I was hoping that the speed would be better than before, especially the time to first byte, but the total time to load continued to be very high in all combinations I tried.

    Another big problem was that the cache expired quickly and needed to be re-cached manually by the visitors. I dedicated several weeks to testing other solutions: W3 Total Cache was very complex, introduced many issues for my website and didn’t give me good results. WP Rocket worked easily and provided better results on speed test pages but really didn’t improve the total load time very much. I tried many other caches and optimization plugins but the best I was able to achieve was to load the homepage in around 3.5 seconds. Internal pages that had Adsense loaded in 5-10 seconds.

    The Pagespeed/YSlow scores, Pingdom and Webpagetest normally resulted in C or D scores and were never better than a B.

    After

    Now we have our own dedicated server where we store a lot of websites, many of them complex multistore/multilanguage Magento stores using the LiteMage plugin, along with several WordPress sites. For this reason, we use CloudLinux too, to work exactly in the same manner that our previous hosting did: separating all of the WHM accounts and limiting the assigned resources. In this way, we can provide unlimited resources to some domains and limited CPU/RAM to others.

    We have had amazing results with a Magento store that was hosted by Aspiration Hosting,using LiteSpeed Web Server with LiteMage, so we really are big fans of LiteSpeed. And so without any doubt, we bought a 4 CPU license for this server.

    For the https://www.invitacionesytarjetas.gratis website we limited the resources to 2 CPU cores and 2GB of RAM too: exactly the same as in our previous hosting.

    We installed the LiteSpeed Cache plugin for WordPress, and without modify anything, we noticed a very big speed improvement – simply using the default setup. And once we saw that this plugin is a really an All-in-One optimization suite, we started playing with different options.

    Current Plugin Configuration

    • Cache: All options enabled except Cache Mobile.
    • Optimize: All options enabled, including DNS Prefetch
    • Tuning: We’ve excluded one JS file from minification to avoid a conflict with another plugin. This is an awesome feature because you can continue using the Minimize/Combine JS options without the need to fully disable them if a conflict arises.
    • Media: LazyLoad features are off because our template already handles that feature. Image WebP Replacement is enabled.
    • CDN: We have enabled Cloudflare. We use the free account, as our website is worldwide oriented in the Spanish language, not only for Spain, and a CDN can always help. We set Load JQuery remotely to Google.
    • Everything else uses the default setting.

    Another great feature integrated in the plugin is Image Optimization. We have achieved Level 5 here with all images optimized: in total, 2429 images optimized and converted to webp format.

    I can’t forget to mention the amazing crawler feature. We are using Yoast’s sitemap.xml to be sure that all posts and pages are properly crawled and cached. This tool helps to minimize the number of uncached pages a visitor will encounter.

    Results

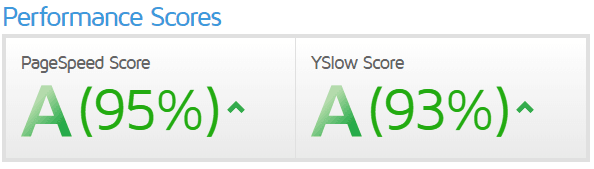
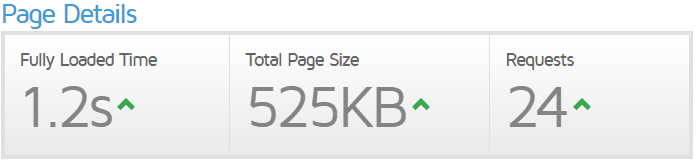
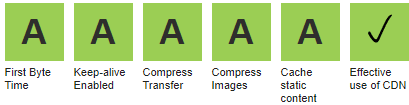
    GTmetrix: (Pagespeed A 95% / YSlow A 93% / 1.2s load):
    https://gtmetrix.com/reports/www.invitacionesytarjetas.gratis/hvFYT09v
     LSCache Provides All-in-One Optimization for WordPress Performance Scores
     LSCache Provides All-in-One Optimization for WordPress Page Details

    Pingdom tools: Performance B 88 – 377ms to full load
    https://tools.pingdom.com/#!/c5ntzi/https://www.invitacionesytarjetas.gratis
     LSCache Provides All-in-One Optimization for WordPress Pingdom Tools

    Webpagetest: All in green A A A A A
    https://www.webpagetest.org/result/180116_3S_adf6f339b68fa9b7e31409979a63c8b0/
     LSCache Provides All-in-One Optimization for WordPress
     LSCache Provides All-in-One Optimization for WordPress

    So we are very happy with our LiteSpeed server in combination with the LiteSpeed Cache WordPress plugin.

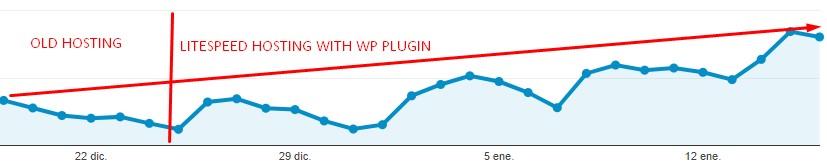
    We noticed an increase in organic traffic from Google within days of switching. No one can confirm that the main reason for such a gain is the 300% improvement in speed, or the exceptional ratings according to the Google requirements and guidelines, but at this screenshot from the last 30 days. Coincidence?

     LSCache Provides All-in-One Optimization for WordPress Traffic Increase

    Litespeed plugin is a real All-in-One plugin

    You no longer need to have 3-4 different plugins to achieve what you need. Often the use of multiple plugins can introduce conflicts. Finding the right combination of plugins with a good collection of features and the ability to work well together can be a challenge.

    LiteSpeed’s plugin has the server cache, CSS/JS minification and combination with the option to exclude some files, CDN support, DNS prefetch, a built-in crawler, image optimization, and many more advanced features.

    Even better? You can install the plugin, and using the default options, start to see improved performance immediately. After a while, you can start playing with all of the options, enabling and testing the results to discover the combination that is best for your site.

    We see how the LiteSpeed team works very hard adding a lot of new options each week to their plugin. They listen to the users demands, issues notifications and fix problems quickly. So, you can expect the best real solution for your speed problems.


    Our thanks to Sergio for sharing his story! This is our first Customer Showcase in some time, and we would love to see more of them here. Have you experienced the LiteSpeed difference? If you would like to share your story with our readers, drop me a line, and we can discuss it. –Lisa