Blog

  • Common Questions About OWASP with OpenLiteSpeed

    Common Questions About OWASP with OpenLiteSpeed

    OWASP with OpenLiteSpeed

    Running into difficulty with mod_security? Our support team provided this short list of Frequently Asked Questions. We hope they will help you to be successful using the OWASP rule set to secure your OpenLiteSpeed server!

    How do I set up OWASP with OpenLiteSpeed?

    OWASP, or Open Web Application Security Project, provides a comprehensive collection of mod_security rules to protect your server. There are three ways to start using OWASP with OpenLiteSpeed (OLS). Choose the method that applies to your configuration.

    When your OLS is a cloud image, was installed using ols1clk, or was installed using the LiteSpeed repo, you can set up OWASP with the following command:

    bash <( curl -k https://raw.githubusercontent.com/litespeedtech/ols1clk/master/ols1clk.sh ) --owasp-enable
    

    If you’re using OLS with Docker, you can use the built-in bash bin/webadmin.sh --mod_secure enable feature to enable OWASP.

    If you have compiled OLS from source, follow the instructions in our Knowledge Base and install OWASP manually.

    What if mod_security doesn’t exist?

    If the /usr/local/lsws/modules/mod_security.so file doesn’t exist, you can either install it from the repository with the apt-get install ols-modsecurity -y command, or build it from source.

    Is syntax causing my problem?

    It’s common for configuration syntax to be an issue. Here are a few things to remember:

    • Even if Enable Module is set to Yes, you still need to set Modsecurity ON.
    • When you are adding custom rules to the Modsecurity_rules block, be sure that they are enclosed inside of a backtick (`)

    How do I verify if OWASP works?

    You can test the effectiveness of an OWASP rule by trying to break it. For example, try some Cross Site Scripting on your domain:

    http://example.com/?user=<script>alert(123)</script>
    

    If the OWASP rule is working correctly, the server will return a 403` code, and the following error message will be appended to the server error log:

    [Module:mod_security] ModSecurity: Warning. detected XSS using libinjection. [file "/usr/local/lsws/conf/owasp/owasp-modsecurity-crs/rules/REQUEST-941-APPLICATION-ATTACK-XSS.conf"] [line "38"] [id "941100"]
    

    You can try other simple test cases, such as:

    • Classic SQL Injection:
      http://www.example.com/?Username='1' OR '1' = '1' AND Password='1' OR '1' = '1'
      
    • Select Statement:
      http://www.example.com/?id=10 AND 1=2
      

    For each test, verify that the appropriate error message was logged.

    There is much more to OWASP testing than this, so consider taking a look at OWASP’s official testing guide for more ideas.

    What if I am seeing false positives?

    If you are experiencing false positives, first make sure that you are using the most recent Core Rule Set version.

    Then, if the false positives continue, you can raise an issue on the official Core Rule Set repo.

    To keep a particular false positive from impacting access to your site, you might want to comment out the rule to keep it from firing.

    For example, let’s say you have the following in your server’s error log, but it is a false positive:

    [Module:mod_security] ModSecurity: Warning. detected XSS using libinjection. [file "/usr/local/lsws/conf/owasp/owasp-modsecurity-crs/rules/REQUEST-941-APPLICATION-ATTACK-XSS.conf"] [line "38"] [id "941100"]
    

    Edit the configuration file found at /usr/local/lsws/conf/owasp/owasp-modsecurity-crs/rules/REQUEST-941-APPLICATION-ATTACK-XSS.conf and comment out every line of the 941100 rule, like so:

    # SecRule REQUEST_COOKIES|!REQUEST_COOKIES:/__utm/|REQUEST_COOKIES_NAMES|REQUEST_HEADERS:User-Agent|ARGS_NAMES|ARGS|XML:/* "@detectXSS" \
        # "id:941100,\
        # phase:2,\
        # block,\
        # t:none,t:utf8toUnicode,t:urlDecodeUni,t:htmlEntityDecode,t:jsDecode,t:cssDecode,t:removeNulls,\
        # msg:'XSS Attack Detected via libinjection',\
        # logdata:'Matched Data: XSS data found within %{MATCHED_VAR_NAME}: %{MATCHED_VAR}',\
        # tag:'application-multi',\
        # tag:'language-multi',\
        # tag:'platform-multi',\
        # tag:'attack-xss',\
        # tag:'paranoia-level/1',\
        # tag:'OWASP_CRS',\
        # tag:'capec/1000/152/242',\
        # ctl:auditLogParts=+E,\
        # ver:'OWASP_CRS/3.3.5',\
        # severity:'CRITICAL',\
        # setvar:'tx.xss_score=+%{tx.critical_anomaly_score}',\
        # setvar:'tx.anomaly_score_pl1=+%{tx.critical_anomaly_score}'"
    

    Restart the server, and that rule will no longer fire.

    Conclusion

    OpenLiteSpeed and OWASP are a powerful combination for securing your server. If you have a busy server, try the more performant, highly scalable proprietary mod_security engine that comes with LiteSpeed Enterprise Web Server.

    Thank you to Eric Leu for providing most of the information in this article.
  • Rapid Reset HTTP/2 Vulnerablilty

    Rapid Reset HTTP/2 Vulnerablilty

    Rapid Reset HTTP/2 LiteSpeed

    Here’s the situation with the Rapid Reset HTTP/2 vulnerability in a nutshell:

    • CVE-2023-44487 was published yesterday. It outlines a vulnerability in the HTTP/2 protocol, which allows DDoS attacks that are massive in scale
    • LiteSpeed server products (including LiteSpeed Web Server Enterprise, LiteSpeed Web ADC and OpenLiteSpeed) are NOT vulnerable to this line of attack

    Read on for more information about the Rapid Reset HTTP/2 vulnerability, and why you don’t have to worry about your LiteSpeed-powered sites.

    How Rapid Reset Works

    After an HTTP/2 connection is established, the client may choose to cancel the stream by sending an RST_STREAM frame to the server. This is intended to save the server from executing unnecessary tasks.

    The vulnerability is exploited when a large number of streams are canceled quickly over a single connection, before any subsequent streams arrive. The server’s concurrent stream count is not incremented, the maximum is never reached despite all of the activity, and the server becomes overloaded.

    How it affects LiteSpeed products

    Unlike Cloudflare, Google, Microsoft, Amazon, F5, and others, who have been working together on a solution for more than a month, we only learned of this vulnerability with everyone else yesterday, when the CVE was published.

    Despite the short notice, we got to work immediately to learn how (or if) the Rapid Reset vulnerability could be leveraged against LiteSpeed’s HTTP/2 implementation.

    “Because the attack abuses an underlying weakness in the HTTP/2 protocol, we believe any vendor that has implemented HTTP/2 will be subject to the attack.”

    Cloudflare’s Rapid Reset Technical Breakdown

    We’re happy to report that LiteSpeed servers are NOT subject to the attack, and this comes down to our unique HTTP/2 implementation. When LiteSpeed Enterprise became the first web server to offer HTTP/2 support, we did so with an implementation that was written from the ground up with security in mind. LiteSpeed HTTP/2 effectively fends off many attacks that other implementations may struggle against.
    With LiteSpeed HTTP/2:

    • New streams are placed in internal priority queues
    • Streams are processed based on priority at the ending edge of one I/O event
    • When there are massive amounts of new streams with a RST_STREAM frame, closely followed within the same I/O event, the stream is immediately discarded from the priority queue without further processing.
    • If an attacker delays the RST_STREAM frame after the stream is processed, the effects are twofold:
      1. The attack will be slowed down
      2. The non-configurable 100 concurrent stream limit will be reached, and the connection will be closed by the server.

    There is nothing you need to do to protect yourself from this type of attack.

    The maximum impact a Rapid Reset attack can have on a LiteSpeed server is the wasting of CPU cycles in handling the stream’s frames, and creating and recycling the stream object.

    What we intend to do

    We plan to further enhance our HTTP/2 implementation to specifically target this attack based on its traffic pattern. Once detected, we’ll eliminate the waste of CPU cycles with IP blocking.

    An emergency security patch is not required this time.

    Conclusion

    “We, along with Google and AWS, have disclosed the attack method to web server vendors who we expect will implement patches.”
    Cloudflare’s Rapid Reset Technical Breakdown

    This was not our experience, sadly. We wish we had been notified in advance about this event. After all, we serve more than 12% of the top sites on the internet! It’s disappointing that we were not afforded the luxury of time that the other web server vendors were presumably given to address the potential impacts for our clients.

    Luckily, LiteSpeed servers are minimally affected by the Rapid Reset vulnerability. But can we be sure that will be the case when future vulnerabilities are discovered?

    We have tried to contact the proper people about this, to no avail. If you were involved in the coordination of the CVE, please get in touch via our info@litespeedtech.com email and help us ensure we are kept in the loop in the future. Thank you.

  • Managing Cacheability With LSCWP API

    Managing Cacheability With LSCWP API

    LSCWP API Cache Tags

    The LiteSpeed Cache plugin for WordPress includes an API that you can use to customize cache behavior. If you’re a developer, the LSCWP API will help you to achieve LiteSpeed compatibility within your plugins. If you’re a site owner who enjoys customizing every little aspect of your site, maybe you have some unique reason to use one of our API hooks in your child theme’s functions.php file.

    Whatever your actual purpose is, today we’re going to look at three LSCWP API cache hooks and show you how to use them to control the cacheability of a page:

    • litespeed_control_set_nocache
    • litespeed_control_set_cacheable
    • litespeed_control_force_cacheable

    Plus, we’ll look at a couple of bonus hooks that are useful for setting cache scope:

    • litespeed_control_set_private
    • litespeed_control_force_public

    To cache, or not to cache

    First, let’s look at how LSCWP decides which pages to cache and which pages not to cache.

    By default, the wp action hook is run on each page of a WordPress site, after the query has been parsed and the post has been loaded, but before template functionality is executed. (There may be exceptions to this rule, but we’ll talk about that later.)

    LSCWP considers all pages that have had the wp action run on them to be cacheable. Essentially, every page is cacheable. Unless it falls into one of these categories:

    • It is an admin page
    • It is a POST request
    • is_trackback() is true
    • is_search() is true
    • No theme is used

    Site administrators may also set some content to be non-cacheable, so LSCWP checks the values of the settings in LiteSpeed Cache > Cache > Excludes, and considers a page non-cacheable if:

    • The URI is found in the Do Not Cache URIs list
    • The URL has a query string found in the Do Not Cache Query Strings list
    • The post has a category found in the Do Not Cache Categories list
    • The post has a tag found in the Do Not Cache Tags list
    • The request has a cookie found in the Do Not Cache Cookies list
    • The request has a user agent found in the Do Not Cache User Agents list
    • The request is being made by a user whose role is checked in the Do Not Cache Roles list

    This is enough for most admins, but maybe you have a special case that you want to handle programmatically. Or maybe you have written a plugin that generates its own pages and doesn’t follow the usual wp action hook conventions. What do you do then?

    You use LSCWP’s cache control API hooks.

    Cache control API hooks

    Mark the current page as cacheable

    If your plugin generates pages and does not invoke the wp action hook, then LSCWP may not know that the page should be cached. Use the litespeed_control_set_cacheable action with a ‘reason’ parameter, like so:

    do_action(
    	'litespeed_control_set_cacheable',
    	'The lady doth protest too much, methinks.'
    );
    

    Note that if the page fits one of the criteria specified in the the plugin’s Cache > Excludes settings, then the page may ultimately be set as non-cacheable, despite this hook.

    Mark the current page as non-cacheable

    The litespeed_control_set_nocache action is the opposite of the previous one. Use it in your plugins or snippets to inform LSCWP not to cache the page.

    do_action(
    	'litespeed_control_set_nocache',
    	'And flights of angels sing thee to thy rest!'
    );
    

    Force the current page to be cacheable

    The litespeed_control_force_cacheable action informs LSCWP to cache the page, and it will override anything the user may enter in the Cache > Excludes settings.

    do_action(
    	'litespeed_control_force_cacheable',
    	'if it be not to come, it will be now'
    );
    

    What have I done?

    With all the settings and API hooks available, it can be difficult to know whether the current page is set to be cached or whether it is non-cacheable. Use the litespeed_control_cacheable filter to get a definitive answer.

    apply_filters( 'litespeed_control_cacheable', false );
    

    BONUS

    Once you set a page as cacheable, you might want to further define the scope of that cache. Do you want to store the cache object in a logged-in user’s private cache, or do you want all visitors to view a publicly cached copy? By default, LSCWP caches pages publicly. Use these action hooks to explicitly define cache scope:

    do_action(
    	'litespeed_control_set_private',
    	'Listen to many, speak to a few.'
    );
    
    do_action(
    	'litespeed_control_force_public',
    	'Brevity is the soul of wit.'
    );
    

    Conclusion

    We hope this is helpful to you plugin developers and site tinkerers out there. If you want to learn more about LSCWP’s API hooks, take a look at our API Reference.


    Thank you to Tynan Beatty for his numerous contributions to this post, including all of the sample code!

  • How to use Configuration Templates

    How to use Configuration Templates

    LiteSpeed Virtual Host Configuration Templates

    Introduction

    If you are using OpenLiteSpeed, LiteSpeed Web ADC, or native LiteSpeed Web Server Enterprise without a control panel, you can take advantage of virtual host configuration templates.

    Today we’ll show you how templates work, go over some benefits, and walk you through an example usage.

    Benefits of Templating

    When you host multiple websites on one server, you may find that many of them have similar configurations. With LiteSpeed’s virtual host template feature, you can create many virtual hosts from one master template and edit all of their configurations at once. Plus, configuring a new vhost can be as simple as connecting it to the template.

    How Configuration Templates Work

    Each template contains three things:

    1. a configuration file
    2. a list of mapped listeners, and
    3. a list of member virtual hosts.

    Creating a Template

    To create a brand new template, navigate to WebAdmin Console > Configuration > Virtual Host Templates > Add. You will be asked to fill out basic information for this template. One of the fields will require the location of your template file. If you do not have a template file yet, that’s fine. You can make up a new file name and LiteSpeed will create it for you in $SERVER_ROOT/conf/templates/.

    For the purposes of this blog post, let’s call your new template mytemplate.

    Once you’ve added mytemplate, you don’t need to configure any more settings, though you will probably want to.

    Most of the settings in a virtual host template are comparable to normal virtual host settings. The main difference is that you can use the $VH_NAME variable in template settings to stand in for the names of the virtual hosts that you will be applying the template to.

    Applying a Template to a Virtual Host

    A virtual host template does nothing until you assign it to some member virtual hosts.

    Virtual host template settings are located in the WebAdmin Console under Configuration > Virtual Host Templates. That is where you can find a list of your existing templates.

    To add virtual hosts to mytemplate, click mytemplate and navigate to Template > Member Virtual Hosts > Add. Each virtual host you add will be automatically configured with the mytemplate settings. The member virtual host’s name will be substituted anywhere that $VH_NAME appears in the template settings. And listener-to-virtual host mapping will be added automatically for all listeners in the template’s mapped listener list.

    Making Changes to a Template

    In the WebAdmin Console, navigate to Configuration > Virtual Host Templates, and click View/Edit next to mytemplate, (or whichever template you wish to edit).

    When you update the settings in a virtual host template, all of the member virtual hosts will automatically take on the new settings.

    You will need to perform a Graceful Restart to put your updates into effect.

    Default Templates

    Our server products may come with some default virtual host templates, which can be found in the $SERVER_ROOT/conf/templates/ directory.

    LiteSpeed Web Server has three, for the three most common types of virtual hosts:

    • centralConfigLog is good for basic virtual hosts that will use the same server root directories and share a common directory naming framework.
    • PHP_SuEXEC contains a setup ideal for hosting external PHP applications running in suEXEC mode. PHP scripts for member virtual hosts will be executed as the owner of the virtual host’s document root.
    • EasyRailsWithSuEXEC is just like the PHP_SuEXEC template, but for Ruby on Rails applications.

    Example

    Let’s set up a new template in the LiteSpeed WebAdmin Console.

    1. Click Configuration > Listeners and delete the default port 80 listener.
    2. Click Add. Set the following, and click Save:
      1. Listener name: http
      2. Port: 80
      3. Binding Not set
    3. Repeat step 2 to create an https listener for port 443.
    4. Configure an SSL certificate for the https listener.
    5. Click the Virtual Host Templates tab and click Add. Set the following, and click Save:
      1. Template Name: mytemplate (or whatever name you would like to use)
      2. Template file: /usr/local/lsws/conf/templates/mytemplate.xml
      3. Mapped Listeners:http, https
    6. Click View/Edit on mytemplate. Click the General tab, and click Edit. Set the following, and click Save:
      1. Default Virtual Host Root: /home/$VH_NAME/
      2. Config file: /usr/local/lsws/conf/vhosts/$VH_NAME.xml
      3. Document Root: /home/$VH_NAME/public_html
    7. Click the Security tab. Set the following, and click Save:
      1. External App Set UID Mode: DocRoot UID
      2. suEXEC User: $VH_NAME
      3. suEXEC Group: $VH_NAME
    8. Click the External App tab and choose the LiteApeed SAPI App type. Set the following, and click Save:
      1. Name: $VH_NAME_lsphp81 (we are using PHP v8.1 in this example, but you can use any version you like)
      2. Address: uds://tmp/lshttpd/$VH_NAME.sock
      3. Max Connections: 3
      4. Initial Request Timeout (secs): 60
      5. Retry Timeout (secs): 30
      6. Connection Keepalive Timeout: -1
      7. Command: /usr/local/lsws/lsphp81/bin/lsphp
      8. Run as user: $VH_NAME
      9. Run as group: $VH_NAME
    9. Click the Script Handler tab and click Add. Set the following, and click Save:
      1. Suffixes: php
      2. Handler type: LiteSpeed SAPI
      3. Handler name: [VHost Level]: $VH_NAME_lsphp81
    10. Click the Template tab and click Add. Set the following, and click Save:
      1. Virtual Host Name: site1 (or any name of your choice)
      2. Domain: site1.com
      3. Aliases: www.site1.com
    11. Click the Add button again. Set the following, and click Save:
      1. Virtual Host Name: site2 (or any name of your choice)
      2. Domain: site2.com
      3. Aliases: www.site2.com
    12. Repeat step 11 for every virtual host that you want to add with this template.
    13. Click Graceful restart to apply your changes

    Testing

    Once the template is created and the site1 and site2 virtual hosts are added as members, you can (1) test that the sites exist, (2) check the file system to verify that their document roots are in the correct place, as defined by the template, and (3), verify that each site owns a running PHP processes, as defined by the template.

    1. In a browser window, verify that you can successfully visit site1.com and site2.com.
    2. Verify that document roots exist in /home/site1/public_html and /home/site2/public_html.
    3. Run: ps -aux | grep lsphp. This command will show you any lsphp processes running, and you can verify that they are owned by site1:site1 and site2:site2.

    Conclusion

    You should now know why templates are useful, and you should be able to create one and assign virtual hosts as members.

    If you’d like to learn more, you can see our wiki on the subject, or take a look at these instructions for creating a template to be used with LiteSpeed Web ADC and Kubernetes.

  • Serving Static Content Through a Subdomain

    Serving Static Content Through a Subdomain

    Serving Static Content Through a Subdomain

    Serving static content from a subdomain can provide multiple benefits, including better website performance and optimization. It can allow you to offload your images to a CDN, or allow you to serve a specific file extension through a different domain.

    But how does this work with the LiteSpeed Cache Plugin for WordPress (LSCWP)? Let’s take a closer look.

    LSCWP allows you to offload static content such as images, JavaScript, and CSS files or any file extensions you define, so that they are served from a subdomain.

    This involves two main steps:

    • Setting up the subdomain on your Hosting Server
    • Configuring LSCWP to use the new subdomain

    Step 1: Create a Subdomain

    Setting up a subdomain to serve static content is a simple process that can be done with all hosting panels or even on custom servers if you’re an experienced system admin.

    The goal here is to point the subdomain exactly to the same directory as the main website, so that it can access static files correctly.

    Here’s an example of how to set up your subdomain using cPanel:

    1.1 Create a subdomain in cPanel

    Create a subdomain in cPanel

    1. Log into cPanel using the account where you wish to add the subdomain.
    2. Click Domains under the Domains section.
    3. Click the Create A New Domain button.
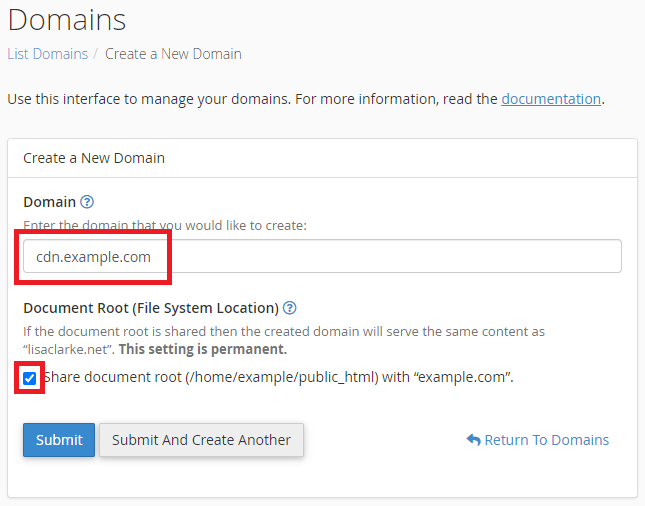
    4. Enter the subdomain name (cdn.example.com) in the Domain text box.
    5. Select the Share document root (/home/username/public_html) with “example.com” option. Using a shared document root for a subdomain can be useful when serving static content because it allows you to easily manage and update your static files without duplicating them across multiple directories.
    6. Click the Submit button.

    1.2 Add CORS Headers

    For your subdomain to be able to serve files that are originally meant for your domain, most common browsers will ask you to set up CORS headers for your domain.

    Setting up a CORS header can be a bit complex depending on your stack. On Litespeed Enterprise, which has full .htaccess support, you can add this line to your .htaccess:

    Header add Access-Control-Allow-Origin "*" 
    Header add Access-Control-Allow-Methods: "GET,POST,OPTIONS,DELETE,PUT"
    

    Note: These are only basic CORS instructions. You should consider consulting with your developer and/or hosting provider before implementing CORS.

    Step 2: Instruct Litespeed Cache to replace your URLs

    LiteSpeed Cache CDN Settings

    From the WordPress Dashboard, navigate to LiteSpeed Cache > CDN.
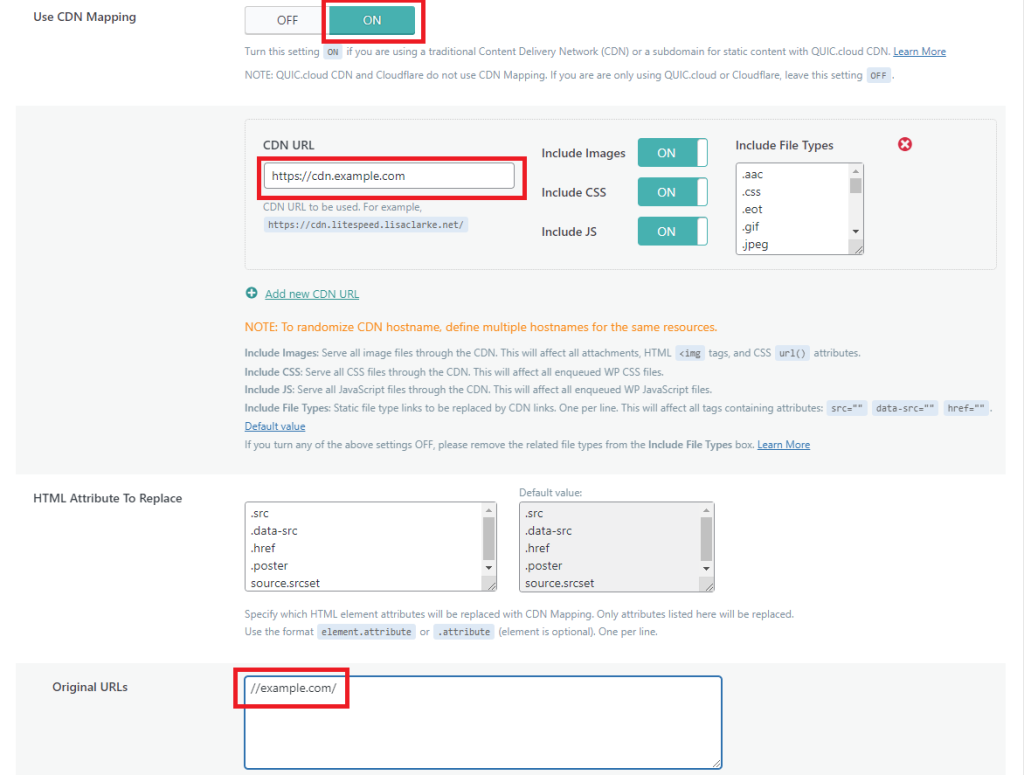
    Set up CDN mapping to use the new subdomain, like so:

    1. Set Use CDN Mapping to ON
    2. Set CDN URL to cdn.example.com
    3. Put //example.com/ in the Original URLs box.
    4. Save changes

    Verify

    Finally, you will need to test your website to ensure that everything is working correctly. Visit your website in a browser, view the site’s page source, and verify that images and other static files are being served from cdn.example.com.

    Troubleshooting

    URL’s are replaced in the website source, but images don’t load on the website.

    Please check Step 1, and ensure that you have set up the subdomain correctly to serve your static files.

    URL’s are not replaced in the website source.

    Please check the Original URLs setting in LSCWP. Ensure you have set it correctly and it is the same as your WordPress site.

    Some resources are not replaced but some are.

    Please check the Extensions list in the LSCWP CDN Mapping settings to verify the file extensions.

    Conclusion

    Routing your static content using CDN Mapping from your main domain using LiteSpeed Cache for WordPress is a great way to improve your website’s performance and reduce server load. By offloading your static content to a subdomain, a CDN or a different server, you can deliver your website’s images, stylesheets, and other assets to your visitors more quickly, while also reducing the bandwidth and server resources needed to serve these files.

  • OpenLiteSpeed + Metabase

    OpenLiteSpeed + Metabase

    OpenLiteSpeed and Metabase

    OpenLiteSpeed Web Server is great for building and deploying web applications. The WebAdmin Console enables you to quickly configure features that allow you to deliver a fast web application that your users will love.

    Metabase is a business intelligence web application that can be deployed on an OpenLiteSpeed Web Server. It is a java-based web app that can connect to almost any database and has a built-in question builder tool that allows you to get intelligent insights on your data.

    OpenLiteSpeed and Metabase

    In this guide, you will learn how to install and configure OpenLiteSpeed as a reverse proxy for Metabase. That means the web server will sit in front of Metabase and intercept requests made by clients. Upon completion of this guide you will have a business intelligence web based application powered by OpenLiteSpeed web server.

    Below are 7 steps covered in this tutorial:

    1. Installing OpenLiteSpeed with MariaDB
    2. Installing Java
    3. Creating a MariaDB database
    4. Downloading Metabase
    5. Creating a systemd configuration file for Metabase
    6. Configuring a Let’s Encrypt SSL Certificate
    7. Completing the post-installation setup

    Requirements

    Here is what you will need to complete this setup:

    1. An SSH client such as Putty or the macOS terminal app.
    2. A server running a Debian-based operating system such as Ubuntu Server
    3. A fully qualified domain name pointing to the public IP address of your server.

    Step 1: Install OpenLiteSpeed with MariaDB

    The first step is to install OpenLiteSpeed. We will use the 1-click installation script, which is a single command that will install OpenLiteSpeed, set up the virtualhost, add the reverse proxy configuration and install MariaDB.

    On a newly deployed debian-based server, run the command below to install OpenLiteSpeed with a reverse proxy configuration:

    bash <( curl -k https://raw.githubusercontent.com/litespeedtech/ols1clk/master/ols1clk.sh) --proxy-c --pure-mariadb
    

    This command will automatically create a reverse proxy configuration using the example virtualhost, and install MariaDB.

    Log in to the OpenLiteSpeed WebAdminConsole. Click Server Configuration > External App. 

    Click Edit on the Web Server external app, update Address * to http://127.0.0.1:3000, and click Save.

    Restart OpenLiteSpeed for the changes to take effect.

    Step 2: Install Java

    The second step is to install the Java development kit (JDK), and the Java runtime environment (JRE). Run the command below to install:

    sudo apt-get install openjdk-11-jdk openjdk-11-jre -y
    

    Step 3: Create a MariaDB database

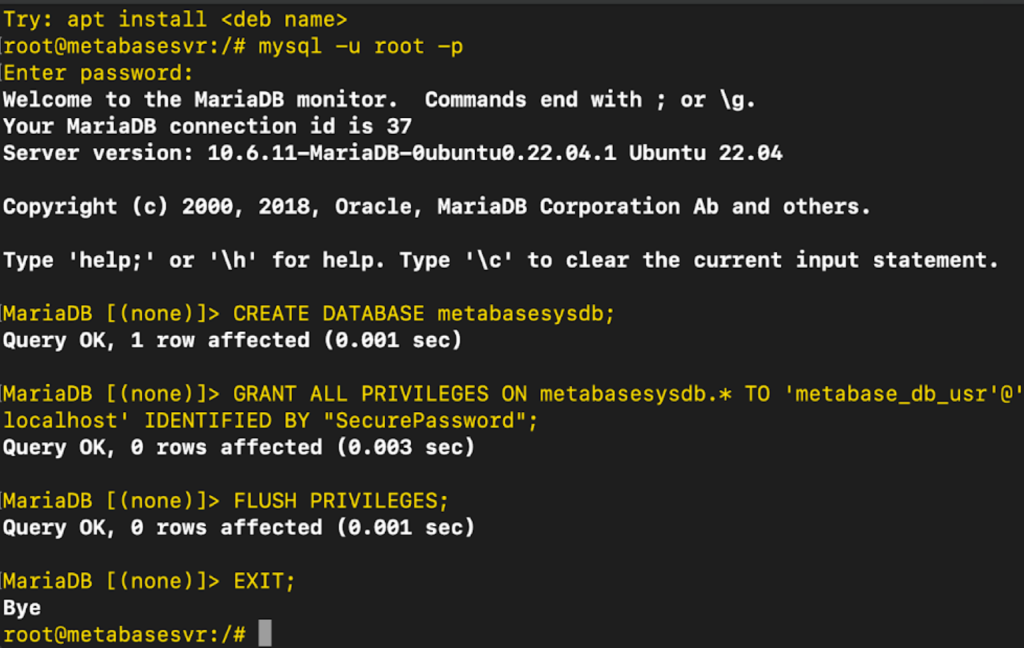
    The third step is to create a MariaDB database for Metabase.

    Run the commands below to connect to the MariaDB shell and create a new database:

    mysql -u root -p
    CREATE DATABASE metabasesysdb;
    GRANT ALL PRIVILEGES ON metabasesysdb.* TO 'metabase_db_usr'@'localhost' IDENTIFIED BY "SecurePassword";
    FLUSH PRIVILEGES;
    EXIT;
    

    Step 4: Download Metabase

    You have successfully installed OpenLiteSpeed and added reverse proxy configuration. Follow the next few steps to start using Metabase with OpenLiteSpeed.

    Create a folder for Metabase in the /opt directory, and download the latest version of Metabase from the official download page:

    sudo mkdir /opt/metabase
    cd /opt/metabase
    wget https://downloads.metabase.com/v0.45.2/metabase.jar
    

    Change the owner of the /opt/metabase directory and all files in this directory to nobody and nogroup by running this command:

    chown -R nobody:nogroup /opt/metabase
    

    Set the permissions of the /opt/metabase directory and all files in the directory:

    chmod -R 755 /opt/metabase
    

    Step 5: Create a systemd configuration file.

    To ensure Metabase is always running on your server, and to simplify stopping and starting the business intelligence web app, you can create a systemd configuration file. Run the commands below to create a service file in the /etc/systemd/system directory:

    sudo apt install nano
    sudo nano /etc/systemd/system/metabase.service
    

    Edit the metabase.service file, and copy and paste the following configuration below into it:

    [Unit]
    Description=Metabase Business Intelligence Web App Powered By OpenLiteSpeed Web Server
    [Service]
    WorkingDirectory=/opt/metabase/
    ExecStart=/usr/bin/java -jar /opt/metabase/metabase.jar
    User=nobody
    Type=simple
    Restart=on-failure
    RestartSec=10
    [Install]
    WantedBy=multi-user.target
    

    Save the file and exit out of it.

    Reload the system daemon, start the Metabase service, and set it to start automatically at system boot:

    systemctl daemon-reload
    systemctl start metabase
    systemctl enable metabase
    

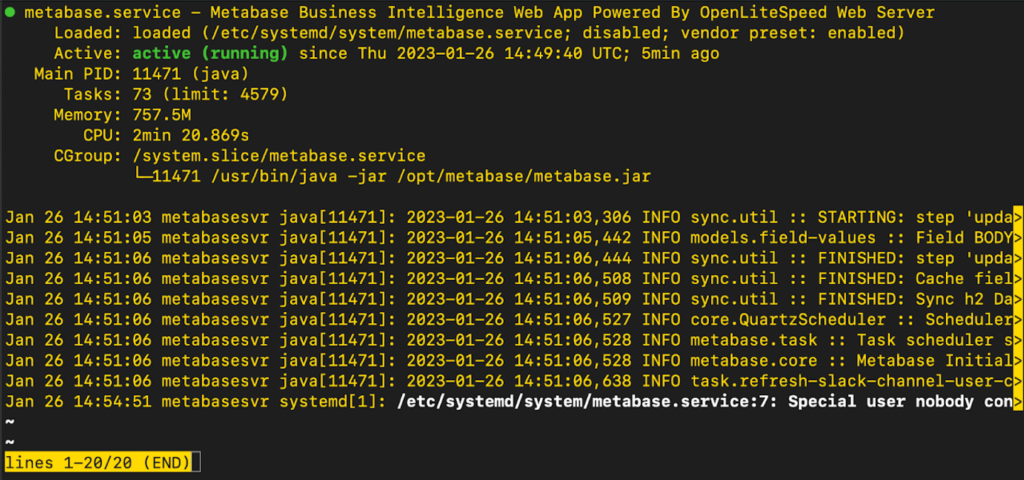
    You also need to ensure the newly created metabase service is marked as active and running. Run the command

    systemctl status metabase
    

    If Metabase is active and running, the command will return the following output:

    metabase.service - Metabase Business Intelligence Web App Powered By OpenLiteSpeed Web Server
          Loaded: loaded (/etc/systemd/system/metabase.service;
          Active: active (running)
    

    Step 6: Configure a Let’s Encrypt SSL Certificate.

    The next step is to configure a Let’s Encrypt SSL Certificate. This ensures that you always access Metabase using a secure HTTPS connection. Follow the steps below:

    Install the certbot utility:

    sudo apt-get install certbot -y
    

    Generate the SSL certificate by following the instructions in the OpenLiteSpeed KB.

    Step 7: Complete the post installation setup

    Open a new browser window and enter the domain name for the metabase server in the browser address bar.

    You will see the Metabase welcome page. Click Let’s get started.

    Choose your preferred language and click Next

    Enter your personal details and ensure you set a secure password. Click Next, select I’ll add my data later and click Next.

    Click Finish, and click Take me to Metabase. This will open the dashboard where you can perform business intelligence tasks using the builtin features.

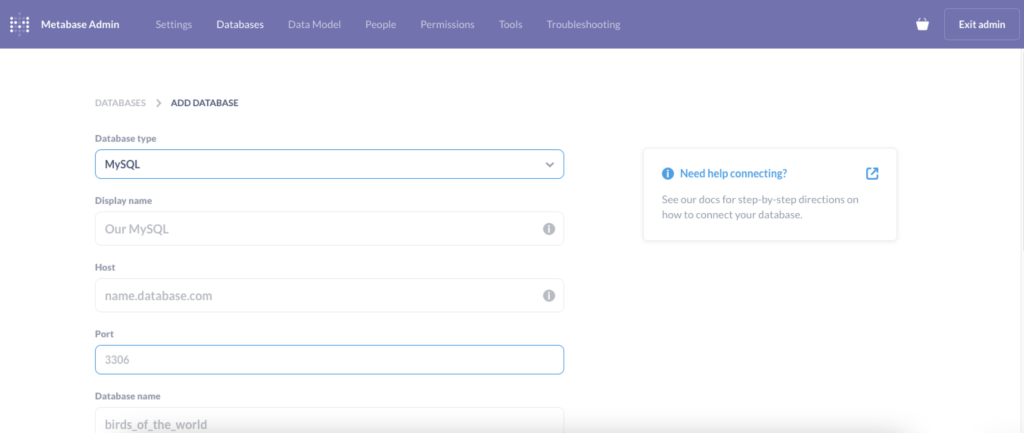
    You can also configure the database that you created on Step 3. Click Add your own data to open the Add Database wizard.

    Select the type of database you would like to add on the Database type drop down, configure your database details, and click Save

    Conclusion

    You have successfully installed the Metabase Business Intelligence web app on an OpenLiteSpeed Web Server. For more details about OpenLiteSpeed features that you can configure to further enhance web app performance please visit our knowledge base.

  • WebAdmin Security Tips

    WebAdmin Security Tips

    LiteSpeed WebAdmin Security Tips

    Recently we’ve had some reports of brute force attacks on LiteSpeed WebAdmin Console. So we thought it would be a good time to share our WebAdmin Security tips. Here are five things you can do to protect your WebAdmin Console and give yourself more peace of mind:

    • Verify the Administrator Email
    • Restrict access via the Allowed List
    • Change the Listener Port
    • Set a strong password
    • Obtain a CA-signed SSL certificate

    Let’s look at each of those steps in more detail.

    Verify the Administrator Email

    First thing’s first: it’s crucial that your Administrator email is configured correctly. This email address is used to keep you informed about important events such as:

    • Failed login attempts to WebAdmin Console
    • LiteSpeed Web Server crashes
    • License expiration

    To verify that your admin email address is correct, navigate to Configuration > Server > General > General Settings section and check the Administrator Email setting.

    This field accepts a comma-delimited list, in case you want admin alerts to go to multiple people. For example:

    me@example.com, him@example.com, her@example.com, them@example.com
    

    If you update this field, click Save and then perform a Graceful Restart to apply your changes.

    Restrict access via the Allowed List

    One very effective way to avoid brute force login attacks is to prevent attackers from reaching your server login page in the first place. You can do this through the Allowed List.

    Your own IP address should be added to that list first. If you have a fixed IP address, you can add it directly. If you don’t have a fixed IP address, we recommend that you set up VPN access with a fixed IP, and then add that fixed IP to the Allowed List.

    To add IP addresses to the WebAdmin Console, navigate to Web Console > General > Security > Access Control. Click the Edit link and set the Denied List to all. In the Allowed List field, type in a comma-separated list of the IP addresses allowed to access the WebAdmin Console. Click Save and then perform a Graceful Restart to apply your changes.

    To test if the configuration is working as expected, try connecting to your WebAdmin Console from a public IP address that is not listed in the Allowed List. If access control is set up correctly, you will see a 403 forbidden error message.

    Change the Listener Port

    The standard way to access the WebAdmin Console for your domain is by visiting https://example.com:7080 (or https://example.com:7088 in a Plesk environment). This is the place that attackers would expect to find your LSWS admin. You can effectively “hide” your WebAdmin Console by changing the listener Port to a custom value.

    Navigate to Web Console > Listeners > Action. Find the listener called adminListener and edit it. Set Port to any unused number between 1024 and 65535. Click Save.

    Adjust your firewall settings to allow the new port, if necessary, and then perform a Graceful Restart to apply your changes.

    TIP: You may choose to always keep the new port blocked at the firewall until you need it. You would have to update your firewall config every time you wanted to use the WebAdmin Console, but you would be guaranteed nobody else can access it in the meantime.

    Set a strong password

    We highly recommend that you set a strong password for the WebAdmin Console. You can use a password generator such as Avast to create a secure password. We recommend a password that is at least 8 characters long, contains mixed capitalization, numbers, and special characters.

    If multiple admins need to access this server, it’s best to set up an account for each admin. Do not share passwords.

    To update your password, navigate to Web Console > General > Security > WebAdmin Users, and edit your user. Enter your old WebAdmin Console password. Type or paste the new password into the New Password and Retype Password fields. Click Save to apply the changes.

    Obtain a CA-Signed SSL certificate

    Our final recommendation is to obtain an SSL certificate from a Certificate Authority (or CA), instead of using the default self-signed certificate. This will ensure that you always access the console using a secure HTTPS connection verified by an SSL certificate authority.

    Obtain a certificate from the CA of your choice. They will provide the following three files:

    • private.key
    • certificate.crt
    • ca_bundle.crt

    Copy these files to the /usr/local/lsws/admin/conf/cert directory.

    Change the owner of the files to lsadm, like so:

    chown -R lsadm:lsadm /usr/local/lsws/admin/conf/cert/* 
    

    Return to the WebAdmin Console, navigate to the adminListener listener, and click Edit. Set Secure to Yes. Navigate to SSL and click Edit. Set the following:

    • Private Key = /usr/local/lsws/admin/conf/cert/private.key
    • Certificate = /usr/local/lsws/admin/conf/cert/certificate.crt
    • Chained Certificate = Yes
    • CA Certificate Path = /usr/local/lsws/admin/conf/cert/
    • CA Certificate File = /usr/local/lsws/admin/conf/cert/ca_bundle.crt

    Click Save and then perform a Graceful Restart to apply your changes.

    Conclusion

    We hope that implementing these tips will give you some peace of mind. If you’d like to see these suggestions demonstrated, have a look at our recent YouTube video:

    For more information about LiteSpeed WebAdmin Console, please see the documentation.

  • Platform Showcase: Managed LSWS and OLS with SPanel

    Platform Showcase: Managed LSWS and OLS with SPanel

    Managed LiteSpeed Web Server with SPanel

    Our friends at SPanel asked if they could tell our readers a little bit about their control panel, and about managed LiteSpeed Web Server with SPanel. So, without further ado, here is the SPanel team. -LC

    What is SPanel?

    SPanel is a multifunctional web hosting platform that simplifies server management to a level where anyone can operate their environment even without previous technical experience.

    SPanel developers focus strongly on their fully managed LiteSpeed Web Server and OpenLiteSpeed solutions. They cater to business-oriented site and app owners. You can choose a plan where all technical tasks will be handled by a professional support team.

    The solution consists of two essential parts: The Admin Interface and the User Interface.

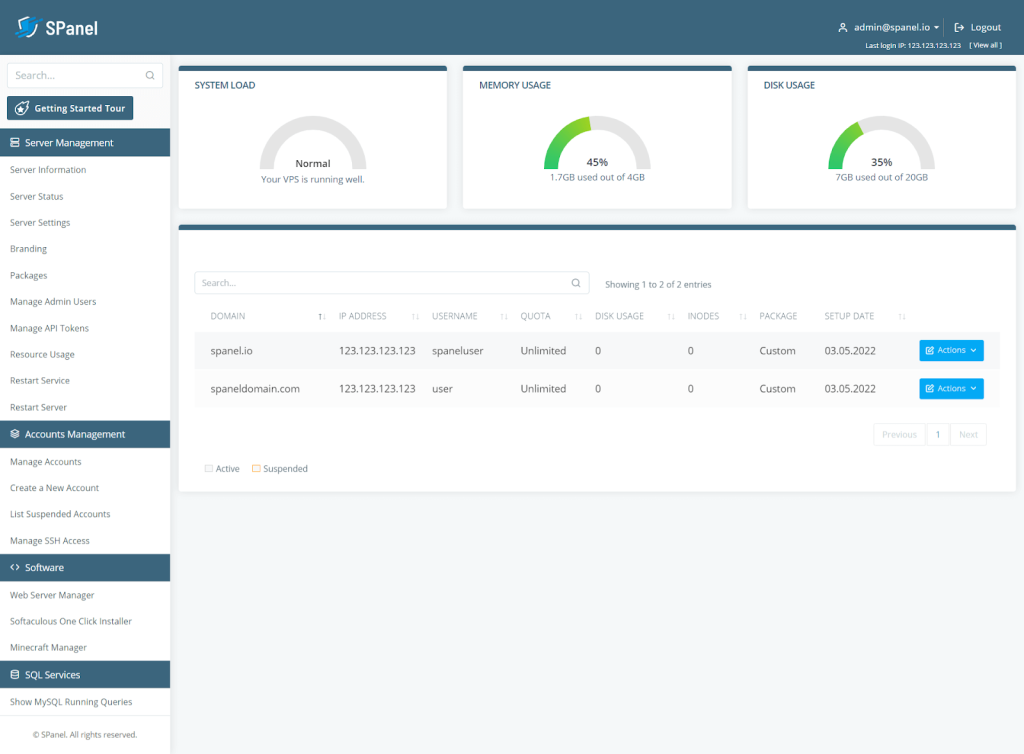
    SPanel LiteSpeed Web Server admin interface

    The Admin Interface is for managing the server and all associated accounts. It allows you to create, modify, and delete accounts, monitor your connectivity and running processes, restart the machine, and more.

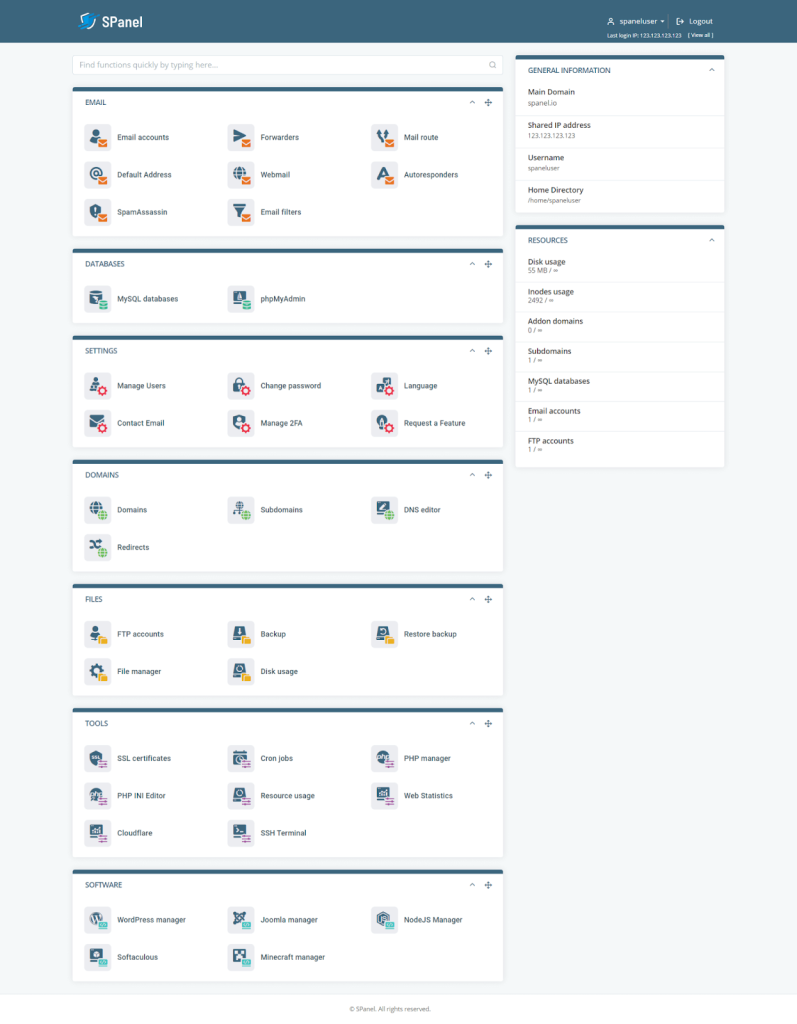
    SPanel LiteSpeed Web Server user interface

    The User Interface is responsible for managing individual accounts and services. It has an intuitive graphic interface that helps you deal with domain names, emails, site files, databases, SSL certificates, and more.

    SPanel integrates with all popular web hosting solutions. Using its powerful API, you can pair the platform with LiteSpeed, OpenLiteSpeed, Nginx, WHMCS, Softaculous – basically the full package of services to start any type of online project.

    For a complete list of features, check out the SPanel.io website or take a look at this introductory video:

    How to Install LiteSpeed Web Server or OpenLiteSpeed in SPanel

    Switching your service to LiteSpeed Web Server or OpenLiteSpeed is effortless in SPanel. The process involves literally just three clicks:

    IMAGE

    1. Log in to your SPanel Admin Area.
    2. Choose the Web Server Manager option under Software in the left-side menu.
    3. Choose LiteSpeed or OpenLiteSpeed on the next screen.
    4. Activate by clicking the blue button at the bottom of the page.

    That is all there is to it – quick and seamless integration that requires no technical expertise.

    SPanel Benefits

    cPanel still holds the lion’s share of the market for web hosting solutions, but alternatives like SPanel, Plesk, and InterWorx are certainly gaining traction

    In fact, there are numerous reasons why SPanel, in particular, has been getting so much attention. Here are a few of the most notable:

    • Fully Managed Service: SPanel might be extremely user-friendly, but many website owners still prefer to focus on their business instead of dealing with technicalities. For them, the developers offer a fully managed service where their support team takes care of all configurations, updates, monitoring, maintenance, and technical issues.
    • SShield: one of the things only SPanel can offer is SShield, an AI-powered security monitoring system. The tool has proven to be a beast when it comes to cybersecurity, recognizing over 99.98% of all known malware and spam. Whenever SShield detects suspicious activities in your web traffic, it proactively sends a notification, so you have enough time to react.
    • SWordPress Manager: another unique SPanel integration, targeted for WordPress users. If you are looking to simplify your day-to-day operations with the most popular CMS, you can install WP, take advantage of automatic updates, change admin password, and many more. The Security Lock feature allows you to restrict editing access to chosen folders and directories, protecting WordPress installation from any outside breaches.
    • Joomla Manager: similar to SWordPress Manager, SPanel packs a solution for all the Joomla fans. The Joomla Manager is integrated by default in SPanel, helping users with a one-click installation, password change, and site cloning.
    • Feature Requests by Users: the thing that most separates SPanel from similar platforms is the involvement of the entire community. The control panel receives regular updates, and most new feature implementations come directly from user suggestions. There is a Feature Requests forum on the official website. You can suggest a new feature or vote on other people’s ideas. The SPanel engineers gather all popular requests and put them on the to-do list, ensuring they see the light of day in future updates.

    Final Takes

    SPanel can be a highly reliable alternative to the market leaders in hosting management solutions. The platform is lightweight, highly secure, and extremely versatile. The managed plans are ideal for website owners who have a strong business focus. They take the weight off of the webmaster’s shoulders. And the licensing model, lets you take full advantage of SPanel with any host.

    Our thanks to SPanel for sharing their story! Does your business provide a tool that enhances the LiteSpeed experience? If you would like to share your story with our readers, find me (@Lisa at Litespeed) on our Slack workspace, and we can discuss it. –LC

  • LiteSpeed QUIC and HTTP/3 Library v4.0

    LiteSpeed QUIC and HTTP/3 Library v4.0

    lsquic v4.0

    After about 2 years of strong stability and performance in production, LiteSpeed’s QUIC and HTTP/3 library gets its first major feature enhancement release: lsquic v4.0. Notable enhancements include:

    • Support for QUIC version 2
    • Version negotiation
    • Packet retry for address validation
    • Handshake improvements under high packet loss
    • Greatly improved QUIC interop results.

    Below is the detailed information about the improvements.

    QUIC version 2

    QUIC version 2 is in draft 10 as of this writing, and will be published as RFC9369 soon. QUIC version 2 is not intended to deprecate version 1. Instead, it is meant to mitigate ossification concerns and exercise the version negotiation mechanisms.

    There are a few QUIC implementations that already support QUIC v2 including ngtcp2, Kwik, picoquic, and HAProxy. lsquic might have been a little late to the party, but we are here now with v4.

    We also plan to release QUIC v2 into the production environment with our commercial server products very soon.

    Version Negotiation

    Version Negotiation is pretty much in the same boat as QUIC v2. It is in draft 14, and soon will be published as RFC9368. It updates RFC8999 by defining version negotiation mechanisms that leverage the Version Negotiation packet.

    Quote from draft 14:

    It is beneficial to avoid additional round trips whenever possible, especially given that most incremental versions are broadly similar to the previous version. This specification also defines a simple version negotiation mechanism which leverages similarities between versions and can negotiate between “compatible” versions without additional round trips.

    Version negotiation is a required feature in order to support QUIC v2.

    Retry Packet for Address Validation

    This feature is defined in RFC9000 section-8.1.2. It is not something new. It has been used in our commercial WebADC product from the very beginning, however this feature was not previously available in the open source lsquic code base. The related code is now published in v4.

    Handshake under high packet loss or corruption

    In QUIC interop test cases, handshakeloss and handshakecorruption have been two of the toughest tests to pass in our course of improving lsquic interoperability.

    The network quality simulated in the test cases is so poor, it is definitely not something a user will come across everyday. However, to make successful handshakes under such conditions, makes a QUIC implementation super resilient to bad network conditions. In the process of testing, many beneficial tweaks have been made, like minimizing server hello return packets, and ACK/PING fine tuning.

    You can see how much lsquic has been improved in the next section.

    QUIC interop improvements

    lsquic was in the first batch of open source QUIC implementations. It has been running in production environments for many years, and is both stable and performant. It has not only been used in LiteSpeed products, but also by other third-parties in large scale deployments.

    However, lsquic’s interoperability results have not always been the best. This does not mean that lsquic is not as good as the implementations that have better results. It is just that we do not focus on the interop tests. Some tests were not turned on, and some needed minor tweaks.

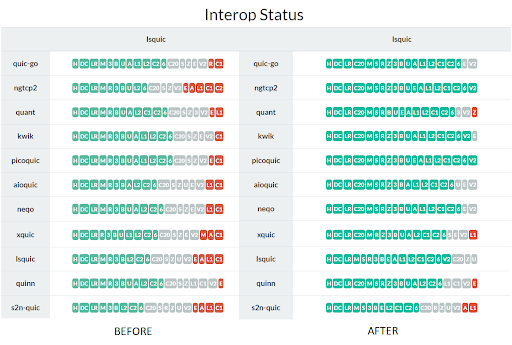
    Since we are making big improvements to lsquic, it is a good time to take this opportunity to improve interoperability with other implementations. Here is the comparison of before and after.

    lsquic 4.0 interop results

    Green is passed, gray is not supported by the client, and red is failure. As you can see, there are only a few red ones left. Those failures mostly are due to client side problems. lsquic now joins ngtcp2 and picoquic in the “passes all interop tests” club.

    You can check the full results at https://interop.seemann.io/

    Conclusion

    The lscquic v4.0 release is a big leap forward in terms of the latest development of the QUIC protocol. The LiteSpeed team is committed to bringing the best QUIC implementation to the public. Stay tuned for what is coming next.

  • Customized Cache Tags With LSCWP API

    Customized Cache Tags With LSCWP API

    Customized Cache Tags With LSCWP API

    LiteSpeed Cache, the powerful cache engine that ships with all LiteSpeed server products, features the clever “smart purge” technology. This system uses tags to group pages together based on a particular set of rules. This grouping then allows them to all be purged together at one time after a single triggering event. In the LiteSpeed Cache plugin for WordPress, this tagging system is at work behind the scenes, using the rules of WordPress publishing to know exactly when to purge posts, pages, products, categories, and more.

    But imagine that you have a plugin, or some customized behavior for your WordPress site, and you would like to be able to group pages together in your own special way, so that they may be purged by your own unique triggering event. How cool would that be?

    Well, it turns out, you can build this functionality into your plugin with the tag-based actions of the LSCWP API.

    LSCache Tags

    Before we get into creating your own custom tags, let’s look at LSCWP’s built-in tagging behavior.

    Here’s an example that shows the “smart purge” system in action:

    You have the following post on your WordPress site:

    • Title: Unique American Towns
    • Category: United States

    People visit your site, and LiteSpeed caches all of the pages that your visitors read, including the Unique American Towns post page.

    Later, you edit that post, change the Title and add a second Category:

    • Title: Unique North American Towns
    • Category: United States, Canada

    Since there have been changes to the post, the following pages are purged from the cache according to the rules set up in LSCWP admin:

    • The post itself
    • The front page and/or home page of your site
    • The author archive page
    • The post type archive page
    • The monthly archive page
    • The United States and Canada category pages

    You can change the rules to purge even more pages than this (or fewer), if it’s appropriate for your website.

    This purge tag functionality is very powerful. It means that LSCache can do a targeted purge like we saw above, removing the edited post, as well as every other page that is influenced by that post. Without a tagging system, we would have to either purge too little (just the post) or too much (all of the site’s pages).

    This functionality allows you to specify relatively long TTLs (Times to Live) for your pages, knowing that LSCache will step in and purge any pages that are affected by recent activities.

    Customized cache tags with LSCWP API

    Now imagine you have your own plugin that generates its own content using custom URLs. LSCWP will cache those pages, but it has only the most basic concept of when to purge them: it will purge the pages when the TTL is reached (that is, when the cache expires).

    If your plugin was using custom cache tags, you could group pages together, and purge them together before they expire, using whatever logic makes sense for your plugin.

    Here’s a simple example: Let’s say you have a widget with a countdown for the number of days remaining until a big event that your site promotes. The widget only changes once per day, but when it does, you would want to purge any page where the widget is displayed. Using the following LSCWP API hooks, this is possible:

    Add a custom $tag to the cached page:

    do_action( 'litespeed_tag_add', $tag );
    

    Purge all pages tagged with the custom $tag:

    do_action( 'litespeed_purge', $tag );
    

    Example

    Here’s a more in-depth example that shows you how to create a basic set of functions which will create a form, and cache or purge that form based on the form’s input values.

    Basic Plugin

    For this plugin, we’ll use a query string parameter called greet, which will store the visitor’s name.

    <?php
    /**
     * Plugin Name:  LiteSpeed Cache API Tag Demo
     * ...
     */
    namespace LscwpApiTagDemo;
    defined( 'WPINC' ) || exit;
    add_action( 'init', function () {
    	if ( ! isset( $_GET['greet'] ) ) {
    		return;
    	}
    	$visitor = $_GET['greet'];
    	# ...
    

    Dynamic Tag Name

    We create a custom tag based on the value of the greet parameter. So, if our URL was https://.example.com/?greet=Lauren, our custom tag would be LscwpApiTagDemo\greet.lauren, and we would add that tag to the current page.

    add_action( 'init', function () {
    	if ( ! isset( $_GET['greet'] ) ) {
    		return;
    	}
    	$visitor = $_GET['greet'];
    	$tag =
    		__NAMESPACE__ . '\greet.'
    		. mb_strtolower( $visitor, 'UTF-8' );
    	$visitor = stripslashes( $visitor );
    	do_action( 'litespeed_tag_add', $tag );
    	# ...
    

    Greeting Content

    We replace WordPress’s content loop with our greeting.

    add_action( 'init', function () {
    	# ...
    	add_action( 'loop_start', 'ob_start', 0, 0 );
    	add_action( 'loop_end', function () use ( $visitor ) {
    		ob_end_clean();
    		?>
    		<article class="page entry">
    			<div class="entry-content">
    				<?php greet( $visitor ); ?>
    			</div>
    		</article>
    		<?php
    	}, 0, 999 );
    } );
    

    Greeting Function

    We display a message and include a form that accepts a reply.

    function greet( $visitor ) {
    	?>
    	<h2><?php
    		printf( esc_html__( 'Howdy, %1$s!' ), $visitor );
    	?></h2>
    	<form method="get">
    		<input name="greet" type="hidden"
    			value="<?php echo $visitor; ?>">
    		<label for="reply">
    			<h3><?php esc_html_e( 'Care to Respond?' ); ?></h3>
    		</label>
    		<input id="reply" name="reply" type="text" value=""
    			placeholder="<?php
    				esc_html_e( 'Type your reply here ...' );
    			?>">
    		<button type="submit"><?php
    			esc_html_e( 'Send' );
    		?></button>
    	</form>
    	<?php
    }
    

    Reply Content

    We revise our main function to add a condition that displays alternative content if the user replied to our greeting.

    add_action( 'init', function () {
    	# ...
    		?>
    		<article class="page entry">
    			<div class="entry-content">
    				<?php
    				if ( isset( $_GET['reply'] ) ) {
    					reply( $visitor );
    				} else {
    					greet( $visitor );
    				}
    				?>
    			</div>
    		</article>
    		<?php
    	}, 0, 999 );
    } );
    

    Reply Function

    We display a thank you note and show that we remember the user’s reply.

    function reply( $visitor ) {
    	?>
    	<h2><?php
    		printf( esc_html__( 'Thank you, %1$s.' ), $visitor );
    	?></h2>
    	<h3><?php
    		esc_html_e( "I'll always remember your kind words." );
    	?></h3>
    	<?php
    	$reply = stripslashes( $_GET['reply'] );
    	if ( ! empty( $reply ) ) {
    		?>
    		<blockquote><?php
    			echo esc_html( $reply );
    		?></blockquote>
    		<?php
    	}
    	# ...
    

    And we add a Forget about me … button that will trigger a cache purge targeting every item associated with the visitor’s name.

    function reply( $visitor ) {
    	# ...
    	}
    	?>
    	<form method="post" action="<?php
    			echo drop_query_var(
    				$_SERVER['REQUEST_URI'],
    				'reply'
    			);
    		?>">
    		<input name="reset" type="hidden">
    		<button type="submit"><?php
    			esc_html_e( 'Forget about me ...' );
    		?></button>
    	</form>
    	<?php
    }
    

    Putting It All Together

    We update our main function once more, so that any page tagged LscwpApiTagDemo\greet.lauren will be deleted if the button is pressed.

    add_action( 'init', function () {
    	# ...
    	$tag =
    		__NAMESPACE__ . '\greet.'
    		. mb_strtolower( $visitor, 'UTF-8' );
    	$visitor = stripslashes( $visitor );
    	if ( isset( $_POST['reset'] ) ) {
    		do_action( 'litespeed_purge', $tag );
    	}
    	do_action( 'litespeed_tag_add', $tag );
    	# ...
    

    Behavior

    So, here’s how that looks in action.:

    Lauren visits the site and provides her name. LiteSpeed doesn’t find the page in cache, so the page is generated, served to Lauren, and cached:

    https://example.com/?greet=lauren
    	x-litespeed-cache: miss
    

    She fills in the form saying, Hello world. LiteSpeed doesn’t find the page in cache, so the page is generated, served to Lauren, and cached:

    https://example.com/?greet=Lauren&reply=Hello%20world
    	x-litespeed-cache: miss
    

    She fills in the form again saying, I love LiteSpeed. LiteSpeed doesn’t find the page in cache, so the page is generated, served to Lauren, and cached:

    https://example.com/?greet=LAUREN&reply=I%20love%20LiteSpeed
    	x-litespeed-cache: miss
    

    Note that the greet parameter is not case sensitive. Our plugin converts it to lowercase before setting the $tag value..

    She goes back to the form again saying, Hello world one more time. LiteSpeed does find the page in cache, so the cached page is served to Lauren:

    https://example.com/?greet=Lauren&reply=Hello%20world
    	x-litespeed-cache: hit
    

    Lauren goes back and presses the Forget about me … button, which triggers a purge of every page where LscwpApiTagDemo\greet.lauren is a tag.

    Because of this, when she goes back to the form and repeats I love LiteSpeed, the page is not found in the cache.

    https://example.com/?greet=LAUREN&reply=I%20love%20LiteSpeed
    	x-litespeed-cache: miss
    

    Conclusion

    As you can see, the API tag functions are a powerful way to customize the caching and purging behavior of your plugins. Without the API, your plugin would have to maintain its own record of which pages need to be purged from the cache when some event mandates it, and then send individual purge requests for each of those pages.

    Using LiteSpeed’s API hooks takes this burden off of your plugin and allows you to let the cache engine do the work.

    For more information about customized cache tags with LSCWP API and other API functions, please see our documentation.


    Thank you to Tynan Beatty for his contributions to this post, including the sample plugin code.