
Blog

  • Introducing LiteSpeed Containers

    Introducing LiteSpeed Containers

    LiteSpeed Containers

    Introducing LiteSpeed Containers for Web Hosts!

    If you host websites and use a Control Panel like cPanel or Plesk and are not using CloudLinux, you may very well consider using LiteSpeed Containers to help you manage your customers.

    LiteSpeed Containers uses the powerful new features of Linux including:

    • Allowing full control of CPU, I/O, number of processes and amount of memory a user can use using cgroups.
    • Putting each user in a sandbox, or container that isolates the user from affecting any other users using namespaces.

    If you use Enterprise Litespeed and one of our supported control panels (cPanel or Plesk), all control is from a PlugIn in the Control Panel itself.

    Even if you use OpenLiteSpeed or an unsupported control panel you can get the same powerful features using our included APIs. This is all built-in to your LiteSpeed server product.

    This blog will walk you through a number of situations where LiteSpeed Containers can help you better manage your environment.

    Turning on LiteSpeed Containers

    If you have LiteSpeed Enterprise v6.3 or later, and one of our supported control panels, you can find LiteSpeed Containers in the Control Panel Plugin, and you can simply run the script there that enables it. We recommend adding the configuration for cgroups and namespaces at the virtual host level.

    If you are running OpenLiteSpeed you will need to upgrade to v1.8 or later, and enable cgroups and namespaces.

    Hogging the CPU

    Preventing CPU hogging is the most basic value of LiteSpeed Containers. Linux will allocate all CPU power to any process that uses it, and users may take advantage of this, intentionally or not. LiteSpeed Containers gives you the tools to manage this condition.

    For example, if one of your users has a bug in a PHP script that creates a tight loop and uses all of the CPU, suddenly every user on that machine sees their processes get hung.

    With LiteSpeed Containers you can avoid this scenario by allocating each user in the package a defined amount of CPU. We strongly recommend that this be in multiples of 100. Each multiple of 100 uses a full CPU, and allocating CPU in this manner avoids context switching.

    If you have one of the LiteSpeed Control Panel Plugins, open the plugin, select Containers Package Manager, highlight the package, and click Edit.
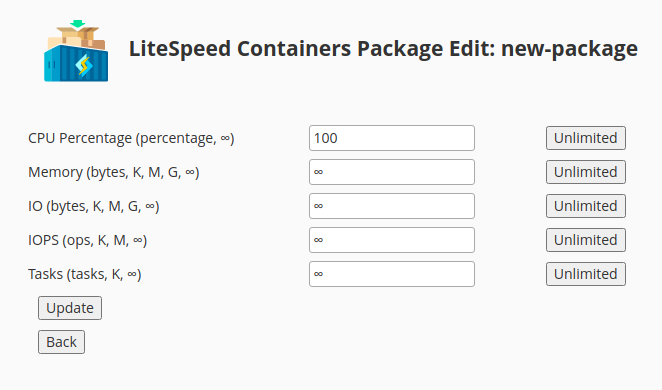
    Enter 100 as in the above example, and each user will get a maximum of 1 CPU. If the user begins to completely hog the CPU, then it will be the only user using that CPU while all other CPUs are available for other users.

    If you do not have a LiteSpeed Control Panel you can do the same thing with the command line API (using the package new-package):

    sudo /usr/local/lsws/lsns/bin/lspkgctl --cpu 100 set new-package

    To see the current values, use this command:

    sudo /usr/local/lsws/lsns/bin/lspkgctl list new-package

    Which displays:

    {
        "packages": {
            "new-package": {
                "uids": [
                    1002
                ],
                "cpu": "100"
            }
        }
    }

    Note that as soon as you complete the action, the user settings are immediately updated.

    Selling a Variety of Access

    LiteSpeed Containers can help you sell a variety of access tiers. For example, you could have a Basic tier which offers a more limited form of access and an Advanced tier that offers more power for customers. The procedure involves something you possibly already have in place, which is to put each user in each tier in a package specific to that tier.

    Once you have that done, you are ready to set up each package for the tier. For example:

    • Basic tier limits to 1 CPU, 1G RAM, 1K IO’s per second, 1M IO and 100 tasks.
    • Advanced tier limits to 2 CPUs, 4G RAM, 4K IO’s per second, 4M IO and 400 tasks.

    These are just examples and the values you would sell are what is appropriate for your region and hardware.

    As above, this is best done at the package level because it affects all users at the same time. We’ll discuss making exceptions below.

    In your control panel, create the packages (or plans in Plesk) and add users as appropriate to each.

    If you have one of the LiteSpeed Control Panel Plugins, in the plugIn, select Containers Package Manager, highlight basic and press the Edit button.
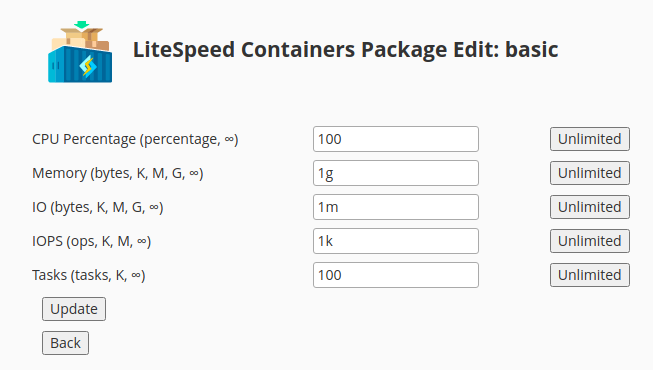
    Enter the appropriate values and press the Update button to apply the changes to the users. To update the advanced package press its Edit button.
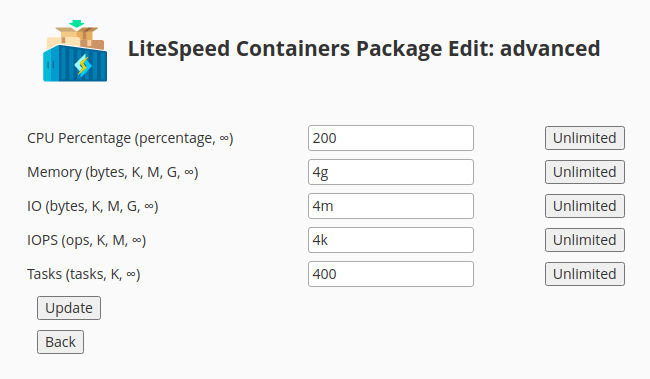
    Again, enter, the appropriate values and press the Update button to apply the changes to the users.

    To perform the same actions using the API enter:

    sudo /usr/local/lsws/lsns/bin/lspkgctl --cpu 100 --io 1m --iops 1k --mem 1g --tasks 100 set basic
    sudo /usr/local/lsws/lsns/bin/lspkgctl --cpu 200 --io 4m --iops 4k --mem 4g --tasks 400 set advanced

    Making cgroups Exceptions

    If you have a user with the name exception in the advanced package, and you wish to offer no limit for tasks, you can do this. In the plugin, select Containers User Manager and click Edit in the Cgroups column, and the appropriate user’s row.
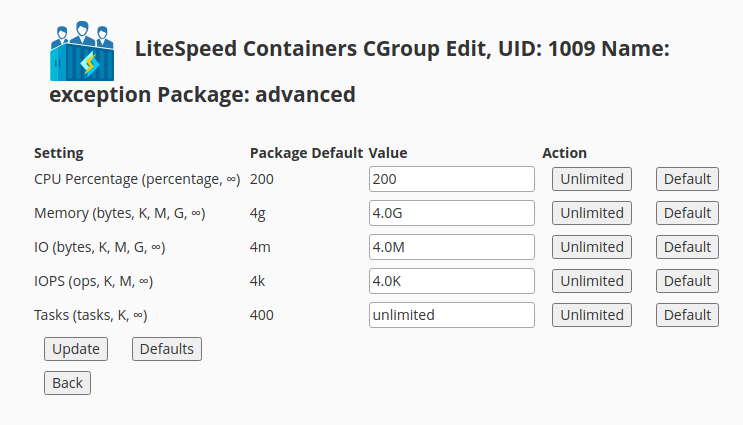
    To set the user’s task enforcement to unlimited, press the Unlimited button in the Tasks row and press the Update button to apply the change. Future package updates to the advanced package will be applied to all users including this one, except for the Tasks limit which will be preserved.

    To perform the same function to the exception user using the API enter:

    sudo /usr/local/lsws/lsns/bin/lscgctl --tasks -1 set exception

    Making namespace Exceptions

    If you configure a user with namespace containers in the LiteSpeed Configuration, it will run in its own container shared with all instances of that user. If you wish to exclude a user from namespace containers you can indeed do that.

    In the plugin select Containers User Manager. In the Namespaces column is a Disable button.
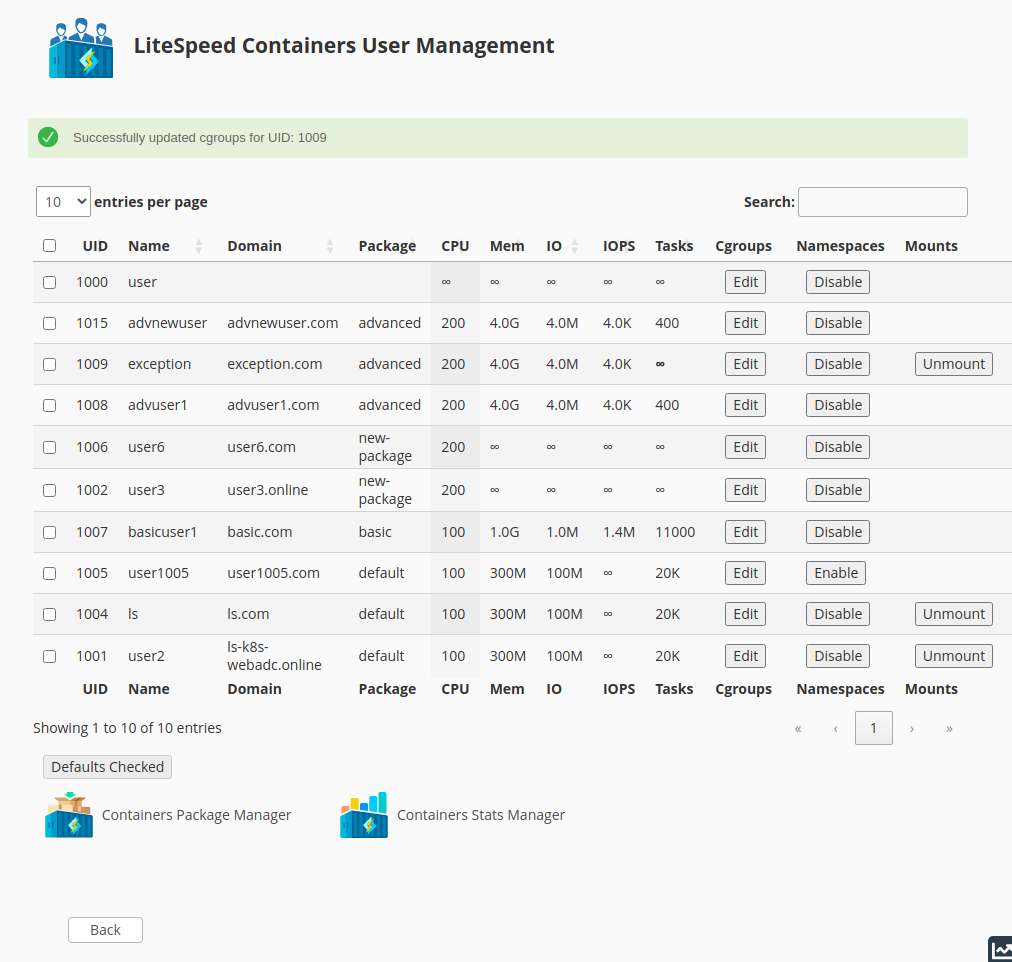
    If you press the Disable button you will disable use the of the container for that user for future invocations. Existing ones will run until completed. It warns you that you must run a manual graceful restart to apply the disable at a time when it will not disrupt user traffic.

    The Unmount button is displayed indicating that there is a namespace created for that user. Once all users are done you can press the Unmount button. Pressing it while users are running will cause no harm. It will warn you that it is in use.

    To disable the user exception using the API:

    sudo /usr/local/lsws/lsns/bin/lsnsctl --uid exception disable-uid

    Monitoring Users With Prometheus

    Besides monitoring LiteSpeed, the LiteSpeed Prometheus Exporter will also monitor cgroups statistics for each user unless configured not to. This is quite a low-overhead operation and has a very large upside for LiteSpeed Containers. With it, you can use Prometheus and Prometheus-compatible tools like Grafana to monitor your system.

    You can get some quick and dirty statistics with the plugin. Select Containers Stats Manager:
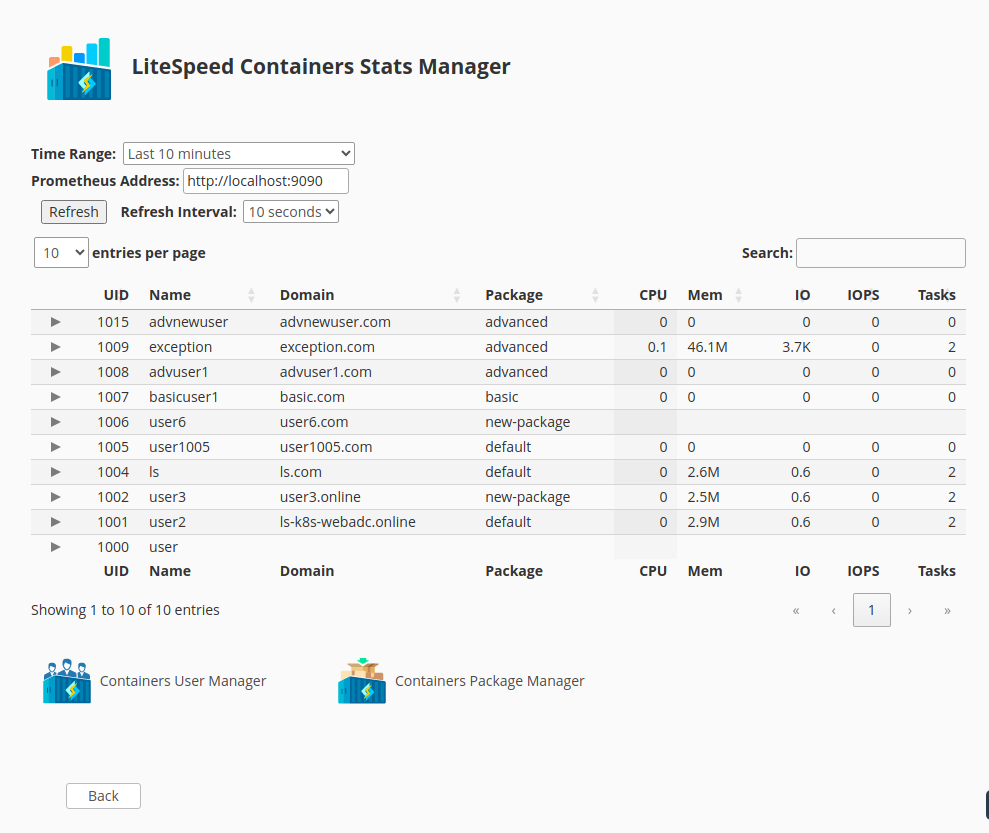
    Time Range can be set to:

    • Last 10 minutes
    • Last 30 minutes
    • Last hour
    • Last 4 hours
    • Today
    • Yesterday

    After changing the Time Range you must press the Refresh button to see the results or select a Refresh Interval other than stop and it will update during the next auto-refresh..

    These statistics come from Prometheus itself so you must have the Prometheus Address configured to contact the same Prometheus server that the LiteSpeed Prometheus Exporter is using. You can use Prometheus or its tools to provide graphs or alerts which can be useful to allow you to see which users are using excessive resources or which users are not actually using the systems.

    Monitoring Users Without Prometheus

    If you do not wish to use Prometheus, you can get a point-in-time look at the system by selecting the Time Range: Real-Time (without Prometheus) and pressing the Refresh button or set a Refresh Interval other than stop. This will only provide the last 2 seconds of information and can be useful in determining the current state of the system.

    There is an API to provide the non-Prometheus information. For example, to see the statistics for the user exception enter:

    /usr/local/lsws/lsns/bin/lscgstats exception

    Which returns the details for the system as a whole, the dot (.) user, and the exception user:

    {
        ".": {
            "name": ".",
            "cpu": "1178426628",
            "io": "80723709952",
            "iops": "463034",
            "mem": "497131520",
            "tasks": "36"
        },
        "1009": {
            "name": "exception",
            "cpu": "844348342",
            "io": "3561500672",
            "iops": "5620",
            "mem": "60563456",
            "tasks": "2"
        }
    }

    The values can be used to calculate details as they are directly from the operating system cgroups user directories. For example, the cpu number is the number of microseconds the CPU has used since the reboot for the system as a whole and for the specific user. Thus if you run this with a 1-second interval and subtract the more recent value from the earlier value and divide by 1 million, you will get the amount of CPU time used in that 1 second. Multiply by 100 and you have a percentage. It is this and similar tricks used by the LiteSpeed Prometheus Exporter which give you statistics about your system.

  • Troubleshooting 503 Service Unavailable

    Troubleshooting 503 Service Unavailable

    503 Error with LiteSpeed Web Server

    There are many reasons why your web server may return an HTTP response of “503 Service Unavailable,” and most of them are not actually a problem with the web server at all! Before you contact LiteSpeed support, let’s take a look at the possible causes of 503 errors, and see which ones you can easily solve on your own.

    What is a 503 error?

    When a web browser sends a request to your web server, the server responds with the requested resource, if applicable, and a status code. The code consists of a 3-digit number, which indicates the success or failure of the request.

    Any response code in the 5xx series indicates a server-side error. 503, in particular, means Service Unavailable. Unfortunately, it does not tell you why the requested service is failing.

    Rule Out a Server Issue

    First, let’s make absolutely sure that you’re not dealing with an issue with your LiteSpeed Web Server.

    The easiest way to do this is to temporarily switch your server to Apache. Once you’ve switched, try to duplicate the 503 error while Apache is running.

    If you still get the 503 error while Apache is running, then this is not a server issue. Switch back to LiteSpeed, and keep reading the troubleshooting suggestions below.

    If the 503 error goes away while Apache is running, then it’s time to contact LiteSpeed support. You can open a ticket from your client area. Be sure to provide as many details as possible to help the support team reproduce the issue!

    If you’ve ruled out a server issue, it’s time to figure out what is really causing the problem. 503 errors are often caused by a PHP crash, a memory issue, or both. There’s a lot that you can learn from a PHP Info page. If you don’t have one, you can create one.

    Check the phpinfo page

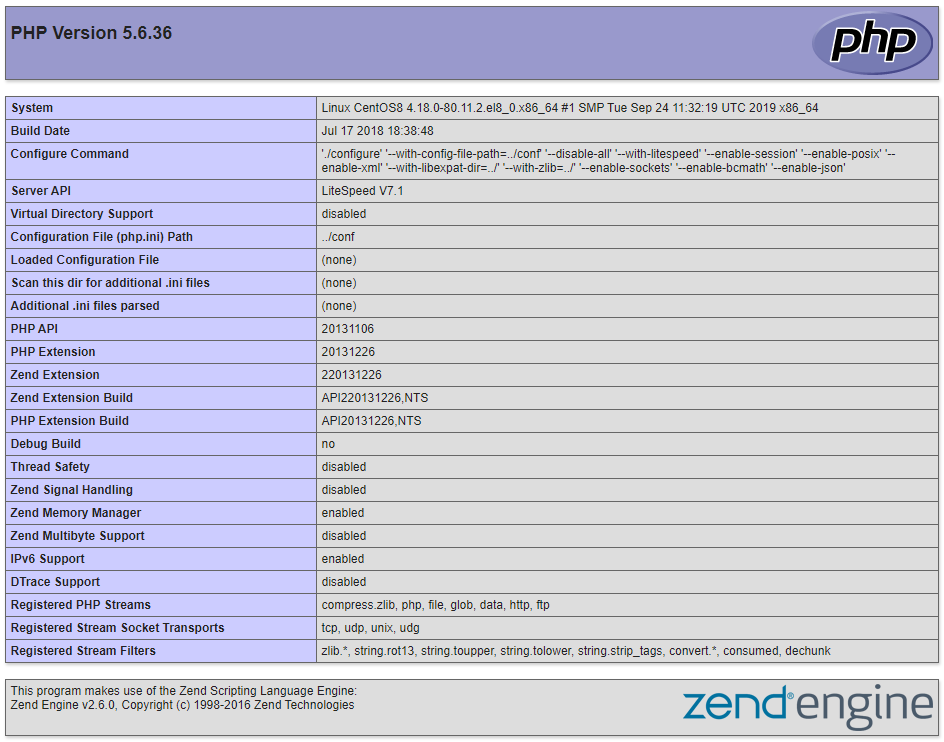
    The PHP info page gives you a lot of detail about your PHP installation. Even if your system is having an issue with PHP, it should be able to handle processing this very basic page. Among other things, the PHP Info page gives you useful information about extensions, memory limits, and execution time.

    503 Error PHP Info

    With this information, you can see if OPCache is enabled, what the memory limit is, and which extensions are loaded, all useful information when looking for the cause of a 503 error.

    You can also use this page to compare differences between Apache and LiteSpeed’s PHP implementations.

    TIP: If the Apache and LSWS PHP info pages are different, please open a support ticket so we can take a look.

    Check Log Files

    There are many different log files that may help you determine the cause of the 503 error. Try checking these logs in the following order:

    1. Standard Error Log
    2. Web Server Error Log
    3. System Log
    4. PHP Error Log

    Standard Error Log stderr.log

    The stderr.log file contains standard errors generated while PHP is running. You can usually find it in either the /var/log/apache2/ or /usr/local/lsws/logs/ directory. This log is often the most helpful.

    In this example output from a standard error log, you can see that you are dealing with a memory issue:

    [STDERR] fork() failed, please increase process limit: Cannot allocate memory
    

    Web Server Error Log

    This error log is generated by the web server. You can usually find it in either the /var/log/apache2/ or /usr/local/lsws/logs/ directory. If the web server has some role in causing PHP to fail, you should get some helpful hints from this log.

    This example output from a web server error log indicates the you have too many open files:

    [INFO] [319934] [1.1.1.1:49873-1#APVH:lsapi] connection to [uds://tmp/lshttpd/APVH-php56.sock] on request #0, confirmed, 0, associated process: 0, running: 0, error: Too many open files!
    

    Another good thing to try: search /etc/apache2/logs/error_log for the term oops:

    grep oops /etc/apache2/logs/error_log
    

    That will give you some idea how many 503 errors have been generated since your last attempted fix, if you take a look at the timestamp. Unfortunately, it’s not likely to give you the reason why the errors are occurring, but it will allow you to see when they are happening and which domains are involved.

    System Log

    This error log is generated by the operating system. You can usually find it as either /var/log/messages or /var/log/syslog. This log is helpful if PHP is being affected by the operating system.

    In this example output from a system log you can see that the lsphp process was killed by the LFD firewall security feature:

    lfd[18304]: *User Processing* PID:18264 Kill:1 User:xxxxx VM:538(MB) EXE:/usr/local/lsws/fcgi-bin/lsphp-5.4.42 CMD:lsphp5
    

    You can fix this problem by excluding lsphp from LFD.

    PHP Error Log

    This error log is defined in php.ini and you can check phpinfo.php for the file location. By default, cPanel will set it to error_log. Depending on the logging level that you have set in PHP, it will be updated when PHP detects an error or a warning. It is usually generated inside of the same folder that the PHP script runs in.

    This example output from a PHP error log shows that there is a fatal error within the test.php application:

    Fatal error: Call to undefined function my_function() in /home/mysite/public_html/test.php on line 2
    

    The best way to solve these types of errors is to forward them to the developers of the PHP applications that are failing.

    Disable opcode cache

    Opcode cache stores bytecode in shared memory so PHP does not need to process the same calls over and over, but it can occasionally cause issues.

    For example, this error points to an opcode cache problem:

    [STDERR] zend_mm_heap corrupted
    

    These are some common opcode cache extensions that you should consider disabling while you troubleshoot:

    • OPCache
    • APC/u
    • XCache
    • eAccelerator

    Disable unsafe PHP extensions

    In addition to the opcode cache extensions, there are other PHP extensions that have been known to cause issues, especially when they are outdated. These include:

    • Imunify360
    • ZendGuardLoader
    • Suhosin
    • ionCube

    We recommended you regularly check for updates for these extensions. If you are already using the latest versions, try to disable them and see if the problem persists.

    If you disable these plugins and are still getting a “503 Service Unavailable” response, disable all other extensions, and check again.

    Check disk space

    PHP will sometimes store files on your server in order to function properly. If your disks become full, especially the partition that houses /tmp/, that could be the cause of your 503 error.

    To check your disk space usage, run the following command:

    sudo df -h
    

    The output should look something like this:

    Filesystem                          Size  Used Avail Use% Mounted on
    devtmpfs                            901M     0  901M   0% /dev
    tmpfs                               915M   96K  915M   1% /dev/shm
    tmpfs                               915M   89M  827M  10% /run
    tmpfs                               915M     0  915M   0% /sys/fs/cgroup
    /dev/mapper/cl_centos                29G  4.2G   25G  15% /
    /dev/vda1                           976M  184M  726M  21% /boot
    tmpfs                               183M     0  183M   0% /run/user/0
    

    If your disks are full, clean them up. Remove any unnecessary files. This should solve the 503 error.

    Check CloudLinux limits

    If you are running CloudLinux and Lightweight Virtual Environment (LVE) it is possible that you are hitting the LVE limits. To adjust them, follow CloudLinux’s guide.

    Check memory limits

    If you’ve confirmed that you are running within LVE limits, try adjusting your PHP memory limit. The PHP Info page will tell you where your php.ini file is located. Edit the file and increase the memory_limit value.

    Sometimes a script may append lines to .htaccess that override the PHP settings. This can supersede what is set in your php.ini file. A memory_limit entry inside of .htaccess would look something like this:

    php_value memory_limit 100M
    

    You can add, delete, or modify this line inside of your .htaccess file to suit your needs.

    If none of the above has an impact, then it is possible LSPHP needs to increase its virtual memory. To do so, navigate to WebAdmin Console > Configuration > Server > PHP, and click Edit for PHP Handler Defaults.

    Change the following settings, then click Save:

    • Memory Soft Limit: 4097M
    • Memory Hard Limit: 4098M

    Navigate to Actions and press the icon next to Restart Detached PHP Processes. Then Apply Changes / Graceful Restart.

    Auto Fix 503

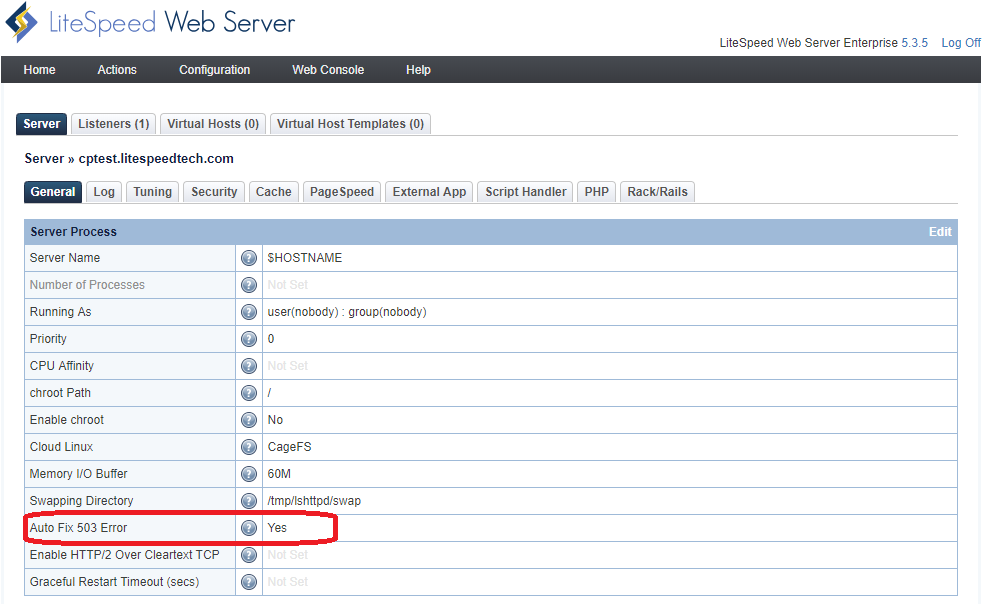
    You may have noticed that LiteSpeed Web Server has an Auto Fix 503 Error setting. This feature does not permanently fix 503 errors. It restarts the server gracefully, which often fixes the issue temporarily.

    Auto Fix 503 with LiteSpeed Web Server

    Auto Fix 503 Error is enabled by default. This means the server will restart automatically whenever the number of 503 errors exceeds thirty in a 30-second span. You should not rely on this feature to fix recurring 503 errors. Going through the steps above to find a permanent fix is always recommended.

    TIP: If you would like to disable this feature, navigate to WebAdmin Console > Server > General and set Auto Fix 503 Error to No.

    Conclusion

    This information should help you track down most causes of 503 errors, but if you need more detailed troubleshooting ideas, take a look at our documentation. The docs take a deeper dive into some of these topics, and give you a few more advanced tools to use in your search for answers.

  • Security Update for LiteSpeed Cache

    Security Update for LiteSpeed Cache

    Security patch for LiteSpeed Cache for WordPress

    We have a security update for LiteSpeed Cache for WordPress. Recently we were made aware of a vulnerability in the LiteSpeed Cache for WordPress plugin. We patched this vulnerability last week, in v6.4.

    To protect your WordPress sites, please update to the latest version of the LSCache plugin immediately.

    This unauthenticated privilege escalation vulnerability, reported by the Patchstack team, has been assigned CVE-2024-28000.

    Impact

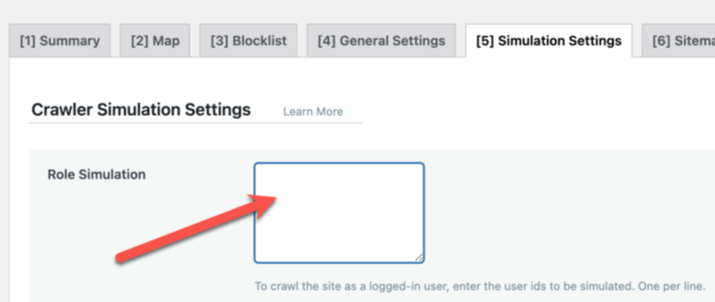
    Bad actors may exploit this vulnerability via the Role Simulation option available with the Crawler feature, due to a weak security hash.

    However, there is an additional weakness which allows the security hash to be generated and saved without enabling the crawler. This combination extends the vulnerability to ALL sites where a bad actor is able to guess the user ID of an admin-level user.

    Actions

    We strongly recommend that every site upgrade to the plugin version 6.4 or higher to patch this vulnerability.

    Additionally, we suggest that you check your site’s user list for any accounts with administrator privileges and delete any accounts that you don’t recognize.

    Timeline

    • August 5, 2024: Patchstack alerted us to the issue.
    • August 13, 2024: We patched the issue and released v6.4 to the WordPress repository
    • August 20, 2024: We added v6.4 to the list of stable releases in our control panel plugins

    Temporary Measures

    While we strongly recommend that you upgrade immediately, if you are unable to do so for some reason, we have alternative temporary solutions that you may implement at the site level or at the server level.

    Site admins

    In your file manager, navigate to wp-content/plugins/litespeed-cache/src and edit the router.cls.php file. Change line 265 from this:

    wp_set_current_user($role_uid);
    

    to this:

    /** wp_set_current_user($role_uid); **/
    

    Save the file.

    Then, from the WordPress Dashboard, navigate to LiteSpeed Cache > Crawler > Simulation Settings and make sure the Role Simulation box is empty.

    Save any changes.

    This will disable role simulation completely, until you are able to upgrade to v6.4.

    Hosting providers

    Hosting providers have two temporary solutions: add a mod_sec rule, or add a rewrite rule. There is no need to apply both. Choose whichever one you prefer.

    These rules disable access to the litespeed_role cookie. Here’s why:

    Potential attacks are carried out via litespeed_role in pre-6.4 versions of the plugin. Blocking the cookie will not have any implications for those who have upgraded. For those who have not upgraded, it will make it impossible for them (or anyone else) to use crawler role simulation. But otherwise, it should not have any impact on the functionality of the plugin.

    Mod_sec rule:

    SecRuleEngine On
    SecRule REQUEST_URI "wp-content/debug.log" "id:10001,phase:1,t:urldecode,t:normalizePath,log,deny,status:403,msg:'wp-content/debug.log block'"
    SecRule &REQUEST_COOKIES_NAMES:litespeed_role "@gt 0" "id:10002,phase:1,log,deny,status:403,msg:'litespeed_role cookie block'"
    

    Rewrite rule:

    RewriteEngine On
    RewriteCond %{HTTP_COOKIE} litespeed_role [NC]
    RewriteRule ^ - [F,L]
    RewriteCond %{REQUEST_URI} wp-content/debug.log [NC]
    RewriteRule ^ - [F,L]
    

    Note that these rules should be enclosed within <IfModule LiteSpeed>...</IfModule> tags. The following instructions explain how to apply the rules in cPanel, Plesk, or DirectAdmin.

    cPanel

    In WHM, create a file called lscwp_custom.conf in the /etc/apache2/conf.d/userdata directory and insert the rewrite rule or the mod_sec rule above into it.

    Rebuild the Apache config file and restart LiteSpeed Web Server with the following commands:

    /scripts/rebuildhttpdconf
    systemctl restart lsws
    

    Plesk

    Edit the /usr/local/psa/admin/conf/templates/custom/domain/domainVirtualHost.php file. Look for two </VirtualHost> lines and insert the rewrite rule or the mod_sec rule before both of them.

    Rebuild the Apache config file and restart LiteSpeed Web Server with the following commands:

    /usr/local/psa/admin/sbin/httpdmng --reconfigure-all
    systemctl restart lsws
    

    DirectAdmin

    Create the custom template directory /usr/local/directadmin/data/templates/custom/ if it doesn’t exist. Copy four template files into that directory using the following commands:

    cp /usr/local/directadmin/data/templates/virtual_host2.conf /usr/local/directadmin/data/templates/custom/virtual_host2.conf
    cp /usr/local/directadmin/data/templates/virtual_host2_secure.conf /usr/local/directadmin/data/templates/custom/virtual_host2_secure.conf
    cp /usr/local/directadmin/data/templates/virtual_host2_sub.conf /usr/local/directadmin/data/templates/custom/virtual_host2_sub.conf
    cp /usr/local/directadmin/data/templates/virtual_host2_secure_sub.conf /usr/local/directadmin/data/templates/custom/virtual_host2_secure_sub.conf
    

    Open each of the new template files, and look for the </VirtualHost> tag at the bottom of the file. Insert the rewrite rule or the mod_sec rule before this line.

    Rebuild the Apache config file and restart LiteSpeed Web Server with the following command:

    /usr/local/directadmin/custombuild/build rewrite_confs
    

    Conclusion

    We thank Patchstack for bringing this issue to our attention. This vulnerability has been patched, so if you are keeping your LiteSpeed Cache plugin up-to-date, there is nothing you need to do. If you have not updated in a while, please do so today.

  • LiteSpeed Web Server Now With hCaptcha

    LiteSpeed Web Server Now With hCaptcha

    LiteSpeed Web Server hCaptcha

    In LiteSpeed Web Server 6.2.1, we added hCaptcha support to our CAPTCHA functionality.

    This change comes largely because of Google’s new reCAPTCHA pricing. hCaptcha can be less expensive, and we want you to have options.

    How to get started

    Signing up for hCaptcha is fairly simple. Visit https://https://www.hcaptcha.com/, and sign up using either your email, Github account, or even your Google account.

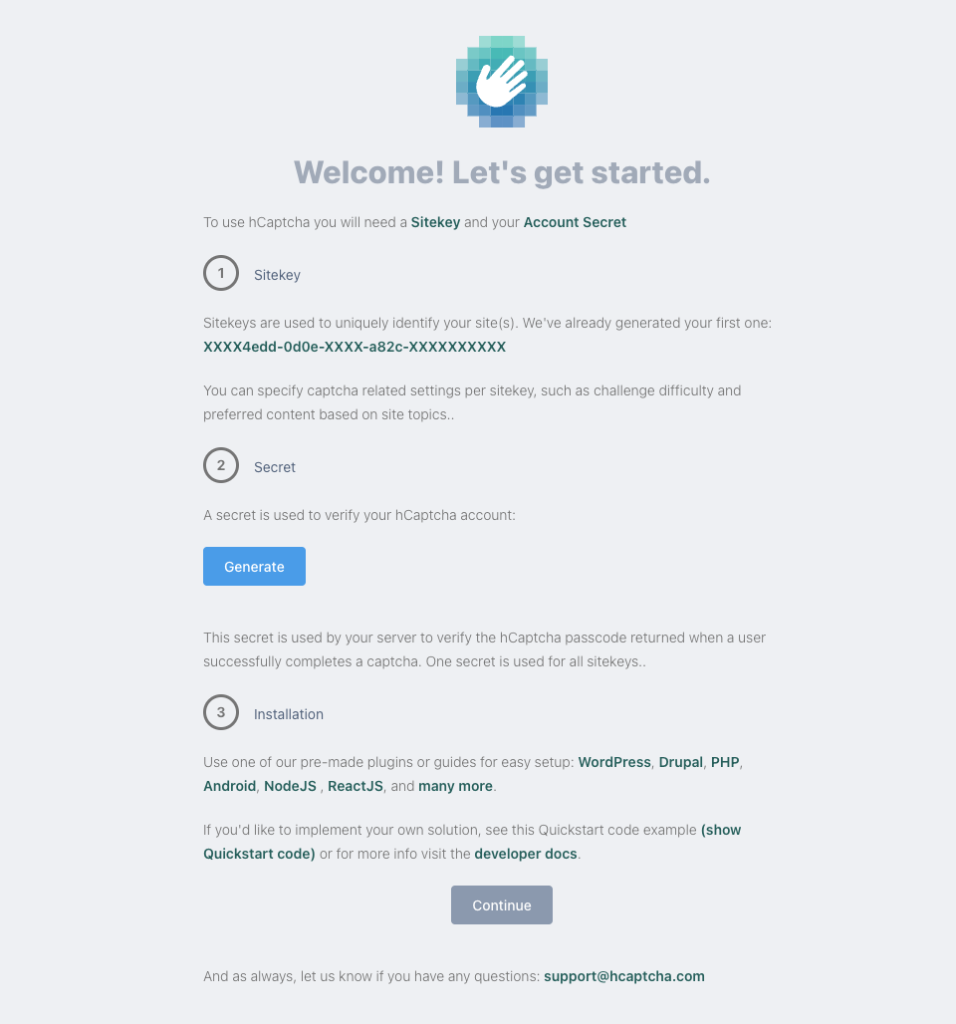
    You’ll end up on the dashboard where you can get started.

    hCaptcha Get Started Screen

    Make note of the Sitekey and then press the Generate button to get a Secret.

    Note down this value! This is the only time hCaptcha will display the Secret.

    In LiteSpeed Web Server WebAdmin Console, navigate to Configuration > Server > Security, and in the reCAPTCHA Protection section, define your Site Key and Secret Key with the values that you copied from the hCaptcha dashboard earlier. Select hCaptcha from the reCAPTCHA Type dropdown. Last but not least, do a graceful restart of the web server.

    More information about other CAPTCHA settings can be found here.

    Putting our newly added hCaptcha to good use

    One of the wonderful aspects of our CAPTCHA feature, is that we can use it to prevent websites from going offline during an extended attack period.

    One of the easiest ways to trigger CAPTCHA for every user on a given website is with a very simple mod_rewrite rule through .htaccess:

    RewriteEngine On
    RewriteRule .* - [E=verifycaptcha]
    

    The above rule will result in all users being shown the hCaptcha, and only after completing the challenge, will they be able to view the website as normal. After completing the challenge, LiteSpeed Web Server will also mark the IP as trusted, so new challenges won’t occur for every pageview for the given IP.

    While the above rule works, it’s often not ideal, since it may result in endpoints getting CAPTCHA challenges, while the clients using these endpoints cannot complete them. This could befor example, the WooCommerce API on WordPress websites, or even things such as payment gateway callbacks.

    We can either make use of RewriteCond to exclude certain user-agents, IPs or URLs, or a slightly different approach is to only serve CAPTCHA pages for those pages that are actively under attack.

    It’s quite common that when attacks happen, the attackers will keep hammering just a few particular pages, or sometimes only the frontpage. In cases like this, we can instead use explicit rewrite rules to only target these pages.

    For example, if something is relentlessly hitting the front page, we can define the following in our .htaccess file:

    RewriteEngine On
    RewriteRule ^$ - [E=verifycaptcha]
    

    If they’re hitting both our front page and /about-us, we can keep the rules fairly simple as such:

    RewriteEngine On
    RewriteRule ^$ - [E=verifycaptcha]
    ReweriteRule ^about-us$ - [E=verifycaptcha]
    

    Or using more complex rules:

    RewriteEngine On
    RewriteCond %{REQUEST_URI} ^/(|about-us)$
    RewriteRule .* - [E=verifycaptcha]
    

    To determine the attacked URLs, you can often tail the access log for the website, and simply determine by looking at the logs, what endpoints you’d like to block.

    Another method is to use a mix of cut (or awk), sort and uniq:

    cat access.log | cut -d' ' -f7 | sort | uniq -c | sort -h
    

    This will, for example, give you a simple count of the most visited URLs on your website. URLs under attack will usually appear with a higher count, and you can simply run it a few times to see what keeps increasing steadily.

    Another way is only looking at the past 50000 requests, for example. This may give a better picture. To do that, we can use tail -50000 access.log instead of cat access.log. You can see an example of such output here:

        241 /assets/images/da.png
        263 /assets/styles/style.css
        268 /assets/styles/main.css
        299 /blog
        328 /assets/scripts/popper.min.js
        331 /assets/images/en.png
        425 /assets/scripts/main.js
        445 /favicon.ico
        468 /robots.txt
     200081 /
  • LiteSpeed Not Vulnerable to HTTP/2 Continuation Flood

    LiteSpeed Not Vulnerable to HTTP/2 Continuation Flood

    LiteSpeed Not Vulnerable to HTTP/2 CONTINUATION Flood Vulnerability

    Here is what you need to know about the HTTP/2 CONTINUATION Flood vulnerability, specifically CVE-2024-27316, and LiteSpeed:

    • The vulnerability allows an attack that uses unbounded header buffering to overwhelm servers
    • LiteSpeed servers are not vulnerable to HTTP/2 CONTINUATION Flood

    What is Continuation Flood?

    The HTTP/2 CONTINUATION Flood vulnerability was announced yesterday as Vulnerability Note #421644 published by the CERT Coordination Center.

    The note states:

    An attacker that can send packets to a target server can send a stream of CONTINUATION frames that will not be appended to the header list in memory but will still be processed and decoded by the server or will be appended to the header list, causing an out of memory (OOM) crash.

    The note goes on to specify a number of CVE listings specific to certain HTTP/2 implementations, including the following:

    • CVE-2024-27983 (node.js)
    • CVE-2024-27919 and CVE-2024-30255 (Envoy)
    • CVE-2024-2758 (Tempesta)
    • CVE-2024-2653 (amphp/http)
    • CVE-2023-45288 (Go)
    • CVE-2024-28182 (nghttp2)
    • CVE-2024-31309 (Apache Traffic Server)

    CVE-2024-27316 is of particular interest because it applies to the Apache Httpd implementation:

    HTTP/2 CONTINUATION frames without the END_HEADERS flag set can be sent in a continuous stream by an attacker to an Apache Httpd implementation, which will not properly terminate the request early.

    LiteSpeed Web Server is an Apache drop-in replacement, but LiteSpeed does not share any code with Apache.

    LiteSpeed’s from-the-ground-up implementation of Apache-compatible systems means that LiteSpeed is usually not subject to the same vulnerabilities as Apache. That is indeed the case with the HTTP/2 CONTINUATION Flood vulnerability.

    How are LiteSpeed Users Protected?

    LiteSpeed Web Server, OpenLiteSpeed, and LiteSpeed Web ADC’s HTTP/2 implementation applies a 64K upper limit for total header buffering. If the limit is reached, the connection is closed.

    Attackers attempting to exploit this vulnerability on LiteSpeed Web Server will find their efforts thwarted after a mere 64K.

  • Extension Showcase with ecomDATA

    Extension Showcase with ecomDATA

    LiteSpeed Cache Plugin for JTL Shop

    Our friends at ecomDATA are here today, to share news of their new LiteSpeed Cache plugin for JTL Shop. This new plugin is available to all JTL Shop owners, regardless of what hosting company they use to host their shops. Without further ado, here is ecomDATA in their own words! -LC

    Great news for JTL Shop owners: We are thrilled to introduce the LiteSpeed Cache Plugin for JTL Shop, exclusively available through ecomDATA. This plugin seamlessly integrates JTL stores with LiteSpeed Web Server’s superior ESI support, providing the ultimate caching solution for your online store. It significantly reduces server load and allows your JTL Shop to load up to 10 times faster!

    About LiteSpeed Cache for JTL Shop

    JTL Shop communicates with LiteSpeed Web Server and LiteSpeed Cache Plugin to save and serve static copies of dynamic web pages. This powerful combination significantly reduces your shop’s page-load time, enhancing the overall shopping experience for your customers.

    As the content in your shop changes, LiteSpeed Cache Plugin offers the flexibility to accurately cache and purge every page. By utilizing Edge Side Includes (ESI), you can punch holes for personalized content on public pages. The static content that remains consistent across visitors is stored in the cache. When the next user accesses the same page, the cached content is promptly delivered, with only the holes needing to be filled in with data specific to that visitor.

    Advantages

    Simple Installation Process

    You can effortlessly obtain the plugin from the JTL Extension Store and install it with a single click. Afterward, activation is all that’s needed to complete the installation of the free version (guest mode only). For more advanced configurations, explore the features offered by LiteSpeed Cache PRO.

    Reduced Server Load

    The LiteSpeed Cache Plugin reduces server load, enabling you to efficiently serve a larger number of visitors using the same hardware.

    Faster Page-Load Times

    LiteSpeed Cache Plugin allows up to 10 times faster loading times for your JTL shop. With this plugin your store achieves an impressive Time To First Byte (TTFB) as low as 20ms, whereas other JTL shops typically range from 200-1500ms for this metric.

    Enhanced SEO Ranking

    Google favors shorter Time To First Byte (TTFB) intervals. Faster loading times not only lead to more content customers but also prolong their stay on your website. Consequently, a reduced TTFB can positively impact your Google ranking.

    LiteSpeed Cache PRO Features

    • Both Public and Private Cache
    • Cache for Logged-in Users
    • Caching for Shopping Cart
    • Server-Level Full-Page Cache
    • Tag-Based Caching and Purge
    • Advanced Configurations and Template Mapping
    • Edge Side Includes (ESI)
    • Cache Blacklist
    • Built-in Crawler
    • Multiple Languages
    • Integrated into LSWS, OLS and Web ADC

    Please note that this LiteSpeed Cache Plugin is designed for JTL Shop 5. The free version can be used with OpenLiteSpeed Web Server, the pro version requires LiteSpeed Enterprise Web Server.

    A more detailed description of LiteSpeed Cache Plugin can be found on our LiteSpeed Cache Page. Installation and configuration instructions can be found in our Installation Manual.

    LiteSpeed Cache Plugin for JTL Shop

    Our thanks to ecommDATA for sharing their story in this Showcase! Have you created a tool that LiteSpeed users may want to know about? Has your business experienced the LiteSpeed difference? If you would like to share your story with our readers, find me (@Lisa at Litespeed) on our Slack workspace, and we can discuss it. –LC

  • LiteSpeed Cache Security Patches

    LiteSpeed Cache Security Patches

    LiteSpeed Cache for WordPress Security Patches

    Last year, we were made aware of two distinct vulnerabilities in the LiteSpeed Cache for WordPress plugin. We patched these vulnerabilities right away, in v5.7 and v5.7.0.1 respectively.

    To protect your WordPress sites, please update to the latest version of the LSCache plugin immediately. (As of this writing, the latest version is v6.1.)

    If you’d like to know more about these vulnerabilities and their impact, read on.

    Stored XSS vulnerability

    The first issue, reported by the WordFence team, was a stored cross-site scripting vulnerability that could be exploited by authenticated users via the ESI shortcode functionality. Users with contributor-level and above permissions could potentially inject arbitrary web scripts into pages via the ESI shortcode. These scripts would have been executed whenever a user requested the page.

    Impact

    Only a small portion of our four million users would have been affected by this vulnerability: those that have ESI enabled, and also have authenticated users with permissions at the Contributor level or higher. ESI is disabled by default.

    We recommend those impacted sites upgrade to the plugin version 5.7 or higher to patch this vulnerability.

    Timeline

    • August 14, 2023: WordFence alerted us to the issue.
    • August 16, 2023: We made a patch and made it available to power users and testers as a GitHub commit
    • October 10, 2023: We released v5.7 to the WordPress repository
    • October 24, 2023: We added v5.7 to the list of stable releases in our control panel plugins

    Broken Access Control vulnerability

    The second issue, reported by the Patchstack team, was a broken access control vulnerability that could be exploited by unauthenticated users via the LSCWP API. Attackers could use certain API functions to access attachment URLs and details, and also change the nameserver configuration.

    Impact

    Because the vulnerability could be triggered by unauthenticated users, all four million installations would have been affected.

    We recommend that every site should upgrade to the plugin version 5.7.0.1 or higher to patch this vulnerability.

    Timeline

    • October 17, 2023: Patchstack alerted us to the issue.
    • October 19, 2023: We made a patch and made it available to power users and testers as a GitHub commit
    • October 25, 2023: We released v5.7.0.1 to the WordPress repository
    • October 26, 2023: We added v5.7.0.1 to the list of stable releases in our control panel plugins

    More Information

    We thank WordFence and Patchstack for bringing these issues to our attention. We have long since patched both vulnerabilities, so if you are keeping your LiteSpeed Cache plugin up-to-date, there is nothing you need to do. If you have not updated in a while, we strongly recommend doing so today.

  • Performance Testing Namespaces

    Performance Testing Namespaces

    Performance Testing Namespaces

    Namespaces in Linux are often used to implement containers and are great at administering sandboxes where files, users, processes and just about all system resources are separated from all other processes. Many commonly used applications, including Docker and Kubernates, use namespaces to implement their sandboxes. Kernel support for namespaces makes them virtually bulletproof and as such, namespaces are considered the gold standard for creating safe sandbox environments.

    OpenLiteSpeed supports both the bubblewrap tool and Linux native namespaces to meet the needs of a safe sandbox environment. But while they both provide a safe environment (bubblewrap actually uses namespaces in its implementation), there are differences between them in execution with OpenLiteSpeed. In this article, we’ll be performance testing namespaces and bubblewrap in OpenLiteSpeed.

    Differences between Bubblewrap and Namespaces

    OpenLiteSpeed’s support of bubblewrap is quite simple: set up a command line, and then execute it and allow bubblewrap to implement the sandbox. There are special command line options for generating the bubblewrap command line. These include custom /etc/passwd and /etc/group files to meet your needs, and file copies to generate files with the correct permissions. Bubblewrap itself does the bulk of the work.

    The namespaces feature in OpenLiteSpeed performs virtually all of the same tasks, but does so in a different way. Instead of a command line, you specify the name of a configuration file, which contains commands in it. Also, when a set of namespaces for a given user’s environment is created, it is persisted so that later executions do not have to recreate it. They can simply join it using facilities similar to nsenter. This should result in significantly better performance, but does it? That’s what we will aim to find out in this article.

    Goals

    • Determine the conditions where namespaces and bubblewrap perform the same.
    • Determine the conditions where namespaces perform better than bubblewrap and how much improvement there is.

    In an earlier blog which described OpenLiteSpeed’s use of bubblewrap, PHP processes were used to describe the feature. And while PHP is good for demonstrating how it works, and it remains the most common use of bubblewrap in OpenLiteSpeed, it is not the best tool to show performance differences between bubblewrap and namespaces.

    LiteSpeed highly optimizes PHP, and starts a small number of lsphp processes to serve any number of PHP requests. Thus the setup is one time for each execution of lsphp. It’s still worth using namespaces as doing so removes the overhead of executing an intermediary process. The lsphp program is run directly rather than through bubblewrap, so the actual performance gain is slight.

    Plain CGI executables provide the largest gain in performance and are the best tool to demonstrate the value of LiteSpeed’s native namespaces over bubblewrap’s implementation of namespaces. These are programs which are directly run by the web server and do their communications with the server though standard I/O and environment variables (see Common Gateway Interface).

    Performance Benchmarks

    In https://http2benchmark.org/ the test tool of choice is h2load, thus we used it for testing performance here as well.

    Test environment

    • Hardware: Intel i7, with 16GB of memory.
    • Software: VM with Ubuntu 22.04, configured to use 8GB of memory and 3 processors. VirtualBox running on Windows.
    • Test version of OpenLiteSpeed with a pre-release of namespace support. Running 3 workers to utilize the 3 processors.
    • After each test, we ran unmount_ns to assure that a subsequent test would not benefit from a persisted namespace. Also, we stopped and restarted OpenLiteSpeed after each test as well.
    • We tested using the sample CGI program included with OpenLiteSpeed: cgi-bin/helloworld. This program is simple enough to incur minimal overhead and thus demonstrate the value of any performance changes between the tests.

    Test results

    Small Load Test

    Command line:

    h2load -n 10000 -c 10 https://127.0.0.1:8089/cgi-bin/helloworld
    

    Where:

    • -n 10000: 10,000 total requests
    • -c 10: 10 concurrent requests

    Bubblewrap results:

    • 69 seconds
    • 145 requests per second
    • 7 K/sec

    Namespace results:

    • 16 seconds
    • 613 requests per second
    • 29 K/sec

    Without namespace or bubblewrap:

    • 13 seconds
    • 761 requests per second
    • 35 K/sec

    This shows in a small number of requests a 431% improvement in clock time and 423% improvement in throughput. The penalty for namespaces is 23% in clock time and 24% in throughput.

    Large Load Test

    Command line:

    h2load -n 100000 -c 100 -m 10 https://127.0.0.1:8089/cgi-bin/helloworld
    

    Where:

    • -n 100000: 100,000 total requests
    • -c 100: 100 concurrent requests
    • -m 10: 10 streams, or since this is http, the number of requests in flight at a time.

    Bubblewrap results:

    • 1123 seconds
    • 89 requests per second
    • 8 K/sec

    Namespace results:

    • 159 seconds
    • 628 requests per second
    • 36 K/sec

    Without namespace or bubblewrap:

    • 125 seconds
    • 799 requests per second
    • 43 K/sec

    This shows in a larger number of requests a 706% improvement in clock time and 706% improvement in throughput. The penalty for namespaces is only 27% in clock time and 27% in throughput.

    Conclusion

    In conclusion, it is clear that for CGI requests, you can accomplish substantial performance gains using namespaces over bubblewrap. These performance gains merely hint at the other resource gains in CPU, memory, processes, etc. And the value of a sandbox comes at a reasonable cost in performance and overhead.

  • Server Improvements Under the Hood

    Server Improvements Under the Hood

    LiteSpeed Web Server and Web ADC Updates

    LiteSpeed Web Server and LiteSpeed Web ADC both got significant updates at the end of 2023. Let’s look under the hood to see how these new updates can make your LiteSpeed experience even better!

    RE2 in ModSecurity

    LiteSpeed’s sleek and performant ModSecurity engine now supports the RE2 regular expression library. You can stick with the PCRE library that Apache, nginx, and others currently use, or you can switch to RE2, which comes with a resource-management advantage.

    PCRE commonly faces infinite-looping and thread-blocking issues when processing large input with poorly written patterns. This is a fatal problem for a high-performance, event-driven server. LiteSpeed minimizes the impact of thread blocking by using a thread pool that is separate from the main loop. But despite these measures, as PCRE’s resource usage grows exponentially, it can still cause a server to slow down.

    Computational resource consumption by RE2, on the other hand, grows only linearly and is more predictable.

    RE2 offers a slightly smaller number of features than PCRE does. However, RE2 is faster than PCRE when using certain operators like Boolean OR (|).

    Bottom line: if PCRE is working for you, there is no need to switch. But if you are seeing high CPU utilization, and you think ModSecurity could be to blame, try using RE2, and see if that helps. Navigate to WebAdmin Console > Server > Security > Web Application Firewall (WAF) and select Use RE2 regex engine.

    QUIC v2

    In March of 2023, we updated our LSQUIC HTTP/3 Library to use QUIC v2. Since then, we’ve taken our time integrating QUIC v2 into our server products. This has allowed for maximum testing time and confidence before rolling it out.

    As of LSWS v6.2 and LSADC v3.2, QUIC v2 is in production.

    Request Header Validation

    Request header validation is now more strict. As of these new versions, our validator checks for NULL bytes in the header value, and Transfer-Encoding value manipulation. If either of these is detected, a 400 bad request is returned.

    LSWS Apache Compatibility

    We have three compatibility improvements to share.

    First up, Litespeed now supports the new flags recently added to Apache’s rewrite engine:

    • BNP
    • backrefnoplus
    • BCTLS
    • BNE

    Second, we now support RewriteCond expr '<expression>'.

    And third, we squashed a bug that was preventing us from supporting dynamic regular expression matching. The issue was with variables in the pattern, as seen in SSI code like this:

    <!--#if expr="$referrer = /$host/" –>
    

    LiteSpeed could support fixed regular expression patterns in Apache expressions, but failed when variables were used. This issue is now solved, and LiteSpeed Web Server v6.2 fully supports dynamic regular expression matching.

    Web ADC HEAD Caching

    LiteSpeed Web ADC now supports HEAD caching. Separate cache entries will be created for HEAD requests, to avoid unnecessary hits to the back end, and to improve the cache hit rate.

    Conclusion

    Have you updated LiteSpeed Web Server or LiteSpeed Web ADC yet? The new versions are stable and ready to serve!

    If you’re new to LiteSpeed and want to take one of these products out for a spin, sign up for a 15-day trial, today:

  • LiteSpeed Cache v6.0 for WordPress

    LiteSpeed Cache v6.0 for WordPress

    Introduction

    LiteSpeed Cache v6.0 for WordPress is here, and we’ve got a bunch of behind-the-scenes improvements, a few bug fixes, and some nifty new features. You can see the full release log here, but today we’re going to focus on these great new settings and features:

    • The Preload Featured Image setting in Page Optimization > Media
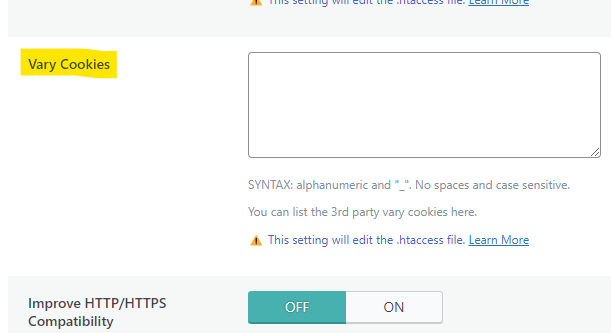
    • The Vary Cookies setting in Cache > Advanced
    • The new Crawler commands for the WordPress Command Line Interface (WP-CLI)
    • Parallel Pull, an improved method of pulling images for Image Optimization

    Preload Featured Image

    When you instruct a browser to “preload” a resource, that resource is added to the front of the processing queue, and is loaded even before the browser begins to render the page. By preloading a resource, you can potentially eliminate it as a render-blocking element.

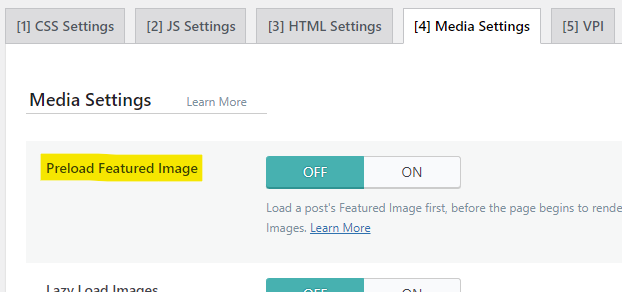
    You can enable the new Preload Featured Image setting to allow your posts’ Featured Images to be preloaded in browsers that support it. This user-experience enhancement ensures that browsers display your most important image right away, with no waiting.

    We’ve disabled this setting by default. To enable it from the WordPress Dashboard, navigate to LiteSpeed Cache > Page Optimization > Media Settings, and set Preload Featured Image to ON.

    NOTE: As of LSCWP v6.2, the Preload Featured Image option has been removed and the functionality folded into the ViewPort Images service. Any image that is detected to be a viewport image for a post is now automatically preloaded.

    Vary Cookies

    Before we talk about the new Vary Cookies setting, it’s helpful to understand the concept of cache varies in general, and the part that cookies play in that.

    LiteSpeed Cache stores and retrieves cache objects using a Cache Key. An optional component of the cache key is the “vary string.” It’s this vary string that allows you to save multiple cache objects from the same URL. This is useful in a number of situations including those where the desktop and mobile views of a page are different, or where the currency displayed on a page varies by the visitor’s geographical location.

    When you instruct the LiteSpeed Cache Engine to vary on a cookie, you are telling the Cache Engine to look for the cookie name, and then create cache varies based on the value of that cookie.

    So, for example, let’s say you have a membership plugin that shows one set of shop prices to members and a different set of prices to non-members, and the behavior is governed by a _member cookie. The cache engine could vary on the value of _member. It would store two copies of your shop page in cache: one for “yes” and one for “no”. Or maybe the cookie has three potential values: “full,” “trial,” and “no.” In that case the cache engine could store three copies of the page.

    LiteSpeed Cache can vary on any cookie you wish, and potentially create a separate version of the page in cache for each value of the cookie.

    If you have a situation like this, you can instruct LiteSpeed Cache to vary on any cookie that you wish. Navigate to LiteSpeed Cache > Cache > Advanced and add the name of the cookie to the Vary Cookies setting. If you want to vary on multiple cookies, enter them one per line.

    NOTE: Be careful not to vary on any cookie that uses a unique ID for each user as a value. This can potentially create an infinite number of copies of each page, and that will eat up your cache storage very quickly.

    Why is this new setting a big deal?

    Before Vary Cookies was added to the LiteSpeed Cache plugin, you could have defined some vary cookies for your site with a few lines in the .htaccess file. By adding the setting to the plugin, your defined vary cookies are now passed along to QUIC.cloud CDN.

    This is a big deal, because it means that your cookie-based cache varies exist at the CDN level. No other CDN can serve multiple cached copies of the same page based on a cookie value. But as of LSCWP v6.0, QUIC.cloud CDN can!

    CLI Crawler

    LiteSpeed Cache v6.0 comes with some new commands for the WordPress CLI. Now you can  control the crawler from the command line!

    WP-CLI is accessed with the wp command, and all crawler instructions begin with litespeed-crawler, so a complete WP-CLI crawler command would look like:

    wp litespeed-crawler <instruction> <parameters>
    

    There are five functions available:

    • List: list or l
    • Enable: enable <crawler-id>
    • Disable: disable <crawler-id>
    • Start: run or r
    • Reset: reset

    For more information about the new CLI crawler functionality, and how to use each function, take a look at our documentation.

    Parallel Pull

    Do you use the Priority Line or Jumbo Group power-ups that are available for Image Optimization? If so, you may notice your pulled images sliding back into your WordPress more speedily than they used to.

    This is due to Parallel Pull. Normally, when the cron pulls your optimized images back to your site, it downloads them one at a time. But users of those two power-ups now can expect multiple images to download at one time, potentially decreasing the time it takes to receive a batch of optimized images.

    There is nothing you need to do to enable this behavior. It is on by default when you subscribe to Priority Line or Jumbo Group.

    NOTE: These Image Optimization power-ups have been disabled as of September 1, 2024 in preparation for a new and improved Image Optimization service coming soon.

    Conclusion

    We’re always excited to bring you a new set of features and enhancements, and this release is no different. Install LiteSpeed Cache v6.0 for WordPress today and try it for yourself!!