We are more than halfway through 2025, and we wanted to take this opportunity to tell you what we’ve been doing this year, in case you’ve missed anything. We’ve released updates to three cache plugins, three control panel plugins, and all three server products!
Cache Plugins
First, let’s take a look at what’s new with our LiteSpeed Cache plugins for WordPress, PrestaShop, and Magento.
WordPress
We released three LSCWP updates in the last six months. In addition to dozens of minor changes and bug fixes, these new features were among the updates:
For v1.5.2 of LSCPS, we made a few minor updates: we fixed some bugs, we added parameter support to ESI block widgets, and we improved compatibility with Smarty and Symphony caches.
Our server products were updated this year to use a new version of LSQUIC. (A hash flood vulnerability was addressed in our LSQUIC HTTP/3 Library in February with the v4.2.0 release.)
LiteSpeed Web Server
We released LSWS v6.3.2 and v6.3.3, which included new features, security updates, and a number of bug fixes. See the full release log here.
New features include:
Improvements to HTTP/2’s ability to block aggressive robots when under attack
Improved support for LiteSpeed Containers and Redis in control panels
The ability to selectively disable anti-DDoS detection
The security updates addressed the LSQUIC vulnerability, and an issue with stderr.log permissions.
OpenLiteSpeed
OLS v1.8.3 updated LSQUIC and added support for “expect: 100 continue” handling.
LiteSpeed Cache plugins are available for a variety of web applications, including WordPress, Joomla!, and Drupal. But do you know why you should cache your apps? Or why a LiteSpeed Cache plugin is uniquely capable of delivering your web content quickly and accurately?
Let’s talk about all of that, and then look at a quick and easy way to see if your website supports LiteSpeed Cache.
Prefer to see this topic in video form? Click here.
Why Cache Your Web App?
Let’s start with a basic explanation of what a cache is. Generally speaking, a cache is a way of storing data so that it is easier or faster to retrieve than the original source.
With many web applications, caches are particularly helpful. The dynamic pages generated by these apps don’t exist anywhere in the file system. They are built on demand with PHP or some other method. So even though the web app’s pages are served to the visitor as HTML, generating them can be resource-intensive. And slow.
This is where LiteSpeed Cache comes in. LiteSpeed takes the dynamically generated web page, and stores it as a static HTML snapshot. That way, the next time the page is requested by a visitor, the snapshot can be served immediately. Serving a snapshot is much faster and uses far fewer resources than generating the page dynamically does.
Why Use a LiteSpeed Plugin?
If you know a little something about .htaccess files, and how to use rewrite rules, you can control the LiteSpeed Cache Engine that way. All it takes is a few rewrite rules in your application’s document root .htaccess, and you can have a simple page cache.
So what do you gain by using an LSCache plugin? Quit a lot actually.
An LSCache plugin bridges the knowledge gap between a web app and the Cache Engine.
Let’s put it another way: web applications have rules about what content you can cache, and when that cache should expire or be purged. An LSCache plugin understands these rules, and instructs the server Cache Engine how to proceed. This communication is not something that you can duplicate with rewrite rules.
For example, let’s say you have a WordPress site. The LSCache plugin for WordPress knows that when a post is edited, saved, or deleted, that post must then be purged from the cache. But it goes even further than that.
The LiteSpeed Cache engine is equipped with a handy tagging system that allows cached pages to be grouped together and purged all at the same time. This purge tag functionality is very powerful. It means that LSCache can do a targeted purge, removing the edited page, as well as every other page that is influenced by it. Without a tagging system, other plugins may either purge too little (just the single page) or too much (all of the site’s pages).
So, returning to our WordPress example, when the plugin knows to purge an edited post from the cache, it also knows to purge everything else that shares the same purge tags as that post. That can include the category pages for the post’s categories, monthly archives for the post’s publication date, author archives for the post’s author, and more.
Other benefits of LiteSpeed Cache plugins include:
the ability to cache both logged in and guest users
ESI technology for punching holes of private content on publicly cached pages
support for caching multiple views of a single URL with cache varies
and much more
LSCache plugins are available for many popular web apps, and you can get a list of them at lscache.io.
If there is no plugin for your favorite web app, and you’ve got developer skills, why not try writing one? Check out our documentation for all of the details.
Check Your Site for LiteSpeed Support
There’s a simple way to see if your site supports LiteSpeed Cache, and if caching is active: the LSCache Check Tool.
Visit check.lscache.io and enter your website’s URL. The tool will respond with an easy-to-read Yes or No result. Plus, it will display the URL’s response headers, in case you want to examine the results more closely.
In addition to LSCache support, the tool can detect cache hits, and can detect when sites are using LiteSpeed Web ADC or QUIC.cloud CDN for caching.
Additionally, a Stale Cache Warning will alert you if browser cache is detected on dynamic pages. This is because browser cache may interfere with the delivery of fresh content.
If your site doesn’t have LiteSpeed Cache support, you can change that! Here are a few ways:
We have a security update for LiteSpeed Cache for WordPress. Recently we were made aware of a vulnerability in the LiteSpeed Cache for WordPress plugin. We patched this vulnerability in v7.1.
To protect your WordPress sites, please update to the latest version of the LSCache plugin immediately.
This vulnerability affects those using Responsive Placeholders, and having the following configuration:
Media Settings > Lazy Load Images must be ON
Media Settings > Responsive Placeholders must be ON
With both of these settings in place, the vulnerability may be exploited by a user with unfiltered_html capability and the ability to create a new post with a Custom HTML block.
NOTE: by default, only Editor, Admin, and Super Admin roles have the unfiltered_html capability, but admins may assign it to other roles on a case-by-case basis via a plugin or custom code.
Actions
We suggest that every site upgrade to the plugin version 7.1 or higher to patch this low-severity vulnerability.
Timeline
April 10, 2025: Patchstack alerted us to the issue.
April 24, 2025: We patched the issue and released v7.1 to the WordPress repository.
April 30, 2025: We added v7.1 to the list of stable releases in our control panel plugins.
Conclusion
We thank Patchstack for bringing this issue to our attention. This vulnerability has been patched, so if you are keeping your LiteSpeed Cache plugin up-to-date, there is nothing you need to do. If you have not updated in a while, please do so today.
LiteSpeed is thrilled to announce Version 7.0 of the LiteSpeed Cache plugin for WordPress! One of the improvements that you will see in v7 is a new option for next-generation image formats. We’ve always provided the ability to generate WebP images with our image optimization service, and now we are adding the option to choose AVIF format, if you prefer.
The WebP raster graphics file format, announced in 2010 by Google, was introduced as a potential replacement for JPEG, PNG, and GIF file formats. It is widely available across major browsers.
The AVIF file format, introduced in 2019, is intended to replace the WebP format, and shows better compression ability than the JPEG format. It has recently become available across major browsers, too.
Which is better?
Both WebP and AVIF support these features:
ICC profiles including HDR
Both lossless and lossy compression
Alpha channels for transparency
Animation
Exif and XMP metadata support
Royalty-free usage
AVIF additionally supports these features that WebP doesn’t:
A variety of color spaces, including monochrome
Multi-layer images
Film grain synthesis
When Should you use WebP Image formats?
If your site contains mostly web graphics, especially illustrations, logos, and animations
If you plan to use lossless compression
If you want to continue enjoying QUIC.cloud image optimization Standard Queue for free
When Should you use AVIF Image formats?
If your site features high-quality photos, where accurate colors and finer details are important
If you plan to use lossy compression
If you want to upgrade to QUIC.cloud image optimization Advanced Queue, which for an additional charge, gives you faster processing and AVIF format
The bottom line: if you’re currently using WebP images, and you are happy with that, there’s no need to do anything. But if you want to switch to using AVIF instead, keep reading!
How to Generate AVIF Images
Here’s how you can set up the LiteSpeed plugin to generate a next-generation image format alongside your optimized JPG and PNG files.
If you are brand new to our Image Optimization service, we recommend you visit QUIC.cloud’s Handy Guide to Image Optimization to learn how to get started. It will tell you everything you need to know.
If you’re a seasoned Image Optimization user, and you’re ready to start generating AVIF images, here’s how to do it:
In your WordPress Dashboard, navigate to LiteSpeed Cache > Image Optimization > Image Optimization Settings and set Next-Gen Image Format to AVIF. Press the Save Changes button.
Click the Image Optimization Summary tab and click the Soft Reset Optimization Counter link under Optimization Tools. This will tell LiteSpeed to start over at the beginning of your Media Library and process everything again. Images that are already optimized will not be re-optimized, but AVIF files will be created for them.
If you have enabled Auto Request Cron, then you can simply wait for Image Optimization to begin again. Otherwise, click the Send Optimization Request button to get started.
Image Optimization employs two queues:
The Standard Queue, which is always free
The Advanced Queue (previously called the Fast Queue), which is mostly not.
WebP images may be generated using either queue, but AVIF images may only be generated with the Advanced Queue power-up.
QUIC.cloud gives every domain some free Advanced Queue quota every month. Once it is used up, all requests are sent to the Standard Queue for processing. Or, in the case of AVIF users, requests are paused until the free quota replenishes at the beginning of the next month.
An optional Advanced Queue power-up subscription is available for a monthly charge. With that, you get 20,000 additional Advanced Queue requests each month.
There is also a pay-as-you-go option. Use this to increase your Advanced Queue quota on an ad-hoc basis. You can manage it manually, or enable auto-refill to top up your quota whenever you are running low.
LSCWP v7 is packed with fabulous features, including these:
A new, streamlined approach to enabling QUIC.cloud services in WordPress. We’ve replaced the Domain Key with sodium encryption, and automated more of the process. Visit LiteSpeed Cache > General > Online Services to get started, or see our documentation for more details.
Introducing a new way to install LiteSpeed Web Server with just one click! LiteSpeed Web Server One-Click Installation (lsws1clk.sh) comes with several options and can be used with any supported operating system. Using this versatile script, you can quickly and easily install our enterprise web server with its default settings, and you can choose to include other useful applications, including WordPress and the LiteSpeed Cache plugin.
The script includes a 15-day LiteSpeed Web Server trial license by default. After the trial period, you can apply your own license or enter your serial number using the --license [LICENSE_NO] parameter during installation. Don’t know what license is best for you? You can browse our licenses here. There’s a LiteSpeed Web Server license for every budget, starting at zero dollars!
Install LSWS and LSPHP
The default use for the one-click script sets a random admin password and installs only two pieces of software:
A few tips to keep in mind when using the script to install WordPress:
The -W parameter will install WordPress as shown above, but you will still need to configure the WordPress installation through the browser.
By default, a MariaDB database will be set up using this script. You can also specify another DB if needed, using the --with-mysql or --with-percona flags.
If you already have a WordPress installation running on another server, it can be imported into LiteSpeed with no hassle using the --wordpresspath parameter.
To completely install WordPress with your LiteSpeed installation, skipping the need for the browser installation process, use --wordpressplus [SITEDOMAIN]. The --wpuser, --wppassword, --wplang, and --sitetitle flags allow you to further customize the settings.
Other Examples
Here are a few more usage examples that you might find helpful:
./lsws1clk.sh --lsphp 83: install LSWS with LSPHP v8.3 (also known as lsphp83)
./lsws1clk.sh -A 123456 -E admin@example.com: install LSWS with WebAdmin password 123456 and email admin@example.com
./lsws1clk.sh -R 123456 -W: install LSWS with WordPress and MariaDB root password 123456
./lsws1clk.sh --wordpressplus example.com: install LSWS with a fully configured WordPress installation at example.com
Please see the documentation to learn how to use these and other options.
Additional Virtual Hosts
Any time you want to create an additional virtual host, we have another script for that. Create a vhost in seconds using vhsetup.sh with the -d option, like so:
The document root in the example above would be /var/www/www.example.com. Be sure to substitute your own domain when you use the -d option.
Add Let’s Encrypt
Want to use Let’s Encrypt to get an SSL certificate? You can do that with the -le option, as long as you already have your domain configured to point to the server.
This example creates a www.example.com virtual host with the admin email address of admin@example.com. We used the -f option to force an HTTPS redirection:
This will create the www.example.com virtual host, and install all of the applications needed for WordPress.
NOTE: The first time you create an additional WordPress virtual host, you need to make sure the script can fetch your database root password. If you have a custom password, you can update /usr/local/lsws/password, or you can echo the password to /root/.db_password, like so:
The LiteSpeed Web Server one-click installation script has flexible options that allow you to make installation as simple or complex as you wish. Check out our documentation for more options, or watch our brief video to see lsws1clc in action.
If you’re an OpenLiteSpeed user, we’ve got a script for you, too. Find information about the OLS one-click script here.
We have a security update for LiteSpeed’s QUIC and HTTP/3 Library (LSQUIC). Recently we were made aware of a vulnerability affecting several QUIC implementations, including LSQUIC. We patched this vulnerability in v4.2.0.
Please update to the latest version of LSQUIC.
This Hash-based Denial-of-Service vulnerability, reported by Paul Bottinelli, Cryptography and Security Consultant at NCC Group, has been assigned CVE-2025-24947.
Impact
Several QUIC implementations, including LSQUIC, use a hash table to store Secure Connection IDs (or, SCIDs) as indices to connection data. If the hash function is weak, an attacker can trigger a denial-of-service attack by initiating connections with colliding SCIDs, causing significant slow downs.
LSQUIC, while technically vulnerable to this type of attack, has a rate limiting feature. If there are too many INIT packets for new connections, a Retry packet will be triggered. This means, LSQUIC doesn’t put the client-generated SCID in the hash. As such, in a real-world deployment, this vulnerability is not easy to exploit with LSQUIC.
Previously, we used XXH32(), which is prone to hash collisions, to generate a 32-bit hash key. With v4.2.0, LSQUIC has switched to rapidhash, which allows us to generate a stronger random seed, and produces a 64-bit hash key.
Our test shows that it addresses the hash collision issue well. Here are some examples:
without seed
211C6C858BB29CDD408F1EBDAA43A980CE016B71 -> F3C569EBDE612455
211CEC85DBB29CDE418F1EBDAA43A980CF214B71 -> F3C569EBDE612455
with seed
211C6C858BB29CDD408F1EBDAA43A980CE016B71 -> 3173D06C62EB64E2
211CEC85DBB29CDE418F1EBDAA43A980CF214B71 -> EF06763606005C05
without seed
211C6C858BB29CDD408F1EBDAA43A980CE016B71 -> 56B71185739E534A
211CEC85DBB29CDE418F1EBDAA43A980CF214B71 -> 56B71185739E534A
with seed
211C6C858BB29CDD408F1EBDAA43A980CE016B71 -> D18323CAAFD14A5A
211CEC85DBB29CDE418F1EBDAA43A980CF214B71 -> 190C4F2674528BE1
without seed
211C6C858BB29CDD408F1EBDAA43A980CE016B71 -> 9183B84F3AE05847
211CEC85DBB29CDE418F1EBDAA43A980CF214B71 -> 9183B84F3AE05847
with seed
211C6C858BB29CDD408F1EBDAA43A980CE016B71 -> D05A92D1069111F3
211CEC85DBB29CDE418F1EBDAA43A980CF214B71 -> 3150BF22FFAA28E4
Actions
We recommend that those using the QUIC and HTTP/3 library upgrade to LSQUIC version 4.2.0 or higher to patch this vulnerability.
Those who are using LiteSpeed server products, including LiteSpeed Web Server (LSWS), LiteSpeed Web ADC (LSADC), and OpenLiteSpeed (OLS), should upgrade to the latest versions of these products.
Timeline
January 10, 2025: We were alerted to the issue.
January 15, 2025: Patch was added to our internal repo to be included in all subsequent builds of our commercial server products
February 18, 2025: Released LSWS v 6.3.2, LSADC v3.3.0, and OLS v1.8.3
February 18, 2025: Released LSQUIC v4.2.0 to the GitHub repository
Conclusion
We thank Paul Bottinelli for bringing this issue to our attention. This vulnerability has been patched, so if you are keeping your LSQUIC library or your LiteSpeed server products up-to-date, there is nothing you need to do. If you have not updated in a while, please do so today.
Web Servers play an important role in connecting people around the world through the internet. Every day, users send millions of requests for content via their web browsers, and it’s web servers that answer those calls.
In this introduction to web servers, we’ll look at how this request-and-response routine works, and get some more details about the capabilities and functionalities of web servers.
If you’d prefer the video version of this article, you can watch it here:
Requests and Responses
A user’s website experience is built on a series of requests and responses.
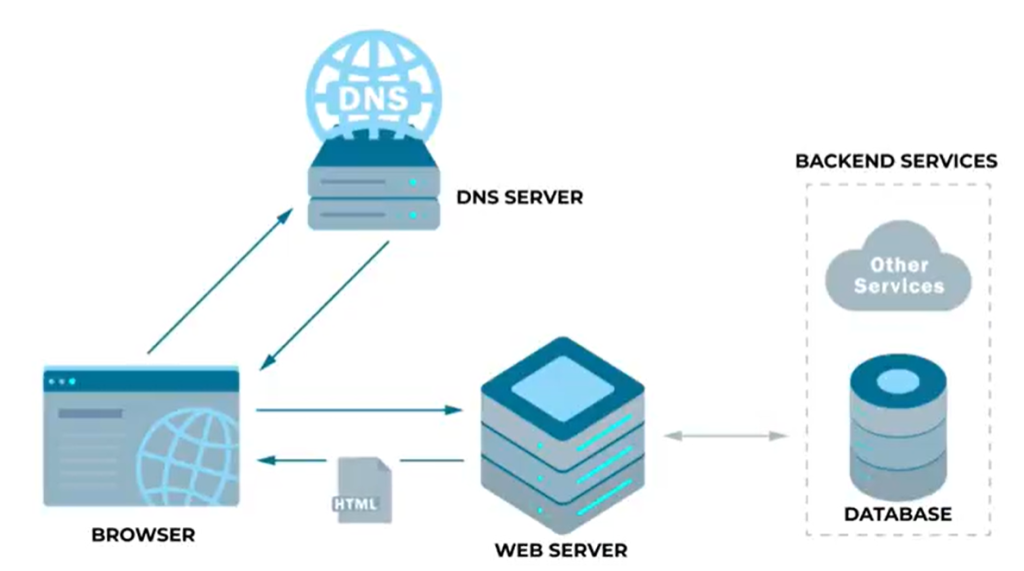
First the user opens their browser and enters a URL. Let’s say, example.com.
Every device that is connected to the internet has a unique IP address. Think of it like a phone number. The browser sends a request to the Domain Name System (DNS) to look up the IP address that belongs to example.com‘s web server. Using DNS to translate a URL into an IP address allows your browser to know exactly where to send the request.
The DNS Request
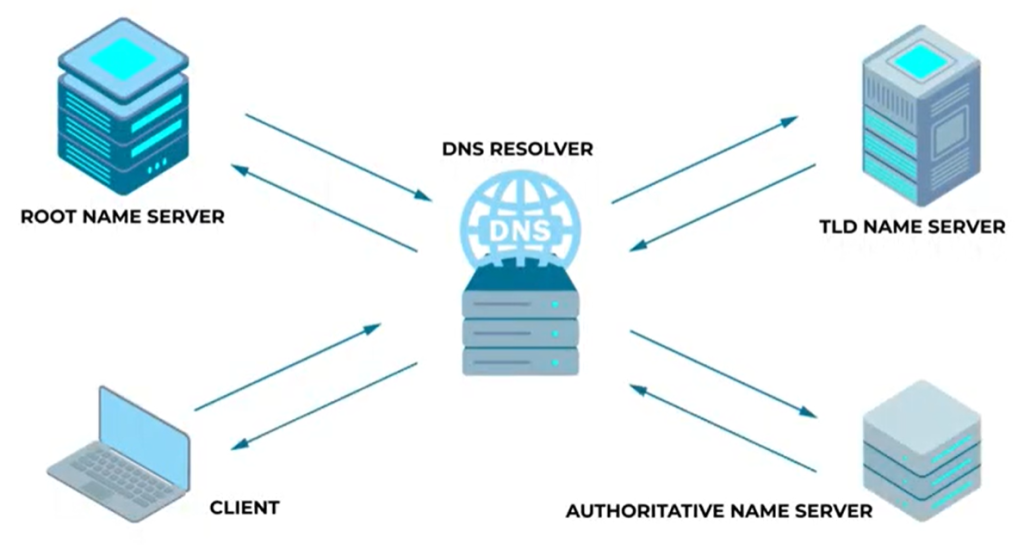
A DNS request is processed through a hierarchy of servers:
The Recursive Resolver receives the initial request and passes it along to the closest Root Nameserver
The Root Nameserver has information about top-level domains (TLDs), such as .com,.net, and all of the country-based domains, so it instructs the Recursive Resolver to pass along the request to the appropriate TLD Nameserver.
The TLD Nameserver stores information for second-level domain names, like example.com, and instructs the Recursive Resolver to pass the request along to the appropriate Authoritative Nameserver.
The Authoritative Nameserver looks up example.com’s IP address (let’s say, 192.0.2.0) and returns it to the recursive resolver, which finally sends the information to the browser.
Thanks to DNS, the browser now knows to send the user’s example.com request to 192.0.2.0, where the web server will receive it.
The Web Server Response
The web server’s job is to receive the request, fetch any necessary content, and send a response back to the browser:
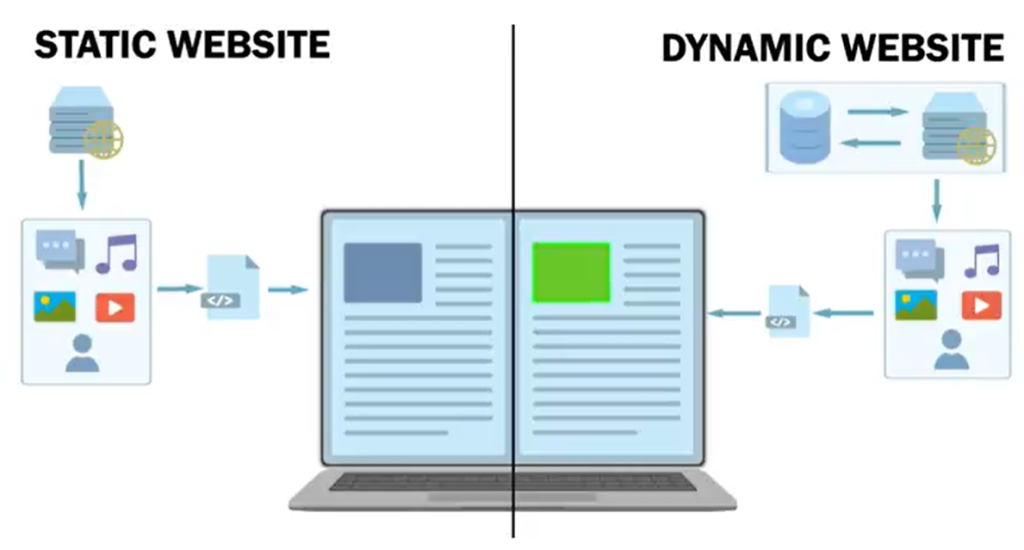
Processing the request: The web server receives the request and interprets it (for example, is it a GET request? or a POST request?). It checks if the requested content is static (like HTML) or whether it requires dynamic generation (like PHP or Python).
Fetching or generating content: The server retrieves the requested content. If it’s dynamic content, the server also processes the request using backend languages, connects to databases if needed, and generates the appropriate response.
Sending the response to the browser: Once the content is ready, the server wraps it in an HTTP or secure HTTPS response and sends it back to the browser.
After all of these steps, which usually take a fraction of a second, the browser renders the requested content from example.com for the user.
So, What is a Web Server?
A web server is a collection of specialized software installed on a physical server (a machine similar to your computer at home) that listens for incoming requests from browsers. These requests are usually made via the HTTP or HTTPS protocols and could involve fetching static files like HTML, CSS, and JavaScript, or processing dynamic data.
Let’s look more closely at these ideas.
Key Components of a Web Server
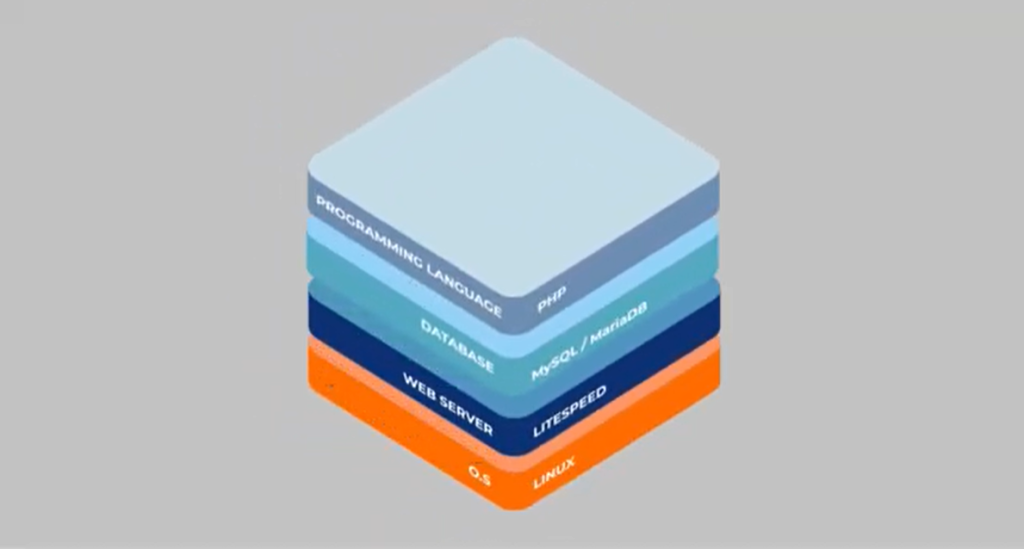
A “web server” essentially consists of three things: a physical computer or virtual machine, an operating system, and web server software.
The physical computer or virtual machine acts as the foundation of the web server, providing computing resources (CPU, RAM, storage) and network connectivity to support web hosting. The resources can be dedicated to a single user or shared with several users.
The underlying operating system (OS) manages hardware resources and provides a platform for other components in the system. These components, plus the OS itself are also called a “stack.” Common choices for OS include Linux and Windows Server. Linux is the most popular, well-known for its stability and flexibility in server environments. The majority of web servers use some variant of Linux, like CentOS or Ubuntu.
The web server software handles the incoming HTTP/HTTPS requests. In response, it serves static content or forwards dynamic requests to an application server. Common web server software includes Apache HTTP Server, Nginx, and LiteSpeed Web Server. We’ll talk more about these later.
Static vs. Dynamic Content
Let’s look at the different types of content that may be requested from a web server:
When the web server receives a request for static content, it directly delivers pre-existing files to the browser without any modifications. It’s fast, because the server only has to retrieve and serve the file. Popular types of static content include HTML, CSS, and images.
Dynamic content requires additional server-side processing time before the response can be sent to the browser. In a nutshell:
The web server runs an application server script. This could be in PHP, Python, or some other language.
The script may talk to a database to get specific information, such as user details, or search results, depending on the request.
The server generates a custom HTML page tailored to the user’s request.
The server sends the generated page back as static HTML to be displayed in the user’s browser.
Additional Web Server Features
This is the basic behavior of a web server: to receive a request, process it, and respond with the requested content. But there are other features that a web server provides, including security and performance enhancements.
Security Features
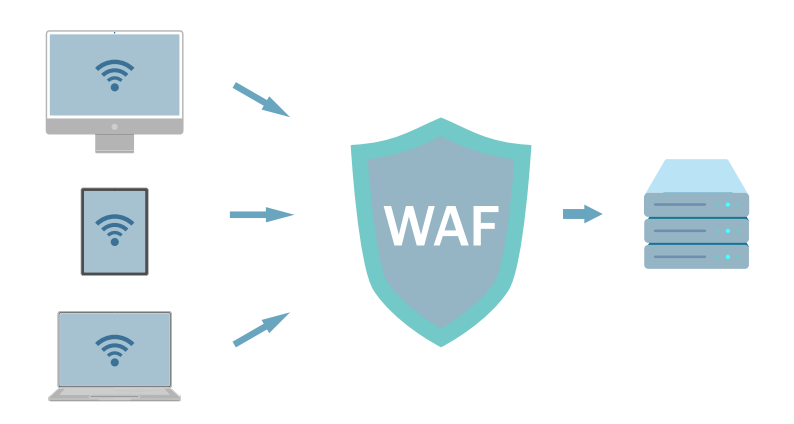
Web servers can support a number of security features, but the two most popular are Web Application Firewall (WAF) and Secure Socket Layers (SSL) / Transport Layer Security (TLS) Encryption. These important features are not built into web servers, per se, but good servers support them.
A WAF, usually in conjunction with a server’s security module, monitors incoming traffic, inspects each request, and uses a set of rules to block anything suspicious. This helps prevent hacking attempts and traffic overload attacks like Distributed Denial of Service (DDoS) attacks.
SSL and TLS encrypt the data that is exchanged between your browser and the web server, keeping sensitive information like passwords and payment details safe from hackers. When you see https in the address bar, you know that the server is using SSL/TLS to create a secure connection, scrambling data so that only the right people can read it.
SSL and TLS protect personal information from being intercepted, ensure data isn’t altered during transmission, and confirm the website is genuine. SSL support is built into the web server, but it uses certificates that are generated externally via a Certificate Authority (CA) like Let’s Encrypt.
Performance Features
In addition to security, web servers provide important performance features, such as compression and caching.
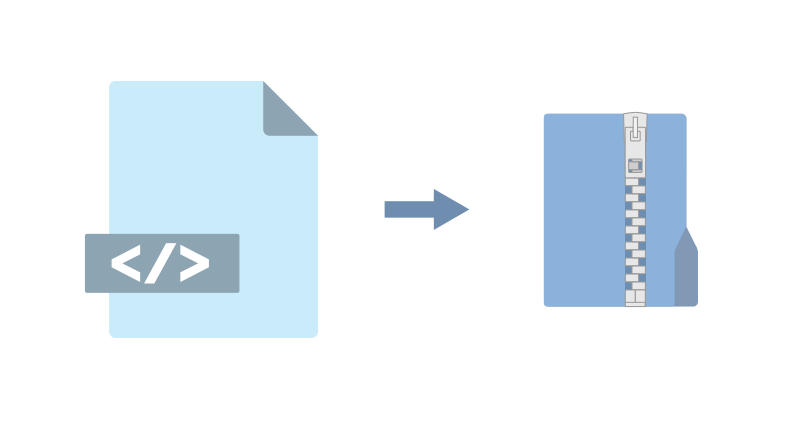
Web servers use GZIP, Brotli, and other technologies to compress the size of files sent from the server, making them faster to download. The browser decompresses the files upon receipt. This saves bandwidth and decreases page load times, a boon for users with slower connections.
A cache is used to store static copies of frequently requested dynamic content. Web servers that make use of caching, serve the static copies rather than regenerating the dynamic content each time it is needed. This significantly reduces server workload, saves resources, improves load times and provides a better user experience.
Common Web Servers
Let’s take a look at a few popular Linux-based web servers, and see what sets them apart from each other.
Apache
Apache HTTP Server was launched in 1995, and is one of the earliest web servers. Still widely used today, Apache was developed as an open-source project, and gained popularity for its flexibility and ability to run on multiple platforms, such as Linux and Windows.
Apache revolutionized web hosting by making it accessible and customizable. Its modular design attracted users who were able to adapt the server for a wide range of web-based applications. Even today, Apache powers millions of websites worldwide.
Nginx
Nginx was released in 2004 by Igor Sysoev, and was designed to solve the problem of handling ten thousand concurrent connections efficiently. This is also known as the C10k Problem. Nginx’s lightweight, event-driven architecture made it an attractive choice for high-traffic websites.
Known for its high performance, scalability, and low resource usage, Nginx excels at serving static content and handling a large number of simultaneous connections. It’s often used as a reverse proxy and load balancer in front of Apache servers, as it is better at efficiently handling heavy traffic than Apache tends to be.
LiteSpeed Web Server
LiteSpeed Web Server was launched in 2003 by George Wang. It was designed for speed and efficiency, developed to address the performance limitations of traditional web servers like Apache. LiteSpeed Web Server offers seamless Apache compatibility and significantly better performance, especially for dynamic content and SSL handling. Its compatibility with Apache configurations allows for easy migration, making it attractive for users seeking better performance without reconfiguring their entire setup.
LiteSpeed is known for its speed, resource efficiency, and robust security features. It excels in server-side caching, and is a go-to solution for web hosts prioritizing speed, security, and scalability.
Conclusion
We hope this overview has given you a sense of what web servers do, in general, and the vital role they play in the functioning of the internet. Visit our website if you’d like to learn more about LiteSpeed Web Server in particular!
We have a security update for LiteSpeed Cache for WordPress. Recently we were made aware of a vulnerability in the LiteSpeed Cache for WordPress plugin. We patched this vulnerability in v6.5.3.
To protect your WordPress sites, please update to the latest version of the LSCache plugin immediately.
This vulnerability affects those using the Viewport Images service, and having the following Page Optimization configuration:
Media Settings > Lazy Load Images must be ON
VPI > Viewport Images must be ON
Tuning > Optimize for Guests Only must be OFF
With all of these settings in place, the vulnerability may be exploited by a user with the Editor role. They must have permission to create a new post and set the LiteSpeed Options on that post, before they can inject JavaScript code through a DOM mutation.
Actions
We strongly recommend that every site upgrade to the plugin version 6.5.3 or higher to patch this vulnerability.
Timeline
November 07, 2024: Patchstack alerted us to the issue.
December 04, 2024: We patched the issue and released v6.5.3 to the WordPress repository
December 05, 2024: We added v6.5.3 to the list of stable releases in our control panel plugins
Conclusion
We thank Patchstack for bringing this issue to our attention. This vulnerability has been patched, so if you are keeping your LiteSpeed Cache plugin up-to-date, there is nothing you need to do. If you have not updated in a while, please do so today.
LiteSpeed Cache for WordPress provides a number of optimization tools, like CSS Combine, or JavaScript Combine. When you use these tools, the goal is to make your pages load faster. Sometimes, though, these tools cause your disk space to grow very quickly, and that can be a problem. If this is happening to you, the reason is probably a randomized string in your CSS or JavaScript code.
The Problem With Randomized Strings
Why are random strings a problem? The presence of random strings causes a new combined file to be created for each page on your site. And if you’ve got a separate mobile view, then there will be two combined files created for each page in the site. For each additional cache vary on your site, another set of combined files will be created.
As you can imagine, this is not ideal, and it has the potential to fill up your server’s disk space very quickly.
To stop this behavior, you must exclude the randomized CSS or JavaScript from being combined. But first, you have to figure out where the random string is coming from.
Finding the Random String
To find a random string that is inline in your page’s HTML, here’s what you need to do:
View the page without any optimization, in two different incognito browsers
View the page source from each browser and compare them
The only difference you should see is the random string itself. You can use that to determine which CSS or JavaScript should be excluded from optimization
An Example
Let’s go through an example:
Open an incognito browser window and visit your site. Append the ?LSCWP_CTRL=before_optm string to the end of the URL. Like this: https://example.com/?LSCWP_CTRL=before_optm
Open another incognito browser window and visit your site without optimization, like this: https://example.com/
You should see just a few lines of CSS or JavaScript highlighted. This is where the two page loads differ, and it indicates where the random strings are.
The strings should have a common part. (for example, if you see abc_12345 and abc_67890, the common part is abc_) It will be something different for your own page, but it should be fairly easy to spot.
If the random string occurred in CSS, then navigate to Page Optimization > Tuning and enter the common part of the string into the CSS Excludes setting.
If the random string occurred in JavaScript, then navigate to Page Optimization > JS Tuning and enter the common part of the string into the JS Excludes setting.
Save your changes.
Finally, hover over the LiteSpeed icon on the WordPress Admin Bar and click Purge All in the drop down menu. This will clear the CSS and JavaScript page optimization files in the wp-content/litespeed folder. After a short while the page optimization process will re-generate the files. Without any of the random strings, many fewer files will be generated, and you will see that it doesn’t take up much disk space at all.
Video
Prefer to see this topic in video form? Your wish is our command.
Conclusion
If you’ve tried these steps and are still having difficulty with your disk space filling up, your random strings may not be inline. They may be in combined CSS or JavaScript files. Here’s another method you can try to find random strings in combined CSS or JS files. If you’re still having trouble after that, open a ticket with our friendly support team, and they’ll be happy to help!
We have a new patch to announce. Recently we were made aware of a vulnerability in the LiteSpeed Cache for WordPress plugin. We patched this vulnerability in v6.5.2.
To protect your WordPress sites, please update to the latest version of the LSCache plugin immediately.
This vulnerability only affects those who have a very specific Crawler configuration:
Crawler must be ON
Run Duration and Interval Between Runs should both be large numbers, for example 3000
Server Load Limit should be 0
Role Simulation should be 1 (or any other userid with Administrator privileges)
All crawlers should be turned off, except for the Administrator crawler
With all of these settings in place, the vulnerability may be exploited.
This is a configuration that is unlikely to be used under real world conditions, and as such, we don’t expect too many sites to be impacted.
In particular, it is highly unusual to set the Server Load Limit to 0, because that means that the crawler won’t run at all, and it is required for Server Load Limit to be 0 to reproduce the issue.
Actions
We recommend that every site upgrade to the plugin version 6.5.2 or higher to patch this vulnerability. Additionally, we suggest that you check your site’s user list for any accounts with administrator privileges and delete any accounts that you don’t recognize.
Version 6.5.2 temporarily removes the Role Simulation functionality, and eliminates the mt_srand function which was used for random hash generation. We understand that some users do rely on the Role Simulation functionality, so we plan to reinstate it once we can be sure it won’t leave your sites vulnerable.
Timeline
September 24, 2024: Patchstack alerted us to the issue.
October 17, 2024: We patched the issue and released v6.5.2 to the WordPress repository
October 29, 2024: We added v6.5.2 to the list of stable releases in our control panel plugins
Conclusion
We thank Patchstack for bringing this issue to our attention. This vulnerability has been patched, so if you are keeping your LiteSpeed Cache plugin up-to-date, there is nothing you need to do. If you have not updated in a while, please do so today.