
Category: LiteSpeed Web Server

Learn more about LiteSpeed Web Server. LSWS conserves resources without sacrificing performance, security, compatibility, or convenience. When you replace Apache with LiteSpeed, you double your maximum capacity, and eliminate the need for a 3rd party caching layer – all in 15 minutes with zero downtime!

  • Introducing LiteSpeed Containers

    Introducing LiteSpeed Containers

    LiteSpeed Containers

    Introducing LiteSpeed Containers for Web Hosts!

    If you host websites and use a Control Panel like cPanel or Plesk and are not using CloudLinux, you may very well consider using LiteSpeed Containers to help you manage your customers.

    LiteSpeed Containers uses the powerful new features of Linux including:

    • Allowing full control of CPU, I/O, number of processes and amount of memory a user can use using cgroups.
    • Putting each user in a sandbox, or container that isolates the user from affecting any other users using namespaces.

    If you use Enterprise Litespeed and one of our supported control panels (cPanel or Plesk), all control is from a PlugIn in the Control Panel itself.

    Even if you use OpenLiteSpeed or an unsupported control panel you can get the same powerful features using our included APIs. This is all built-in to your LiteSpeed server product.

    This blog will walk you through a number of situations where LiteSpeed Containers can help you better manage your environment.

    Turning on LiteSpeed Containers

    If you have LiteSpeed Enterprise v6.3 or later, and one of our supported control panels, you can find LiteSpeed Containers in the Control Panel Plugin, and you can simply run the script there that enables it. We recommend adding the configuration for cgroups and namespaces at the virtual host level.

    If you are running OpenLiteSpeed you will need to upgrade to v1.8 or later, and enable cgroups and namespaces.

    Hogging the CPU

    Preventing CPU hogging is the most basic value of LiteSpeed Containers. Linux will allocate all CPU power to any process that uses it, and users may take advantage of this, intentionally or not. LiteSpeed Containers gives you the tools to manage this condition.

    For example, if one of your users has a bug in a PHP script that creates a tight loop and uses all of the CPU, suddenly every user on that machine sees their processes get hung.

    With LiteSpeed Containers you can avoid this scenario by allocating each user in the package a defined amount of CPU. We strongly recommend that this be in multiples of 100. Each multiple of 100 uses a full CPU, and allocating CPU in this manner avoids context switching.

    If you have one of the LiteSpeed Control Panel Plugins, open the plugin, select Containers Package Manager, highlight the package, and click Edit.
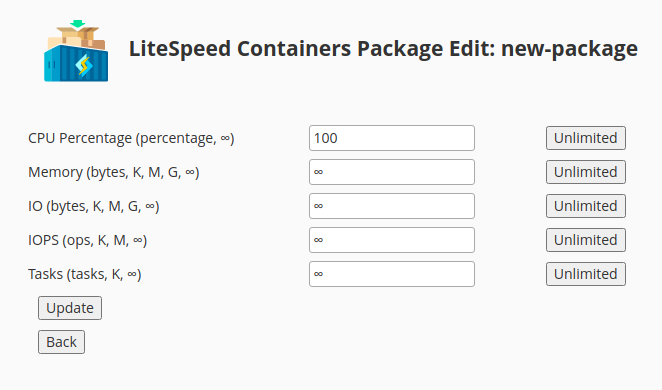
    Enter 100 as in the above example, and each user will get a maximum of 1 CPU. If the user begins to completely hog the CPU, then it will be the only user using that CPU while all other CPUs are available for other users.

    If you do not have a LiteSpeed Control Panel you can do the same thing with the command line API (using the package new-package):

    sudo /usr/local/lsws/lsns/bin/lspkgctl --cpu 100 set new-package

    To see the current values, use this command:

    sudo /usr/local/lsws/lsns/bin/lspkgctl list new-package

    Which displays:

    {
        "packages": {
            "new-package": {
                "uids": [
                    1002
                ],
                "cpu": "100"
            }
        }
    }

    Note that as soon as you complete the action, the user settings are immediately updated.

    Selling a Variety of Access

    LiteSpeed Containers can help you sell a variety of access tiers. For example, you could have a Basic tier which offers a more limited form of access and an Advanced tier that offers more power for customers. The procedure involves something you possibly already have in place, which is to put each user in each tier in a package specific to that tier.

    Once you have that done, you are ready to set up each package for the tier. For example:

    • Basic tier limits to 1 CPU, 1G RAM, 1K IO’s per second, 1M IO and 100 tasks.
    • Advanced tier limits to 2 CPUs, 4G RAM, 4K IO’s per second, 4M IO and 400 tasks.

    These are just examples and the values you would sell are what is appropriate for your region and hardware.

    As above, this is best done at the package level because it affects all users at the same time. We’ll discuss making exceptions below.

    In your control panel, create the packages (or plans in Plesk) and add users as appropriate to each.

    If you have one of the LiteSpeed Control Panel Plugins, in the plugIn, select Containers Package Manager, highlight basic and press the Edit button.
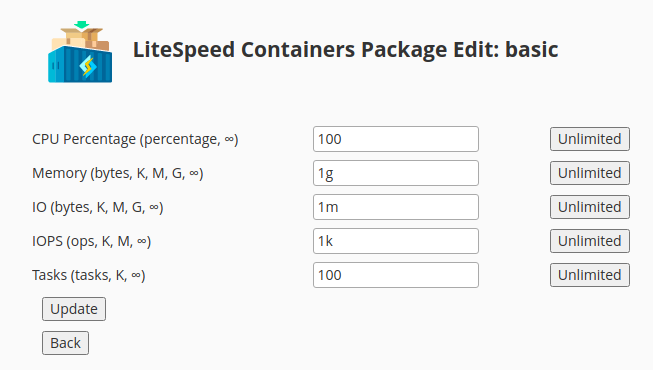
    Enter the appropriate values and press the Update button to apply the changes to the users. To update the advanced package press its Edit button.
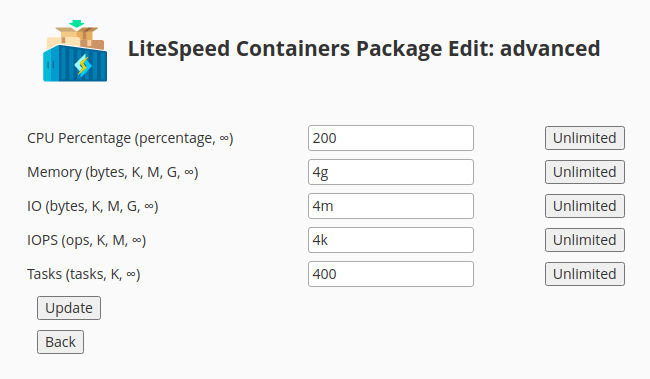
    Again, enter, the appropriate values and press the Update button to apply the changes to the users.

    To perform the same actions using the API enter:

    sudo /usr/local/lsws/lsns/bin/lspkgctl --cpu 100 --io 1m --iops 1k --mem 1g --tasks 100 set basic
    sudo /usr/local/lsws/lsns/bin/lspkgctl --cpu 200 --io 4m --iops 4k --mem 4g --tasks 400 set advanced

    Making cgroups Exceptions

    If you have a user with the name exception in the advanced package, and you wish to offer no limit for tasks, you can do this. In the plugin, select Containers User Manager and click Edit in the Cgroups column, and the appropriate user’s row.
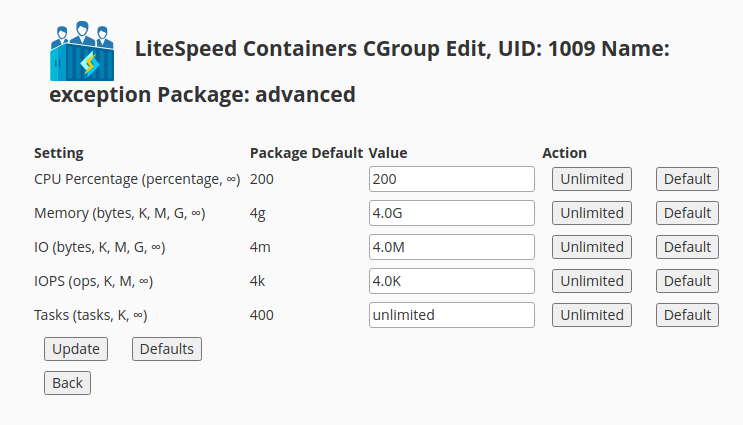
    To set the user’s task enforcement to unlimited, press the Unlimited button in the Tasks row and press the Update button to apply the change. Future package updates to the advanced package will be applied to all users including this one, except for the Tasks limit which will be preserved.

    To perform the same function to the exception user using the API enter:

    sudo /usr/local/lsws/lsns/bin/lscgctl --tasks -1 set exception

    Making namespace Exceptions

    If you configure a user with namespace containers in the LiteSpeed Configuration, it will run in its own container shared with all instances of that user. If you wish to exclude a user from namespace containers you can indeed do that.

    In the plugin select Containers User Manager. In the Namespaces column is a Disable button.
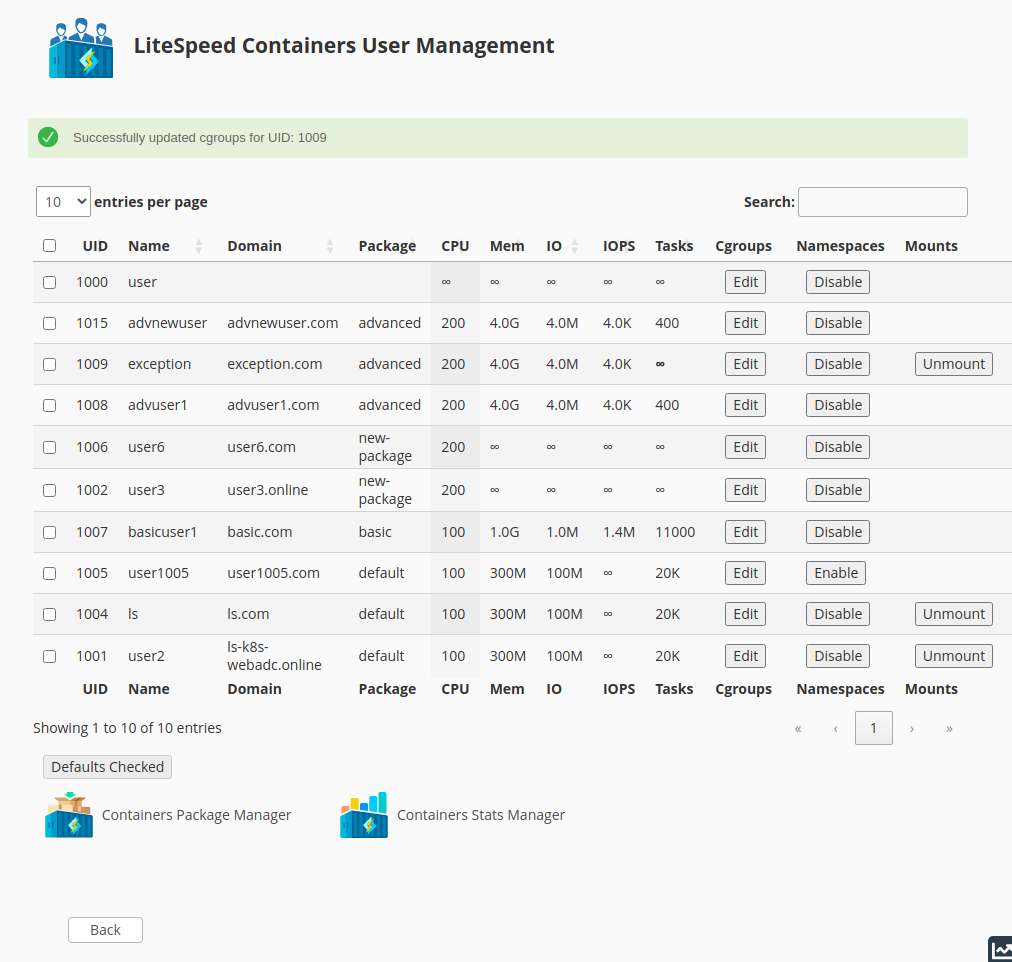
    If you press the Disable button you will disable use the of the container for that user for future invocations. Existing ones will run until completed. It warns you that you must run a manual graceful restart to apply the disable at a time when it will not disrupt user traffic.

    The Unmount button is displayed indicating that there is a namespace created for that user. Once all users are done you can press the Unmount button. Pressing it while users are running will cause no harm. It will warn you that it is in use.

    To disable the user exception using the API:

    sudo /usr/local/lsws/lsns/bin/lsnsctl --uid exception disable-uid

    Monitoring Users With Prometheus

    Besides monitoring LiteSpeed, the LiteSpeed Prometheus Exporter will also monitor cgroups statistics for each user unless configured not to. This is quite a low-overhead operation and has a very large upside for LiteSpeed Containers. With it, you can use Prometheus and Prometheus-compatible tools like Grafana to monitor your system.

    You can get some quick and dirty statistics with the plugin. Select Containers Stats Manager:
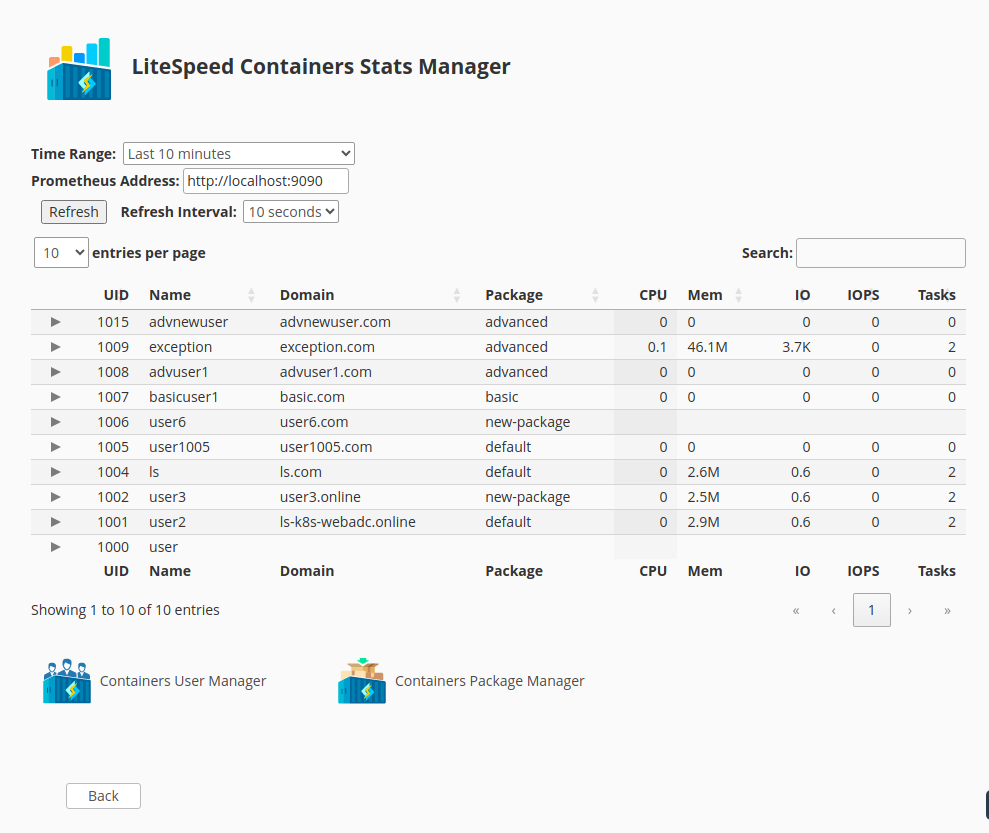
    Time Range can be set to:

    • Last 10 minutes
    • Last 30 minutes
    • Last hour
    • Last 4 hours
    • Today
    • Yesterday

    After changing the Time Range you must press the Refresh button to see the results or select a Refresh Interval other than stop and it will update during the next auto-refresh..

    These statistics come from Prometheus itself so you must have the Prometheus Address configured to contact the same Prometheus server that the LiteSpeed Prometheus Exporter is using. You can use Prometheus or its tools to provide graphs or alerts which can be useful to allow you to see which users are using excessive resources or which users are not actually using the systems.

    Monitoring Users Without Prometheus

    If you do not wish to use Prometheus, you can get a point-in-time look at the system by selecting the Time Range: Real-Time (without Prometheus) and pressing the Refresh button or set a Refresh Interval other than stop. This will only provide the last 2 seconds of information and can be useful in determining the current state of the system.

    There is an API to provide the non-Prometheus information. For example, to see the statistics for the user exception enter:

    /usr/local/lsws/lsns/bin/lscgstats exception

    Which returns the details for the system as a whole, the dot (.) user, and the exception user:

    {
        ".": {
            "name": ".",
            "cpu": "1178426628",
            "io": "80723709952",
            "iops": "463034",
            "mem": "497131520",
            "tasks": "36"
        },
        "1009": {
            "name": "exception",
            "cpu": "844348342",
            "io": "3561500672",
            "iops": "5620",
            "mem": "60563456",
            "tasks": "2"
        }
    }

    The values can be used to calculate details as they are directly from the operating system cgroups user directories. For example, the cpu number is the number of microseconds the CPU has used since the reboot for the system as a whole and for the specific user. Thus if you run this with a 1-second interval and subtract the more recent value from the earlier value and divide by 1 million, you will get the amount of CPU time used in that 1 second. Multiply by 100 and you have a percentage. It is this and similar tricks used by the LiteSpeed Prometheus Exporter which give you statistics about your system.

  • Troubleshooting 503 Service Unavailable

    Troubleshooting 503 Service Unavailable

    503 Error with LiteSpeed Web Server

    There are many reasons why your web server may return an HTTP response of “503 Service Unavailable,” and most of them are not actually a problem with the web server at all! Before you contact LiteSpeed support, let’s take a look at the possible causes of 503 errors, and see which ones you can easily solve on your own.

    What is a 503 error?

    When a web browser sends a request to your web server, the server responds with the requested resource, if applicable, and a status code. The code consists of a 3-digit number, which indicates the success or failure of the request.

    Any response code in the 5xx series indicates a server-side error. 503, in particular, means Service Unavailable. Unfortunately, it does not tell you why the requested service is failing.

    Rule Out a Server Issue

    First, let’s make absolutely sure that you’re not dealing with an issue with your LiteSpeed Web Server.

    The easiest way to do this is to temporarily switch your server to Apache. Once you’ve switched, try to duplicate the 503 error while Apache is running.

    If you still get the 503 error while Apache is running, then this is not a server issue. Switch back to LiteSpeed, and keep reading the troubleshooting suggestions below.

    If the 503 error goes away while Apache is running, then it’s time to contact LiteSpeed support. You can open a ticket from your client area. Be sure to provide as many details as possible to help the support team reproduce the issue!

    If you’ve ruled out a server issue, it’s time to figure out what is really causing the problem. 503 errors are often caused by a PHP crash, a memory issue, or both. There’s a lot that you can learn from a PHP Info page. If you don’t have one, you can create one.

    Check the phpinfo page

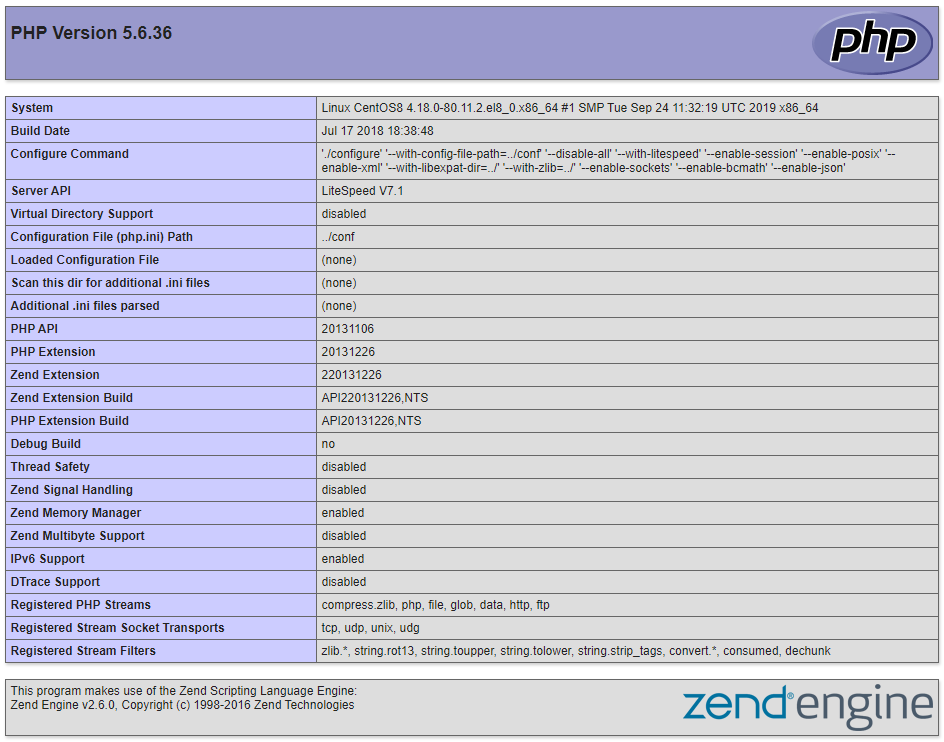
    The PHP info page gives you a lot of detail about your PHP installation. Even if your system is having an issue with PHP, it should be able to handle processing this very basic page. Among other things, the PHP Info page gives you useful information about extensions, memory limits, and execution time.

    503 Error PHP Info

    With this information, you can see if OPCache is enabled, what the memory limit is, and which extensions are loaded, all useful information when looking for the cause of a 503 error.

    You can also use this page to compare differences between Apache and LiteSpeed’s PHP implementations.

    TIP: If the Apache and LSWS PHP info pages are different, please open a support ticket so we can take a look.

    Check Log Files

    There are many different log files that may help you determine the cause of the 503 error. Try checking these logs in the following order:

    1. Standard Error Log
    2. Web Server Error Log
    3. System Log
    4. PHP Error Log

    Standard Error Log stderr.log

    The stderr.log file contains standard errors generated while PHP is running. You can usually find it in either the /var/log/apache2/ or /usr/local/lsws/logs/ directory. This log is often the most helpful.

    In this example output from a standard error log, you can see that you are dealing with a memory issue:

    [STDERR] fork() failed, please increase process limit: Cannot allocate memory
    

    Web Server Error Log

    This error log is generated by the web server. You can usually find it in either the /var/log/apache2/ or /usr/local/lsws/logs/ directory. If the web server has some role in causing PHP to fail, you should get some helpful hints from this log.

    This example output from a web server error log indicates the you have too many open files:

    [INFO] [319934] [1.1.1.1:49873-1#APVH:lsapi] connection to [uds://tmp/lshttpd/APVH-php56.sock] on request #0, confirmed, 0, associated process: 0, running: 0, error: Too many open files!
    

    Another good thing to try: search /etc/apache2/logs/error_log for the term oops:

    grep oops /etc/apache2/logs/error_log
    

    That will give you some idea how many 503 errors have been generated since your last attempted fix, if you take a look at the timestamp. Unfortunately, it’s not likely to give you the reason why the errors are occurring, but it will allow you to see when they are happening and which domains are involved.

    System Log

    This error log is generated by the operating system. You can usually find it as either /var/log/messages or /var/log/syslog. This log is helpful if PHP is being affected by the operating system.

    In this example output from a system log you can see that the lsphp process was killed by the LFD firewall security feature:

    lfd[18304]: *User Processing* PID:18264 Kill:1 User:xxxxx VM:538(MB) EXE:/usr/local/lsws/fcgi-bin/lsphp-5.4.42 CMD:lsphp5
    

    You can fix this problem by excluding lsphp from LFD.

    PHP Error Log

    This error log is defined in php.ini and you can check phpinfo.php for the file location. By default, cPanel will set it to error_log. Depending on the logging level that you have set in PHP, it will be updated when PHP detects an error or a warning. It is usually generated inside of the same folder that the PHP script runs in.

    This example output from a PHP error log shows that there is a fatal error within the test.php application:

    Fatal error: Call to undefined function my_function() in /home/mysite/public_html/test.php on line 2
    

    The best way to solve these types of errors is to forward them to the developers of the PHP applications that are failing.

    Disable opcode cache

    Opcode cache stores bytecode in shared memory so PHP does not need to process the same calls over and over, but it can occasionally cause issues.

    For example, this error points to an opcode cache problem:

    [STDERR] zend_mm_heap corrupted
    

    These are some common opcode cache extensions that you should consider disabling while you troubleshoot:

    • OPCache
    • APC/u
    • XCache
    • eAccelerator

    Disable unsafe PHP extensions

    In addition to the opcode cache extensions, there are other PHP extensions that have been known to cause issues, especially when they are outdated. These include:

    • Imunify360
    • ZendGuardLoader
    • Suhosin
    • ionCube

    We recommended you regularly check for updates for these extensions. If you are already using the latest versions, try to disable them and see if the problem persists.

    If you disable these plugins and are still getting a “503 Service Unavailable” response, disable all other extensions, and check again.

    Check disk space

    PHP will sometimes store files on your server in order to function properly. If your disks become full, especially the partition that houses /tmp/, that could be the cause of your 503 error.

    To check your disk space usage, run the following command:

    sudo df -h
    

    The output should look something like this:

    Filesystem                          Size  Used Avail Use% Mounted on
    devtmpfs                            901M     0  901M   0% /dev
    tmpfs                               915M   96K  915M   1% /dev/shm
    tmpfs                               915M   89M  827M  10% /run
    tmpfs                               915M     0  915M   0% /sys/fs/cgroup
    /dev/mapper/cl_centos                29G  4.2G   25G  15% /
    /dev/vda1                           976M  184M  726M  21% /boot
    tmpfs                               183M     0  183M   0% /run/user/0
    

    If your disks are full, clean them up. Remove any unnecessary files. This should solve the 503 error.

    Check CloudLinux limits

    If you are running CloudLinux and Lightweight Virtual Environment (LVE) it is possible that you are hitting the LVE limits. To adjust them, follow CloudLinux’s guide.

    Check memory limits

    If you’ve confirmed that you are running within LVE limits, try adjusting your PHP memory limit. The PHP Info page will tell you where your php.ini file is located. Edit the file and increase the memory_limit value.

    Sometimes a script may append lines to .htaccess that override the PHP settings. This can supersede what is set in your php.ini file. A memory_limit entry inside of .htaccess would look something like this:

    php_value memory_limit 100M
    

    You can add, delete, or modify this line inside of your .htaccess file to suit your needs.

    If none of the above has an impact, then it is possible LSPHP needs to increase its virtual memory. To do so, navigate to WebAdmin Console > Configuration > Server > PHP, and click Edit for PHP Handler Defaults.

    Change the following settings, then click Save:

    • Memory Soft Limit: 4097M
    • Memory Hard Limit: 4098M

    Navigate to Actions and press the icon next to Restart Detached PHP Processes. Then Apply Changes / Graceful Restart.

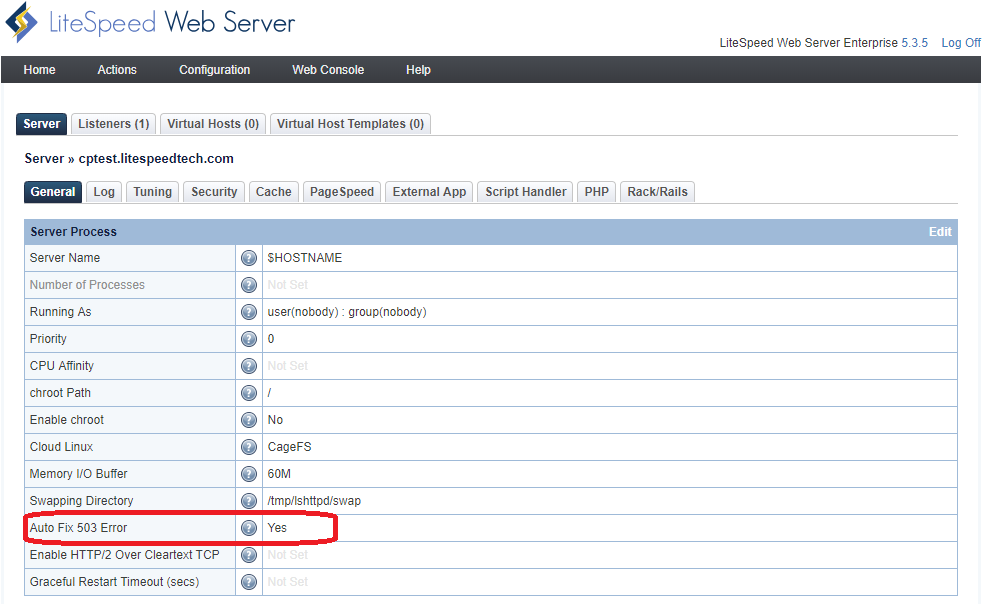
    Auto Fix 503

    You may have noticed that LiteSpeed Web Server has an Auto Fix 503 Error setting. This feature does not permanently fix 503 errors. It restarts the server gracefully, which often fixes the issue temporarily.

    Auto Fix 503 with LiteSpeed Web Server

    Auto Fix 503 Error is enabled by default. This means the server will restart automatically whenever the number of 503 errors exceeds thirty in a 30-second span. You should not rely on this feature to fix recurring 503 errors. Going through the steps above to find a permanent fix is always recommended.

    TIP: If you would like to disable this feature, navigate to WebAdmin Console > Server > General and set Auto Fix 503 Error to No.

    Conclusion

    This information should help you track down most causes of 503 errors, but if you need more detailed troubleshooting ideas, take a look at our documentation. The docs take a deeper dive into some of these topics, and give you a few more advanced tools to use in your search for answers.

  • LiteSpeed Web Server Now With hCaptcha

    LiteSpeed Web Server Now With hCaptcha

    LiteSpeed Web Server hCaptcha

    In LiteSpeed Web Server 6.2.1, we added hCaptcha support to our CAPTCHA functionality.

    This change comes largely because of Google’s new reCAPTCHA pricing. hCaptcha can be less expensive, and we want you to have options.

    How to get started

    Signing up for hCaptcha is fairly simple. Visit https://https://www.hcaptcha.com/, and sign up using either your email, Github account, or even your Google account.

    You’ll end up on the dashboard where you can get started.

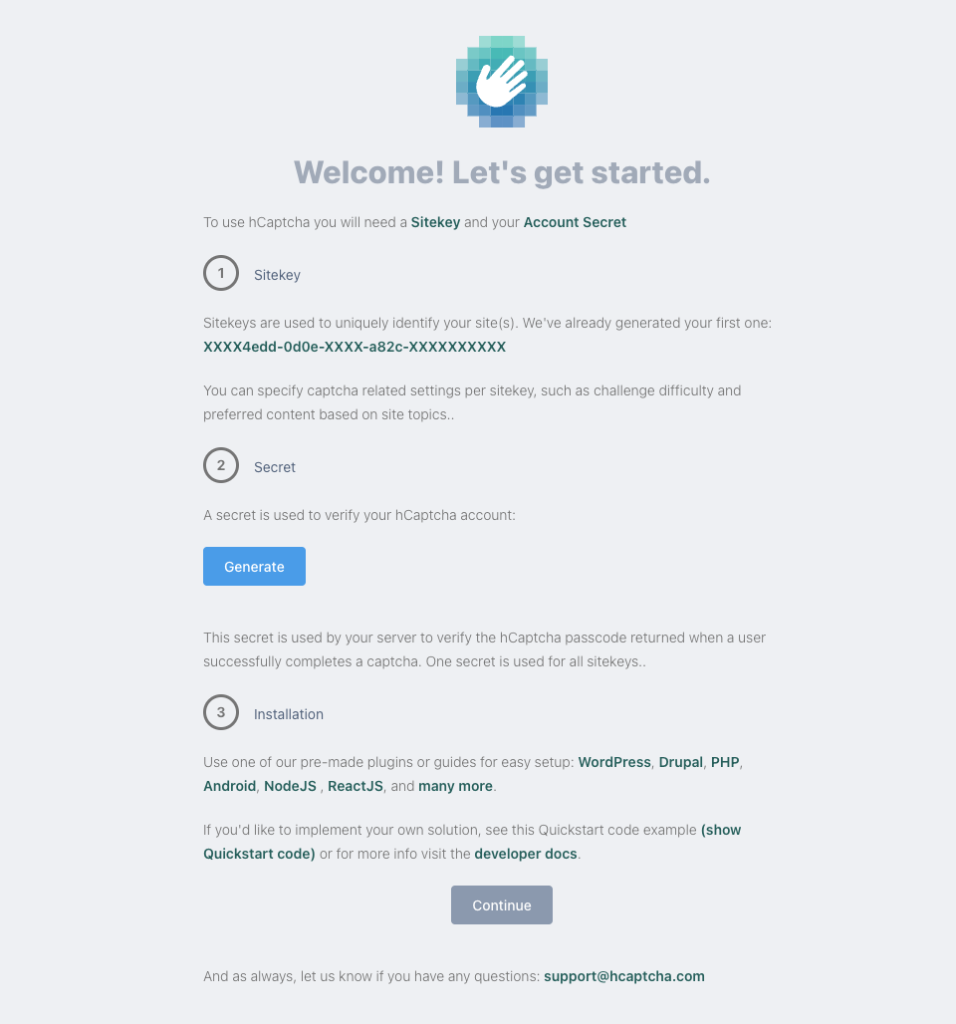
    hCaptcha Get Started Screen

    Make note of the Sitekey and then press the Generate button to get a Secret.

    Note down this value! This is the only time hCaptcha will display the Secret.

    In LiteSpeed Web Server WebAdmin Console, navigate to Configuration > Server > Security, and in the reCAPTCHA Protection section, define your Site Key and Secret Key with the values that you copied from the hCaptcha dashboard earlier. Select hCaptcha from the reCAPTCHA Type dropdown. Last but not least, do a graceful restart of the web server.

    More information about other CAPTCHA settings can be found here.

    Putting our newly added hCaptcha to good use

    One of the wonderful aspects of our CAPTCHA feature, is that we can use it to prevent websites from going offline during an extended attack period.

    One of the easiest ways to trigger CAPTCHA for every user on a given website is with a very simple mod_rewrite rule through .htaccess:

    RewriteEngine On
    RewriteRule .* - [E=verifycaptcha]
    

    The above rule will result in all users being shown the hCaptcha, and only after completing the challenge, will they be able to view the website as normal. After completing the challenge, LiteSpeed Web Server will also mark the IP as trusted, so new challenges won’t occur for every pageview for the given IP.

    While the above rule works, it’s often not ideal, since it may result in endpoints getting CAPTCHA challenges, while the clients using these endpoints cannot complete them. This could befor example, the WooCommerce API on WordPress websites, or even things such as payment gateway callbacks.

    We can either make use of RewriteCond to exclude certain user-agents, IPs or URLs, or a slightly different approach is to only serve CAPTCHA pages for those pages that are actively under attack.

    It’s quite common that when attacks happen, the attackers will keep hammering just a few particular pages, or sometimes only the frontpage. In cases like this, we can instead use explicit rewrite rules to only target these pages.

    For example, if something is relentlessly hitting the front page, we can define the following in our .htaccess file:

    RewriteEngine On
    RewriteRule ^$ - [E=verifycaptcha]
    

    If they’re hitting both our front page and /about-us, we can keep the rules fairly simple as such:

    RewriteEngine On
    RewriteRule ^$ - [E=verifycaptcha]
    ReweriteRule ^about-us$ - [E=verifycaptcha]
    

    Or using more complex rules:

    RewriteEngine On
    RewriteCond %{REQUEST_URI} ^/(|about-us)$
    RewriteRule .* - [E=verifycaptcha]
    

    To determine the attacked URLs, you can often tail the access log for the website, and simply determine by looking at the logs, what endpoints you’d like to block.

    Another method is to use a mix of cut (or awk), sort and uniq:

    cat access.log | cut -d' ' -f7 | sort | uniq -c | sort -h
    

    This will, for example, give you a simple count of the most visited URLs on your website. URLs under attack will usually appear with a higher count, and you can simply run it a few times to see what keeps increasing steadily.

    Another way is only looking at the past 50000 requests, for example. This may give a better picture. To do that, we can use tail -50000 access.log instead of cat access.log. You can see an example of such output here:

        241 /assets/images/da.png
        263 /assets/styles/style.css
        268 /assets/styles/main.css
        299 /blog
        328 /assets/scripts/popper.min.js
        331 /assets/images/en.png
        425 /assets/scripts/main.js
        445 /favicon.ico
        468 /robots.txt
     200081 /
  • LiteSpeed Not Vulnerable to HTTP/2 Continuation Flood

    LiteSpeed Not Vulnerable to HTTP/2 Continuation Flood

    LiteSpeed Not Vulnerable to HTTP/2 CONTINUATION Flood Vulnerability

    Here is what you need to know about the HTTP/2 CONTINUATION Flood vulnerability, specifically CVE-2024-27316, and LiteSpeed:

    • The vulnerability allows an attack that uses unbounded header buffering to overwhelm servers
    • LiteSpeed servers are not vulnerable to HTTP/2 CONTINUATION Flood

    What is Continuation Flood?

    The HTTP/2 CONTINUATION Flood vulnerability was announced yesterday as Vulnerability Note #421644 published by the CERT Coordination Center.

    The note states:

    An attacker that can send packets to a target server can send a stream of CONTINUATION frames that will not be appended to the header list in memory but will still be processed and decoded by the server or will be appended to the header list, causing an out of memory (OOM) crash.

    The note goes on to specify a number of CVE listings specific to certain HTTP/2 implementations, including the following:

    • CVE-2024-27983 (node.js)
    • CVE-2024-27919 and CVE-2024-30255 (Envoy)
    • CVE-2024-2758 (Tempesta)
    • CVE-2024-2653 (amphp/http)
    • CVE-2023-45288 (Go)
    • CVE-2024-28182 (nghttp2)
    • CVE-2024-31309 (Apache Traffic Server)

    CVE-2024-27316 is of particular interest because it applies to the Apache Httpd implementation:

    HTTP/2 CONTINUATION frames without the END_HEADERS flag set can be sent in a continuous stream by an attacker to an Apache Httpd implementation, which will not properly terminate the request early.

    LiteSpeed Web Server is an Apache drop-in replacement, but LiteSpeed does not share any code with Apache.

    LiteSpeed’s from-the-ground-up implementation of Apache-compatible systems means that LiteSpeed is usually not subject to the same vulnerabilities as Apache. That is indeed the case with the HTTP/2 CONTINUATION Flood vulnerability.

    How are LiteSpeed Users Protected?

    LiteSpeed Web Server, OpenLiteSpeed, and LiteSpeed Web ADC’s HTTP/2 implementation applies a 64K upper limit for total header buffering. If the limit is reached, the connection is closed.

    Attackers attempting to exploit this vulnerability on LiteSpeed Web Server will find their efforts thwarted after a mere 64K.

  • Server Improvements Under the Hood

    Server Improvements Under the Hood

    LiteSpeed Web Server and Web ADC Updates

    LiteSpeed Web Server and LiteSpeed Web ADC both got significant updates at the end of 2023. Let’s look under the hood to see how these new updates can make your LiteSpeed experience even better!

    RE2 in ModSecurity

    LiteSpeed’s sleek and performant ModSecurity engine now supports the RE2 regular expression library. You can stick with the PCRE library that Apache, nginx, and others currently use, or you can switch to RE2, which comes with a resource-management advantage.

    PCRE commonly faces infinite-looping and thread-blocking issues when processing large input with poorly written patterns. This is a fatal problem for a high-performance, event-driven server. LiteSpeed minimizes the impact of thread blocking by using a thread pool that is separate from the main loop. But despite these measures, as PCRE’s resource usage grows exponentially, it can still cause a server to slow down.

    Computational resource consumption by RE2, on the other hand, grows only linearly and is more predictable.

    RE2 offers a slightly smaller number of features than PCRE does. However, RE2 is faster than PCRE when using certain operators like Boolean OR (|).

    Bottom line: if PCRE is working for you, there is no need to switch. But if you are seeing high CPU utilization, and you think ModSecurity could be to blame, try using RE2, and see if that helps. Navigate to WebAdmin Console > Server > Security > Web Application Firewall (WAF) and select Use RE2 regex engine.

    QUIC v2

    In March of 2023, we updated our LSQUIC HTTP/3 Library to use QUIC v2. Since then, we’ve taken our time integrating QUIC v2 into our server products. This has allowed for maximum testing time and confidence before rolling it out.

    As of LSWS v6.2 and LSADC v3.2, QUIC v2 is in production.

    Request Header Validation

    Request header validation is now more strict. As of these new versions, our validator checks for NULL bytes in the header value, and Transfer-Encoding value manipulation. If either of these is detected, a 400 bad request is returned.

    LSWS Apache Compatibility

    We have three compatibility improvements to share.

    First up, Litespeed now supports the new flags recently added to Apache’s rewrite engine:

    • BNP
    • backrefnoplus
    • BCTLS
    • BNE

    Second, we now support RewriteCond expr '<expression>'.

    And third, we squashed a bug that was preventing us from supporting dynamic regular expression matching. The issue was with variables in the pattern, as seen in SSI code like this:

    <!--#if expr="$referrer = /$host/" –>
    

    LiteSpeed could support fixed regular expression patterns in Apache expressions, but failed when variables were used. This issue is now solved, and LiteSpeed Web Server v6.2 fully supports dynamic regular expression matching.

    Web ADC HEAD Caching

    LiteSpeed Web ADC now supports HEAD caching. Separate cache entries will be created for HEAD requests, to avoid unnecessary hits to the back end, and to improve the cache hit rate.

    Conclusion

    Have you updated LiteSpeed Web Server or LiteSpeed Web ADC yet? The new versions are stable and ready to serve!

    If you’re new to LiteSpeed and want to take one of these products out for a spin, sign up for a 15-day trial, today:

  • How to use Configuration Templates

    How to use Configuration Templates

    LiteSpeed Virtual Host Configuration Templates

    Introduction

    If you are using OpenLiteSpeed, LiteSpeed Web ADC, or native LiteSpeed Web Server Enterprise without a control panel, you can take advantage of virtual host configuration templates.

    Today we’ll show you how templates work, go over some benefits, and walk you through an example usage.

    Benefits of Templating

    When you host multiple websites on one server, you may find that many of them have similar configurations. With LiteSpeed’s virtual host template feature, you can create many virtual hosts from one master template and edit all of their configurations at once. Plus, configuring a new vhost can be as simple as connecting it to the template.

    How Configuration Templates Work

    Each template contains three things:

    1. a configuration file
    2. a list of mapped listeners, and
    3. a list of member virtual hosts.

    Creating a Template

    To create a brand new template, navigate to WebAdmin Console > Configuration > Virtual Host Templates > Add. You will be asked to fill out basic information for this template. One of the fields will require the location of your template file. If you do not have a template file yet, that’s fine. You can make up a new file name and LiteSpeed will create it for you in $SERVER_ROOT/conf/templates/.

    For the purposes of this blog post, let’s call your new template mytemplate.

    Once you’ve added mytemplate, you don’t need to configure any more settings, though you will probably want to.

    Most of the settings in a virtual host template are comparable to normal virtual host settings. The main difference is that you can use the $VH_NAME variable in template settings to stand in for the names of the virtual hosts that you will be applying the template to.

    Applying a Template to a Virtual Host

    A virtual host template does nothing until you assign it to some member virtual hosts.

    Virtual host template settings are located in the WebAdmin Console under Configuration > Virtual Host Templates. That is where you can find a list of your existing templates.

    To add virtual hosts to mytemplate, click mytemplate and navigate to Template > Member Virtual Hosts > Add. Each virtual host you add will be automatically configured with the mytemplate settings. The member virtual host’s name will be substituted anywhere that $VH_NAME appears in the template settings. And listener-to-virtual host mapping will be added automatically for all listeners in the template’s mapped listener list.

    Making Changes to a Template

    In the WebAdmin Console, navigate to Configuration > Virtual Host Templates, and click View/Edit next to mytemplate, (or whichever template you wish to edit).

    When you update the settings in a virtual host template, all of the member virtual hosts will automatically take on the new settings.

    You will need to perform a Graceful Restart to put your updates into effect.

    Default Templates

    Our server products may come with some default virtual host templates, which can be found in the $SERVER_ROOT/conf/templates/ directory.

    LiteSpeed Web Server has three, for the three most common types of virtual hosts:

    • centralConfigLog is good for basic virtual hosts that will use the same server root directories and share a common directory naming framework.
    • PHP_SuEXEC contains a setup ideal for hosting external PHP applications running in suEXEC mode. PHP scripts for member virtual hosts will be executed as the owner of the virtual host’s document root.
    • EasyRailsWithSuEXEC is just like the PHP_SuEXEC template, but for Ruby on Rails applications.

    Example

    Let’s set up a new template in the LiteSpeed WebAdmin Console.

    1. Click Configuration > Listeners and delete the default port 80 listener.
    2. Click Add. Set the following, and click Save:
      1. Listener name: http
      2. Port: 80
      3. Binding Not set
    3. Repeat step 2 to create an https listener for port 443.
    4. Configure an SSL certificate for the https listener.
    5. Click the Virtual Host Templates tab and click Add. Set the following, and click Save:
      1. Template Name: mytemplate (or whatever name you would like to use)
      2. Template file: /usr/local/lsws/conf/templates/mytemplate.xml
      3. Mapped Listeners:http, https
    6. Click View/Edit on mytemplate. Click the General tab, and click Edit. Set the following, and click Save:
      1. Default Virtual Host Root: /home/$VH_NAME/
      2. Config file: /usr/local/lsws/conf/vhosts/$VH_NAME.xml
      3. Document Root: /home/$VH_NAME/public_html
    7. Click the Security tab. Set the following, and click Save:
      1. External App Set UID Mode: DocRoot UID
      2. suEXEC User: $VH_NAME
      3. suEXEC Group: $VH_NAME
    8. Click the External App tab and choose the LiteApeed SAPI App type. Set the following, and click Save:
      1. Name: $VH_NAME_lsphp81 (we are using PHP v8.1 in this example, but you can use any version you like)
      2. Address: uds://tmp/lshttpd/$VH_NAME.sock
      3. Max Connections: 3
      4. Initial Request Timeout (secs): 60
      5. Retry Timeout (secs): 30
      6. Connection Keepalive Timeout: -1
      7. Command: /usr/local/lsws/lsphp81/bin/lsphp
      8. Run as user: $VH_NAME
      9. Run as group: $VH_NAME
    9. Click the Script Handler tab and click Add. Set the following, and click Save:
      1. Suffixes: php
      2. Handler type: LiteSpeed SAPI
      3. Handler name: [VHost Level]: $VH_NAME_lsphp81
    10. Click the Template tab and click Add. Set the following, and click Save:
      1. Virtual Host Name: site1 (or any name of your choice)
      2. Domain: site1.com
      3. Aliases: www.site1.com
    11. Click the Add button again. Set the following, and click Save:
      1. Virtual Host Name: site2 (or any name of your choice)
      2. Domain: site2.com
      3. Aliases: www.site2.com
    12. Repeat step 11 for every virtual host that you want to add with this template.
    13. Click Graceful restart to apply your changes

    Testing

    Once the template is created and the site1 and site2 virtual hosts are added as members, you can (1) test that the sites exist, (2) check the file system to verify that their document roots are in the correct place, as defined by the template, and (3), verify that each site owns a running PHP processes, as defined by the template.

    1. In a browser window, verify that you can successfully visit site1.com and site2.com.
    2. Verify that document roots exist in /home/site1/public_html and /home/site2/public_html.
    3. Run: ps -aux | grep lsphp. This command will show you any lsphp processes running, and you can verify that they are owned by site1:site1 and site2:site2.

    Conclusion

    You should now know why templates are useful, and you should be able to create one and assign virtual hosts as members.

    If you’d like to learn more, you can see our wiki on the subject, or take a look at these instructions for creating a template to be used with LiteSpeed Web ADC and Kubernetes.

  • WebAdmin Security Tips

    WebAdmin Security Tips

    LiteSpeed WebAdmin Security Tips

    Recently we’ve had some reports of brute force attacks on LiteSpeed WebAdmin Console. So we thought it would be a good time to share our WebAdmin Security tips. Here are five things you can do to protect your WebAdmin Console and give yourself more peace of mind:

    • Verify the Administrator Email
    • Restrict access via the Allowed List
    • Change the Listener Port
    • Set a strong password
    • Obtain a CA-signed SSL certificate

    Let’s look at each of those steps in more detail.

    Verify the Administrator Email

    First thing’s first: it’s crucial that your Administrator email is configured correctly. This email address is used to keep you informed about important events such as:

    • Failed login attempts to WebAdmin Console
    • LiteSpeed Web Server crashes
    • License expiration

    To verify that your admin email address is correct, navigate to Configuration > Server > General > General Settings section and check the Administrator Email setting.

    This field accepts a comma-delimited list, in case you want admin alerts to go to multiple people. For example:

    me@example.com, him@example.com, her@example.com, them@example.com
    

    If you update this field, click Save and then perform a Graceful Restart to apply your changes.

    Restrict access via the Allowed List

    One very effective way to avoid brute force login attacks is to prevent attackers from reaching your server login page in the first place. You can do this through the Allowed List.

    Your own IP address should be added to that list first. If you have a fixed IP address, you can add it directly. If you don’t have a fixed IP address, we recommend that you set up VPN access with a fixed IP, and then add that fixed IP to the Allowed List.

    To add IP addresses to the WebAdmin Console, navigate to Web Console > General > Security > Access Control. Click the Edit link and set the Denied List to all. In the Allowed List field, type in a comma-separated list of the IP addresses allowed to access the WebAdmin Console. Click Save and then perform a Graceful Restart to apply your changes.

    To test if the configuration is working as expected, try connecting to your WebAdmin Console from a public IP address that is not listed in the Allowed List. If access control is set up correctly, you will see a 403 forbidden error message.

    Change the Listener Port

    The standard way to access the WebAdmin Console for your domain is by visiting https://example.com:7080 (or https://example.com:7088 in a Plesk environment). This is the place that attackers would expect to find your LSWS admin. You can effectively “hide” your WebAdmin Console by changing the listener Port to a custom value.

    Navigate to Web Console > Listeners > Action. Find the listener called adminListener and edit it. Set Port to any unused number between 1024 and 65535. Click Save.

    Adjust your firewall settings to allow the new port, if necessary, and then perform a Graceful Restart to apply your changes.

    TIP: You may choose to always keep the new port blocked at the firewall until you need it. You would have to update your firewall config every time you wanted to use the WebAdmin Console, but you would be guaranteed nobody else can access it in the meantime.

    Set a strong password

    We highly recommend that you set a strong password for the WebAdmin Console. You can use a password generator such as Avast to create a secure password. We recommend a password that is at least 8 characters long, contains mixed capitalization, numbers, and special characters.

    If multiple admins need to access this server, it’s best to set up an account for each admin. Do not share passwords.

    To update your password, navigate to Web Console > General > Security > WebAdmin Users, and edit your user. Enter your old WebAdmin Console password. Type or paste the new password into the New Password and Retype Password fields. Click Save to apply the changes.

    Obtain a CA-Signed SSL certificate

    Our final recommendation is to obtain an SSL certificate from a Certificate Authority (or CA), instead of using the default self-signed certificate. This will ensure that you always access the console using a secure HTTPS connection verified by an SSL certificate authority.

    Obtain a certificate from the CA of your choice. They will provide the following three files:

    • private.key
    • certificate.crt
    • ca_bundle.crt

    Copy these files to the /usr/local/lsws/admin/conf/cert directory.

    Change the owner of the files to lsadm, like so:

    chown -R lsadm:lsadm /usr/local/lsws/admin/conf/cert/* 
    

    Return to the WebAdmin Console, navigate to the adminListener listener, and click Edit. Set Secure to Yes. Navigate to SSL and click Edit. Set the following:

    • Private Key = /usr/local/lsws/admin/conf/cert/private.key
    • Certificate = /usr/local/lsws/admin/conf/cert/certificate.crt
    • Chained Certificate = Yes
    • CA Certificate Path = /usr/local/lsws/admin/conf/cert/
    • CA Certificate File = /usr/local/lsws/admin/conf/cert/ca_bundle.crt

    Click Save and then perform a Graceful Restart to apply your changes.

    Conclusion

    We hope that implementing these tips will give you some peace of mind. If you’d like to see these suggestions demonstrated, have a look at our recent YouTube video:

    For more information about LiteSpeed WebAdmin Console, please see the documentation.

  • Platform Showcase: Managed LSWS and OLS with SPanel

    Platform Showcase: Managed LSWS and OLS with SPanel

    Managed LiteSpeed Web Server with SPanel

    Our friends at SPanel asked if they could tell our readers a little bit about their control panel, and about managed LiteSpeed Web Server with SPanel. So, without further ado, here is the SPanel team. -LC

    What is SPanel?

    SPanel is a multifunctional web hosting platform that simplifies server management to a level where anyone can operate their environment even without previous technical experience.

    SPanel developers focus strongly on their fully managed LiteSpeed Web Server and OpenLiteSpeed solutions. They cater to business-oriented site and app owners. You can choose a plan where all technical tasks will be handled by a professional support team.

    The solution consists of two essential parts: The Admin Interface and the User Interface.

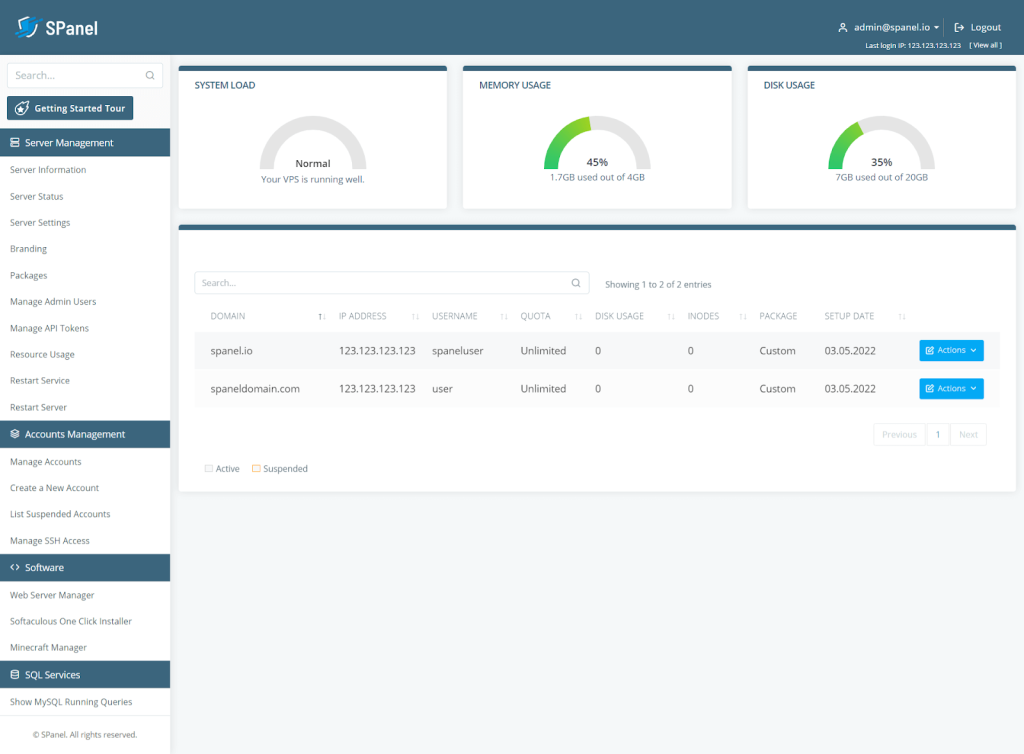
    SPanel LiteSpeed Web Server admin interface

    The Admin Interface is for managing the server and all associated accounts. It allows you to create, modify, and delete accounts, monitor your connectivity and running processes, restart the machine, and more.

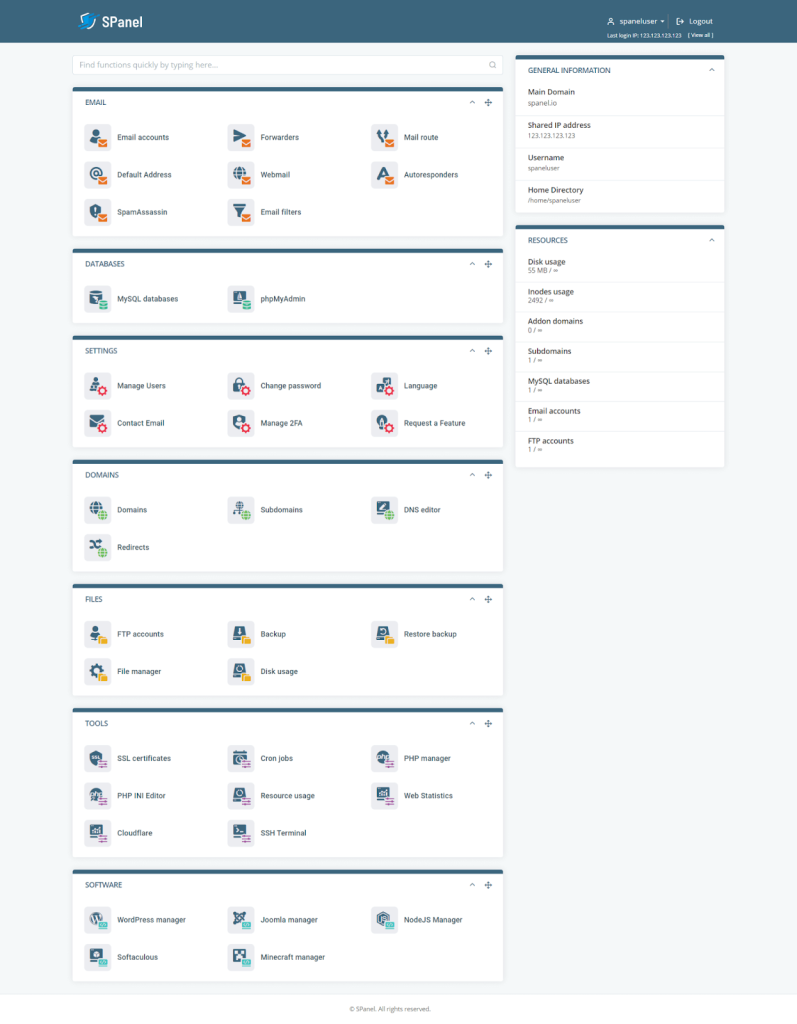
    SPanel LiteSpeed Web Server user interface

    The User Interface is responsible for managing individual accounts and services. It has an intuitive graphic interface that helps you deal with domain names, emails, site files, databases, SSL certificates, and more.

    SPanel integrates with all popular web hosting solutions. Using its powerful API, you can pair the platform with LiteSpeed, OpenLiteSpeed, Nginx, WHMCS, Softaculous – basically the full package of services to start any type of online project.

    For a complete list of features, check out the SPanel.io website or take a look at this introductory video:

    How to Install LiteSpeed Web Server or OpenLiteSpeed in SPanel

    Switching your service to LiteSpeed Web Server or OpenLiteSpeed is effortless in SPanel. The process involves literally just three clicks:

    IMAGE

    1. Log in to your SPanel Admin Area.
    2. Choose the Web Server Manager option under Software in the left-side menu.
    3. Choose LiteSpeed or OpenLiteSpeed on the next screen.
    4. Activate by clicking the blue button at the bottom of the page.

    That is all there is to it – quick and seamless integration that requires no technical expertise.

    SPanel Benefits

    cPanel still holds the lion’s share of the market for web hosting solutions, but alternatives like SPanel, Plesk, and InterWorx are certainly gaining traction

    In fact, there are numerous reasons why SPanel, in particular, has been getting so much attention. Here are a few of the most notable:

    • Fully Managed Service: SPanel might be extremely user-friendly, but many website owners still prefer to focus on their business instead of dealing with technicalities. For them, the developers offer a fully managed service where their support team takes care of all configurations, updates, monitoring, maintenance, and technical issues.
    • SShield: one of the things only SPanel can offer is SShield, an AI-powered security monitoring system. The tool has proven to be a beast when it comes to cybersecurity, recognizing over 99.98% of all known malware and spam. Whenever SShield detects suspicious activities in your web traffic, it proactively sends a notification, so you have enough time to react.
    • SWordPress Manager: another unique SPanel integration, targeted for WordPress users. If you are looking to simplify your day-to-day operations with the most popular CMS, you can install WP, take advantage of automatic updates, change admin password, and many more. The Security Lock feature allows you to restrict editing access to chosen folders and directories, protecting WordPress installation from any outside breaches.
    • Joomla Manager: similar to SWordPress Manager, SPanel packs a solution for all the Joomla fans. The Joomla Manager is integrated by default in SPanel, helping users with a one-click installation, password change, and site cloning.
    • Feature Requests by Users: the thing that most separates SPanel from similar platforms is the involvement of the entire community. The control panel receives regular updates, and most new feature implementations come directly from user suggestions. There is a Feature Requests forum on the official website. You can suggest a new feature or vote on other people’s ideas. The SPanel engineers gather all popular requests and put them on the to-do list, ensuring they see the light of day in future updates.

    Final Takes

    SPanel can be a highly reliable alternative to the market leaders in hosting management solutions. The platform is lightweight, highly secure, and extremely versatile. The managed plans are ideal for website owners who have a strong business focus. They take the weight off of the webmaster’s shoulders. And the licensing model, lets you take full advantage of SPanel with any host.

    Our thanks to SPanel for sharing their story! Does your business provide a tool that enhances the LiteSpeed experience? If you would like to share your story with our readers, find me (@Lisa at Litespeed) on our Slack workspace, and we can discuss it. –LC

  • Install Sails.js on LiteSpeed Web Server

    Install Sails.js on LiteSpeed Web Server

    Sails.js is a realtime Model-View-Controller (MVC) framework for building Node.js applications. It is an open source framework that allows you to build JavaScript apps in a matter of weeks not months. And if paired with a LiteSpeed Web Server, it allows you to offer a high performance JS app that your users will love, by leveraging LiteSpeed’s caching and optimization features. As a developer, building on top of Sails means your app is written entirely in JavaScript, and there is no overhead of having to deal with multiple programming languages to deliver a great user experience. Let’s look at how to install Sails.js on LiteSpeed Web Server.

    Please note this tutorial does not work with control panel installations, nor does it work with OpenLiteSpeed.

    Here is what you will need to complete this setup:

    • Native LiteSpeed Web Server with a valid license key or trial license running on a VPS, or the AWS LiteSpeed Web Server instance deployed via these instructions.
    • Node.js and npm package manager
    • The Sails.js package for Linux distribution

    Install the Sails.js framework

    Install Node.js

    Before you install Sails.js, Node.js must be installed on the server. Run the following commands to install dependencies, add the Node.js repository to your server, and install Node.js:

    apt-get install curl wget gnupg2 -y
    curl -sL https://deb.nodesource.com/setup_14.x | bash -
    apt-get install nodejs -y
    

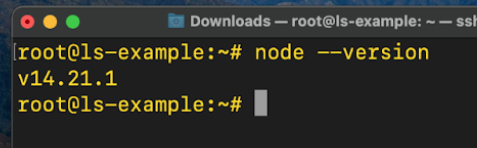
    Check and verify the version of Node.js that is now running on your server by running the command:

    node --version

    Install Sails.js

    Sails.js can be easily installed using the npm package manager for JavaScript. Run the following command to kick start the install:

    npm -g install sails
    

    Once the installation is complete, you can simply create a project folder by running the command:

    mkdir newproject
    

    This will create a new directory named newproject

    You now need to change into the directory and create a new Sails app. Run the following commands to do this:

    cd newproject
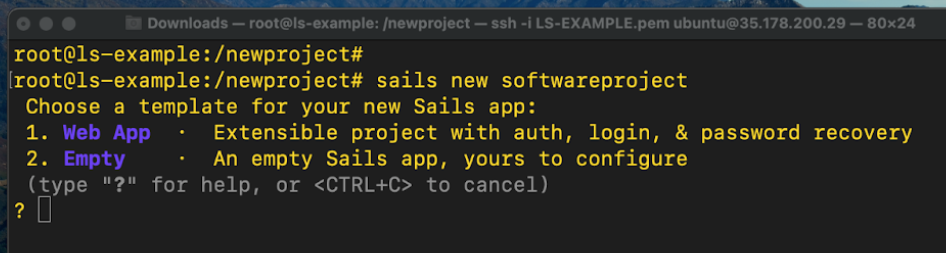
    sails new softwareproject
    

    You will be asked to choose a template for your Sails application:

    Type 2 and press Enter to start the Sails.js app installation process. Sails.js will now start to download dependencies and software components needed by your app.

    Once the Sails.js installation process is complete, an application directory will be created. The directory is given the name of the app that you specified in the sails new command. In this example, it’s softwareproject. Run the following commands to start the Sails application:

    cd softwareproject
    sails lift
    

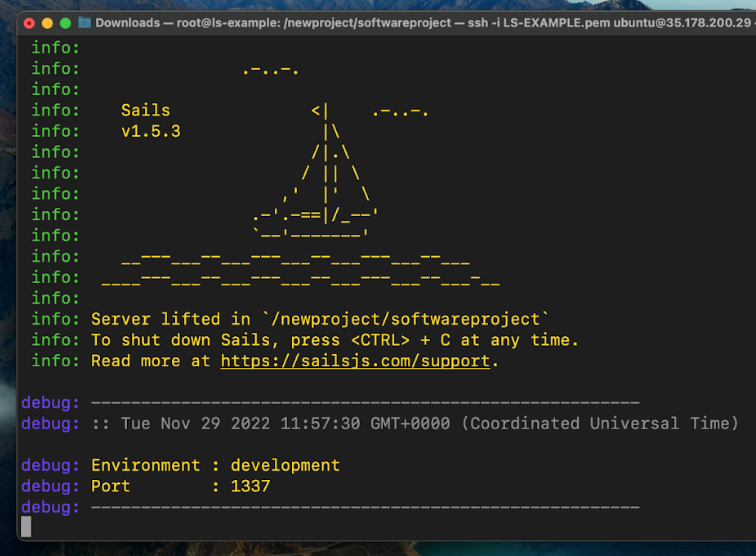
    You should see the following output:

    Sails v1.5.3
    Server lifted in ‘/newproject/softwareproject’ 
    To shut down sails, press <CTRL> + C at any time. 
    Read more at https://sailsjs.com/support
    Environment: development
    Port: 1337
    

    Create a Systemd service file for the Sails.js app that you have created

    You now need to create a systemd configuration file that will help you to manage your Sails.js application. The systemd file will help to ensure that the Sails.js app can start up automatically at system reboot. You can start, stop, and restart the Sails.js app using systemctl.

    Run the following command to create the service file:

    nano /lib/systemd/system/sails.service
    

    Add the following configuration into this file:

    [Unit]
    After=network.target
    [Service]
    Type=simple
    User=root
    WorkingDirectory=/newproject/softwareproject
    ExecStart=/usr/bin/sails lift
    Restart=on-failure
    [Install]
    WantedBy=multi-user.target
    

    Save and close the file then reload the systemd daemon to apply the changes:

    systemctl daemon-reload
    

    You can now start the Sails.js service and enable it to start at system reboot:

    systemctl start sails
    systemctl enable sails
    

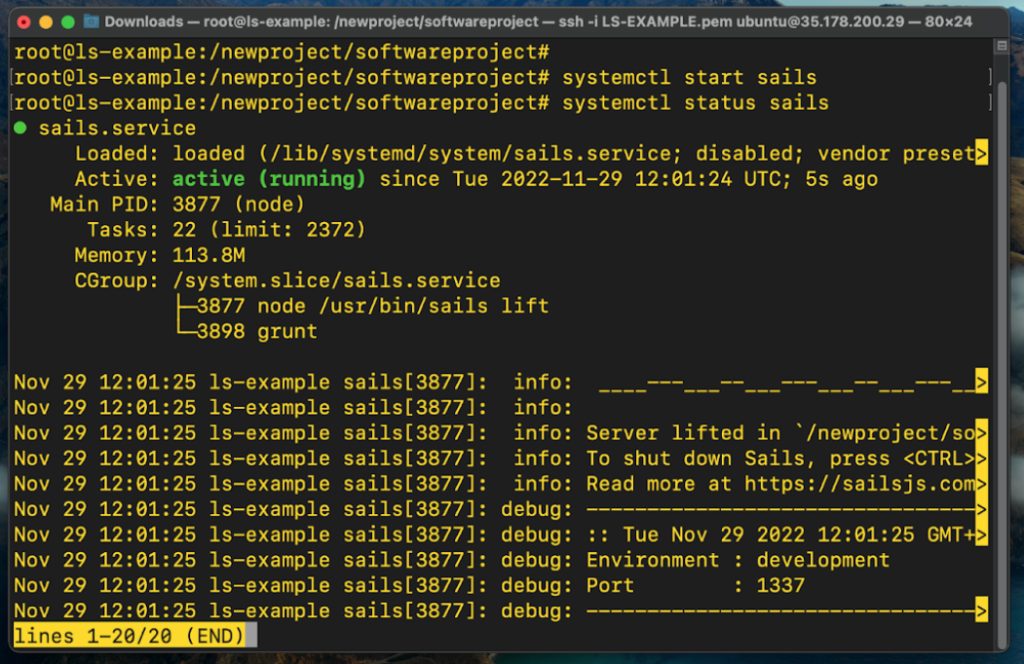
    If you have configured everything correctly, run the following command to check the status of the Sails.js service:

    systemctl status sails

    It should show that the service is active (running) as shown in the output below:

    Configure LitesSpeed Web Server as a reverse proxy for Sails.js

    The final step is to configure LiteSpeed Web Server as a reverse proxy for Sails.js. A reverse proxy is a server that sits in front of a web server and forwards client requests to that web server. LiteSpeed Web Server can also be implemented as a reverse proxy server for websites and web applications to help increase security, performance, and reliability.

    Open a new browser window and type in the following URL to log into the WebAdmin Console:

    https://YOUR_IP_OR_HOSTNAME:7080
    

    On the login page, type in your WebAdmin Console password, navigate to Configuration > Virtual Hosts, and click Add.

    Set the following values (being sure to replace yourdomain with your actual domain name) and click Save:

    • Virtual Host Name: yourdomain.com
    • Virtual Host Root: $SERVER_ROOT/yourdomain/
    • Config File: $SERVER_ROOT/conf/vhosts/yourdomain.xml

    Click on the newly created virtual host, click View/Edit, navigate to General > General, and click Edit. Set the following values and click Save:

    • Document Root: $VH_ROOT/html
    • Enable Compression: Yes

    In the Index Files section, click Edit. Set the following values and click Save:

    • Use Server Index Files: No
    • Index Files: index.html, index.php
    • Auto Index: No

    Navigate to External App and click Add. Set Type to Web Server and click Next. Set the following values and click Save:

    • Name: SAILSJS
    • Address: http://127.0.0.1:1337

    Navigate to Context and click Add. Set Type to Proxy and click Next. Set the following values and click Save:

    • URI: /
    • Web Server: [VHost level] SAILSJS

    To put everything into action, navigate to Configuration > Listeners > Virtual Host Mappings, and click Add. Select the virtual host that you created, set Domains to your domain name, and click Save.

    Click the Grateful Restart link at the top of the WebAdmin Console to apply the above changes.

    Test the access to the Sails.js web application

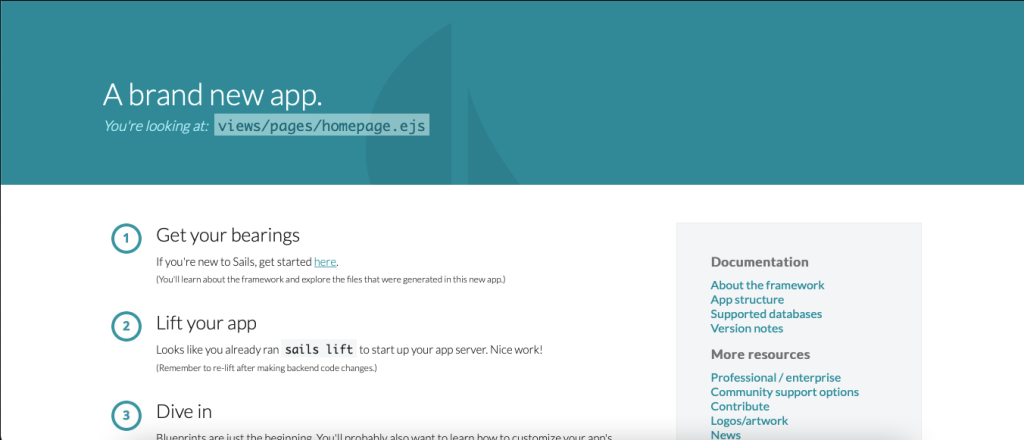
    Open a new browser window and type in your domain name. You should see the default Sails.js page as shown in the image below:

    And that’s it! You have successfully installed the Sails.js framework on a LiteSpeed Enterprise Web Server. From here you can now start building amazing and fast web JavaScript applications for your users. For more technical support details please visit our LiteSpeed Web Server documentation.

  • OpenLiteSpeed or LiteSpeed Enterprise?

    OpenLiteSpeed or LiteSpeed Enterprise?

    OpenLiteSpeed or LiteSpeed Enterprise

    Are you an OpenLiteSpeed user wondering if you should take the next step and upgrade to LiteSpeed Enterprise Web Server? Or maybe you’re new to LiteSpeed entirely, and not sure which server product is right for you. Either way, we can help.

    The open source OpenLiteSpeed (or OLS), and the Enterprise-level LiteSpeed Web Server (or LSWS) have many features in common: both are equipped with the powerful LSCache engine, cutting edge HTTP/3 support, unlimited IP-based and name-based virtual hosting, compression with GZIP and Brotli, and so much more.

    To help in your decision-making, let’s look at some of the main differences between OLS and LSWS.

    Main Differences

    .htaccess

    .htaccess files are configuration files used by Apache web server to define rules for the server’s behavior on a per directory basis. OLS and LSWS differ in the extent to which they each support .htaccess.

    • LSWS supports Apache rewrite rules and the majority of Apache directives. It will automatically detect any changes to .htaccess files, and will adjust as necessary without any need for a server restart.
    • OLS supports Apache rewrite rules, but does not support Apache directives. You will need to restart the server to load any changes to .htaccess.

    ModSecurity Engine

    ModSecurity is an open-source web application firewall, which provides server protection by filtering web traffic through a series of rules. Both OLS and LSWS support ModSecurity rules, but there are differences.

    • LSWS boasts a proprietary ModSecurity engine that was built by the LiteSpeed team to deliver superior performance. It processes Apache ModSecurity rules using a highly optimized asynchronous approach.
    • OLS also supports Apache ModSecurity rules through a standard ModSecurity v3 engine, using the same library as open source nginx uses.

    ESI

    ESI, which stands for Edge Side Includes, is a markup language that allows web developers to designate parts of a web page as fragments that the server will process separately from the rest of the page. With ESI, a web page can be broken into different fragments, processed separately, and then re-assembled before being delivered to the browser. It is especially useful in ecommerce applications where there may be a mix of public and private information on a single page. When combined with LSCache, ESI creates a powerful cache solution.

    • LSWS supports ESI.
    • OLS does not support ESI.

    Asynchronous SSL Handshake

    The private key handshake of SSL can put a strain on server resources. Asynchronous SSL handshake relieves that strain by moving handshake operations to separate worker threads instead of handling it in the main event-handling thread. This improves SSL performance and reduces congestion in I/O event handling.

    • LSWS supports Asynchronous SSL Handshake
    • OLS does not support Asynchronous SSL Handshake

    WordPress Brute Force Protection

    During a WordPress Brute Force Attack, attackers repeatedly access the login page in an attempt to guess a valid user ID and password, and gain entry to the system. Besides the obvious security risks that brute force attacks pose, they also consume considerable server resources.

    • LSWS comes with built-in protection against WordPress Brute Force Attack.
    • OLS does not have native protection against WordPress Brute Force Attack

    Control Panel Support

    Web hosting control panels are a popular way for system administrators to handle server management tasks. Many popular control panels were written specifically for Apache servers.

    • LSWS is a drop-in Apache replacement, which means that any control panel that supports Apache also supports LSWS. Popular LSWS-friendly control panels include cPanel, Plesk, DirectAdmin, and more.
    • OLS is not a direct replacement for Apache, so it cannot automatically use the same control panels as Apache. However, there is a growing number of control panels that support OpenLiteSpeed, including CyberPanel, DirectAdmin, CloudPages, RunCloud, and GridPane. Additionally, pre-built OpenLiteSpeed cloud images are available on every major platform for simple installation.

    Licensing

    Licensing requirements are also different between the two servers.

    • LSWS requires a license. There’s a LiteSpeed license to fit any situation, from the Free Starter license for single domains on small servers, to the unlimited license for large web hosts, and everything in between.
    • OLS is 100% free and open source. It may be used by anyone with any number of domains, and any size server, under a GPLv3 License.

    Learn More

    OpenLiteSpeed or LiteSpeed Enterprise: which should you choose?

    OpenLiteSpeed and LiteSpeed Enterprise Web Server are both feature rich, and this comparison is just the beginning. We’ve only covered the big differences here. You can explore the full list of features of both servers side by side on our LiteSpeed Web Server Editions page if you’d like to continue your research.

    Already know what you want? Choose your own adventure: get OpenLiteSpeed or get LiteSpeed Enterprise today!