Category: OpenLiteSpeed

News, tutorials, and information about OpenLiteSpeed, the fast open source web server developed by LiteSpeed Technologies. OpenLiteSpeed provides fewer processes, less overhead, more connections, and enormous scalability, with no hardware upgrade required!

  • HTTP/2 Bomb Vulnerability

    HTTP/2 Bomb Vulnerability

    Here is what you need to know about LiteSpeed and the HTTP/2 Bomb vulnerability:

    • HTTP/2 Bomb is a remote denial-of-service exploit that exists in many servers’ default HTTP/2 configurations.
    • LiteSpeed server products (including LiteSpeed Web Server Enterprise, LiteSpeed Web ADC, and OpenLiteSpeed) are effectively not vulnerable to HTTP/2 Bomb attacks

    Who is affected by HTTP/2 Bomb?

    The HTTP/2 Bomb vulnerability was announced this week on the Calif Substack after having previously been disclosed to nginx and Apache, who then released their own patches. Other servers, not including LiteSpeed, have since been included in the “affected” list.

    LiteSpeed Web Server is an Apache drop-in replacement, but LiteSpeed does not share any code with Apache.

    LiteSpeed’s from-the-ground-up implementation of Apache-compatible systems means that LiteSpeed is usually not subject to the same vulnerabilities as Apache. That is indeed the case with the HTTP/2 Bomb vulnerability.

    How are LiteSpeed Users Protected?

    We assessed the vulnerability and concluded that there is only one situation in which LiteSpeed servers may be exploitable by the HTTP/2 Bomb vulnerability:

    • If an IP address is added to the Trusted IP list, and is intentionally allowed to abuse the server, the HTTP/2 Bomb may have an effect.

    We don’t anticipate that many admins have trusted their attacker’s IPs, but even if they have, the amplification rate is roughly 30x to 40x. This should not be enough to bring down a server.

    Just the same, we will add some tightening around this scenario in upcoming server product releases.

    If you are using LiteSpeed Web Server Enterprise, LiteSpeed Web ADC, or OpenLiteSpeed, there is nothing you need to do right now. You are already immune to this attack, assuming your Trusted IP list contains only truly trustworthy IPs.

  • LiteSpeed Security Update

    LiteSpeed Security Update

    LiteSpeed Security Update

    We have a security update for LiteSpeed’s QUIC and HTTP/3 Library (LSQUIC), and all three LiteSpeed server products. Recently we were made aware of a vulnerability affecting LSQUIC. We patched this vulnerability in v4.3.1.

    Please update to the latest versions of LSQUIC and all LiteSpeed server products.

    This Allocation of Resources Without Limits or Throttling vulnerability, reported by Yohann Sillam from Imperva Offensive Team, has been assigned CVE-2025-54939.

    Impact

    UDP packets, crafted in a particular way and sent to the HTTP/QUIC service port, can cause an unbounded memory leak. This has the potential to cause the process or the server to run out of memory, eventually leading to a Denial of Service.

    This vulnerability in the LSQUIC Library affects all server products and may be easily exploited.

    Actions

    We strongly recommend that those using the QUIC and HTTP/3 library upgrade to LSQUIC version 4.3.1 or higher to patch this vulnerability.

    Additionally, those who are using LiteSpeed server products, should upgrade to the following versions of these products immediately:

    • LiteSpeed Web Server (LSWS) v6.3.4 or higher
    • LiteSpeed Web ADC (LSADC) v3.3.1 or higher
    • OpenLiteSpeed (OLS) v1.8.4 or higher

    If you cannot upgrade your server at this time, you can disable HTTP/3 to avoid this vulnerability.

    Timeline

    • July 15, 2025: We were alerted to the issue.
    • July 18, 2025: Patch was added to our internal repo to be included in all subsequent builds of our commercial server products
    • August 1, 2025: Released LSWS v6.3.4 and OLS v1.8.4
    • August 4, 2025: Released LSADC v3.3.1
    • August 13, 2025: Released LSQUIC v4.3.1 to the GitHub repository

    Conclusion

    We thank Imperva Offensive Team for bringing this issue to our attention. This vulnerability has been patched, so if you are keeping your LSQUIC library or your LiteSpeed server products up-to-date, there is nothing you need to do. If you have not updated in a while, please do so today.

  • 2025 So Far

    2025 So Far

    2025 so far
    We are more than halfway through 2025, and we wanted to take this opportunity to tell you what we’ve been doing this year, in case you’ve missed anything. We’ve released updates to three cache plugins, three control panel plugins, and all three server products!

    Cache Plugins

    First, let’s take a look at what’s new with our LiteSpeed Cache plugins for WordPress, PrestaShop, and Magento.

    WordPress

    We released three LSCWP updates in the last six months. In addition to dozens of minor changes and bug fixes, these new features were among the updates:

    • AVIF support in v7.0
    • Allowlist support for Critical CSS in v7.1
    • Cloudflare cache clear on Purge All in v7.2

    This is just the tip of the iceberg, though. There’s a lot more. See the full release log.

    PrestaShop

    For v1.5.2 of LSCPS, we made a few minor updates: we fixed some bugs, we added parameter support to ESI block widgets, and we improved compatibility with Smarty and Symphony caches.

    See the release log.

    Magento

    LiteMage v2.2.5 had just a minor release, which included a bug fix, and an update which removed the jQuery dependency for custom varies.

    See the release log.

    Servers

    Our server products were updated this year to use a new version of LSQUIC. (A hash flood vulnerability was addressed in our LSQUIC HTTP/3 Library in February with the v4.2.0 release.)

    LiteSpeed Web Server

    We released LSWS v6.3.2 and v6.3.3, which included new features, security updates, and a number of bug fixes. See the full release log here.

    New features include:

    • Improvements to HTTP/2’s ability to block aggressive robots when under attack
    • Improved support for LiteSpeed Containers and Redis in control panels
    • The ability to selectively disable anti-DDoS detection

    The security updates addressed the LSQUIC vulnerability, and an issue with stderr.log permissions.

    OpenLiteSpeed

    OLS v1.8.3 updated LSQUIC and added support for “expect: 100 continue” handling.

    See the release log.

    Web ADC

    Our LSADC v3.3.0 release improved both HTTP/2 and HTTP/3 with stronger anti-DDoS capabilities, and stream priority adjustments.

    See the release log.

    Control Panel Plugins

    Our control panel plugins for cPanel/WHM, Plesk, and DirectAdmin all got a brand new Flag All button for the Cache Management feature.

    Additionally, in cPanel and WHM we addressed a minor security issue, and added some improvements related to the Cache Redis for Users feature.

    We released the following plugin updates:

    • cPanel v2.4.1-v2.4.3 and WHM v5.1.2-v5.2.3
    • Plesk v2.1.3-v2.2.0
    • DirectAdmin v2.4

    See the release logs.

    Stay Tuned

    We’ve got a lot more in store for the rest of 2025. Thanks for coming along for the ride!

  • LSQUIC Security Update

    LSQUIC Security Update

    We have a security update for LiteSpeed’s QUIC and HTTP/3 Library (LSQUIC). Recently we were made aware of a vulnerability affecting several QUIC implementations, including LSQUIC. We patched this vulnerability in v4.2.0.

    Please update to the latest version of LSQUIC.

    This Hash-based Denial-of-Service vulnerability, reported by Paul Bottinelli, Cryptography and Security Consultant at NCC Group, has been assigned CVE-2025-24947.

    Impact

    Several QUIC implementations, including LSQUIC, use a hash table to store Secure Connection IDs (or, SCIDs) as indices to connection data. If the hash function is weak, an attacker can trigger a denial-of-service attack by initiating connections with colliding SCIDs, causing significant slow downs.

    LSQUIC, while technically vulnerable to this type of attack, has a rate limiting feature. If there are too many INIT packets for new connections, a Retry packet will be triggered. This means, LSQUIC doesn’t put the client-generated SCID in the hash. As such, in a real-world deployment, this vulnerability is not easy to exploit with LSQUIC.

    Previously, we used XXH32(), which is prone to hash collisions, to generate a 32-bit hash key. With v4.2.0, LSQUIC has switched to rapidhash, which allows us to generate a stronger random seed, and produces a 64-bit hash key.

    Our test shows that it addresses the hash collision issue well. Here are some examples:

    without seed 
    211C6C858BB29CDD408F1EBDAA43A980CE016B71 -> F3C569EBDE612455
    211CEC85DBB29CDE418F1EBDAA43A980CF214B71 -> F3C569EBDE612455
    with seed 
    211C6C858BB29CDD408F1EBDAA43A980CE016B71 -> 3173D06C62EB64E2
    211CEC85DBB29CDE418F1EBDAA43A980CF214B71 -> EF06763606005C05
    without seed 
    211C6C858BB29CDD408F1EBDAA43A980CE016B71 -> 56B71185739E534A
    211CEC85DBB29CDE418F1EBDAA43A980CF214B71 -> 56B71185739E534A
    with seed 
    211C6C858BB29CDD408F1EBDAA43A980CE016B71 -> D18323CAAFD14A5A
    211CEC85DBB29CDE418F1EBDAA43A980CF214B71 -> 190C4F2674528BE1
    without seed 
    211C6C858BB29CDD408F1EBDAA43A980CE016B71 -> 9183B84F3AE05847
    211CEC85DBB29CDE418F1EBDAA43A980CF214B71 -> 9183B84F3AE05847
    with seed 
    211C6C858BB29CDD408F1EBDAA43A980CE016B71 -> D05A92D1069111F3
    211CEC85DBB29CDE418F1EBDAA43A980CF214B71 -> 3150BF22FFAA28E4
    

    Actions

    We recommend that those using the QUIC and HTTP/3 library upgrade to LSQUIC version 4.2.0 or higher to patch this vulnerability.

    Those who are using LiteSpeed server products, including LiteSpeed Web Server (LSWS), LiteSpeed Web ADC (LSADC), and OpenLiteSpeed (OLS), should upgrade to the latest versions of these products.

    Timeline

    • January 10, 2025: We were alerted to the issue.
    • January 15, 2025: Patch was added to our internal repo to be included in all subsequent builds of our commercial server products
    • February 18, 2025: Released LSWS v 6.3.2, LSADC v3.3.0, and OLS v1.8.3
    • February 18, 2025: Released LSQUIC v4.2.0 to the GitHub repository

    Conclusion

    We thank Paul Bottinelli for bringing this issue to our attention. This vulnerability has been patched, so if you are keeping your LSQUIC library or your LiteSpeed server products up-to-date, there is nothing you need to do. If you have not updated in a while, please do so today.

  • Introducing LiteSpeed Containers

    Introducing LiteSpeed Containers

    LiteSpeed Containers

    Introducing LiteSpeed Containers for Web Hosts!

    If you host websites and use a Control Panel like cPanel or Plesk and are not using CloudLinux, you may very well consider using LiteSpeed Containers to help you manage your customers.

    LiteSpeed Containers uses the powerful new features of Linux including:

    • Allowing full control of CPU, I/O, number of processes and amount of memory a user can use using cgroups.
    • Putting each user in a sandbox, or container that isolates the user from affecting any other users using namespaces.

    If you use Enterprise Litespeed and one of our supported control panels (cPanel or Plesk), all control is from a PlugIn in the Control Panel itself.

    Even if you use OpenLiteSpeed or an unsupported control panel you can get the same powerful features using our included APIs. This is all built-in to your LiteSpeed server product.

    This blog will walk you through a number of situations where LiteSpeed Containers can help you better manage your environment.

    Turning on LiteSpeed Containers

    If you have LiteSpeed Enterprise v6.3 or later, and one of our supported control panels, you can find LiteSpeed Containers in the Control Panel Plugin, and you can simply run the script there that enables it. We recommend adding the configuration for cgroups and namespaces at the virtual host level.

    If you are running OpenLiteSpeed you will need to upgrade to v1.8 or later, and enable cgroups and namespaces.

    Hogging the CPU

    Preventing CPU hogging is the most basic value of LiteSpeed Containers. Linux will allocate all CPU power to any process that uses it, and users may take advantage of this, intentionally or not. LiteSpeed Containers gives you the tools to manage this condition.

    For example, if one of your users has a bug in a PHP script that creates a tight loop and uses all of the CPU, suddenly every user on that machine sees their processes get hung.

    With LiteSpeed Containers you can avoid this scenario by allocating each user in the package a defined amount of CPU. We strongly recommend that this be in multiples of 100. Each multiple of 100 uses a full CPU, and allocating CPU in this manner avoids context switching.

    If you have one of the LiteSpeed Control Panel Plugins, open the plugin, select Containers Package Manager, highlight the package, and click Edit.
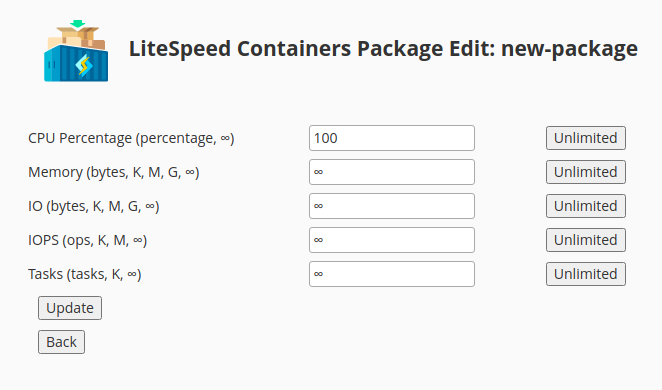
    Enter 100 as in the above example, and each user will get a maximum of 1 CPU. If the user begins to completely hog the CPU, then it will be the only user using that CPU while all other CPUs are available for other users.

    If you do not have a LiteSpeed Control Panel you can do the same thing with the command line API (using the package new-package):

    sudo /usr/local/lsws/lsns/bin/lspkgctl --cpu 100 set new-package

    To see the current values, use this command:

    sudo /usr/local/lsws/lsns/bin/lspkgctl list new-package

    Which displays:

    {
        "packages": {
            "new-package": {
                "uids": [
                    1002
                ],
                "cpu": "100"
            }
        }
    }

    Note that as soon as you complete the action, the user settings are immediately updated.

    Selling a Variety of Access

    LiteSpeed Containers can help you sell a variety of access tiers. For example, you could have a Basic tier which offers a more limited form of access and an Advanced tier that offers more power for customers. The procedure involves something you possibly already have in place, which is to put each user in each tier in a package specific to that tier.

    Once you have that done, you are ready to set up each package for the tier. For example:

    • Basic tier limits to 1 CPU, 1G RAM, 1K IO’s per second, 1M IO and 100 tasks.
    • Advanced tier limits to 2 CPUs, 4G RAM, 4K IO’s per second, 4M IO and 400 tasks.

    These are just examples and the values you would sell are what is appropriate for your region and hardware.

    As above, this is best done at the package level because it affects all users at the same time. We’ll discuss making exceptions below.

    In your control panel, create the packages (or plans in Plesk) and add users as appropriate to each.

    If you have one of the LiteSpeed Control Panel Plugins, in the plugIn, select Containers Package Manager, highlight basic and press the Edit button.
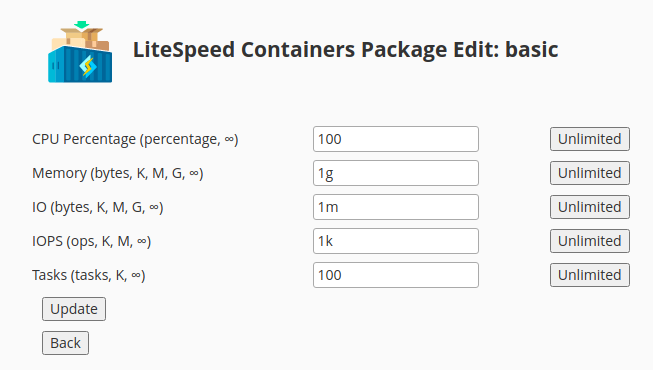
    Enter the appropriate values and press the Update button to apply the changes to the users. To update the advanced package press its Edit button.
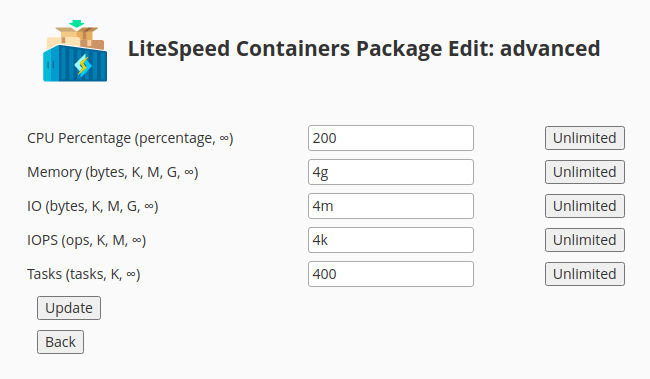
    Again, enter, the appropriate values and press the Update button to apply the changes to the users.

    To perform the same actions using the API enter:

    sudo /usr/local/lsws/lsns/bin/lspkgctl --cpu 100 --io 1m --iops 1k --mem 1g --tasks 100 set basic
    sudo /usr/local/lsws/lsns/bin/lspkgctl --cpu 200 --io 4m --iops 4k --mem 4g --tasks 400 set advanced

    Making cgroups Exceptions

    If you have a user with the name exception in the advanced package, and you wish to offer no limit for tasks, you can do this. In the plugin, select Containers User Manager and click Edit in the Cgroups column, and the appropriate user’s row.
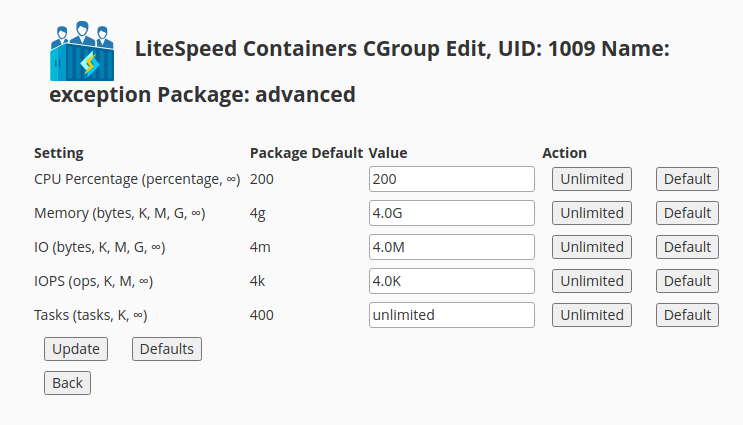
    To set the user’s task enforcement to unlimited, press the Unlimited button in the Tasks row and press the Update button to apply the change. Future package updates to the advanced package will be applied to all users including this one, except for the Tasks limit which will be preserved.

    To perform the same function to the exception user using the API enter:

    sudo /usr/local/lsws/lsns/bin/lscgctl --tasks -1 set exception

    Making namespace Exceptions

    If you configure a user with namespace containers in the LiteSpeed Configuration, it will run in its own container shared with all instances of that user. If you wish to exclude a user from namespace containers you can indeed do that.

    In the plugin select Containers User Manager. In the Namespaces column is a Disable button.
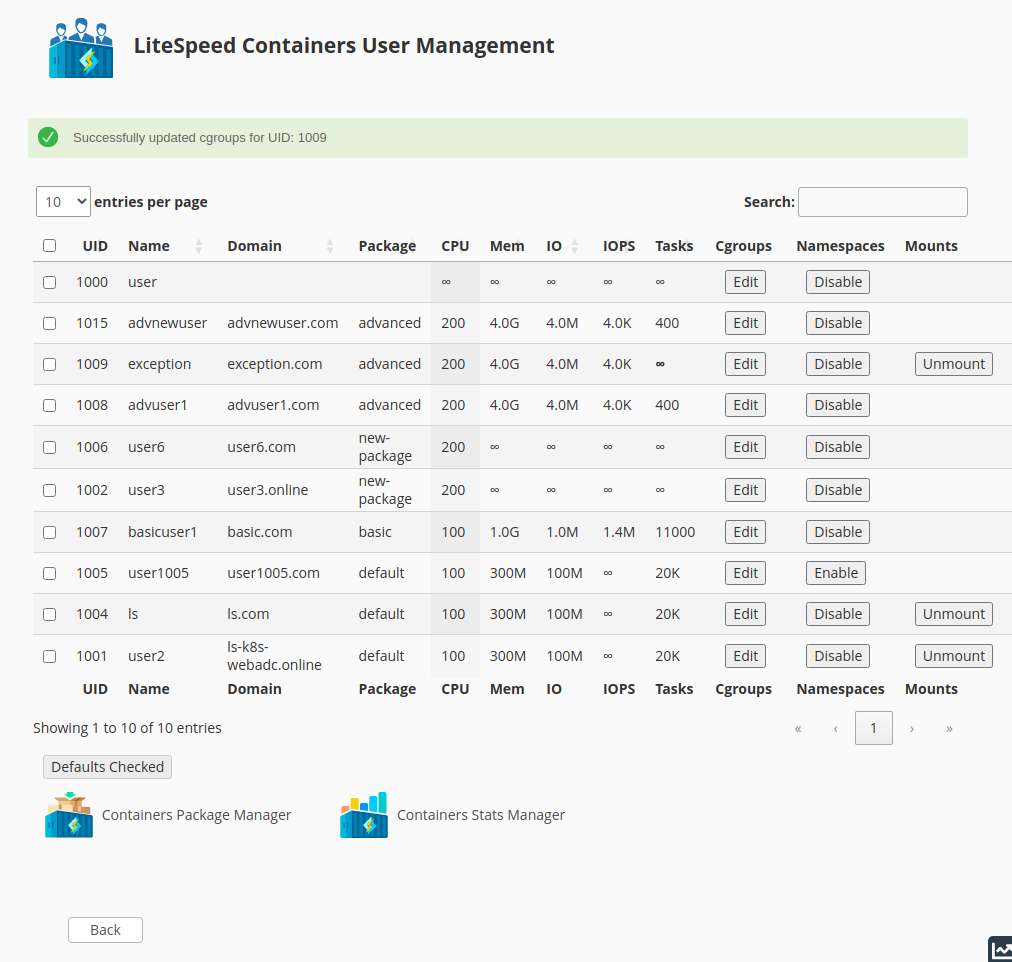
    If you press the Disable button you will disable use the of the container for that user for future invocations. Existing ones will run until completed. It warns you that you must run a manual graceful restart to apply the disable at a time when it will not disrupt user traffic.

    The Unmount button is displayed indicating that there is a namespace created for that user. Once all users are done you can press the Unmount button. Pressing it while users are running will cause no harm. It will warn you that it is in use.

    To disable the user exception using the API:

    sudo /usr/local/lsws/lsns/bin/lsnsctl --uid exception disable-uid

    Monitoring Users With Prometheus

    Besides monitoring LiteSpeed, the LiteSpeed Prometheus Exporter will also monitor cgroups statistics for each user unless configured not to. This is quite a low-overhead operation and has a very large upside for LiteSpeed Containers. With it, you can use Prometheus and Prometheus-compatible tools like Grafana to monitor your system.

    You can get some quick and dirty statistics with the plugin. Select Containers Stats Manager:
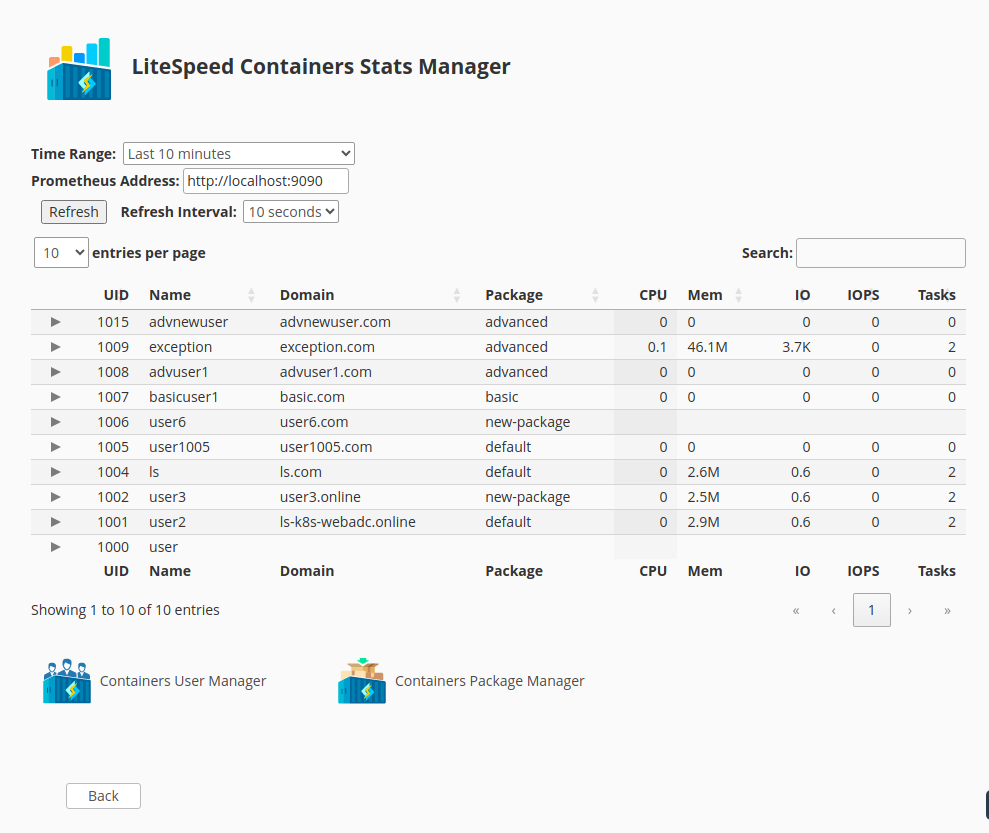
    Time Range can be set to:

    • Last 10 minutes
    • Last 30 minutes
    • Last hour
    • Last 4 hours
    • Today
    • Yesterday

    After changing the Time Range you must press the Refresh button to see the results or select a Refresh Interval other than stop and it will update during the next auto-refresh..

    These statistics come from Prometheus itself so you must have the Prometheus Address configured to contact the same Prometheus server that the LiteSpeed Prometheus Exporter is using. You can use Prometheus or its tools to provide graphs or alerts which can be useful to allow you to see which users are using excessive resources or which users are not actually using the systems.

    Monitoring Users Without Prometheus

    If you do not wish to use Prometheus, you can get a point-in-time look at the system by selecting the Time Range: Real-Time (without Prometheus) and pressing the Refresh button or set a Refresh Interval other than stop. This will only provide the last 2 seconds of information and can be useful in determining the current state of the system.

    There is an API to provide the non-Prometheus information. For example, to see the statistics for the user exception enter:

    /usr/local/lsws/lsns/bin/lscgstats exception

    Which returns the details for the system as a whole, the dot (.) user, and the exception user:

    {
        ".": {
            "name": ".",
            "cpu": "1178426628",
            "io": "80723709952",
            "iops": "463034",
            "mem": "497131520",
            "tasks": "36"
        },
        "1009": {
            "name": "exception",
            "cpu": "844348342",
            "io": "3561500672",
            "iops": "5620",
            "mem": "60563456",
            "tasks": "2"
        }
    }

    The values can be used to calculate details as they are directly from the operating system cgroups user directories. For example, the cpu number is the number of microseconds the CPU has used since the reboot for the system as a whole and for the specific user. Thus if you run this with a 1-second interval and subtract the more recent value from the earlier value and divide by 1 million, you will get the amount of CPU time used in that 1 second. Multiply by 100 and you have a percentage. It is this and similar tricks used by the LiteSpeed Prometheus Exporter which give you statistics about your system.


  • LiteSpeed Not Vulnerable to HTTP/2 Continuation Flood

    LiteSpeed Not Vulnerable to HTTP/2 Continuation Flood

    LiteSpeed Not Vulnerable to HTTP/2 CONTINUATION Flood Vulnerability

    Here is what you need to know about the HTTP/2 CONTINUATION Flood vulnerability, specifically CVE-2024-27316, and LiteSpeed:

    • The vulnerability allows an attack that uses unbounded header buffering to overwhelm servers
    • LiteSpeed servers are not vulnerable to HTTP/2 CONTINUATION Flood

    What is Continuation Flood?

    The HTTP/2 CONTINUATION Flood vulnerability was announced yesterday as Vulnerability Note #421644 published by the CERT Coordination Center.

    The note states:

    An attacker that can send packets to a target server can send a stream of CONTINUATION frames that will not be appended to the header list in memory but will still be processed and decoded by the server or will be appended to the header list, causing an out of memory (OOM) crash.

    The note goes on to specify a number of CVE listings specific to certain HTTP/2 implementations, including the following:

    • CVE-2024-27983 (node.js)
    • CVE-2024-27919 and CVE-2024-30255 (Envoy)
    • CVE-2024-2758 (Tempesta)
    • CVE-2024-2653 (amphp/http)
    • CVE-2023-45288 (Go)
    • CVE-2024-28182 (nghttp2)
    • CVE-2024-31309 (Apache Traffic Server)

    CVE-2024-27316 is of particular interest because it applies to the Apache Httpd implementation:

    HTTP/2 CONTINUATION frames without the END_HEADERS flag set can be sent in a continuous stream by an attacker to an Apache Httpd implementation, which will not properly terminate the request early.

    LiteSpeed Web Server is an Apache drop-in replacement, but LiteSpeed does not share any code with Apache.

    LiteSpeed’s from-the-ground-up implementation of Apache-compatible systems means that LiteSpeed is usually not subject to the same vulnerabilities as Apache. That is indeed the case with the HTTP/2 CONTINUATION Flood vulnerability.

    How are LiteSpeed Users Protected?

    LiteSpeed Web Server, OpenLiteSpeed, and LiteSpeed Web ADC’s HTTP/2 implementation applies a 64K upper limit for total header buffering. If the limit is reached, the connection is closed.

    Attackers attempting to exploit this vulnerability on LiteSpeed Web Server will find their efforts thwarted after a mere 64K.

  • Performance Testing Namespaces

    Performance Testing Namespaces

    Performance Testing Namespaces

    Namespaces in Linux are often used to implement containers and are great at administering sandboxes where files, users, processes and just about all system resources are separated from all other processes. Many commonly used applications, including Docker and Kubernates, use namespaces to implement their sandboxes. Kernel support for namespaces makes them virtually bulletproof and as such, namespaces are considered the gold standard for creating safe sandbox environments.

    OpenLiteSpeed supports both the bubblewrap tool and Linux native namespaces to meet the needs of a safe sandbox environment. But while they both provide a safe environment (bubblewrap actually uses namespaces in its implementation), there are differences between them in execution with OpenLiteSpeed. In this article, we’ll be performance testing namespaces and bubblewrap in OpenLiteSpeed.

    Differences between Bubblewrap and Namespaces

    OpenLiteSpeed’s support of bubblewrap is quite simple: set up a command line, and then execute it and allow bubblewrap to implement the sandbox. There are special command line options for generating the bubblewrap command line. These include custom /etc/passwd and /etc/group files to meet your needs, and file copies to generate files with the correct permissions. Bubblewrap itself does the bulk of the work.

    The namespaces feature in OpenLiteSpeed performs virtually all of the same tasks, but does so in a different way. Instead of a command line, you specify the name of a configuration file, which contains commands in it. Also, when a set of namespaces for a given user’s environment is created, it is persisted so that later executions do not have to recreate it. They can simply join it using facilities similar to nsenter. This should result in significantly better performance, but does it? That’s what we will aim to find out in this article.

    Goals

    • Determine the conditions where namespaces and bubblewrap perform the same.
    • Determine the conditions where namespaces perform better than bubblewrap and how much improvement there is.

    In an earlier blog which described OpenLiteSpeed’s use of bubblewrap, PHP processes were used to describe the feature. And while PHP is good for demonstrating how it works, and it remains the most common use of bubblewrap in OpenLiteSpeed, it is not the best tool to show performance differences between bubblewrap and namespaces.

    LiteSpeed highly optimizes PHP, and starts a small number of lsphp processes to serve any number of PHP requests. Thus the setup is one time for each execution of lsphp. It’s still worth using namespaces as doing so removes the overhead of executing an intermediary process. The lsphp program is run directly rather than through bubblewrap, so the actual performance gain is slight.

    Plain CGI executables provide the largest gain in performance and are the best tool to demonstrate the value of LiteSpeed’s native namespaces over bubblewrap’s implementation of namespaces. These are programs which are directly run by the web server and do their communications with the server though standard I/O and environment variables (see Common Gateway Interface).

    Performance Benchmarks

    In https://http2benchmark.org/ the test tool of choice is h2load, thus we used it for testing performance here as well.

    Test environment

    • Hardware: Intel i7, with 16GB of memory.
    • Software: VM with Ubuntu 22.04, configured to use 8GB of memory and 3 processors. VirtualBox running on Windows.
    • Test version of OpenLiteSpeed with a pre-release of namespace support. Running 3 workers to utilize the 3 processors.
    • After each test, we ran unmount_ns to assure that a subsequent test would not benefit from a persisted namespace. Also, we stopped and restarted OpenLiteSpeed after each test as well.
    • We tested using the sample CGI program included with OpenLiteSpeed: cgi-bin/helloworld. This program is simple enough to incur minimal overhead and thus demonstrate the value of any performance changes between the tests.

    Test results

    Small Load Test

    Command line:

    h2load -n 10000 -c 10 https://127.0.0.1:8089/cgi-bin/helloworld
    

    Where:

    • -n 10000: 10,000 total requests
    • -c 10: 10 concurrent requests

    Bubblewrap results:

    • 69 seconds
    • 145 requests per second
    • 7 K/sec

    Namespace results:

    • 16 seconds
    • 613 requests per second
    • 29 K/sec

    Without namespace or bubblewrap:

    • 13 seconds
    • 761 requests per second
    • 35 K/sec

    This shows in a small number of requests a 431% improvement in clock time and 423% improvement in throughput. The penalty for namespaces is 23% in clock time and 24% in throughput.

    Large Load Test

    Command line:

    h2load -n 100000 -c 100 -m 10 https://127.0.0.1:8089/cgi-bin/helloworld
    

    Where:

    • -n 100000: 100,000 total requests
    • -c 100: 100 concurrent requests
    • -m 10: 10 streams, or since this is http, the number of requests in flight at a time.

    Bubblewrap results:

    • 1123 seconds
    • 89 requests per second
    • 8 K/sec

    Namespace results:

    • 159 seconds
    • 628 requests per second
    • 36 K/sec

    Without namespace or bubblewrap:

    • 125 seconds
    • 799 requests per second
    • 43 K/sec

    This shows in a larger number of requests a 706% improvement in clock time and 706% improvement in throughput. The penalty for namespaces is only 27% in clock time and 27% in throughput.

    Conclusion

    In conclusion, it is clear that for CGI requests, you can accomplish substantial performance gains using namespaces over bubblewrap. These performance gains merely hint at the other resource gains in CPU, memory, processes, etc. And the value of a sandbox comes at a reasonable cost in performance and overhead.

  • Common Questions About OWASP with OpenLiteSpeed

    Common Questions About OWASP with OpenLiteSpeed

    OWASP with OpenLiteSpeed

    Running into difficulty with mod_security? Our support team provided this short list of Frequently Asked Questions. We hope they will help you to be successful using the OWASP rule set to secure your OpenLiteSpeed server!

    How do I set up OWASP with OpenLiteSpeed?

    OWASP, or Open Web Application Security Project, provides a comprehensive collection of mod_security rules to protect your server. There are three ways to start using OWASP with OpenLiteSpeed (OLS). Choose the method that applies to your configuration.

    When your OLS is a cloud image, was installed using ols1clk, or was installed using the LiteSpeed repo, you can set up OWASP with the following command:

    bash <( curl -k https://raw.githubusercontent.com/litespeedtech/ols1clk/master/ols1clk.sh ) --owasp-enable
    

    If you’re using OLS with Docker, you can use the built-in bash bin/webadmin.sh --mod_secure enable feature to enable OWASP.

    If you have compiled OLS from source, follow the instructions in our Knowledge Base and install OWASP manually.

    What if mod_security doesn’t exist?

    If the /usr/local/lsws/modules/mod_security.so file doesn’t exist, you can either install it from the repository with the apt-get install ols-modsecurity -y command, or build it from source.

    Is syntax causing my problem?

    It’s common for configuration syntax to be an issue. Here are a few things to remember:

    • Even if Enable Module is set to Yes, you still need to set Modsecurity ON.
    • When you are adding custom rules to the Modsecurity_rules block, be sure that they are enclosed inside of a backtick (`)

    How do I verify if OWASP works?

    You can test the effectiveness of an OWASP rule by trying to break it. For example, try some Cross Site Scripting on your domain:

    http://example.com/?user=<script>alert(123)</script>
    

    If the OWASP rule is working correctly, the server will return a 403` code, and the following error message will be appended to the server error log:

    [Module:mod_security] ModSecurity: Warning. detected XSS using libinjection. [file "/usr/local/lsws/conf/owasp/owasp-modsecurity-crs/rules/REQUEST-941-APPLICATION-ATTACK-XSS.conf"] [line "38"] [id "941100"]
    

    You can try other simple test cases, such as:

    • Classic SQL Injection:
      http://www.example.com/?Username='1' OR '1' = '1' AND Password='1' OR '1' = '1'
      
    • Select Statement:
      http://www.example.com/?id=10 AND 1=2
      

    For each test, verify that the appropriate error message was logged.

    There is much more to OWASP testing than this, so consider taking a look at OWASP’s official testing guide for more ideas.

    What if I am seeing false positives?

    If you are experiencing false positives, first make sure that you are using the most recent Core Rule Set version.

    Then, if the false positives continue, you can raise an issue on the official Core Rule Set repo.

    To keep a particular false positive from impacting access to your site, you might want to comment out the rule to keep it from firing.

    For example, let’s say you have the following in your server’s error log, but it is a false positive:

    [Module:mod_security] ModSecurity: Warning. detected XSS using libinjection. [file "/usr/local/lsws/conf/owasp/owasp-modsecurity-crs/rules/REQUEST-941-APPLICATION-ATTACK-XSS.conf"] [line "38"] [id "941100"]
    

    Edit the configuration file found at /usr/local/lsws/conf/owasp/owasp-modsecurity-crs/rules/REQUEST-941-APPLICATION-ATTACK-XSS.conf and comment out every line of the 941100 rule, like so:

    # SecRule REQUEST_COOKIES|!REQUEST_COOKIES:/__utm/|REQUEST_COOKIES_NAMES|REQUEST_HEADERS:User-Agent|ARGS_NAMES|ARGS|XML:/* "@detectXSS" \
        # "id:941100,\
        # phase:2,\
        # block,\
        # t:none,t:utf8toUnicode,t:urlDecodeUni,t:htmlEntityDecode,t:jsDecode,t:cssDecode,t:removeNulls,\
        # msg:'XSS Attack Detected via libinjection',\
        # logdata:'Matched Data: XSS data found within %{MATCHED_VAR_NAME}: %{MATCHED_VAR}',\
        # tag:'application-multi',\
        # tag:'language-multi',\
        # tag:'platform-multi',\
        # tag:'attack-xss',\
        # tag:'paranoia-level/1',\
        # tag:'OWASP_CRS',\
        # tag:'capec/1000/152/242',\
        # ctl:auditLogParts=+E,\
        # ver:'OWASP_CRS/3.3.5',\
        # severity:'CRITICAL',\
        # setvar:'tx.xss_score=+%{tx.critical_anomaly_score}',\
        # setvar:'tx.anomaly_score_pl1=+%{tx.critical_anomaly_score}'"
    

    Restart the server, and that rule will no longer fire.

    Conclusion

    OpenLiteSpeed and OWASP are a powerful combination for securing your server. If you have a busy server, try the more performant, highly scalable proprietary mod_security engine that comes with LiteSpeed Enterprise Web Server.

    Thank you to Eric Leu for providing most of the information in this article.

  • How to use Configuration Templates

    How to use Configuration Templates

    LiteSpeed Virtual Host Configuration Templates

    Introduction

    If you are using OpenLiteSpeed, LiteSpeed Web ADC, or native LiteSpeed Web Server Enterprise without a control panel, you can take advantage of virtual host configuration templates.

    Today we’ll show you how templates work, go over some benefits, and walk you through an example usage.

    Benefits of Templating

    When you host multiple websites on one server, you may find that many of them have similar configurations. With LiteSpeed’s virtual host template feature, you can create many virtual hosts from one master template and edit all of their configurations at once. Plus, configuring a new vhost can be as simple as connecting it to the template.

    How Configuration Templates Work

    Each template contains three things:

    1. a configuration file
    2. a list of mapped listeners, and
    3. a list of member virtual hosts.

    Creating a Template

    To create a brand new template, navigate to WebAdmin Console > Configuration > Virtual Host Templates > Add. You will be asked to fill out basic information for this template. One of the fields will require the location of your template file. If you do not have a template file yet, that’s fine. You can make up a new file name and LiteSpeed will create it for you in $SERVER_ROOT/conf/templates/.

    For the purposes of this blog post, let’s call your new template mytemplate.

    Once you’ve added mytemplate, you don’t need to configure any more settings, though you will probably want to.

    Most of the settings in a virtual host template are comparable to normal virtual host settings. The main difference is that you can use the $VH_NAME variable in template settings to stand in for the names of the virtual hosts that you will be applying the template to.

    Applying a Template to a Virtual Host

    A virtual host template does nothing until you assign it to some member virtual hosts.

    Virtual host template settings are located in the WebAdmin Console under Configuration > Virtual Host Templates. That is where you can find a list of your existing templates.

    To add virtual hosts to mytemplate, click mytemplate and navigate to Template > Member Virtual Hosts > Add. Each virtual host you add will be automatically configured with the mytemplate settings. The member virtual host’s name will be substituted anywhere that $VH_NAME appears in the template settings. And listener-to-virtual host mapping will be added automatically for all listeners in the template’s mapped listener list.

    Making Changes to a Template

    In the WebAdmin Console, navigate to Configuration > Virtual Host Templates, and click View/Edit next to mytemplate, (or whichever template you wish to edit).

    When you update the settings in a virtual host template, all of the member virtual hosts will automatically take on the new settings.

    You will need to perform a Graceful Restart to put your updates into effect.

    Default Templates

    Our server products may come with some default virtual host templates, which can be found in the $SERVER_ROOT/conf/templates/ directory.

    LiteSpeed Web Server has three, for the three most common types of virtual hosts:

    • centralConfigLog is good for basic virtual hosts that will use the same server root directories and share a common directory naming framework.
    • PHP_SuEXEC contains a setup ideal for hosting external PHP applications running in suEXEC mode. PHP scripts for member virtual hosts will be executed as the owner of the virtual host’s document root.
    • EasyRailsWithSuEXEC is just like the PHP_SuEXEC template, but for Ruby on Rails applications.

    Example

    Let’s set up a new template in the LiteSpeed WebAdmin Console.

    1. Click Configuration > Listeners and delete the default port 80 listener.
    2. Click Add. Set the following, and click Save:
      1. Listener name: http
      2. Port: 80
      3. Binding Not set
    3. Repeat step 2 to create an https listener for port 443.
    4. Configure an SSL certificate for the https listener.
    5. Click the Virtual Host Templates tab and click Add. Set the following, and click Save:
      1. Template Name: mytemplate (or whatever name you would like to use)
      2. Template file: /usr/local/lsws/conf/templates/mytemplate.xml
      3. Mapped Listeners:http, https
    6. Click View/Edit on mytemplate. Click the General tab, and click Edit. Set the following, and click Save:
      1. Default Virtual Host Root: /home/$VH_NAME/
      2. Config file: /usr/local/lsws/conf/vhosts/$VH_NAME.xml
      3. Document Root: /home/$VH_NAME/public_html
    7. Click the Security tab. Set the following, and click Save:
      1. External App Set UID Mode: DocRoot UID
      2. suEXEC User: $VH_NAME
      3. suEXEC Group: $VH_NAME
    8. Click the External App tab and choose the LiteApeed SAPI App type. Set the following, and click Save:
      1. Name: $VH_NAME_lsphp81 (we are using PHP v8.1 in this example, but you can use any version you like)
      2. Address: uds://tmp/lshttpd/$VH_NAME.sock
      3. Max Connections: 3
      4. Initial Request Timeout (secs): 60
      5. Retry Timeout (secs): 30
      6. Connection Keepalive Timeout: -1
      7. Command: /usr/local/lsws/lsphp81/bin/lsphp
      8. Run as user: $VH_NAME
      9. Run as group: $VH_NAME
    9. Click the Script Handler tab and click Add. Set the following, and click Save:
      1. Suffixes: php
      2. Handler type: LiteSpeed SAPI
      3. Handler name: [VHost Level]: $VH_NAME_lsphp81
    10. Click the Template tab and click Add. Set the following, and click Save:
      1. Virtual Host Name: site1 (or any name of your choice)
      2. Domain: site1.com
      3. Aliases: www.site1.com
    11. Click the Add button again. Set the following, and click Save:
      1. Virtual Host Name: site2 (or any name of your choice)
      2. Domain: site2.com
      3. Aliases: www.site2.com
    12. Repeat step 11 for every virtual host that you want to add with this template.
    13. Click Graceful restart to apply your changes

    Testing

    Once the template is created and the site1 and site2 virtual hosts are added as members, you can (1) test that the sites exist, (2) check the file system to verify that their document roots are in the correct place, as defined by the template, and (3), verify that each site owns a running PHP processes, as defined by the template.

    1. In a browser window, verify that you can successfully visit site1.com and site2.com.
    2. Verify that document roots exist in /home/site1/public_html and /home/site2/public_html.
    3. Run: ps -aux | grep lsphp. This command will show you any lsphp processes running, and you can verify that they are owned by site1:site1 and site2:site2.

    Conclusion

    You should now know why templates are useful, and you should be able to create one and assign virtual hosts as members.

    If you’d like to learn more, you can see our wiki on the subject, or take a look at these instructions for creating a template to be used with LiteSpeed Web ADC and Kubernetes.

  • OpenLiteSpeed + Metabase

    OpenLiteSpeed + Metabase

    OpenLiteSpeed and Metabase

    OpenLiteSpeed Web Server is great for building and deploying web applications. The WebAdmin Console enables you to quickly configure features that allow you to deliver a fast web application that your users will love.

    Metabase is a business intelligence web application that can be deployed on an OpenLiteSpeed Web Server. It is a java-based web app that can connect to almost any database and has a built-in question builder tool that allows you to get intelligent insights on your data.

    OpenLiteSpeed and Metabase

    In this guide, you will learn how to install and configure OpenLiteSpeed as a reverse proxy for Metabase. That means the web server will sit in front of Metabase and intercept requests made by clients. Upon completion of this guide you will have a business intelligence web based application powered by OpenLiteSpeed web server.

    Below are 7 steps covered in this tutorial:

    1. Installing OpenLiteSpeed with MariaDB
    2. Installing Java
    3. Creating a MariaDB database
    4. Downloading Metabase
    5. Creating a systemd configuration file for Metabase
    6. Configuring a Let’s Encrypt SSL Certificate
    7. Completing the post-installation setup

    Requirements

    Here is what you will need to complete this setup:

    1. An SSH client such as Putty or the macOS terminal app.
    2. A server running a Debian-based operating system such as Ubuntu Server
    3. A fully qualified domain name pointing to the public IP address of your server.

    Step 1: Install OpenLiteSpeed with MariaDB

    The first step is to install OpenLiteSpeed. We will use the 1-click installation script, which is a single command that will install OpenLiteSpeed, set up the virtualhost, add the reverse proxy configuration and install MariaDB.

    On a newly deployed debian-based server, run the command below to install OpenLiteSpeed with a reverse proxy configuration:

    bash <( curl -k https://raw.githubusercontent.com/litespeedtech/ols1clk/master/ols1clk.sh) --proxy-c --pure-mariadb
    

    This command will automatically create a reverse proxy configuration using the example virtualhost, and install MariaDB.

    Log in to the OpenLiteSpeed WebAdminConsole. Click Server Configuration > External App. 

    Click Edit on the Web Server external app, update Address * to http://127.0.0.1:3000, and click Save.

    Restart OpenLiteSpeed for the changes to take effect.

    Step 2: Install Java

    The second step is to install the Java development kit (JDK), and the Java runtime environment (JRE). Run the command below to install:

    sudo apt-get install openjdk-11-jdk openjdk-11-jre -y
    

    Step 3: Create a MariaDB database

    The third step is to create a MariaDB database for Metabase.

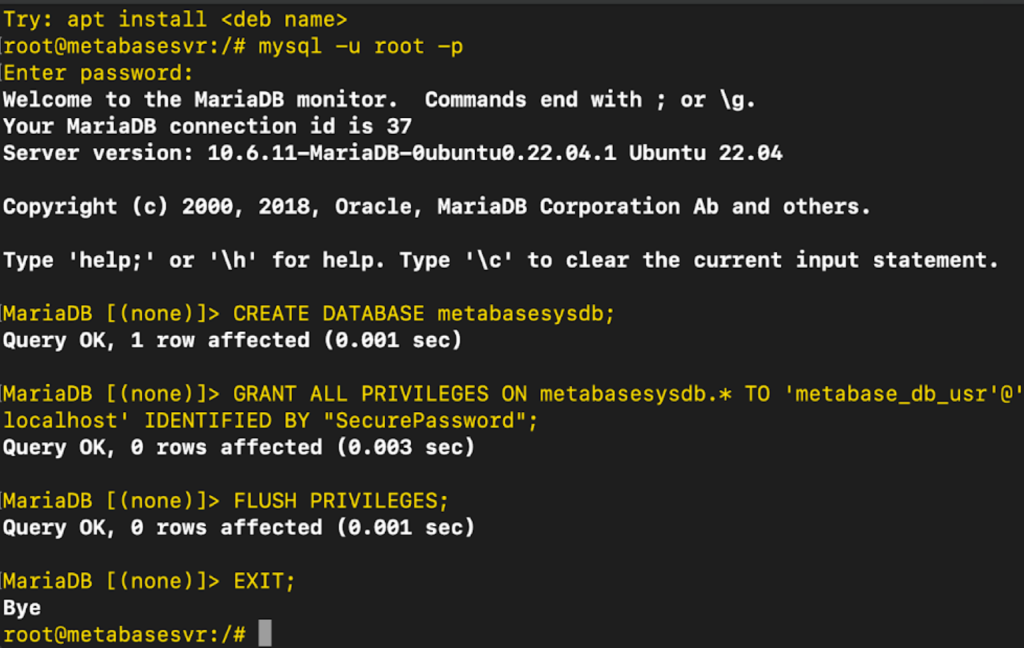
    Run the commands below to connect to the MariaDB shell and create a new database:

    mysql -u root -p
    CREATE DATABASE metabasesysdb;
    GRANT ALL PRIVILEGES ON metabasesysdb.* TO 'metabase_db_usr'@'localhost' IDENTIFIED BY "SecurePassword";
    FLUSH PRIVILEGES;
    EXIT;
    

    Step 4: Download Metabase

    You have successfully installed OpenLiteSpeed and added reverse proxy configuration. Follow the next few steps to start using Metabase with OpenLiteSpeed.

    Create a folder for Metabase in the /opt directory, and download the latest version of Metabase from the official download page:

    sudo mkdir /opt/metabase
    cd /opt/metabase
    wget https://downloads.metabase.com/v0.45.2/metabase.jar
    

    Change the owner of the /opt/metabase directory and all files in this directory to nobody and nogroup by running this command:

    chown -R nobody:nogroup /opt/metabase
    

    Set the permissions of the /opt/metabase directory and all files in the directory:

    chmod -R 755 /opt/metabase
    

    Step 5: Create a systemd configuration file.

    To ensure Metabase is always running on your server, and to simplify stopping and starting the business intelligence web app, you can create a systemd configuration file. Run the commands below to create a service file in the /etc/systemd/system directory:

    sudo apt install nano
    sudo nano /etc/systemd/system/metabase.service
    

    Edit the metabase.service file, and copy and paste the following configuration below into it:

    [Unit]
    Description=Metabase Business Intelligence Web App Powered By OpenLiteSpeed Web Server
    [Service]
    WorkingDirectory=/opt/metabase/
    ExecStart=/usr/bin/java -jar /opt/metabase/metabase.jar
    User=nobody
    Type=simple
    Restart=on-failure
    RestartSec=10
    [Install]
    WantedBy=multi-user.target
    

    Save the file and exit out of it.

    Reload the system daemon, start the Metabase service, and set it to start automatically at system boot:

    systemctl daemon-reload
    systemctl start metabase
    systemctl enable metabase
    

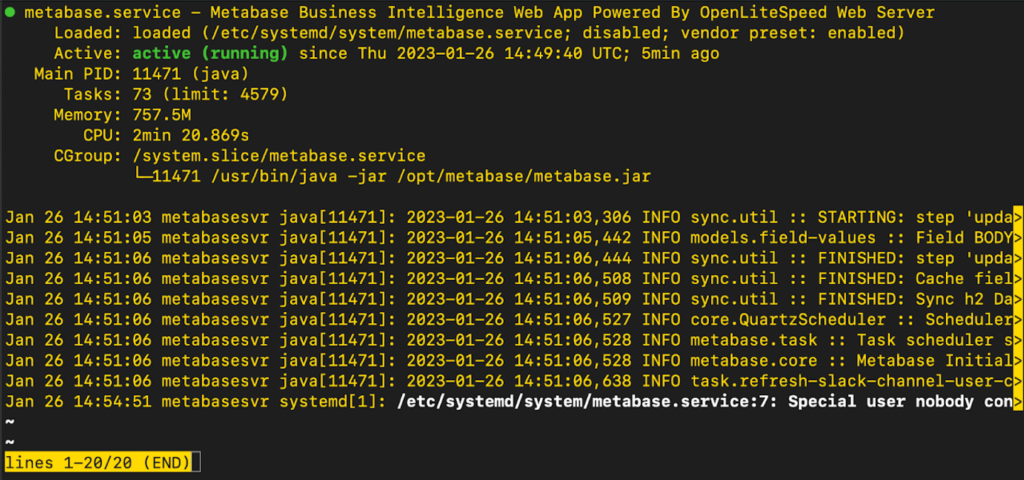
    You also need to ensure the newly created metabase service is marked as active and running. Run the command

    systemctl status metabase
    

    If Metabase is active and running, the command will return the following output:

    metabase.service - Metabase Business Intelligence Web App Powered By OpenLiteSpeed Web Server
          Loaded: loaded (/etc/systemd/system/metabase.service;
          Active: active (running)
    

    Step 6: Configure a Let’s Encrypt SSL Certificate.

    The next step is to configure a Let’s Encrypt SSL Certificate. This ensures that you always access Metabase using a secure HTTPS connection. Follow the steps below:

    Install the certbot utility:

    sudo apt-get install certbot -y
    

    Generate the SSL certificate by following the instructions in the OpenLiteSpeed KB.

    Step 7: Complete the post installation setup

    Open a new browser window and enter the domain name for the metabase server in the browser address bar.

    You will see the Metabase welcome page. Click Let’s get started.

    Choose your preferred language and click Next

    Enter your personal details and ensure you set a secure password. Click Next, select I’ll add my data later and click Next.

    Click Finish, and click Take me to Metabase. This will open the dashboard where you can perform business intelligence tasks using the builtin features.

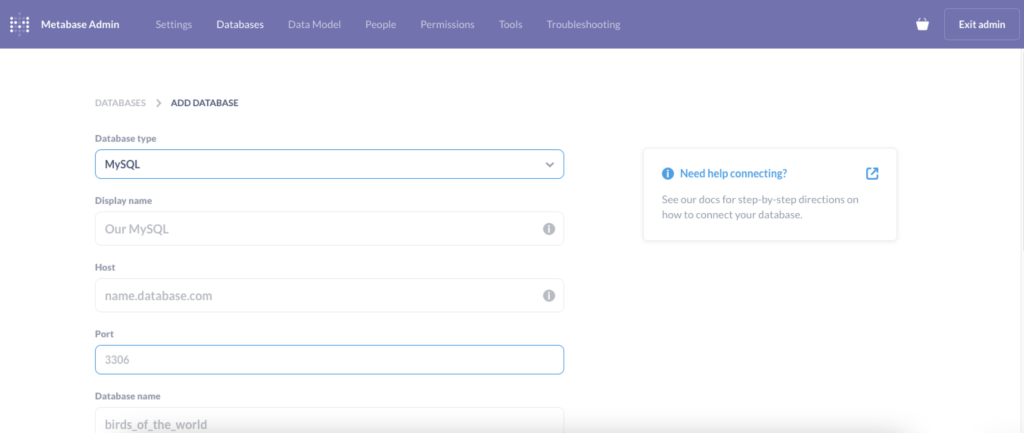
    You can also configure the database that you created on Step 3. Click Add your own data to open the Add Database wizard.

    Select the type of database you would like to add on the Database type drop down, configure your database details, and click Save

    Conclusion

    You have successfully installed the Metabase Business Intelligence web app on an OpenLiteSpeed Web Server. For more details about OpenLiteSpeed features that you can configure to further enhance web app performance please visit our knowledge base.