Category: LiteSpeed Web ADC

Learn more about LiteSpeed Web ADC. Our load balancer and application delivery controller fits easily into your existing infrastructure, offering better performance at significantly lower cost.  A 100% software solution, LiteSpeed Web ADC can run anywhere – private dedicated hardware, hosted environments, clouds, etc.

  • Kubernetes Support for LiteSpeed Web ADC

    Kubernetes Support for LiteSpeed Web ADC

    Kubernetes Support for LiteSpeed Web ADC

    LiteSpeed is pleased to introduce the LiteSpeed Ingress Controller, which adds full support for Kubernetes to the LiteSpeed Web ADC.

    The LiteSpeed Web ADC has been available for over 10 years and is a mature, stable product. Supporting lots of cutting edge features, including built-in Web Application Firewall, Zero configuration application specification and more, it is well suited for the Kubernetes environment.

    Kubernetes is an open-source system for automating deployment, scaling, and management of containerized applications. Originally written by Google to solve their problem of scaling backends, Kubernetes takes containerized applications, usually containerized by Docker, and deploys them into pods which are simply one or more containers, instantiated. This is done using Kubernetes deployments, services, and ingresses. An ingress exposes the application container to a load balancer which then exposes it to the internet.

    So many applications can run in Kubernetes without any modifications at all, but not a load balancer. A load balancer needs to know what’s happening in Kubernetes. A Kubernetes administrator generally spends their full time administering Kubernetes. Thus a Kubernetes-aware load balancer needs two components:

    • A Kubernetes application. This continually monitors Kubernetes for changes to definitions and reacts to them.
    • A conventional load balancer. This can spend its time doing the job of servicing requests from the internet and routing them to the correct containerized backend.

    The two must coordinate their activities so that the conventional load balancer can react to changes in Kubernetes definitions.

    The Kubernetes-aware program needs to be written in the programming language Go, and spend the bulk of its time monitoring Kubernetes itself.

    Kubernetes Support in LiteSpeed Web ADC
    We determined that since the load balancer component is busy monitoring the internet and backends and routing traffic between them, this was the ideal place for the existing LiteSpeed Web ADC controller.

    ZeroConf + Helm

    The LiteSpeed Web ADC controller already had a feature which allowed external programs to modify its configuration: ZeroConf. With ZeroConf, the Go program can monitor ingress definitions and when it sees a change, use ZeroConf to apply that change to the load balancer.

    Kubernetes is all about containers so the load balancer and Go program are all packaged into a single container for distribution. One of our early goals was to make it easy to use our load balancer. There are a number of load balancing solutions already available on the market, and we wanted to make transition to ours as easy as possible.

    Fortunately, Kubernetes has a tool named Helm, which eases distribution and installation of containers:

    • We created a Helm chart, which is a complex specification about how to deploy an application, and posted it to our GitHub repository.
    • You tell Helm to install our chart, and it does the work of downloading the container and fitting it into your Kubernetes environment.

    If you have Kubernetes, you probably are already using Helm.

    To support Kubernetes some changes were made to the ZeroConf interface, but ZeroConf remains backwards compatible. Note that since both the load balancer and the Go program are distributed as a pre-built container, there are never incompatibilities between the Go program and the load balancer. They are always distributed in the same container.

    Plus, our ZeroConf tool continues to benefit as new features are added with Kubernetes in mind, as these features may be applicable to other users needing API control of the load balancer. All of these changes are fully documented.

    Advantages of the LiteSpeed Ingress Controller
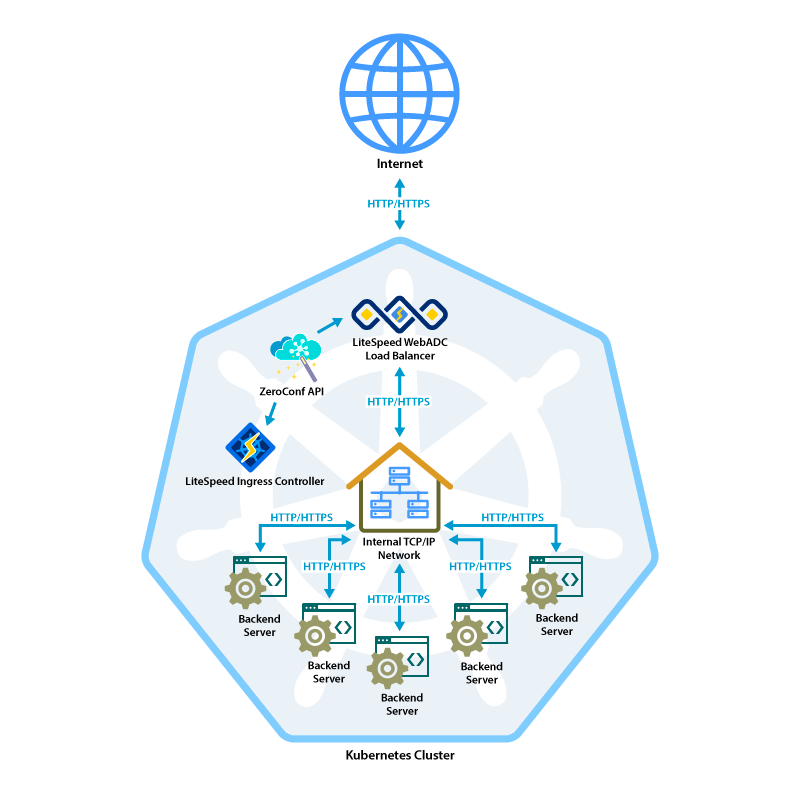
     

    LiteSpeed Ingress Controller for a Kubernetes Cluster

    Kubernetes uses an ingress to make deployed pods of containers available to the load balancer so they can be exposed to the internet. To recognize traffic which must be routed by our load balancer, you add an annotation which we can recognize to your ingress specification. This is the only specification you need to use our load balancer. And if you want, you can set up Web ADC as the default load balancer and avoid any specifications at all. Since we can recognize traffic destined for our load balancer, you can run multiple load balancers – even from different vendors – and LiteSpeed will stay out of their way.

    When compared to the free versions of similar controllers, there are a number of advantages to the LiteSpeed Ingress Controller:

    • Web admin interface. Besides the Kubernetes controller commands available with kubectl, the LiteSpeed ADC WebAdmin Console is available with real-time stats.
    • High speed, low drag WAF (web application firewall) which uses ModSecurity rules and templates to ease implementation.
    • ZeroConf Ingress management, which removes the need to restart the load balancer to apply Kubernetes changes.
    • Easy Helm installation with full 24-7 support.
    • Seamless integration with the LiteSpeed WebADC engine for load balancing.
    • Native ingress support, with no sidecars or Kubernetes modifications required.
    • Automatic ConfigMap management. No need to manage Kubernetes ConfigMaps.
    • Advanced red/blue and canary routing without the need for special Kubernetes changes.

    Security

    Web ADC's ModSecurity Implementation

    Security is an important part of any internet connected device, so our load balancer is heavily security aware. HTTPS is the heart of the secure internet, encrypting data and guaranteeing its proper authorization using certificates. Kubernetes stores certificates in an internal structure known as a “secret.” Our Go program is able to extract these secrets and fortunately, ZeroConf supports certificates on a per-domain basis. The certificate verification is done at the load balancer level, which relieves the backend machine of having to manage them. It even allows the communication between the load balancer and the backend to be HTTP if you wish.

    Also, Kubernetes has an open source cert manager that is recommended in large environments. Due to our Go program’s ability to access secrets, we are able to utilize it.

    By default, if there is a certificate for an ingress, traffic will be redirected to HTTPS. But we recognized that to be flexible, we would need to be able to deny or redirect HTTP traffic by ingress (through annotations) or system-wide.

    We also decided that we needed to be able to recognize specific ingress definitions and support HTTPS-only traffic on those pods. Thus we added support for individual ingress annotations that enforce HTTPS-only traffic, and we added support for enforcement, or the lack of enforcement, at the overall level.

    WAF

    The most advanced security feature in the LiteSpeed load balancer is the Web Application Firewall (WAF) which uses ModSecurity rules and works with the standard rule sets like OWASP or Comodo.

    We recognized that the WAF was a critical feature for the Kubernetes Load Balancer. Fortunately, ZeroConf had the perfect mechanism: templates.

    Templates must be configured at the startup of the load balancer. To enable easy configuration of templates, you can optionally expose the LiteSpeed Web ADC configurator. It defaults to port 7090 and is disabled by default.

    Enabling that port makes the configurator available, along with the rest of the WebAdmin console. The generalized interface for saving configuration information in Kubernetes is ConfigMaps. The Go program monitors file writes, which are generated when you save configuration changes in the WebAdmin interface. When a file write to the configuration directory is performed, it saves the file as Kubernetes ConfigMaps. Similarly deletions are monitored, so the ConfigMap is deleted when the file is deleted. And to complete the cycle, ConfigMaps are automatically re-loaded on load balancer startup.

    Additionally, files written to the configuration directory configmaps in the load balancer pod are also saved to ConfigMaps. This gives you a mechanism to persist configuration information, including complex ModSecurity rule files.

    Thus you do not need to be aware that ConfigMaps are used. They are managed when you perform configuration and startup.

    So you can create a template which specifies, say, the Comodo ModSecurity rules, and applies them to some or all of the inbound traffic to your Kubernetes cluster. And you can do it all through the addition of a single annotation to your ingress specifications.

    As a bonus, when you activate the configuration, the real-time stats feature becomes available. It can be quite useful in monitoring traffic in your cluster.

    Control

    Typically in Kubernetes there are three points of control of the load balancer:

    1. Command line parameters when it is started. These are set as helm parameters. It was our goal to offer a large range of these so that the load balancer could be tailored for the needs of specific user environments. Useful defaults are chosen such as 80 for HTTP and 443 for HTTPS,
    2. Ingress definitions. These are architected within Kubernetes and as a design requirement, we had to meet the needs of all of the features documented there including dynamic modification. These include path types, host name wildcards, and fan-out by paths, A part of Ingress definitions may be annotations, simple text controls by ingress, and LiteSpeed needs to utilize them as a control mechanism.
    3. Configuration. Application configuration In Kubernetes is generally done using ConfigMaps. And as you see above, these are managed without any explicit user interaction.

    Advanced Routing

    Ingress Controller Advanced Routing

    Making the load balancer easy to live with is a continuing goal. The Kubernetes ingress specification helps with this by supporting wildcards in domain names, and paths including both prefix and exact specifications for fan-out routing.

    The load balancer also adds support for regular expressions in paths. Thus you can route by path wildcards. For example you could specify /gr[ae]y which would route traffic for /gray and /grey in one specification. Since the regular expression facility is rich, this allows all sorts of imaginative control.

    As part of regular expression, there is also a rewrite-target specification which lets you modify the input specification to a replaceable parameter. For example, you could specify a path of /something(/|$)(.*) and a rewrite target of /$2. This asks the load balancer to only rewrite the second wildcard specification, the first being (/|$), and the second being (.*), which is the generic match-all wildcard spec. Thus, if /something/new is received, it would fail the first wildcard, match the second and be routed to the backend using /new. While this is complex to get your hands around, it allows a huge amount of control and flexibility in routing requests to backends you may not have much control over.

    Red/Blue and Canary Routing

    When you have a new containerized image to deploy you can indeed just patch the deployment and do a RollingUpdate to force it out. The Kubernetes documentation has examples that show how to do it.

    However, you might want to try it out on a subset of users. Say, give it to 10% of your user population and see if there are problems. This is typically described as a “canary” deployment. You might want to increase the percentage until most users are using it. Then, pass over control completely to the new group.

    Or you may want to set up the deployment, and swap it over knowing you can swap it back quickly. That’s a “red-blue” deployment.

    The LiteSpeed Ingress Controller supports both. And it does it using standard Kubernetes objects, no extensions or sidecars required.

    We recommend that you set it up in advance and give it a try. However, you can patch it in for immediate deployment if you wish.

    The technique uses the fact that you can configure an ingress with two paths or definitions with different names and different service definitions. Then you use an annotation to describe which one is to get traffic based on the name and a weight. A weight is a percentage of traffic that goes to a given name. Once you have set it up you can use a single kubectl command to change the routing from red to blue, add a canary, or change the level that canaries are being routed.

    To further simplify the deployment process, regular expressions are supported in the annotation.  They can be used to specify multiple domains or services in a single definition.

    The Future of Kubernetes Support for LiteSpeed Web ADC

    We see Kubernetes as a strategic platform so it is a work in progress with new features announced regularly. LiteSpeed Ingress Controller is currently in beta. If you try it, please contact us with any questions, difficulties, or feedback. Our development team is committed to providing interesting and unique ways that the evolving world of Kubernetes can be put to use in your environment.


  • The New Failover Strategy for Web ADC

    The New Failover Strategy for Web ADC

    Failover Strategy with LiteSpeed Web ADC

    LiteSpeed Web ADC is a high-performing HTTP load balancer and application delivery controller. Load balancing optimizes response time by efficiently distributing incoming traffic across a cluster of backend servers. There are a variety of strategies that can be used to determine the optimal server for a task’s delegation, including Web ADC’s new strategy: Failover.

    Web ADC Load Balancing Strategies

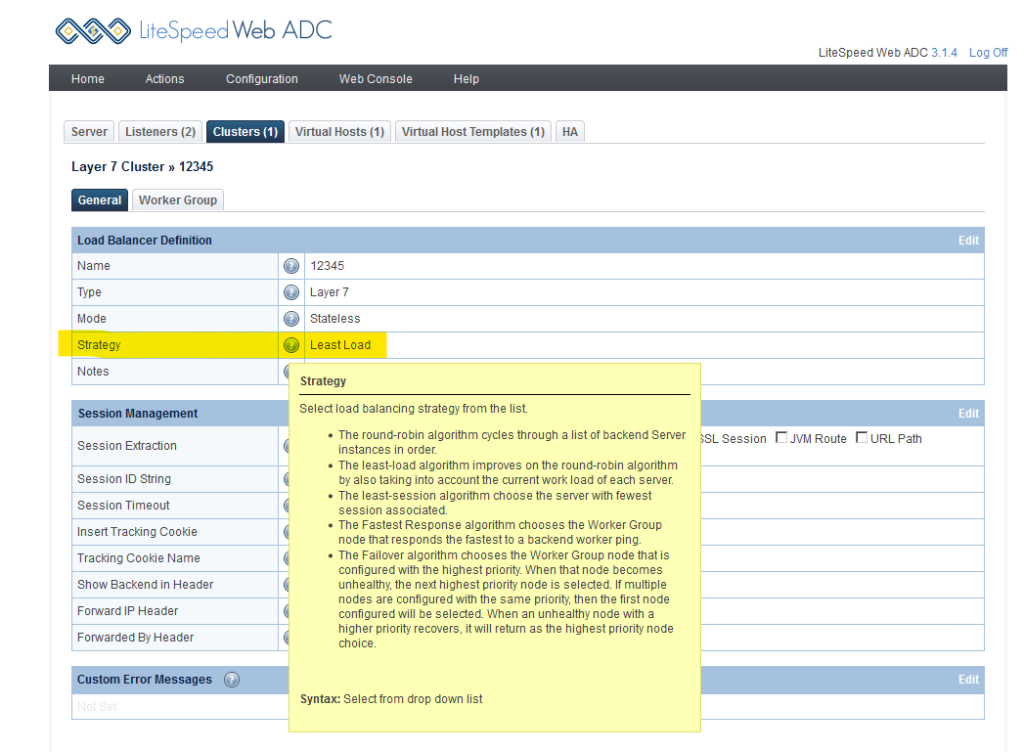
    LiteSpeed Web ADC provides five load-balancing strategies to choose from. These algorithms define how the backend servers should be used by the ADC when distributing requests.

    The first four of these, you may already be familiar with:

    • Round Robin: Cycle through a list of backend server instances in order
    • Least Load: Choose the server with the lightest current workload
    • Least Session: Choose the server with the fewest associated sessions
    • Fastest Response: Choose the server that responds fastest to a backend worker ping

    And the new strategy:

    • Failover: Always choose one primary server, and switch to one of the backups, only if the primary server fails

    The New Web ADC Failover Strategy

    Let’s talk more about the new Failover strategy. You assign priorities to each backend server, and the Failover algorithm chooses the one with the highest priority. If that node becomes unhealthy, the node with the next highest priority is selected. Once the higher-priority node recovers, it is put back into rotation with its original priority restored.

    It’s worth noting that this load balancing strategy is not really about balance at all. In Web ADC’s other four strategies, the idea is to share the load among all backend servers in a way that does not overwhelm any one of them.

    But Failover is not about sharing the load. It is about making sure there are fallbacks in place to keep data highly available.

    Example

    Let’s compare the Failover strategy with Round Robin, to see how requests are distributed under normal circumstances, and in the situation where a server fails.

    We have three backend servers:

    1. Highest priority
    2. Medium priority
    3. Lowest priority

    Here’s how the Round Robin and Failover strategies would distribute six requests (1,2,3,4,5,6), each from a unique IP:

    • Round Robin: A, B, C, A, B, C
    • Failover: A, A, A, A, A, A

    What if Server A went down, was unavailable for the fourth request, and did not recover?

    • Round Robin: A, B, C, B, C, B
    • Failover: A, A, A, B, B, B

    What if Server A failed on the fourth request, but had recovered in time for the sixth?

    • Round Robin: A, B, C, B, C, A
    • Failover: A, A, A, B, B, A

    How to Change Web ADC’s Load Balancing Strategy

    Configure Load Balancing Failover Strategy

    You’ll find the load balancing strategies in general cluster configuration.

    In LiteSpeed Web ADC’s WebAdmin Console, navigate to Clusters, and Edit the cluster you want to change. Then, in the General tab, click Edit and select your desired Strategy from the drop-down list. Save your changes, and restart Web ADC.

    NOTE: Strategy configuration is available for ZeroConf, but it is not yet possible to specify a priority per backend server. We’re planning to add this functionality, though, and we’ll let you know when it’s ready!

    Conclusion

    Different organizations have their own uses and requirements for having a proxy like Web ADC in front of their application servers. Maybe the backend is very heavy (like for a Magento store), or the site is exceptionally busy. In both of these cases, multiple backends help support the load and keep the site available.

    Web ADC’s new Failover algorithm provides confidence for you, and uninterrupted service for your visitors. In the event of primary backend server failure, Web ADC delivers requests seamlessly to the other servers, and keeps your data highly available.

    Don’t have LiteSpeed Web ADC yet? Then try it for free!

  • Protocol Switching with Web ADC 3.0

    Protocol Switching with Web ADC 3.0

    Protocol Switching with Web ADC 3.0

    Web servers and web browsers rely on HTTP to communicate with each other. The HTTP protocol in use on the web today may be one of three versions (HTTP/1.1, HTTP/2, or HTTP/3) and not all browsers or servers support all three versions.

    LiteSpeed Web ADC v3.0 has the unique ability to proxy requests across all HTTP versions, providing end-to-end HTTP/3 for backend servers that support it.

    Because it can support all versions as both a server and a client, our ADC acts as a bridge between disparate technologies. This enables us to upgrade requests from HTTP/1 to HTTP/3 for backend servers that support HTTP/3, or to downgrade requests from HTTP/3 to HTTP/1 or HTTP/2 for backend servers that cannot. This provides maximum flexibility and optimal performance regardless of backend infrastructure.

    What is LiteSpeed Web ADC?

    LiteSpeed Web ADC is a high-performing HTTP load balancer and application delivery controller. It is a 100% software solution, meaning it can operate anywhere: private dedicated hardware, hosted environment, or the cloud, and can act as proxy to any type of backend web server (LiteSpeed, Apache, nginx, etc.).

    How Protocol Switching Works

    Browser to Web ADC

    Browser connections to the ADC work much as they would with any other server.

    The Initial connection is an HTTP/1 SSL connection. This may be negotiated to HTTP/2 during the SSL handshake, and further upgraded to HTTP/3 once the browser processes the ADC response headers. All LiteSpeed web serving products can handle all versions of HTTP requests. So, whether the connection is via HTTP/1, HTTP/2, or HTTP/3 mainly depends on what the browser can support.

    Web ADC to Backend Server

    Here is where LiteSpeed Web ADC differs from other proxies.

    When the ADC is unable to serve a request on its own and must retrieve a page from a backend web server, the ADC takes on the role of client. Then, the same process as above is played out between the ADC and the backend server. The ADC negotiates a connection via HTTP/1, HTTP/2, or HTTP/3 depending on what the backend server supports.

    No other proxy supports HTTP/3 connections to the backend servers. Many proxies don’t support HTTP/2 either. But LiteSpeed Web ADC provides support for all modern HTTP versions, along with all of the benefits that entails.

    Why it Matters

    LiteSpeed Web ADC has the ability to switch between HTTP protocol versions depending on the capabilities of the frontend browser and the backend servers. This interchangeability offers the maximum flexibility between infrastructures. Plus, it enables us to multiplex both the frontend and the backend, and support end-to-end HTTP/3. That leads to better performance all around.

    Get a trial license, and take LiteSpeed Web ADC 3.0 out for a spin today!

  • BBR Control in QUIC and HTTP/3

    BBR Control in QUIC and HTTP/3

    BBR Congestion Control in QUIC and HTTP/3

    BBR congestion control is now available for LiteSpeed QUIC and the upcoming HTTP/3.

    The newly released LiteSpeed Web Server 5.4.2, Web ADC 2.6.0, and OpenLiteSpeed 1.6.1 use BBR congestion control for QUIC connections. BBR (which stands for Bottleneck Bandwidth and RTT) is a new congestion control algorithm developed by Google in the last few years. It features several profitable properties.

    Resistance to Loss

    The main idea behind BBR is that packet loss may not mean that there is congestion in the network. For example, a packet may be lost due to transient radio interference. Cubic and other congestion-based algorithm do not distinguish between such spurious losses and real congestion, reducing their send rate in both cases. BBR, on the other hand, is not so easily spooked.

    As a result, BBR can deliver sustained throughput performance even in the face of suboptimal network conditions.

    Minimal Latency

    Bufferbloat has been the bane of good UX for years. Since the problem was identified and alarm sounded, there have been changes to network infrastructure equipment to avoid buffering too much data. Nevertheless, the fact remains: Cubic will try to fill the bottleneck buffer on the network path, increasing connection latency. A study of 4G LTE networks reveals that to mask packet loss, buffers are used extensively, thereby inflating RTT.

    BBR keeps track of the bottleneck bandwidth and periodically tests for minimum round-trip time. These estimates are used by the sender to avoid filling the bottleneck buffer. With BBR, an interactive web application is more likely to be responsive.

    Drawbacks

    Despite its terrific advantages, BBR is not without problems. It performs poorly when there are shallow buffers on the path and it may not be fair to other flows, claiming most of available bandwidth. These issues will be addressed in BBRv2, which is being actively developed at Google.

    Test Results

    Throughput Under Loss

    To compare BBR to Cubic, I set up a pre-release build of LSWS 5.4.2 and conducted a few experiments downloading a static file from the web server using the LiteSpeed QUIC client. The bottleneck was set up on the client side using netem and ifb.

    Rate (MBit/sec) Delay (ms) Loss (%) Cubic (sec) BBR (sec)
    20 25 0 4.5 4.5
    20 25 0.5 6.7 4.6
    20 25 1 8.6 4.6
    20 25 2 14.3 4.7
    20 25 3 17.6 4.7

    Table 1: Time to transfer 10 MB file, in seconds

    It is evident that Cubic is very sensitive to packet loss, while BBR is not.

    Latency

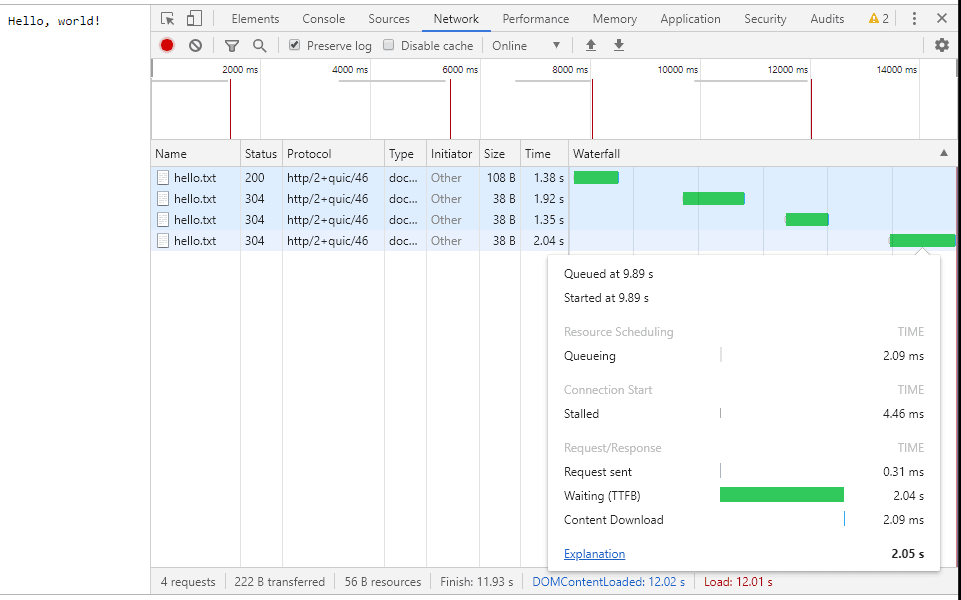
    To test the difference in latency between Cubic and BBR, we set up a simple website with three resources: an HTML page with links to two files: one large and one tiny. The bottleneck was set up to have 20 MBit/sec bandwidth and 25 ms delay with a large buffer. The user clicks on the large file and it begins downloading. The user then clicks on the small file. When Cubic is used, it takes one to two seconds to download the small file:


    Figure 1: Downloading small file when server uses Cubic

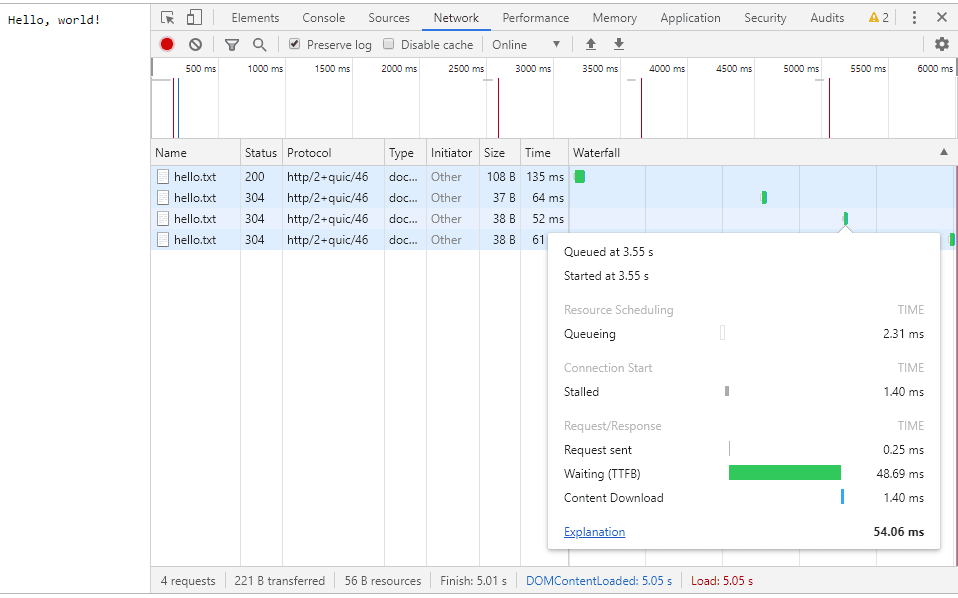
    This is because Cubic tries to fill the intermediate buffer. BBR, on the other hand, keeps the bottleneck buffer filled “just right” so that downloading a small file take on the order of RTT:


    Figure 2: Downloading small file when server user BBR

    BBR Congestion Control in QUIC and HTTP/3

    BBR is a novel congestion control technology. It has two advantages over the widely-deployed Cubic congestion control: insensitivity to random loss and low latency. With LiteSpeed, you can take advantage of this technology today to power your server’s Google QUIC and HTTP/3 connections.

    As Google evolves BBR, we will continue to support the most recent stable version.

  • LiteSpeed Powers Most QUIC Sites!

    LiteSpeed Powers Most QUIC Sites!

    LiteSpeed Powers Most QUIC Sites

    Back in July, we announced that we would be supporting the QUIC internet protocol in our web server products. Today, a mere five months later, LiteSpeed powers most QUIC sites: more than 97% of them, to be exact!

    According to W3Techs:

    LiteSpeed Powers Most QUIC Sites Tweet via W3Techs

    Wow!

    As of this writing, 0.5% of the web is currently QUIC-enabled, and most of those sites are running a LiteSpeed server!

    We love seeing statistics like this. It means our energy is well-spent, and our efforts to champion widespread adoption of QUIC so far have not been in vain. We will continue to help QUIC usage climb in 2018!

    This kind of thing is in our blood. We deliver cutting-edge technologies and work towards seeing them widely adopted. We did it with HTTP/2, and before that, it was SPDY. It’s what we do: Internet. Accelerated.

    So how can you get in on the QUIC action if you haven’t already? Get yourself a trial license, and Install LiteSpeed Web Server. QUIC will be enabled by default. All you need to do is open UDP port 443. It doesn’t get much easier than that.

    We’ve been writing a lot about QUIC lately, so be sure to check out some of the other articles here on the blog, if you’d like to know more.

  • WpW: Brute Force Attack Protection

    WpW: Brute Force Attack Protection

    Welcome to another installment of WordPress Wednesday!
    Today’s Topic: Brute Force Attack Protection for WordPress

    Disclaimer: The information contained in this post is accurate for LSWS v5.2.3 [release log]. If you are using a newer version of LiteSpeed Enterprise, some details may have changed. Please refer to our wiki for the latest!

    This week we are going to talk about brute force login attacks, and what you, as a site admin or hosting provider, can do to protect your WordPress site(s). Usually our WPW posts involve our popular cache plugin, but this week it’s all about the web server. You don’t need to be running LSCache for WordPress in order to benefit from LiteSpeed’s WordPress Protection. You only need a LiteSpeed Enterprise server or LiteSpeed Web ADC.

    What is a Brute Force Login Attack?

    During a brute force login attack, the attacker attempts to gain access to a website by repeatedly trying to guess a valid username and password. WordPress, being the most popular CMS, often finds itself the target of such shenanigans, and without any built-in protection, a third-party solution is needed.

    Enter LiteSpeed.

    Starting with version 5.2.3, LSWS has a built-in WordPress protection system. It covers shared hosting WordPress environments against large-scale brute force attacks. Such attacks usually target the wp-login.php and xmlrpc.php pages via POST, and have the potential to bring down entire servers!

    How Brute Force Protection Works

    So how, exactly, does LiteSpeed protect your WordPress sites? We’ve got you covered through a new directive known as WordPressProtect.

    The directive

    This directive may be used at the server level, the virtual host level, or the individual site level via .htaccess.

    Usage: WordPressProtect [off|on|drop|deny|throttle, ] <limit>

    Examples:

    • WordPressProtect drop, 10 – drop the connection after 10 login attempts.
    • WordPressProtect throttle, 20 – throttle the connection after 20 login attempts.
    • WordPressProtect 12 – after 12 login attempts, take the preferred action.

    The drop, deny, and throttle parameters configure how the server is to react when the login limit is reached. By default, the connection will be throttled, however you may choose to drop the connection directly without any reply, or to deny the connection with a 403 response.

    The login <limit> is the maximum number of wp-login.php and xmlrpc.php login attempts allowed within 5 minutes before the desired action is taken. Possible values are integers between 5 and 1000.

    Values higher than 1000 will be treated as 1000, and values lower than 5 will be treated as 5, with two exceptions:

    • 0 is the same as off. It disables WordPress Protection.
    • 1 is used at the virtual-host level to indicate that the server-level setting should be honored.

    The quota system

    The login limit is used to drive a quota system as follows:

    • The quota starts at the specified login limit.
    • Each POST attempt decreases the quota by 1
    • Once the quota reaches half of the limit, the IP will be throttled, slowing more as the quota drops further.
    • When the quota reaches 0, the IP is either throttled, denied, or dropped according to the settings.

    A blocked IP, given time or a restart, may be redeemed:

    • Over the course of 5 minutes without further POST attempts, the quota gradually increases back to the set limit.
    • Restarting LiteSpeed Web Server will reset the quota back to the specified login limit.

    Examples

    • Assume the limit is set to 10, and the preferred action is to drop.
    • After the first POST attempt, the quota is decreased to 9.
    • When there are more than 5 attempts within a short period of time, the IP will be throttled.
    • Once the quota reaches 0, the client will be dropped.
    • Every 30 seconds, if there are no further POST attempts, the quota will increase by 1. (Why 30 seconds? 5 minutes divided by 10 [the limit] = 30 seconds)


    • Assume the limit is set to 300, and the preferred action is to deny.
    • After the first POST attempt, the quota is decreased to 299.
    • When there are more than 150 attempts within a short period of time, the IP will be throttled.
    • Once the quota reaches 0, the client will be denied with a 403 response from the server.
    • Every second, if there are no further POST attempts, the quota will increase by 1. (Why every second? 5 minutes divided by 300 [the limit] = 1 second)

    Why Use LiteSpeed’s WordPressProtect?

    Security-conscious site admins have been protecting themselves with various WordPress plugins since the first time somebody got hacked. And while plugins have their place, nothing beats the speed and efficiency of stopping attackers at the server level.

    To that end, some use the mod_security WAF, but it can be slow. LiteSpeed’s WordPressProtect feature is fast.

    There are a few scenarios where WordPressProtect will not activate:

    • If you are using deny from all in .htaccess for your WP login page, a 403 is immediately returned when access to that page is attempted. WordPressProtect is not necessary when all visitors are denied an opportunity for login.
    • Some security plugins employ a tactic of renaming the login page to something that is less easily guessed by potential attackers. If your login page is named something other than wp-login.php, WordPressProtect will not know about it, and the feature will not activate.
    • If the user’s IP is on the trusted list, WordPressProtect will not block or throttle that IP.

    WordPressProtect Logic

    Since you can set up WordPressProtect at a few different levels, it’s a good idea to understand how these settings relate to each other, and which ones take precedence over which other ones.

    WordPressProtect is enabled by default at the server level with login limit 10 in LiteSpeed Web Server v5.2.3 and above. (It is disabled by default in LiteSpeed Web ADC.)

    If you want to change anything, keep these facts in mind:

    • Changing the settings at the Apache-server-level configuration will override the setting for any Apache-based virtual host, but will have no impact on LSWS-native virtual hosts, which can only be controlled by LSWS-native settings.
    • Changing the settings at the Apache-virtual-host level configuration will override the server-level configuration as well as the .htaccess level. This means that the server administrator’s virtual host setting will override the end user’s setting in .htaccess.

    Additionally:

    • No matter how the server level is set, the end user has the ability to enable or disable it through their .htaccess file. In other words, user level overrides server level.
    • However, the end user’s preference does not override the virtual host level, if any setting is specified at that level. This means that if the feature is disabled in the virtual-host-level include file, then any directives in .htaccess will be ignored.

    Here’s a handy chart that will help you visualize the priority rules. Assume A, B, and C refer to different WordPressProtect directives:

    Server Virtual Host User Result
    A not set not set A
    A not set C C
    A B not set B
    A B C B

    Please take a look at our wiki for some concrete examples for setting up WordPressProtect in a cPanel environment.

    Testing

    We ran a test with WordPressProtect set to drop, 10, and these are the results:

    Round:  1  Fail 0.626
    Round:  2  Fail 0.615
    Round:  3  Fail 0.605
    Round:  4  Fail 0.581
    Round:  5  Fail 0.595
    Round:  6  Fail 1.619
    Round:  7  Fail 2.615
    Round:  8  Fail 3.611
    Round:  9  Fail 4.602
    Round:  10 Fail 5.604
    Round:  11 Erro MSG:  ('Connection aborted.', RemoteDisconnected('Remote end closed connection without response',))
    

    You can see that the server is responding fairly quickly for each login attempt until the sixth. At that point, the quota has surpassed the halfway point of the login limit, and so the server is starting to throttle its responses. Each attempt after that gets an even slower response. At the 10th attempt, the quota reaches 0. The server won’t even talk to us for attempt #11.

    We’re locked out until we’ve behaved ourselves for a long enough period of time to regenerate our quota.

    As you can see, this new tool will protect your WordPress sites from relentless login attempts, and the potential drain on your server that such attacks can cause. And of course, the fewer login attempts that are allowed, the less likely the attackers will actually have time to guess a valid login and password combination!

    Upgrade to LiteSpeed Enterprise 5.2.3 today and all of your WordPress installations are automatically protected.


    Have some of your own ideas for future WordPress Wednesday topics? Leave us a comment!

    Don’t forget to meet us back here next week for the next installment. In the meantime, here are a few other things you can do:

  • 2017: The Year in Review

    2017: The Year in Review

    As the year draws to a close, we thought we’d take a moment to look back on our most memorable accomplishments of 2017. It was a year of innovation and growth, and we’re so happy to have had you along for the ride!

    QUIC

    In 2017, LiteSpeed released the first production-grade mass-market QUIC implementation available for the public.

    QUIC is the next generation Internet protocol, and is poised to replace HTTP/2. We introduced QUIC support in LiteSpeed Web Server and LiteSpeed Web ADC in the middle of the summer, and it has been a popular feature among our customers.

    We believe in this technology and so it has been a pleasure to publicly release our open source QUIC Client Library as a way to spearhead widespread adoption of QUIC. Going forward, we are participating in the QUIC standardization process alongside Google, Microsoft, Facebook, and others. Being a part of Internet history is a humbling experience, and we are honored to have a seat at the table.

    If you missed all of the excitement at the time, you can get the facts about QUIC on our website.

    Cache Plugins

    Our popular LSCache module for LiteSpeed Web Server and LiteSpeed Web ADC can be configured through rewrite rules. But the easiest approach is through LSCache plugins that are designed specifically for your web app.

    This year we added the LSCache Module for PrestaShop to our cache plugin family, thereby giving simple cache-management capabilities to LiteSpeed-powered PrestaShops everywhere.

    Additionally, there’s the so-new-it-hasn’t-yet-been-announced LSCache for MediaWiki! Look for more information about that soon.

    It’s always exciting to launch a new cache plugin, but we’ve also been having a blast enhancing one of our existing plugins as well: LiteSpeed Cache for WordPress. Over the course of 2017, this plugin has grown beyond cache management to become an all-in-one WordPress optimization solution. Some users are reporting PageSpeed scores of 100%! The reviews have been overwhelmingly positive, and we thank you for that.

    We’re planning more cache plugins for additional web apps in 2018, so stay tuned for that.

    LiteSpeed Web ADC

    Our Web ADC load balancer features High Scalability, High Availability IP failover, Cross Datacenter Replication, Cache Data Synchronization and out-of-the box acceleration for Magento and WordPress. And this year, we added more bells and whistles, including support for QUIC, BoringSSL, TCP_FastOPN, IP2Location, and SecRemoteRules.

    Additionally, the new ZeroConfig API means you can automate direct third-party management of your Web ADC’s configuration. You’ll be able to replace manual configuration of back-ends and domains using our automated message based interface.

    If you haven’t given our Web ADC a chance, why not get a trial license and play with it for a few weeks?

    CyberPanel

    This year OpenLiteSpeed users got a treat in the form of a shiny new control panel. CyberPanel is the only control panel built specifically for OpenLiteSpeed, and it’s free and Open Source, just like OpenLiteSpeed.

    Web Presence

    Our website got a complete overhaul in April, and we continue to make improvements to it.

    Around the same time, we added two more social media accounts to our online presence – you can now like and follow us on Facebook and Instagram. We share informational links and behind-the-scenes glimpses of our New Jersey office. In just under one year, we have already reached almost 2k followers on Facebook, and we are so thrilled. A huge thank you to all the LiteSpeeders out there. Keep interacting with us and inspiring us! In turn, we’ll continue to post interesting content.

    Speaking of interesting content, 2017 was the year we breathed new life into this blog. Since the introduction of WordPress Wednesday in May, we’ve published more than 30 tutorials and explored key caching concepts in detail. Our Developer’s Corner series has provided an opportunity for our developers to write about their projects from a technical point-of-view. This fall, we kicked off a new series, Notes from the Road, which we used to give you a peek into the QUIC Working Group Meeting in Seattle and the cPanel Convention in Florida.

    We’re loving these ways of communicating with our customers, so look for additional interesting blog and social media content in 2018!

    New Team Members

    This year, our team saw impressive growth. Say hello to 2017’s new faces: Tishu, Wuhua, Usman, Bob, Eric, Hai, Kacey, and Lisa (that one’s me… hi there!).

    All of the members of the LiteSpeed family – those who have been here for many years and those who are relative newbies – are happy to be here, working together towards the goal of an accelerated internet!

    Coming in 2018

    If you know LiteSpeed, then you know we’re never content to rest on our laurels. We’ve got so many more exciting developments to come, including:

    • New LiteSpeed Cache plugins for other popular web apps.
    • An embedded PHP module for OpenLiteSpeed, which will make OLS the fastest PHP server platform!
    • CRIU (Checkpoint Restore In User mode) support for PHP

    And that’s just the beginning! Stick with us in 2018 and beyond and see what’s next!

    From our family to yours: wishing you a happy and healthy New Year!

  • LiteSpeed Announces QUIC Support

    LiteSpeed Announces QUIC Support

    We said it was coming, and now it is here!

    LiteSpeed Technologies is pleased to announce QUIC support!

    As of today, your LiteSpeed-powered sites can be on the cutting-edge with QUIC, via LiteSpeed WebADC and LiteSpeed Web Server.

    What is QUIC?

    QUIC (or, Quick UDP Internet Connection) is an experimental protocol initially developed by Google in 2012, and announced publicly the following year.

    As of mid-2015, roughly half of all requests from Chrome to Google servers were served over QUIC, and Google intended to ramp up QUIC traffic, eventually making it the default transport from Google clients to Google servers.

    QUIC is now in the hands of the IETF, which is working to develop a standard.

    Why use a QUIC Server?

    QUIC is a good choice for those looking to reduce connection-establishment time and improve congestion control.

    QUIC takes a unique approach to classic latency problems. Rather than attempting to solve the issues of packet-loss and long RTT’s (Round Trip Times), QUIC developers have devised new time-saving and resource-saving ways around these issues.

    Connection-establishment

    SPDY and HTTP/2 have made significant progress in improving application performance, but they fail to address the problem of high round trip time. There is a limited amount that can be done to improve RTT, as response time over a network is limited by the speed of light. QUIC sets aside the hard-to-solve question of reducing RTT and instead concentrates on reducing the number of trips that must be taken.

    When establishing a secure network connection with HTTPS, multiple round trips are required. The client and server shake hands and share encryption keys before they ever get around to the initial request. The QUIC approach is to combine some of these steps, which results in a need for fewer trips. QUIC uses UDP (User Datagram Protocol) instead of the ubiquitous TCP, and as such a multi-step handshake process can be stripped down to 1 or 2 steps, depending on whether this is a new connection, or a re-establishment of a known one.

    Congestion Control

    QUIC deals with packet loss more efficiently than HTTP/2. HTTP/2 and TCP rely on consecutive packets, which means the connection is stalled when one packet goes awry. QUIC and UDP, on the other hand, don’t require packets to arrive in order, and as such, one missing packet can’t tie up the entire queue.

    LiteSpeed + QUIC

    LiteSpeed provides the first production-grade mass-market QUIC implementation available for the public. If you want to serve your web content using the QUIC protocol, LiteSpeed is the solution.

    Concerned about user experience? Who isn’t? You gain an impressive edge over your competitors by serving applications over QUIC. Your visitors will love it. Shaving off even a few hundred milliseconds is important when it comes to UX. The site that loads in half a second now could load instantaneously over QUIC!

    QUIC is not a niche product. QUIC support has been enabled by default in all Chrome releases since August of 2013, and recently it was introduced in Opera as well (although it is disabled by default). While it has been widely adopted among Google’s own services, you’re not likely to find QUIC in use much outside of Google space. That is, until now.  Yes, now you can have a QUIC-powered WordPress blog, Joomla site, Magento shop and more.

    If you can serve it from LiteSpeed, you can power it with QUIC!

    QUIC support is built-in to LiteSpeed WebADC 2.1  and LiteSpeed Web Server 5.2.

    We’re energized by this new protocol, and motivated to see what we can do with it, so please stay tuned. And don’t forget to tell us what you think!

    Things to do now:

  • LiteSpeed is powered by QUIC

    LiteSpeed is powered by QUIC

    If you know LiteSpeed, you know our favorite place to be is on the cutting edge. In 2015, we delivered the first HTTP/2 production web server solution for the mass market, and here we are in 2017, doing it again:

    We’ve enabled QUIC on our own website

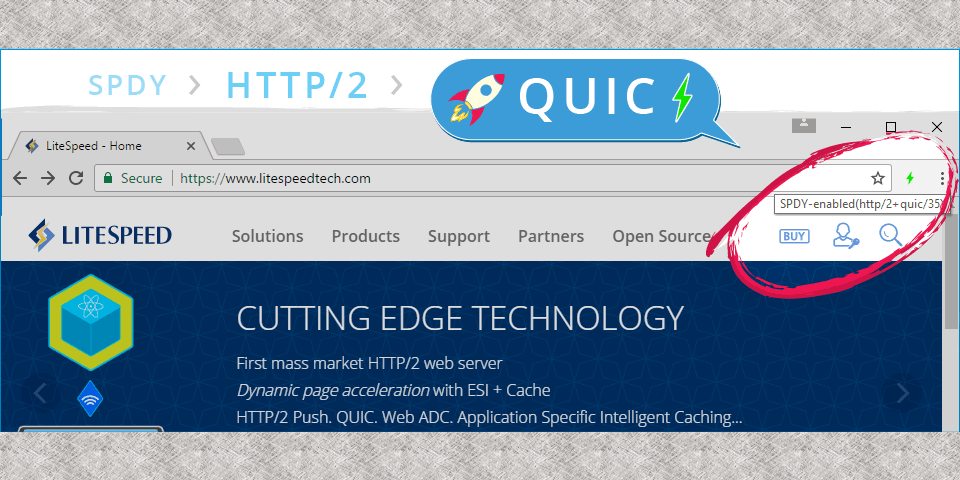
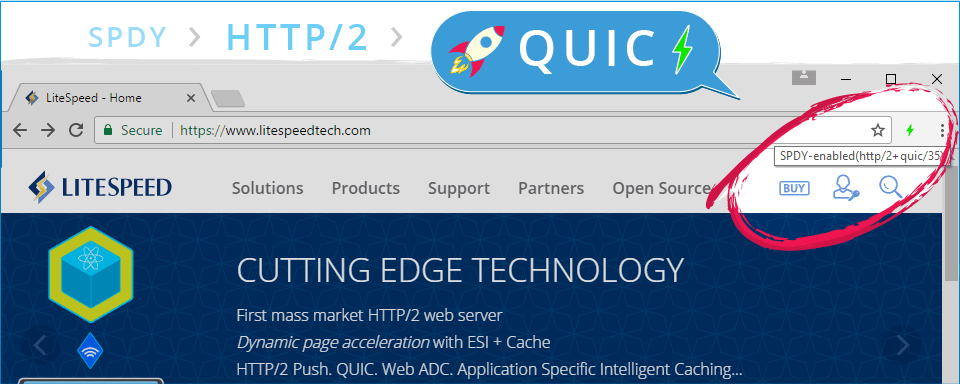
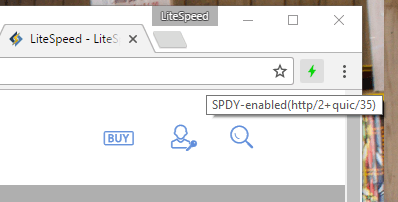
    There’s a Chrome extension which will allow you to see the protocols at work on your favorite websites: HTTP/2 and SPDY indicator by rauchg. Install it, and keep an eye on the little lightning bolt in the Chrome toolbar. Blue indicates HTTP/2 is enabled. Green indicates HTTP/2 + QUIC. And if you hover your cursor over the lightning bolt, you can see a list of enabled protocols for yourself.

    This particular screenshot was captured from our own website. As you can see, we are QUIC-powered!

    What is QUIC?

    The Google-developed QUIC (Quick UDP Internet Connections) protocol is the next-generation web protocol. It takes a new approach to reducing latency by addressing the problems of packet loss and long RTT’s (Round Trip Times). It manages the former through the use of UDP (User Datagram Protocol) vs. the ubiquitous TCP, and then deals with the latter by minimizing the number of round trips between sender and receiver.

    The IETF is currently working on a set of standards, but in the meantime you can learn more about QUIC via Wikipedia.

    QUIC is new, and while support has been widely-adopted among Google’s own services, you’re not likely to find it in use much outside of Google space. Until now, that is!

    Soon you’ll be able to enable QUIC on your site

    QUIC support will be forthcoming in LiteSpeed WebADC 2.1, with LiteSpeed Web Server support to follow. If you’ve got a non-mission-critical server to play with, you can download the WebADC release candidate and give QUIC a try right now!

    We’re pretty motivated to see what we can do with this new protocol, and we will have some exciting QUIC product releases soon.

    Enjoy the next biggest thing of the World Wide Web, today, with LiteSpeed!

    Stay tuned for some benchmarks comparing our QUIC solutions to other implementations out there!

  • Meet Us at WHD.global and HostingCon Global!

    Meet Us at WHD.global and HostingCon Global!

    We are going for a trip around the world! At the end of March, we will be leaving our office in New Jersey, USA, to fly all the way to Rust, Germany, to attend WHD.global in Europa-Park. The second we get back from WHD.global, we will be on the next flight to Los Angeles, California, for HostingCon Global. We would love to personally invite each and every one of you to come visit us at both/either of these wonderful events! (more…)