Tag: vary cookies

  • LiteSpeed Cache v6.0 for WordPress

    LiteSpeed Cache v6.0 for WordPress

    Introduction

    LiteSpeed Cache v6.0 for WordPress is here, and we’ve got a bunch of behind-the-scenes improvements, a few bug fixes, and some nifty new features. You can see the full release log here, but today we’re going to focus on these great new settings and features:

    • The Preload Featured Image setting in Page Optimization > Media
    • The Vary Cookies setting in Cache > Advanced
    • The new Crawler commands for the WordPress Command Line Interface (WP-CLI)
    • Parallel Pull, an improved method of pulling images for Image Optimization

    Preload Featured Image
    When you instruct a browser to “preload” a resource, that resource is added to the front of the processing queue, and is loaded even before the browser begins to render the page. By preloading a resource, you can potentially eliminate it as a render-blocking element.

    You can enable the new Preload Featured Image setting to allow your posts’ Featured Images to be preloaded in browsers that support it. This user-experience enhancement ensures that browsers display your most important image right away, with no waiting.

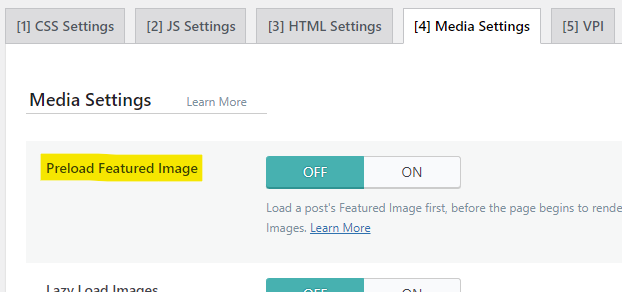
    We’ve disabled this setting by default. To enable it from the WordPress Dashboard, navigate to LiteSpeed Cache > Page Optimization > Media Settings, and set Preload Featured Image to ON.

    NOTE: As of LSCWP v6.2, the Preload Featured Image option has been removed and the functionality folded into the ViewPort Images service. Any image that is detected to be a viewport image for a post is now automatically preloaded.

    Vary Cookies

    Before we talk about the new Vary Cookies setting, it’s helpful to understand the concept of cache varies in general, and the part that cookies play in that.

    LiteSpeed Cache stores and retrieves cache objects using a Cache Key. An optional component of the cache key is the “vary string.” It’s this vary string that allows you to save multiple cache objects from the same URL. This is useful in a number of situations including those where the desktop and mobile views of a page are different, or where the currency displayed on a page varies by the visitor’s geographical location.

    When you instruct the LiteSpeed Cache Engine to vary on a cookie, you are telling the Cache Engine to look for the cookie name, and then create cache varies based on the value of that cookie.

    So, for example, let’s say you have a membership plugin that shows one set of shop prices to members and a different set of prices to non-members, and the behavior is governed by a _member cookie. The cache engine could vary on the value of _member. It would store two copies of your shop page in cache: one for “yes” and one for “no”. Or maybe the cookie has three potential values: “full,” “trial,” and “no.” In that case the cache engine could store three copies of the page.

    LiteSpeed Cache can vary on any cookie you wish, and potentially create a separate version of the page in cache for each value of the cookie.
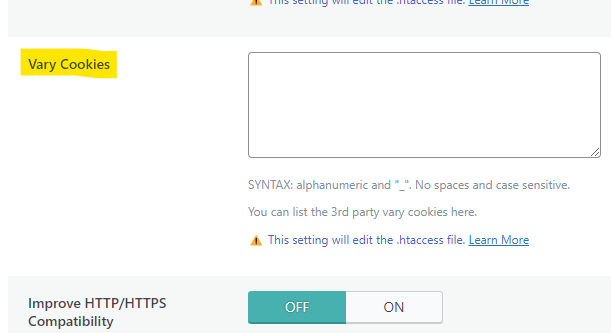
    If you have a situation like this, you can instruct LiteSpeed Cache to vary on any cookie that you wish. Navigate to LiteSpeed Cache > Cache > Advanced and add the name of the cookie to the Vary Cookies setting. If you want to vary on multiple cookies, enter them one per line.

    NOTE: Be careful not to vary on any cookie that uses a unique ID for each user as a value. This can potentially create an infinite number of copies of each page, and that will eat up your cache storage very quickly.

    Why is this new setting a big deal?

    Before Vary Cookies was added to the LiteSpeed Cache plugin, you could have defined some vary cookies for your site with a few lines in the .htaccess file. By adding the setting to the plugin, your defined vary cookies are now passed along to QUIC.cloud CDN.

    This is a big deal, because it means that your cookie-based cache varies exist at the CDN level. No other CDN can serve multiple cached copies of the same page based on a cookie value. But as of LSCWP v6.0, QUIC.cloud CDN can!

    CLI Crawler

    LiteSpeed Cache v6.0 comes with some new commands for the WordPress CLI. Now you can  control the crawler from the command line!

    WP-CLI is accessed with the wp command, and all crawler instructions begin with litespeed-crawler, so a complete WP-CLI crawler command would look like:

    wp litespeed-crawler <instruction> <parameters>
    

    There are five functions available:

    • List: list or l
    • Enable: enable <crawler-id>
    • Disable: disable <crawler-id>
    • Start: run or r
    • Reset: reset

    For more information about the new CLI crawler functionality, and how to use each function, take a look at our documentation.

    Parallel Pull

    Do you use the Priority Line or Jumbo Group power-ups that are available for Image Optimization? If so, you may notice your pulled images sliding back into your WordPress more speedily than they used to.

    This is due to Parallel Pull. Normally, when the cron pulls your optimized images back to your site, it downloads them one at a time. But users of those two power-ups now can expect multiple images to download at one time, potentially decreasing the time it takes to receive a batch of optimized images.

    There is nothing you need to do to enable this behavior. It is on by default when you subscribe to Priority Line or Jumbo Group.

    NOTE: These Image Optimization power-ups have been disabled as of September 1, 2024 in preparation for a new and improved Image Optimization service coming soon.

    Conclusion

    We’re always excited to bring you a new set of features and enhancements, and this release is no different. Install LiteSpeed Cache v6.0 for WordPress today and try it for yourself!!

  • WpW: Conflict-free Cookies and Tags on Multi-app Sites

    WpW: Conflict-free Cookies and Tags on Multi-app Sites

    Welcome to another installment of WordPress Wednesday!

    Today we’re going to discuss the conflicts that arise on multi-app sites, specifically login vary cookie conflicts, and cache tag conflicts. These issues can pop up when you have multiple-WordPress installations with the LSCache plugin enabled on the same root (as in www.example.com/ and www.example.com/store).

    We’re going to be focusing on WordPress for this article, but you can sometimes see these types of conflicts with other apps that have LSCache enabled (Magento and XenForo, for example). If you want to know more about cookie and tag conflicts involving multiple types of applications, this wiki will point you in the right direction.

    Let’s look at a WordPress blog installed at www.example.com and a separate WordPress storefront installed at www.example.com/store. This is our current example, but be aware that the same concepts will apply to any situation where one (or more) WP sites is installed in a subdirectory of any other WP site.

    Here are two possible problems you can have:

    1. Login Vary Cookie Conflict: A page may be served from cache when it shouldn’t be.
    2. Purge Tag Conflict: Pages may be purged from cache when they shouldn’t be.

    Let’s chat about both of these scenarios, what causes them, and how to fix them.

    Mmmmm. Login Vary Cookies.

    Before we explain how to fix this problem, it’s handy to understand how this is all supposed to work.

    As of this writing, LSCache for WordPress will only cache and serve pages for non-logged in users. (Remember this. It’s important.) This behavior is controlled by a vary cookie called _lscache_vary.  Once users have logged in, the cookie is set, and their page requests will always be processed by WordPress. The pages they visit will not be cached, nor will cached pages be served to them.

    You can see why it’s important, then, for the _lscache_vary cookie to be set correctly. It’s the key to determining which users get pages served from cache, and which users get pages through WordPress.

    Ok, so let’s say your domain serves Example Blog at www.example.com/ and Example Store at www.example.com/store/, which is a subdirectory of Example Blog. If you log into Example Blog, the _lscache_vary cookie will be set to indicate that you are logged in, and your requests will not be cached. They will always be sent to the WordPress backend. This is normal behavior.

    You then visit Example Store without logging in. Since you are a non-logged in user, LSCache steps up and caches the page you requested. This is also normal behavior. However, the logged in _lscache_vary cookie is still set from your visit to Example Blog, and so this page is cached for logged-in users . Uh oh. This causes future logged-in Example Store users to get a “cache hit” on this page and be served the non-logged in version of the page. This is decidedly not normal behavior.

    Besides the fact that logged-in users are now being served cached pages (which they should not be), they are being served the non-logged-in versions of those pages (which is also wrong).

    Why does this happen?

    Think about it from the browser’s point of view. As far as the browser is concerned, Example Blog (www.example.com/) and Example Store (www.example.com/store/) are the same website because the store is actually a subdirectory of the blog. When the browser visits either one of those addresses, it will use the cookies for www.example.com.  Even though the store is an entirely separate WordPress application, to the browser it looks simply like a part of the blog.

    How can we fix it?

    We need to tell the browser to use distinct cookies for Example Blog and Example Store. This requires a simple change within the LSCache plugin settings.

    By default, the cache will use _lscache_vary as the login cookie in any WordPress installation. We can avoid conflicts by renaming some of the cookies. Any place where we have one WordPress installation in a subdirectory of another WordPress installation, we will need to set unique cookie names.

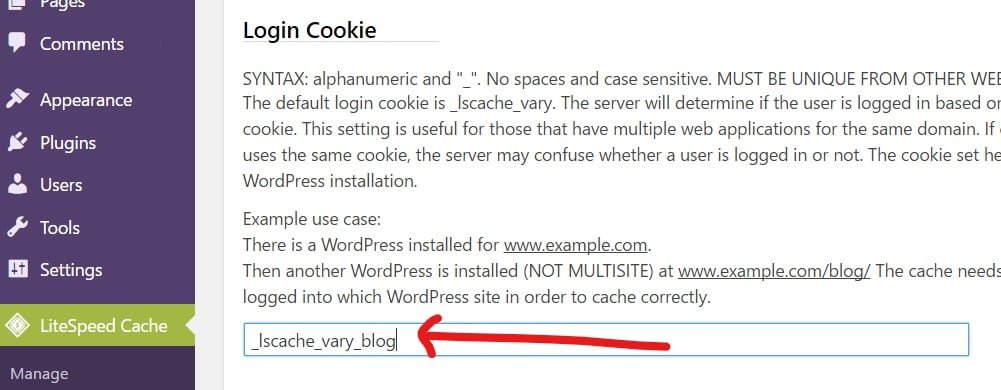
    So for our two-app scenario, you could log in to the WP-Admin panel of Example Blog, navigate to LiteSpeed Cache > Settings > Advanced Settings, and set Login Cookie to _lscache_vary_blog (or whatever you would like it to be).

    You could then do the same in Example Store’s WP-Admin panel and set Login Cookie to something different, like _lscache_vary_store.  (Technically, you don’t need to change both cookie names, because the act of changing just one of them has already given you two unique cookie names. For example, if you only change the cookie on Example Store, you’d have _lscache_vary and _lscache_vary_store.)

    If you had more installations running off of this same root, you’d want to repeat this process for all of them.

    Achievement unlocked: eliminate login vary cookie conflicts!

    Cache Tag Prefix

    September 2017 UPDATE: in the latest versions of LSCache, this is no longer an issue. Cache Tax Prefixes are automatically generated and given a unique string for each installation, thereby eliminating the possibility of conflicts. We’re keeping the information in this section for historical reference, but this is not an issue you should encounter anymore. 

    Here is another problem you may run into when you have Example Blog and Example Store running together on www.example.com: excessive purging of the cache.

    Note: This is not relevant for a single multi-site WordPress install. This issue only occurs in two (or more) distinct WordPress installations that happen to use the same cache root.

    So here’s the issue: LSCache for WordPress has a default cache tag prefix of b1_, and this is the same on every WordPress instance you install. In addition to being a prefix, every page is also cached with the tag b1_ to denote that it belongs to that blog. The cache tag is used to inform LSCache which pages to purge from cache. So, for instance, in a situation where you might want to purge your entire Example Blog from cache, and you press that button, LSCache interprets the command as “purge everything with the cache tag  b1_” and out goes your entire Example Blog cache (which you wanted) and your Example Store cache as well (which you did not want), because it also has the b1_ tag.

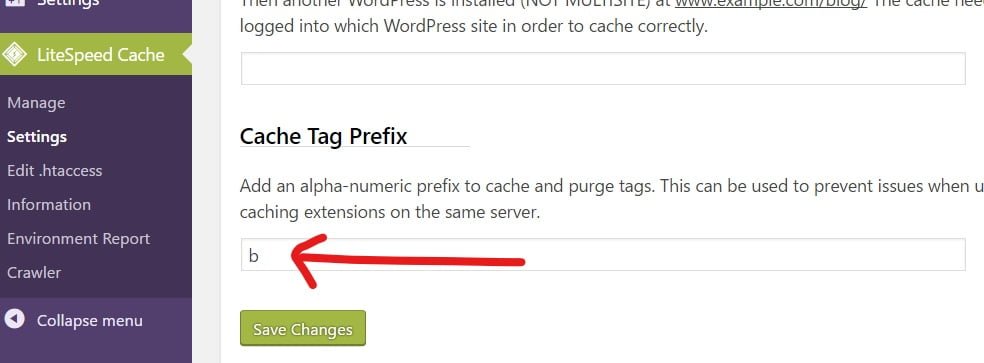
    To solve this, you need to give all of your sites unique custom Cache Tag Prefixes in the same Advanced settings screen as before.

    For Example Blog, you could set it to b, and for Example Store, set it to s. Those strings would then be added to the beginning of the relevant app’s cache and purge tags. A command to purge Example Blog would then be interpreted as “purge everything with the cache tag b_b1_. ”  Example Store would be left alone, because its purge tags begin with s_b1_ .

    Achievement unlocked: eliminate cache purge conflicts!

    In a nutshell…

    Using LiteSpeed Cache on your WordPress (and other) sites can lead to dramatic improvements in performance, so it pays to spend a minute or two working out little kinks like these! For more information on how to deal with cookie and tag issues as they relate to apps other than WordPress, take a look at our wiki articles .

    Have some of your own ideas for future WordPress Wednesday topics? Leave us a comment!

    Don’t forget to meet us back here next week for the next installment. In the meantime, here are a few other things you can do: