Tag: open source

  • QUIC Library Is Now Open-Source

    QUIC Library Is Now Open-Source

    LiteSpeed OpenSources QUIC HTTP/3

    LiteSpeed Technologies is releasing its QUIC and HTTP/3 library under an open-source license. This library, written in the C programming language, contains both client and server logic as well as fully functional example client and server programs to get you started. This is the same code that is used in our flagship LiteSpeed Web Server and LiteSpeed Web ADC products and in the open-source OpenLiteSpeed (OLS) web server.

    The following QUIC and HTTP/3 versions are currently supported:

    • Q039
    • Q043
    • Q046
    • h3-22

    Q039, Q043, and Q046 are versions of the Google QUIC protocol. Q046 is used by the current version of Chrome (Chrome 76). h3-22 is the experimental precursor to HTTP/3, the next-generation HTTP protocol. We will update the library as new gQUIC and HTTP/3 versions are released.

    This library subsumes the LiteSpeed QUIC Client Library which we released two years ago and replaces it on GitHub. The new module is a superset of the original client library.

    We use plenty of open-source tools and libraries. We are happy to contribute back to the community the fruits of our labor: a fully functional, mature, scalable, and robust QUIC library.

    Happy hacking!

    LiteSpeed QUIC Team.

  • WpW: Installing OpenLiteSpeed, WordPress, and LSCache

    WpW: Installing OpenLiteSpeed, WordPress, and LSCache

    WordPress Wednesday: Installing OpenLiteSpeed WordPress and LSCache

    Welcome to another installment of WordPress Wednesday!
    Today’s Topic: Installing OpenLiteSpeed WordPress and LSCache

    So, you want to self-host a WordPress site, and you want to accelerate it with LiteSpeed Cache. That’s great news! LiteSpeed Cache for WordPress can easily be installed through your WordPress Dashboard. However, it requires a LiteSpeed web server in order to function. This guide will walk you through the installation of three free and open source pieces of software: OpenLiteSpeed, WordPress, and LiteSpeed Cache for WordPress.

    When we’re done, you’ll have your own brand new, self-hosted WordPress site, powered by LiteSpeed.

    Please note the versions of everything we are talking about today:

    OpenLiteSpeed: 1.4.28
    WordPress: 4.9
    LiteSpeed Cache for WordPress: 1.6.4

    If you are using different versions of any of this software, your experiences with this tutorial may vary.

    Why OpenLiteSpeed?

    LiteSpeed Cache is a server-level cache. The WordPress plugin provides an easy way for site admins to communicate with the server, but it does not implement any of the caching functionality itself. For this reason, you are required to have a LiteSpeed web server. Without one, the plugin has nothing to talk to.

    You may choose between LiteSpeed Enterprise and OpenLiteSpeed. We’ll be focusing on the latter today, but if you’re wondering which server is right for you, you can compare editions (and take a little quiz, if you like) here.

    Please note: not all LSCache functions are supported by OpenLiteSpeed. If you will be using ESI, for instance, you will need LiteSpeed Enterprise.

    OpenLiteSpeed One-click installation

    ols1clk is a one-click installation script for OpenLiteSpeed. Using this script, you can quickly and easily install OpenLiteSpeed with it’s default settings. By adding different parameters, you can use it to install WordPress and the LiteSpeed Cache.

    Currently one click installation only supports Centos(5-7), Debian(7-9) and Ubuntu(12,14,16)

    ols1clk must be run with superuser access, You can either switch to superuser (root) with the su command or you may run it as root using the sudo command. How you do this will depend upon which distribution you use. Some distributions enable the root user (such as CentOS), while others do not (such as Ubuntu and Debian).

    There are two different one-click methods: Direct Download and Command Line Interface.

    Direct Download

    1. Download ols1clk from GitHub.
    2. Run the ols1clk script on your server command line with ./ols1clk.sh or bash ols1clk.sh;

    CLI Installation

    Run the following from the command line:

    wget --no-check-certificate https://raw.githubusercontent.com/litespeedtech/ols1clk/master/ols1clk.sh; bash ols1clk.sh;
    

    OR, run the following from the command line:

    bash <( curl -k https://raw.githubusercontent.com/litespeedtech/ols1clk/master/ols1clk.sh ) [options] [options] …
    

    The above methods will install OpenLiteSpeed and the lsphp module. For additional options, examples, and a FAQ, see the OpenLiteSpeed wiki.

    WordPress Installation

    Installing OpenLiteSpeed, WordPress, and LSCache

    To install WordPress along with a MySQL database, run the following from the command line:

     ./ols1clk.sh -w.
    

    Answer any prompts within the script and you’re done!

    LSCache for WordPress Installation

    1. Download the LSCWP plugin from our WordPress Plugin Directory page.
    2. Log in to your WordPress Dashboard, navigate to Plugins > Add New and click on Upload Plugin.
    3. Select the LSCWP zip file and click Install Now. Activate the plugin.
    4. Navigate to LiteSpeed Cache > Settings > General and set Enable LiteSpeed Cache to Enable.

    OR

    1. Search for LiteSpeed Cache in the search box. Our plugin should be the first search result to come up.
    2. Press Install Now. Activate the plugin.
    3. Navigate to LiteSpeed Cache > Settings > General and set Enable LiteSpeed Cache to Enable.

    Testing

    Once you have installed LiteSpeed Cache for WordPress, you’ll want to run a few tests to be sure that it’s working as expected.

    You can verify a page is being served from LSCWP through the following steps using your browser’s developer tools:

    Step 1: Open the developer tools on a non-logged-in browser and navigate to your site. Open the Network tab.

    Step 2: Refresh the page.

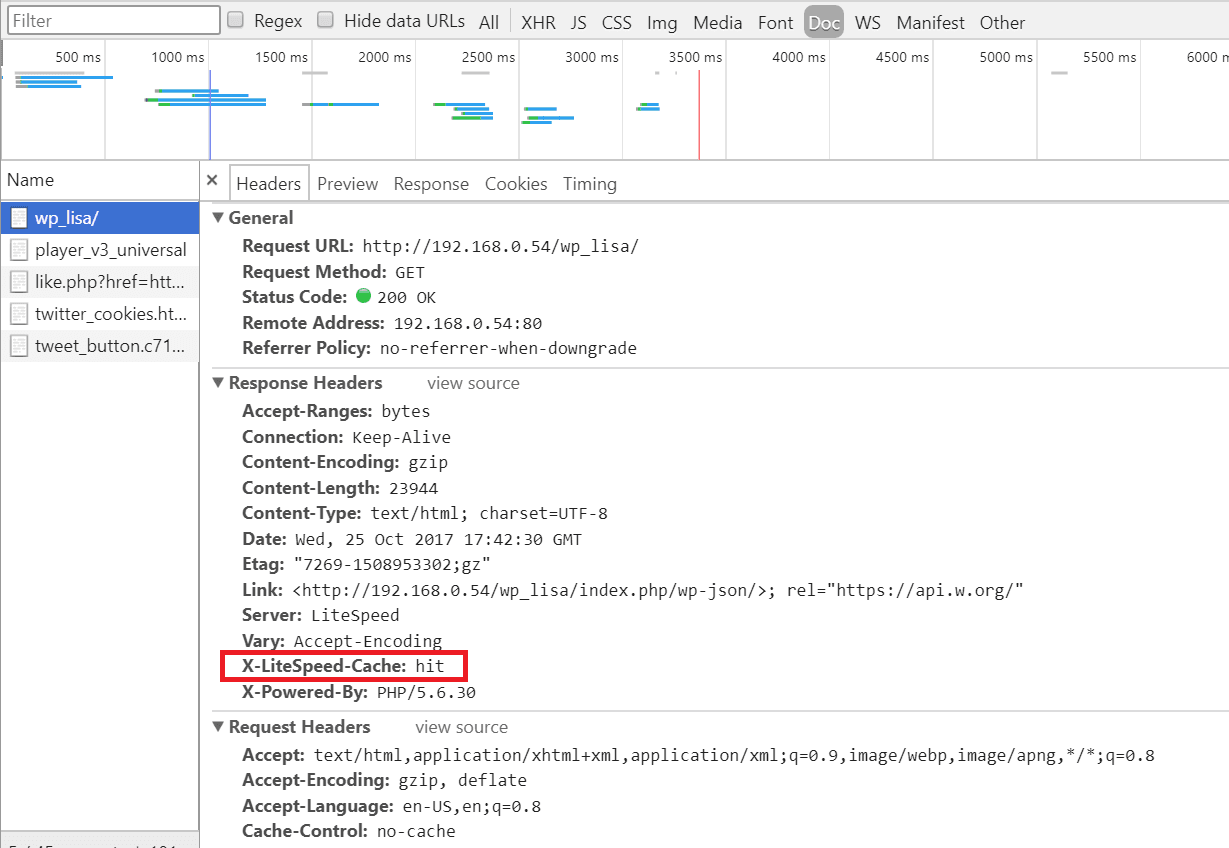
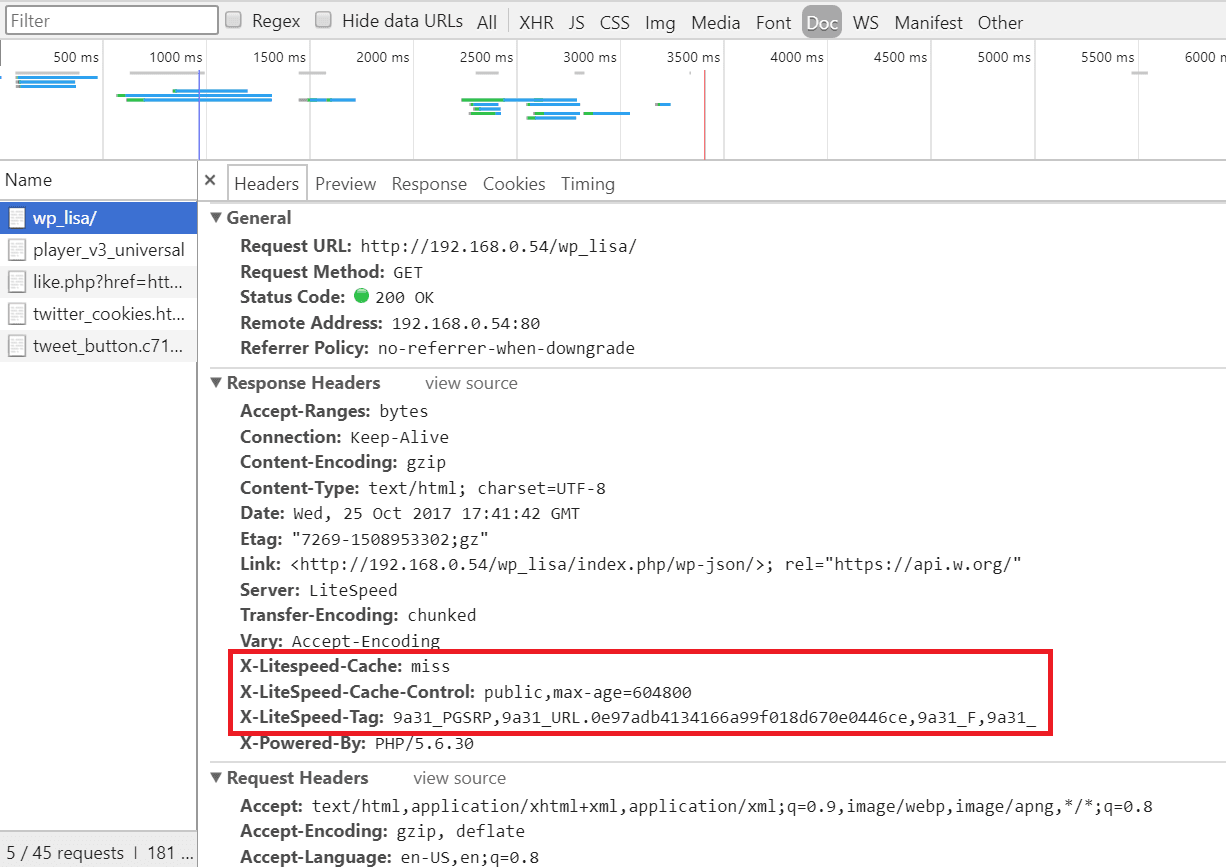
    Step 3: Click the first resource (this should be an HTML file and the resource’s headers should appear as in the image below). For example, if your page is http://example.com/wordpress/, your first resource should either be something like example.com/wordpress/ or wordpress/.

    Step 4: In a different, logged-in browser, in your WordPress Dashboard, navigate to LiteSpeed Cache > Manage and click the Purge All button.
    Installing OpenLiteSpeed, WordPress, and LSCache

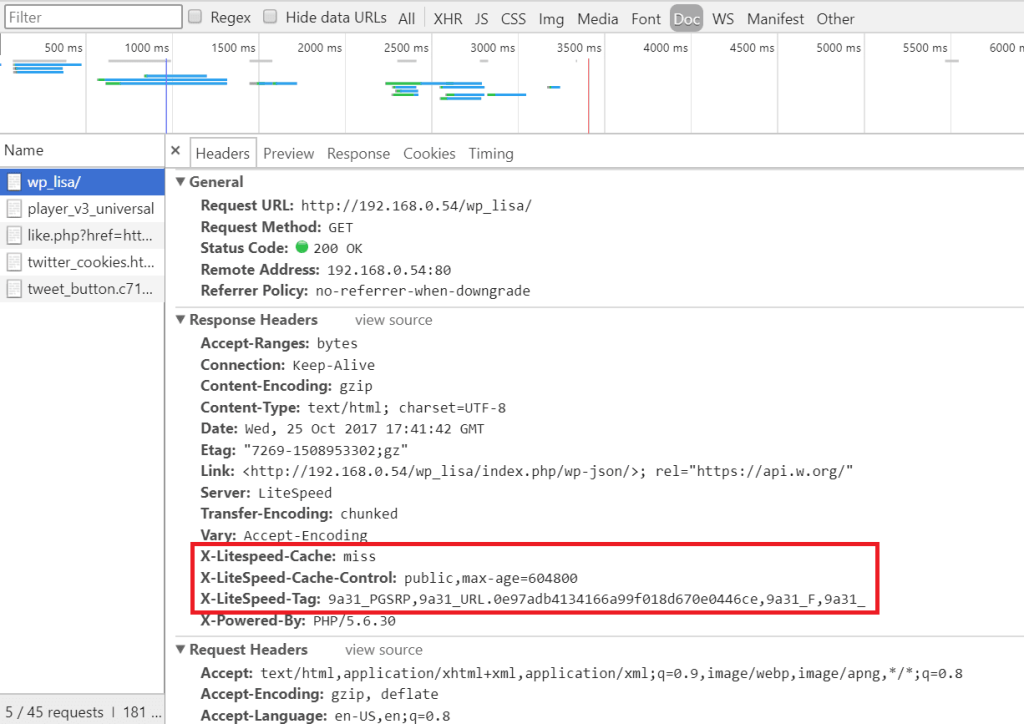
    Step 5: Reload the page in the first (non-logged-in) browser and select the same resource again. If you see headings similar to

    X-LiteSpeed-Cache: miss
    X-LiteSpeed-Cache-Control:public,max-age=1800
    X-LiteSpeed-Tag:B1_F,B1_
    

    (for example), this means the page had not yet been cached, but that LiteSpeed has now stored it for future use.
    Installing OpenLiteSpeed, WordPress, and LSCache

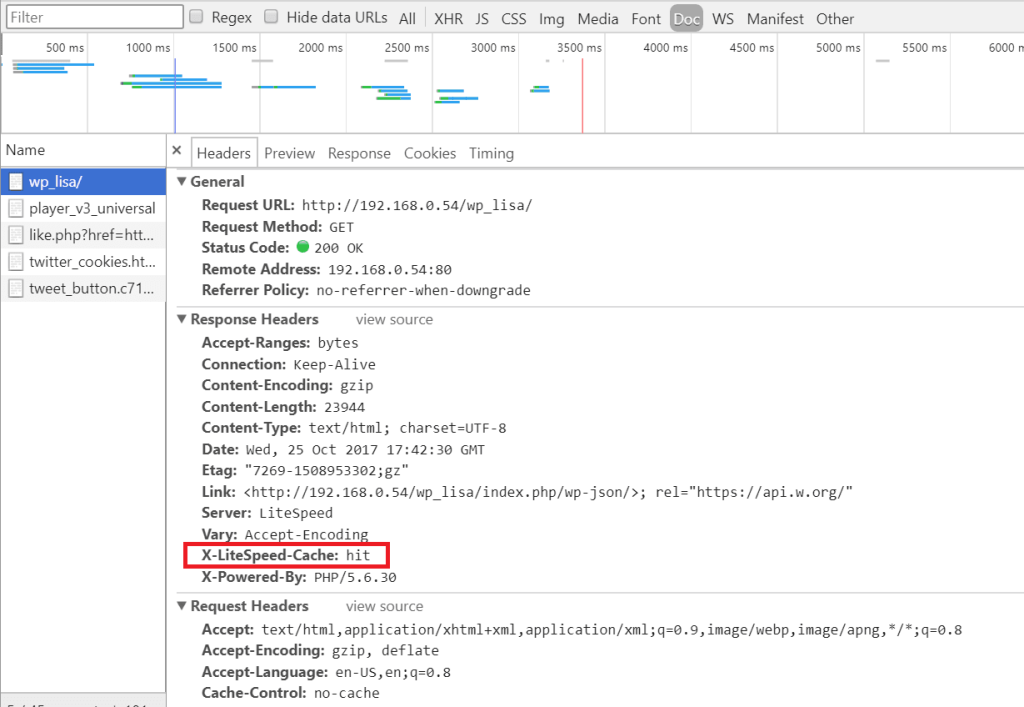
    Step 6: Reload the page a second time and you should see X-LiteSpeed-Cache: hit in the response header. This means the page is being served by the cache and LSCWP is configured correctly.

    Note: If your first refresh after purging returns X-LiteSpeed-Cache: hit in the response header, this may be because someone else visited the page after you purged but before you refreshed it yourself. Try again from step 4.

    Finding Errors

    To check the debug log, enter the following at the command line:

    tail -f wp-content/debug.log
    

    How to report problems you can’t fix

    If you run across a problem you can’t solve on your own, we are here to assist! If you take the time to gather a few of the following things before contacting us, it will help us to help you better:

    • Screenshots: If there are any error messages, grab a screenshot so we can see where it happens.
    • Environment Report: Navigate to LiteSpeed Cache > Environment Report > and press the Send to LiteSpeed button. You’ll be given a report number. Save the number.
    • Debug Log: Capture any relevant lines of the debug log as described above.

    Once you have your screenshots, environment report number, and/or debug log, you can share them with us through the WordPress Support Forum for our plugin, or you can submit a ticket to our ticket system.

    Congratulations!

    You are now the proud owner of a self-hosted, LiteSpeed-powered, WordPress site. Enjoy it!


    Have some of your own ideas for future WordPress Wednesday topics? Leave us a comment!

    Don’t forget to meet us back here next week for the next installment. In the meantime, here are a few other things you can do:

  • Developer’s Corner: Why Use LiteSpeed QUIC Library

    Developer’s Corner: Why Use LiteSpeed QUIC Library

    Projects and individuals have expressed interest in having a standalone QUIC library. The newly-released LiteSpeed Client Library is a good choice for many applications.

    When it comes to selecting a working QUIC library, one has few choices:

    • lsquic — standalone QUIC client library;
    • proto-quic — standalone QUIC client and server library; and
    • quic-go — standalone client and server library.

    quic-go may be inconvenient to incorporate if you do not use the Go programming language and I will not comment upon this library further in this post.

    Since the time it was first released in April of last year, proto-quic has been utilized in some projects. Now that Google no longer maintains proto-quic, these projects have a choice to make: maintain proto-quic, or their derivative thereof, themselves or switch to the newly-released LiteSpeed Client Library. For those that have not yet decided which QUIC library they want to use, I list the arguments in favor of the LiteSpeed implementation below:

    LSQUIC Is Actively Maintained

    The LSQUIC Client Library is maintained, whereas proto-quic is not. Integrating Chromium’s QUIC code into your program requires extracting the relevant bits from Chromium and updating them as new QUIC versions appear. On the other hand, the LSQUIC Client Library is a standalone component that we plan to maintain going forward.

    LSQUIC Is Future-Proof

    We use this code ourselves in our own products. We will continue to support the current line of QUIC versions (Google QUIC) and add support for the upcoming IETF versions of QUIC. We are not abandoning this code.

    LSQUIC Is C, proto-quic is C++

    LSQUIC is written in C99, proto-quic in C++11. The LSQUIC Client Library is easy to integrate into both C and C++ projects.

    LSQUIC Offers Versatile APIs

    Not tied to an event loop

    Our QUIC library is not tied to any specific event loop. In fact, it is not tied to an event loop at all — you do not have to use an event loop to drive the library.

    BYO networking code

    LSQUIC does not do its own networking. Instead, it provides a simple “packets in / packets out” interface. This makes the library quite flexible. And portable, too.

    LSQUIC Consumes Fewer Resources

    proto-quic consumes more CPU and memory than the LSQUIC Client Library. This is mainly due to two factors:

    1. proto-quic is part of Chromium, the market-leading browser. As a user application, its job is to provide features to the user (usually just one user on the machine); resource use is a secondary consideration. The LSQUIC Client Library, on the other hand, is born from LiteSpeed’s implementation of QUIC on the server side. We designed the library with scalability in mind.
    2. Pioneering — and experimental — work on QUIC implementation takes place in Chromium. proto-quic code is full of special cases for various experiments and options that are not used in production. The LSQUIC Client Library implements features and options strictly as required by the protocol.

    LSQUIC Codebase Is Small

    The LSQUIC Client Library is approximately 74,000 lines of code (with the core functionality only about 36,000 lines), as counted by wc(1), while Chromium’s QUIC code size is 156,000 lines of code.

    I hope this was convincing. All that’s left is to do this:

    git clone https://github.com/litespeedtech/lsquic-client.git

    From the cutting edge, until next time,

    LiteSpeed QUIC Team.

  • LiteSpeed Open-Sources QUIC Client

    LiteSpeed Open-Sources QUIC Client

    Open-Source QUIC Client

    LiteSpeed Technologies is pleased to announce the release of the LiteSpeed QUIC Client Library under an open-source license. This library supports all of the QUIC versions released in the Chrome browser in the past year — v35, v37, and v39. Support for new QUIC versions, including the upcoming IETF standard, will be added in a timely manner.

    The LSQUIC Client Library is a fully functional QUIC implementation in the C programming language. It has been tested on Linux, FreeBSD, and Mac OS. A working client program is included in the distribution.

    We believe that LiteSpeed’s Open-Source QUIC Client Library is free of major issues, for most of the QUIC code in it is already being used in our own products, LiteSpeed Web Server and Web ADC. Nevertheless, do not hesitate to report any bugs back to us.

    Open-sourcing our QUIC code is a way for LiteSpeed to contribute back to the community and to facilitate the adoption of QUIC.

  • Announcing the Release of OpenLiteSpeed

    Announcing the Release of OpenLiteSpeed

    We are very happy to announce the release of OpenLiteSpeed 1.0, a new, open source version of LiteSpeed Web Server. That’s right: LiteSpeed is going open source. (more…)