Tag: magento

LiteSpeed blog posts about Magento.

  • 2025 So Far

    2025 So Far

    2025 so far
    We are more than halfway through 2025, and we wanted to take this opportunity to tell you what we’ve been doing this year, in case you’ve missed anything. We’ve released updates to three cache plugins, three control panel plugins, and all three server products!

    Cache Plugins

    First, let’s take a look at what’s new with our LiteSpeed Cache plugins for WordPress, PrestaShop, and Magento.

    WordPress

    We released three LSCWP updates in the last six months. In addition to dozens of minor changes and bug fixes, these new features were among the updates:

    • AVIF support in v7.0
    • Allowlist support for Critical CSS in v7.1
    • Cloudflare cache clear on Purge All in v7.2

    This is just the tip of the iceberg, though. There’s a lot more. See the full release log.

    PrestaShop

    For v1.5.2 of LSCPS, we made a few minor updates: we fixed some bugs, we added parameter support to ESI block widgets, and we improved compatibility with Smarty and Symphony caches.

    See the release log.

    Magento

    LiteMage v2.2.5 had just a minor release, which included a bug fix, and an update which removed the jQuery dependency for custom varies.

    See the release log.

    Servers

    Our server products were updated this year to use a new version of LSQUIC. (A hash flood vulnerability was addressed in our LSQUIC HTTP/3 Library in February with the v4.2.0 release.)

    LiteSpeed Web Server

    We released LSWS v6.3.2 and v6.3.3, which included new features, security updates, and a number of bug fixes. See the full release log here.

    New features include:

    • Improvements to HTTP/2’s ability to block aggressive robots when under attack
    • Improved support for LiteSpeed Containers and Redis in control panels
    • The ability to selectively disable anti-DDoS detection

    The security updates addressed the LSQUIC vulnerability, and an issue with stderr.log permissions.

    OpenLiteSpeed

    OLS v1.8.3 updated LSQUIC and added support for “expect: 100 continue” handling.

    See the release log.

    Web ADC

    Our LSADC v3.3.0 release improved both HTTP/2 and HTTP/3 with stronger anti-DDoS capabilities, and stream priority adjustments.

    See the release log.

    Control Panel Plugins

    Our control panel plugins for cPanel/WHM, Plesk, and DirectAdmin all got a brand new Flag All button for the Cache Management feature.

    Additionally, in cPanel and WHM we addressed a minor security issue, and added some improvements related to the Cache Redis for Users feature.

    We released the following plugin updates:

    • cPanel v2.4.1-v2.4.3 and WHM v5.1.2-v5.2.3
    • Plesk v2.1.3-v2.2.0
    • DirectAdmin v2.4

    See the release logs.

    Stay Tuned

    We’ve got a lot more in store for the rest of 2025. Thanks for coming along for the ride!

  • Crawling Your PrestaShop or Magento 2 Store

    Crawling Your PrestaShop or Magento 2 Store

    Cache Crawler for PrestaShop and Magento 2

    We recently released two new crawler scripts: one for Magento 2 stores using LiteMage, and another for PrestaShop stores using LSCache.

    The LSCache/LiteMage crawler, travels its way through your sitemap file, refreshing pages that have expired in the cache. The purpose is to keep the cache as fresh as possible while minimizing visitor exposure to uncached content.

    Why Crawl Your Store?

    Well, first let’s look at how cache plugins store pages without a crawler. A user request kicks off the whole process. The cache is empty until users start sending requests. The first time a visitor requests a page, the request hits the backend. PHP code is invoked to generate the page, the page is served to the user, and then the page is stored in cache for next time.

    That’s a fairly time-consuming process for the server.

    Now, let’s look at what happens when a crawler builds the cache. When the crawler requests a page, the request hits the backend. PHP code is invoked to generate the page, but because of the special header that lets LSWS know that this is a crawler that initiated the request, the full page doesn’t need to be served. It is simply stored in cache.

    Additionally, with the crawler refreshing expired pages at regular intervals, the chances that a user will encounter an uncached page is significantly diminished. This makes for a faster site.

    So, now that you’re sold on the idea, let’s look at how it’s done.

    Please Note: The concepts behind the PrestaShop cache crawler script and the Magento 2 cache crawler script are the same, and so the instructions are very similar. Where they differ, we’ll put PrestaShop on the left, and Magento 2 on the right.

    Before You Begin

    There are a few things you need to do before you can begin to use the new script.

    • You must be using LiteSpeed Cache for PrestaShop or LiteMage 2 for Magento 2. Follow those links to install and enable the relevant extension.
    • The crawler must be enabled at the server level, or you will see the warning message Server crawler engine not enabled. Please check.... If you are using a shared hosting server, please contact your hosting provider, or see our instructions.
    • Prepare your site’s XML sitemap using the tool of your choice.

    Generate a Sitemap

    If you haven’t yet generated your sitemap, you can use an online sitemap generator such as XML-Sitemaps.com.

    After the crawl is finished, click DOWNLOAD YOUR XML SITEMAP FILE and put it where the crawler script can access it.

    If you’d prefer to do it from within your site, both PrestaShop and Magento 2 have modules that can generate XML sitemaps.

    PrestaShop Magento 2
    The Google Sitemap module is quite popular for Prestashop, and it’s fast.

    For PrestaShop v1.6, the Google Sitemap Module is installed by default.

    For v1.7+, it needs to be installed from source:

    • Download and rename file to gsitemap.zip
    • Navigate to Modules and Services
    • Click Upload a Module and drag the file to into the box to install

    Configure the sitemap as desired and press Generate Sitemap. You can find the URL of your new sitemap displayed in the Your Sitemaps section.

    Magento 2 has a builtin module for generating a sitemap and it’s fast.

    • Navigate to Magento Admin > Stores > Settings > Configuration > Catalog > XML Sitemap
    • Set Generation Settings > Enabled to Yes
    • Navigate to Magento Admin > Marketing > Seo & Search > Sitemap
    • Click the Add Sitemap button.
    • Set Filename = sitemap.xml and Path = /
    • Click the Save & Generate button

    A sitemap.xml file will be generated in your Magento 2 document root.

    Using the Cache Crawler Script

    Download the crawler script from the appropriate link below, and then change the permissions so that the file is executable, like so:

    PrestaShop Magento 2
    Download, then chmod +x cachecrawler.sh

    Usage: bash cachecrawler.sh https://www.example.com/sitemap.xml

    Download, then chmod +x M2-crawler.sh

    Usage: bash M2-crawler.sh https://www.example.com/sitemap.xml

    The crawler scripts take some parameters:

    • -h to display help
    • -m for when Desktop & Mobile have different themes
    • -i NUM to change the default interval from 0.1s to NUM.

    Changing the Crawl Interval

    How often do you want to re-initiate the crawling process? This depends on how long it takes to crawl your site and your Public Cache TTL. The default TTL is one day (24 hours). Let’s say you want to run the script by cron job every 12 hours.

    Add the following to your crontab to run twice a day, once at 3:30am and once at 3:30pm:

    PrestaShop Magento 2
    30 3/15 * * * path_to_script/cachecrawler.sh https://www.example.com/sitemap.xml -m -i 0.2 30 3/15 * * * path_to_script/M2-crawler.sh https://www.example.com/sitemap.xml -m -i 0.2

    You can use an online crontab tool to help you to verify time settings.

    Verifying the Crawler is Working

    When using the browser developer tool, load a page where the TTL has expired. On the first view after the crawler runs, you should see:

    PrestaShop Magento 2
    X-LiteSpeed-Cache: hit X-LiteSpeed-Cache: hit,litemage

    The cache hit indicates that the crawler cached the page for you. If the crawler were not running, you’d have gotten a cache miss.

    Any questions about our new crawler scripts? Let us know in the comments!

  • MM: Cache Warmup for Large Stores

    MM: Cache Warmup for Large Stores

    Magento Monday: LiteMage Cache Warmup for Large Stores

    Welcome to another installment of Magento Monday!
    Today’s Topic: LiteMage Cache Warmup for Large Stores

    Disclaimer: The information contained in this post is accurate for LiteMage v1.3.7 [release log] and Magento 1.x. If you are using a newer version of the extension, some details may have changed. Please refer to our wiki for the latest!

    LiteMage for Magento 1.x is equipped with a crawler function. The crawler travels its way throughout the backend, refreshing pages in the cache. The purpose is to keep the cache as fresh as possible while minimizing visitor exposure to uncached content.

    Our wiki instructions for setting up the LiteMage crawler are detailed and extensive, and if you’ve never enabled your site’s crawler before, we recommend you start there. If you own a large store, you may find the crawler’s duration to be problematic, so today we’re going to discuss how to configure the crawler for stores with many thousands of products.

    What works for small-to-medium sized stores may not work for larger stores. If you have thousands of pages for the crawler to traverse, you may need to adjust the crawler’s settings to make it less intrusive into your store’s daily operation.

    How Long Does Your Crawler Take?

    Before you can begin to determine the optimal configuration for your store’s crawler, you will need to know how long it actually takes to complete.

    LiteMage Cache Warmup for Large Stores: LiteMage Crawler Warmup Status

    You can find that out, along with other useful crawler statistics, in the LiteMage Crawler Warm-up Status section. From the Magento Admin Panel, navigate to System > Cache Management. It should be at the bottom of that page.

    An Example Scenario

    • Shop configuration: A book shop with 15 thousand products
    • Public Cache TTL (Time to Live): 86400 (24 hours)
    • Crawler Warmup Interval: 57600 (16 hours)
    • Crawler Duration: 8 hours

    Fifteen thousand product pages are set to expire in the cache after 24 hours, so every 16 hours the crawler begins refreshing the pages. This process takes about 8 hours to complete, and consumes enough resources to slow the site down considerably.

    Crawling the site takes 8 hours, and it runs every 16 hours. Essentially half of the time that this store is up, it is experiencing crawler-induced lag.

    This is not ideal. However, you don’t want to give up the warm cache, so what can you do?

    A Possible Solution

    LiteMage Cache Warmup for Large Stores: Crowded Bookshelves

    LiteMage’s crawler function is flexible, and with a few adjustments, you can tune it to work well for your store.

    The first thing to consider is the TTL. How often do your products change? If it’s less frequently than “every day,” you don’t need a TTL of 24 hours. How about a week? If it’s reasonable to assume that your products are not likely to change within seven days, you can set your TTL to 604800 seconds (1 week).

    Once your TTL is changed, you can adjust your warmup interval. We have a handy rule-of-thumb for that:

    Warmup Interval <= Public Cache TTL – 2 X Warmup Duration

    Let’s say the TTL is set to 604800 (7 days).

    We know our warmup duration is about 8 hours, or ⅓ day.

    The Warmup Interval we choose should be less than or equal to 7 days minus 2 times ⅓ day

    In other words, the Warmup interval should be less than 6 ⅓ days.

    Let’s set the Warmup Interval to 6 days (or 518400 seconds). This means that instead of your system slowing down every day for 8 hours, it will slow down every six days for 8 hours. That’s a big improvement.

    You can also enable the delta crawler. The delta crawler will allow you to confidently set a one-week TTL, knowing that if a product changes during that time, it will be recrawled within 5 minutes.

    In Conclusion

    As you can see, with the LiteMage crawler, you have options. If your products are fairly static, you might even choose to set a one month TTL, or longer!

    If you have any questions about this, leave a comment. We’ll be happy to help!

    P.S. Perhaps your large store could benefit from our ADC solution. Check out LiteSpeed Web ADC for details.

    Have some of your own ideas for future Magento Monday topics? Leave us a comment!

    If you enjoyed this, here are a few other things you can do:

  • Cache all of the Things with LiteSpeed

    Cache all of the Things with LiteSpeed

    Cache all of the Things: A LiteSpeed Cache Roundup
    You may be a fan of our LiteMage cache extension for Magento, or super enthusiastic about our WordPress cache plugin, but did you know that there is more to our cache story? Indeed. Chances are there is a LiteSpeed Cache plugin for your other favorite web apps, too.

    LSCache plugins, in general

    LSCache is a server-based caching module that is built directly into LiteSpeed Web Server. It saves static versions of dynamically-generated HTML pages in order to speed up subsequent access to those pages. In the beginning, LSCache was set up entirely through rewrite rules and configuration files. It required users to know a little something about their server backend, or to contact their hosting provider to set up caching for them. But more importantly, rewrite-rule caching is inflexible. As such, site owners had no ability to purge on demand, which meant they could only cache for a few minutes at a time, if they wanted to avoid serving stale content.

    Enter LiteSpeed Cache Plugins.

    LiteSpeed Cache plugins take the server-based LSCache functionality and give it a familiar interface, whether that be the WordPress Dashboard or the XenForo Admin Control Panel. Additionally, an LSCache plugin lets you define rules for managing your app’s cache, and then automatically updates the configuration files and rewrite rules on your behalf.

    By putting the LSCache controls into the web apps that site owners use every day, LSCache has become far more accessible and flexible. Site owners may now cache pages for far longer than a few minutes, and they may manage their caches with greater precision.

    As of this writing, LSCache is available in seven flavors! You are probably aware of one or two of these plugins. You may even be a power user. But why stop there? If you’re running all of your web apps on a LiteSpeed server, then you should take advantage of as many of these plugins as you can!

    LSCache plugins, specifically

    Cache all of the Things: A LiteSpeed Cache Roundup
    Every LSCache plugin is a conduit to the cache module of a LiteSpeed server, whether that be LiteSpeed Enterprise, LiteSpeed Web ADC, or OpenLiteSpeed. The server’s module does all of the work, while the plugin provides a simple way for a site owner to tell the server what to do. Because of this, most of our cache plugins have the same abilities. When there are differences, they are usually down to the abilities of the web app itself, or complexities involved in implementing a particular feature for that web app.

    Speaking of the abilities of the web app, LSCache plugins are unique among cache solutions because they have a connection to both the server, and to the app. A plugin can use that relationship to provide features that other cache solutions (or simple rewrite rules) can’t duplicate. We alluded to a prime example of this earlier: tag-based purge.

    Tag-based purge is a cache management tool that takes purge cues from events that occur within the app. For example, when a new post is created in WordPress, LSCache for WordPress tells the server’s LSCache module to purge every page that would be affected by a new post (i.e. the relevant category and tag pages, the home page, etc.).

    All LSCache plugins are free and open source. To learn more about the specific features supported by each, click the name of the plugin.

    Magento

    All content can be assembled from cache, even per-user, private blocks. Multi-store, multi-currency, and multi-user-groups are supported. There are two different versions of LiteMage available: one for Magento 1.x and another for Magento 2.x.

    WordPress

    • Name: LSCache Plugin for WordPress
    • Download: from LiteSpeed
    • Works With: WordPress.org
    • Required Server: LSWS Enterprise, OpenLiteSpeed, or LiteSpeed Web ADC
    • Cache logged-in users? Yes
    • ESI supported? Yes, except on OpenLiteSpeed
    • Cache Crawler supported? Yes

    In addition to the cache functions, our WordPress plugin also includes several optimization features, which makes it a nice all-in-one option for WordPress acceleration. Compatible with WooCommerce.

    XenForo

    • Name: LSCache Add-on for XenForo
    • Download: from XenForo v1.x or v2.x
    • Works With: XenForo 1.x or XenForo 2.x
    • Required Server: LSWS Enterprise, OpenLiteSpeed, or LiteSpeed Web ADC
    • Cache logged-in users? No
    • ESI supported? No
    • Cache Crawler supported? No

    This is a simple XenForo add-on that speeds up your public forum pages for non-logged-in users. There are two different versions of LSCache for XenForo available: one for XenForo 1.x and another for XenForo 2.x.

    Please note that as of this writing, the XenForo 2 add-on only supports rewrite-rule-based caching. Tag-based caching is forthcoming.

    PrestaShop

    • Name: LSCache Module for PrestaShop
    • Download: from LiteSpeed
    • Works With: PrestaShop 1.6 & 1.7
    • Required Server: LSWS Enterprise, or LiteSpeed Web ADC
    • Cache logged-in users? Yes
    • ESI supported? Yes
    • Cache Crawler supported? No

    The PrestaShop module is one of our newer cache plugins. Introduced last year, it is highly-customizable on a global or per-store level. Tag-based smart purge keeps the cache from becoming stale when product details change.

    MediaWiki

    • Name: LSCache Extension for MediaWiki
    • Download: from GitHub
    • Works With: MediaWiki 1.25+
    • Required Server: LSWS Enterprise, OpenLiteSpeed, or LiteSpeed Web ADC
    • Cache logged-in users? Yes
    • ESI supported? No
    • Cache Crawler supported? No

    This one is a straightforward little plugin that speeds up your MediaWiki site for both logged-in and non-logged-in users.

    Drupal

    • Name: LSCache Module for Drupal
    • Download: from GitHub
    • Works With: Drupal 8.x
    • Required Server: LSWS Enterprise, OpenLiteSpeed, or LiteSpeed Web ADC
    • Cache logged-in users? Yes
    • ESI supported? No
    • Cache Crawler supported? No

    This one is hot off the presses! It’s comparable to most of the others, in that it supports public cache, private cache, and ESI, and it features tag-based cache purge.

    Joomla

    • Name: LSCache Module for Joomla
    • Download: from GitHub
    • Works With: Joomla 3.x
    • Required Server: LSWS Enterprise, OpenLiteSpeed, or LiteSpeed Web ADC
    • Cache logged-in users? Yes
    • ESI supported? Yes, except on OpenLiteSpeed
    • Cache Crawler supported? No

    The Joomla plugin is another brand new release, and contains many of the LiteSpeed Cache features you already know and love.

    Go forth and cache!

    Hopefully you have found something new to try among our cache plugins! If you have a favorite web app that is not represented here, leave a comment. You never know… it might end up being next on our list.

    The LiteSpeed wiki contains everything you need to know when it comes to installation and configuration, so be sure to check there if you get stuck.

    Also? We have a Slack community for LiteSpeed users. Join up, leave feedback, help us test new features in development, and connect with your fellow LSCache plugin users!

  • Magento Monday: LiteMage, CDNs, and Tokens

    Magento Monday: LiteMage, CDNs, and Tokens

    Welcome to the first installment of Magento Monday! We’ve enjoyed bringing you WordPress Wednesday every week, and so we thought it would be fun to also share some helpful Magento and LiteMage tips here sometimes.

    Let’s kick off this series by talking about Content Delivery Networks, how the custom CDN cache rules you have defined may be breaking your Magento 1.x store, and what you can do to fix the problem.

    Note: This particular issue is only a Magento 1 issue. It does not apply to Magento 2.

    It’s all about the Tokens

    Magento 1.x uses a session variable called form_key as a CSRF token to prevent CSRF injection. The form_key value is stored in the user session and is unique for every user. When a shopper adds a new product to the cart, or a new item to compare, Magento looks for the form_key token in the dynamically-generated HTML, and uses it in the validation process.

    If there is no caching solution enabled at all, then this process works. It’s slow and painful, but it works.

    If LiteMage is caching the dynamic pages, then this process also works. LiteMage is smart enough to know that it must use ESI to “hole-punch” the correct unique form_key token value for each user into the generated HTML, so that it may be used for validation.

    If a CDN is caching the dynamic pages, then this process falls apart. Content Delivery Networks are not smart enough for hole-punching. They cache only one version of the page, which means they save only one form_key token for every shopper to share. This can’t possibly work, and validation is broken.

    We recommend that you turn off all caching of dynamic pages in your CDN. CDNs are great for static content, like CSS, JavaScript, and image files, so by all means, leave that type of caching enabled, but let LiteMage handle the dynamic page-caching duties.

    Diagnosing and Fixing the Problem

    How can you tell whether your page is being served from CDN cache or LiteMage Cache? Take a look at the Response Headers.

    What you want to see is something like this:

    
    X-LiteSpeed-Cache: hit,litemage


    This shows that LiteMage is in control of caching the page.

    If you see headers like the following:

    
    cache-control:public, max-ago=14400
    cf-cache-status: HIT


    then the CDN (in this case Cloudflare) is doing the caching.

    Here’s how to stop that from happening:

    From the Magento admin area, navigate to System > Configuration > General > Web and open the Unsecure and Secure sections.
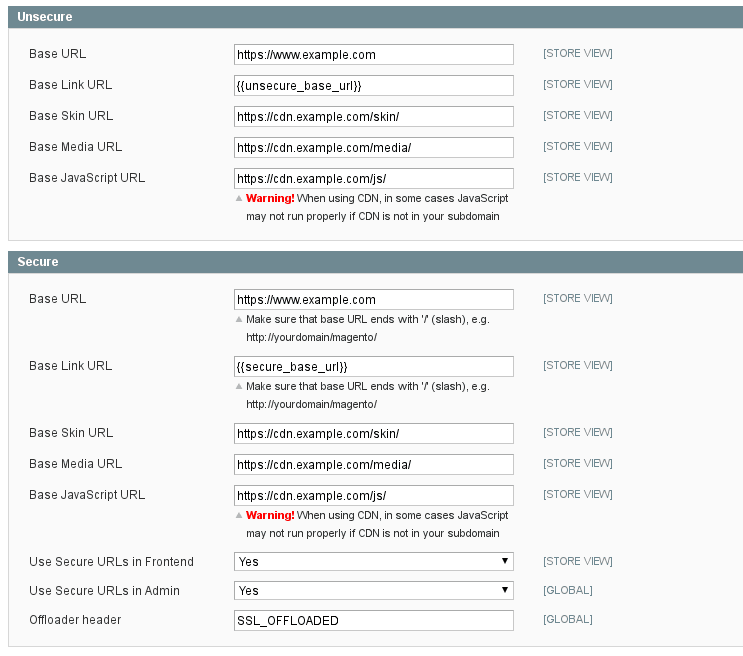
    While it may be easier to just set Base URL to the CDN’s address, and let the CDN sort out what content should be served from where, doing so is highly inefficient and will slow down your site. Why send a request to the CDN only to have it bounced back to your own site for fulfillment?

    Setting it up properly in this section ensures that requests are routed to the proper locations right from the start, with no time wasted with unnecessary travel back-and-forth.

    Set the Base URL to your site’s address, not the CDN’s.

    The Skin, Media, and JavaScript URLs refer to static content, and those may point to your CDN.

    A note about the Unsecure section: Technically, you can use http:// in these fields, but with LiteSpeed’s emphasis on HTTP/2 and QUIC, you have the ability to use https:// everywhere. These days security is a big deal, so why wouldn’t you use it?

    So, Why Don’t CDN Cache Rules Work?

    If you know about Magento 1.x’s session cookies (frontend for HTTP and frontend_cid for HTTPS), you may have tried to use them to configure the CDN’s cache rules as follows: if there is no session cookie, it means the user hasn’t started shopping yet, and the page can be cached by the CDN. If there is a session cookie, then the request must be sent to the Magento backend.

    It’s a clever idea, but unfortunately it doesn’t work, and this is why:

    The form key is irrelevant while the user is simply browsing, and so it seems fine to serve the page from CDN cache. However, as soon as they try to act (add an item to the cart, or to compare), the form key becomes important. And because of the fact that they are performing that first action from the cached page, they will be looking at the cached form_key value instead of a form key that’s been generated specifically for them. As a result, the action will fail.

    If the user reloads the page, the CDN recognizes that they now have a session key, and so their request hits the backend, the correct form key is generated, and they are able to shop normally.

    The problem works itself out on the second attempt, but the damage to user experience has already been done. Some shoppers will reload and keep going, but others will leave after the first error. Can you afford to lose those customers?

    Even if the session cookie idea had worked, it’s hard to see what would be gained from having the CDN handle the caching of that page. LiteMage, which was built specifically for Magento, can manage your shop’s cache in a much more efficient way than a Content Delivery Network can. As we’ve already seen, LiteMage can punch holes for private content, making it possible to store a single copy of the page in public cache, and then serve it with the personalized information in the punched holes.

    With the CDN in charge, users who are actively shopping cannot benefit from caching, but with LiteMage, they can.

    Additionally, LiteMage can take advantage of tag-based purging, making sure that all of the necessary pages (and only the necessary pages) are purged when a product is updated.

    If you are running LiteMage, it’s best to let LiteMage handle all of the page-caching that it was built to handle. Your Content Delivery Network can easily deal with the rest.

    Have some of your own ideas for future Magento Monday topics? Leave us a comment!

    If you enjoyed this, here are a few other things you can do:

  • Magento Connect Goes the Way of the Dodo… Now What?

    Magento Connect Goes the Way of the Dodo… Now What?

    Download LiteMage

    As many of you might be aware, Magento connect, the site responsible for hosting thousands of Magento-verified plugins is being taken down today (Sept 15th, 2017) and being replaced by Magento Marketplace.

    Magento Connect has served as a great platform for us in exposing LiteMage to a wider Magento audience and we are sad to see it go. Overall, LiteMage’s time on Connect has been very positive, with 4,600+ downloads since we first put the plugin up two years ago, and an outpouring of customers amazed at the performance gains they were able to achieve using our intelligent ESI caching.

    That being said, the question on everyone’s mind:

    Will LiteMage be making the move to Magento Marketplace?

    The answer is, “hopefully!” While our Connect experience was a good one, we still have a few question about the Marketplace move and are waiting on a response from the Magento team before proceeding.

    In the meantime, we have made the LiteMage plugin available directly on our site as a download and have updated our installation guide to reflect any changes this introduces.

    Rest easy knowing that no matter where you have to go to download LiteMage, we remain committed to continuing its reputation as one of the best Magento full-page caching solutions out there. LiteMage will always be free and open source!

    What do you think about the new Magento Marketplace? Let us know in the comments!

  • LiteMage 2 for Magento 2

    LiteMage 2 for Magento 2

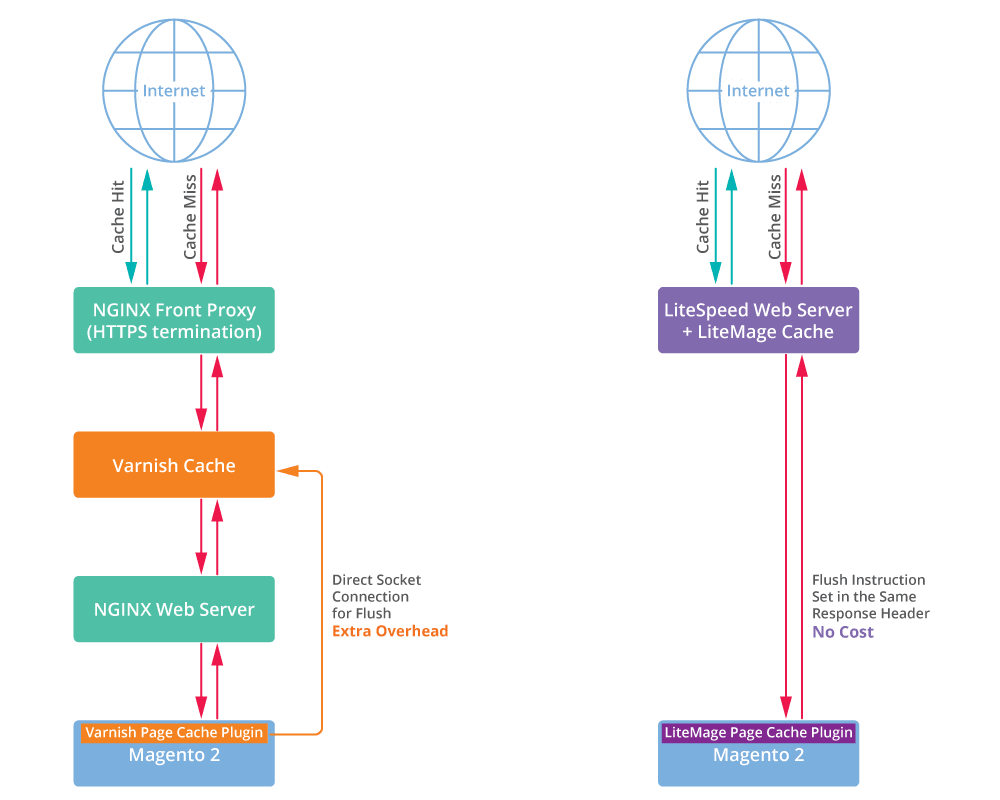
    In a previous blog post, we briefly discussed the release of LiteMage 2 for Magento 2 and its improvements over Varnish and Magento 2’s built-in PageCache module. Today, I’d like to elaborate on a few of those improvements.

    Simplifying Your Stack

    The above diagram is a comparison of the basic setup for Magento using Nginx + Varnish and LiteSpeed Web Server (LSWS) + LiteMage Cache. You can clearly see that with just the basics on both sides, your Magento stack’s complexity is halved when you switch from Nginx + Varnish to LSWS + LiteMage. As is also mentioned above, flush instructions cause extra overhead by design in Nginx + Varnish while LSWS + LiteMage include the flush instruction in the same response header, meaning no extra cost when flushing the cache.

    Performance

    We’ve received a very positive response to LiteMage 2. This is, in part, because LiteMage 2 completely replaces Varnish, supports the same configuration for publicly cached items, and improves on Varnish’s performance.

    LiteSpeed + LiteMage outperforms Nginx + Varnish:

    • reducing server load,
    • cutting CPU Usage,
    • and running more transactions per second.

    We also have plans to further improve upon Magento 2’s performance, providing an even bigger performance gain when compared to Varnish.

  • Prepare For the Holidays With LiteMage’s Newest Feature: Site Visitor Acceleration!

    Prepare For the Holidays With LiteMage’s Newest Feature: Site Visitor Acceleration!

    imagenov82016

    It’s no secret that the slower a page loads, the more likely a customer is to leave your site. With the newest enhancements to LiteSpeed Web Server and LiteMage Cache, you can rest easy knowing that all your visitors will experience the fastest load times ever!

    (more…)

  • Can Your Magento Do This?

    Can Your Magento Do This?

    We’re excited to share a quick LiteSpeed customer success story from one of our European partners running a large-scale Magento site supporting a popular television program.

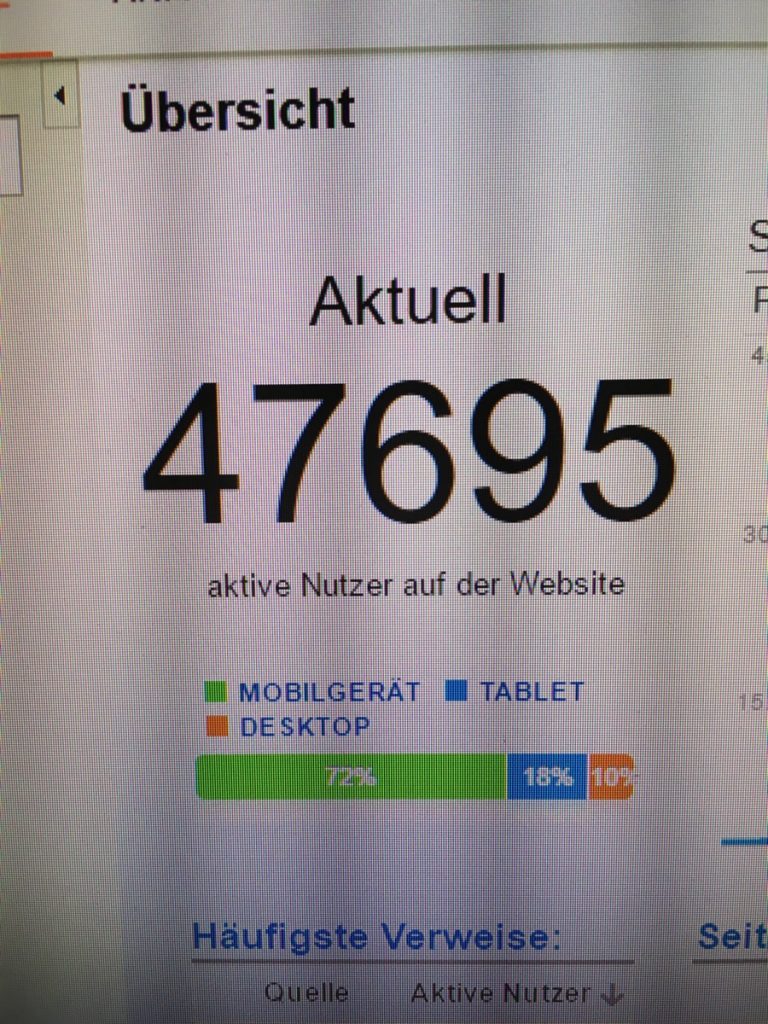
    Every week during the program, the Magento store is supported by a 6-node cluster front ended by a LiteSpeed Load Balancer with LiteMage cache. Stats from this past week are pretty amazing.

    convo_1_blurred

    fe49080bc43c6c3d4e3e33bd1d316477a2b0a1a9bb3bef11e0pimgpsh_fullsize_distr

    In case your German is rusty, that’s almost 50,000 active users in this Magento store at peak usage.

    convo_2_blurred

    With the holiday shopping season rapidly approaching, we want to know…

    Can your Magento do this?

  • Imagine Conference: Magento@LiteSpeed!

    Imagine Conference: Magento@LiteSpeed!

    Magento Imagine 2016

    Last month we posted about our experiences at WHD.Global. Two weeks and thousands of miles later, we attended the Magento Imagine conference in Las Vegas. We’d like to again share our thoughts.
    (more…)