Tag: joomla

  • JT: Using ESI in Joomla with LSCache

    JT: Using ESI in Joomla with LSCache

    Joomla Tips: Using ESI in Joomla

    Welcome to another installment of Joomla Tips!
    Today’s topic is: Using ESI in Joomla

    Last week we discussed private cache for your Joomla site. Today we’re going to take that a step further and explore ESI, or “Edge Side Includes”. ESI takes the concepts of public cache and private cache, and combines them in a way that allows you to serve cached content flexibly and to more of your visitors, both logged out and logged in.

    Please note: ESI is not supported in OpenLiteSpeed. You must be using LiteSpeed Enterprise in order to take advantage of ESI functionality.

    What is ESI?

    ESI is a markup language. It allows you to designate parts of your dynamic page as separate fragments that are then assembled together to make the whole page. ESI lets you “punch holes” in a page, and then fill those holes with content that has different caching requirements than the rest of the page.

    For instance, ESI blocks can have different TTLs and be purged by events that are completely separate from the page they are on. Additionally, ESI blocks can contain private content even when the page they are on is publicly cached. This flexibility allows you to cache more of your site for more of your visitors. ESI is a an important aspect of any ecommerce caching strategy.

    How do ESI and Public/Private Cache Work Together?

    ESI allows you to disassemble a full page and treat the pieces differently from each other.

    LiteSpeed Web Server allows you to store content in either the public cache or a private cache.

    These two elements combine to give you something very powerful: a system that can break apart a page into public and private pieces, cache each piece appropriately, re-assemble the full-page content from the relevant caches, and then serve it to a user without ever hitting the PHP backend.

    That is pretty amazing!

    Using ESI in Joomla: Punched holes in paper

    Examples

    Let’s look at a few common scenarios where ESI is helpful.

    Example #1: The Login Module

    Let’s say your site has a login module on every page. You are logged in, and you visit your site’s home page, which is in the public cache.

    Without ESI: Your request must invoke PHP, because the login module contains private content, and as such this page (and every other page on your site, for that matter) cannot be served to you from public cache.

    With ESI: Most of this page is served to you from the public cache, but the login module is served to you from your private cache. There is no need to invoke PHP.

    Other Thoughts: Technically in this scenario, you could skip ESI and use logged-in caching for every page, but private cache storage adds up, particularly if you have a busy site, or a lot of pages on your site. Using ESI here means that the only thing you need to store in private cache for each user is the contents of a single module.

    Example #2: The Latest Articles Module

    Let’s say you have a large site with mostly static content that rarely changes. The “Latest Articles” module appears on each page.

    Without ESI: Every time a new article is published, every single page in the site must be purged so that the module displays up-to-date data. Re-populating the entire cache requires a crawler to run, or visitors to hit all of the pages of the site.

    With ESI: All of the pages in the site can remain cached with a nice long TTL, while the Latest Article module is the only thing that needs to be purged. Re-populating that one bit of the cache requires just one visitor to request any page one time.

    Other Thoughts: Using an ESI widget for this allows us to keep most pages in cache for a long time, while letting the module change as often as it needs to. If we weren’t using ESI for this, we’d be putting a lot of unnecessary load on the server, and increasing the chances that visitors to the site would encounter uncached content.

    Enabling and Configuring ESI

    When you enable ESI, you allow holes to be punched for content that will either be privately-cached, publicly-cached with its own TTL, or not cached at all.

    While leaving an ESI block uncached is an option, it is not recommended. An uncached module will need to invoke PHP each time that it is requested. PHP uses a lot of resources and slows down your page considerably. If you can avoid hitting the PHP backend, you should.
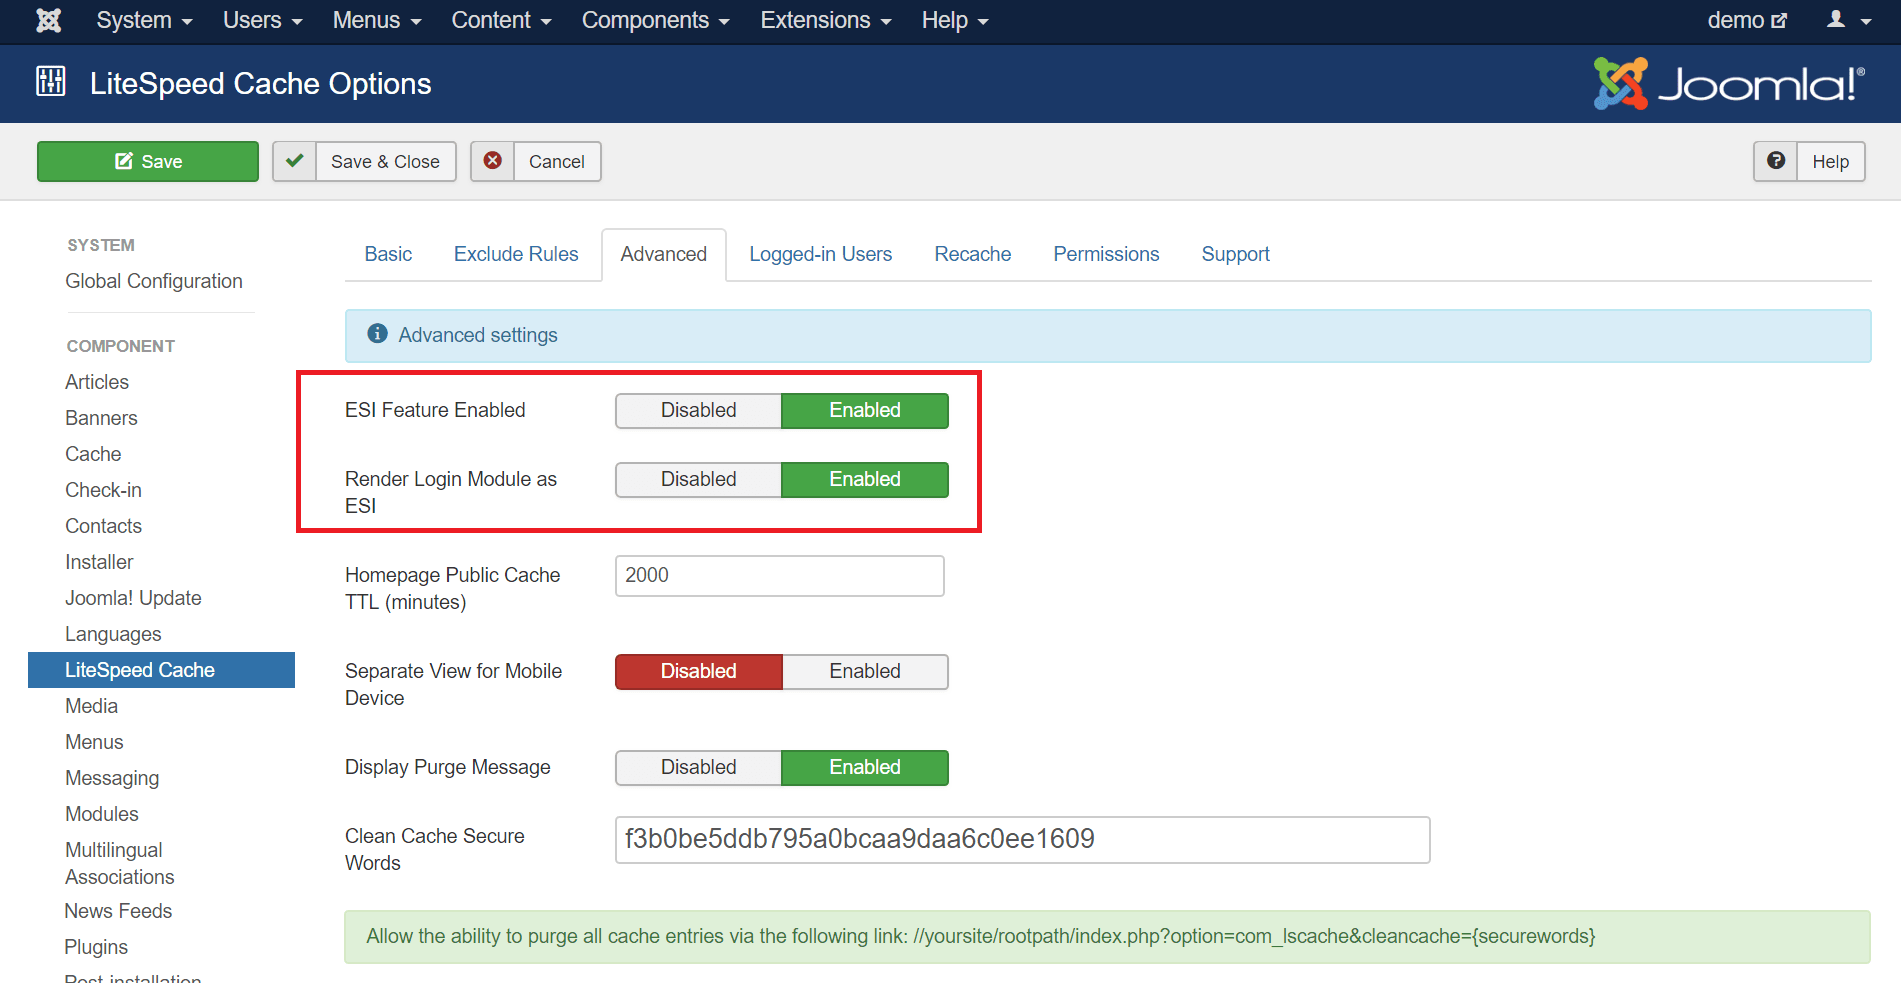
    Using ESI in Joomla: Advanced configuration screen

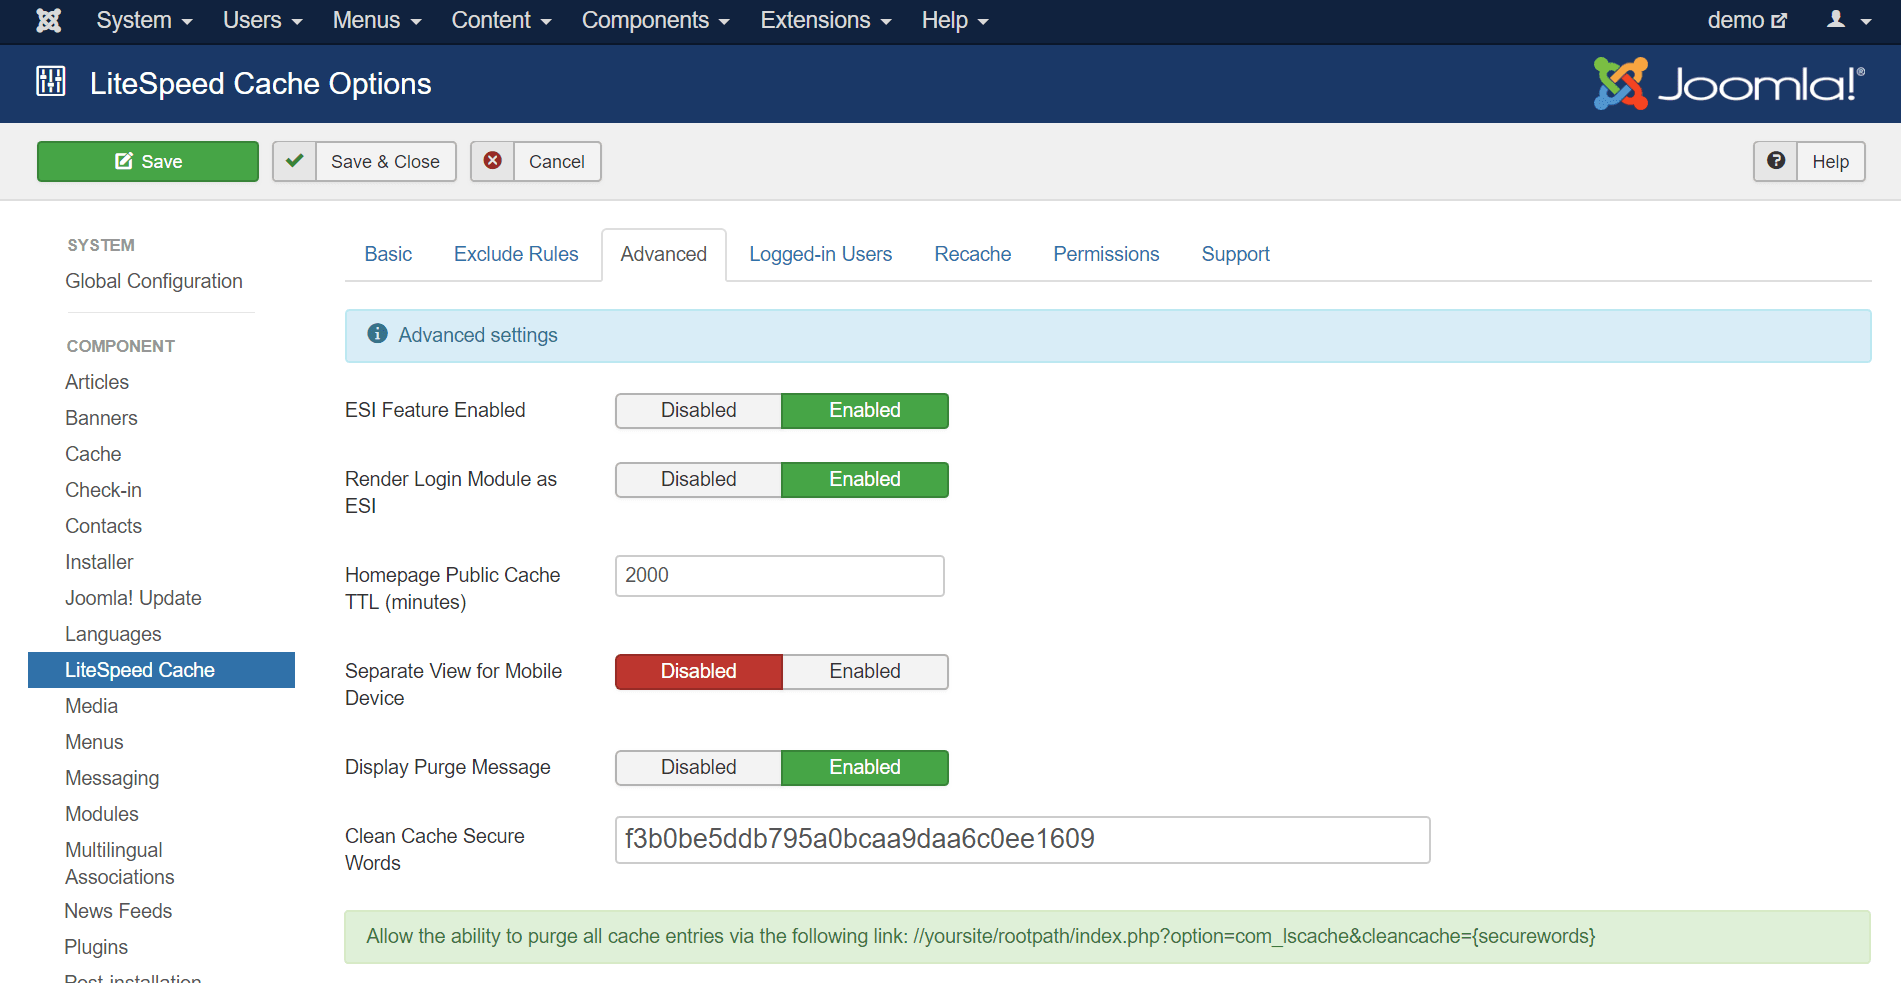
    To enable ESI, navigate to System > Global Configuration > LiteSpeed Cache and click the Advanced tab. Verify that ESI Feature Enabled is set to Enabled. It should be on by default.

    You can also set Render Login Module as ESI to Enabled here, although we are going to take care of that in the LiteSpeed Cache Settings (ESI Module Settings) screen below.

    Rendering Modules as ESI

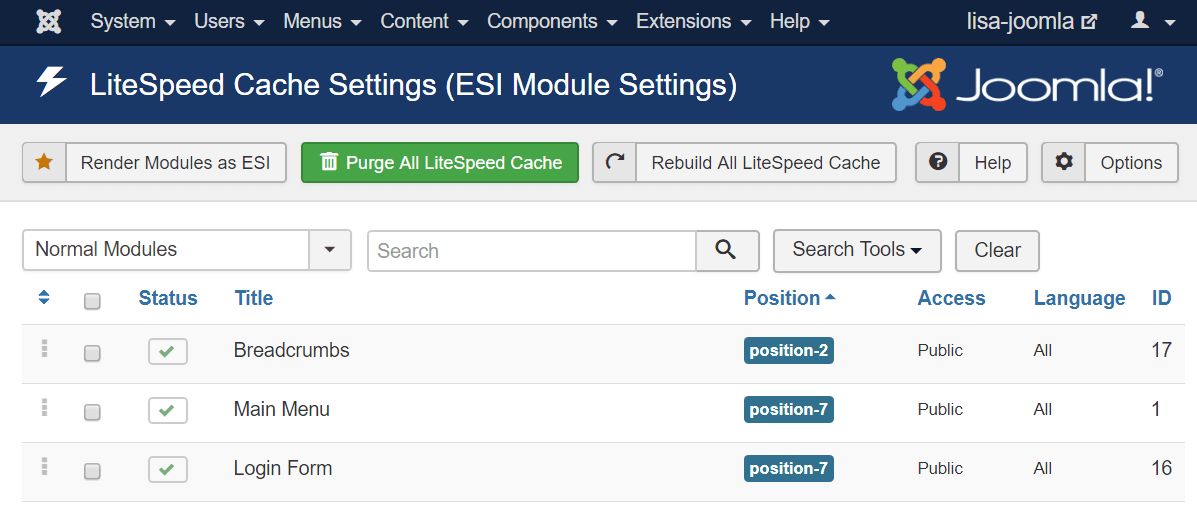
    Any module can be an ESI block if you want it to be. Modules are perfectly-suited to it. They are already self-contained bits of code. Navigate to Components > LiteSpeed Cache.
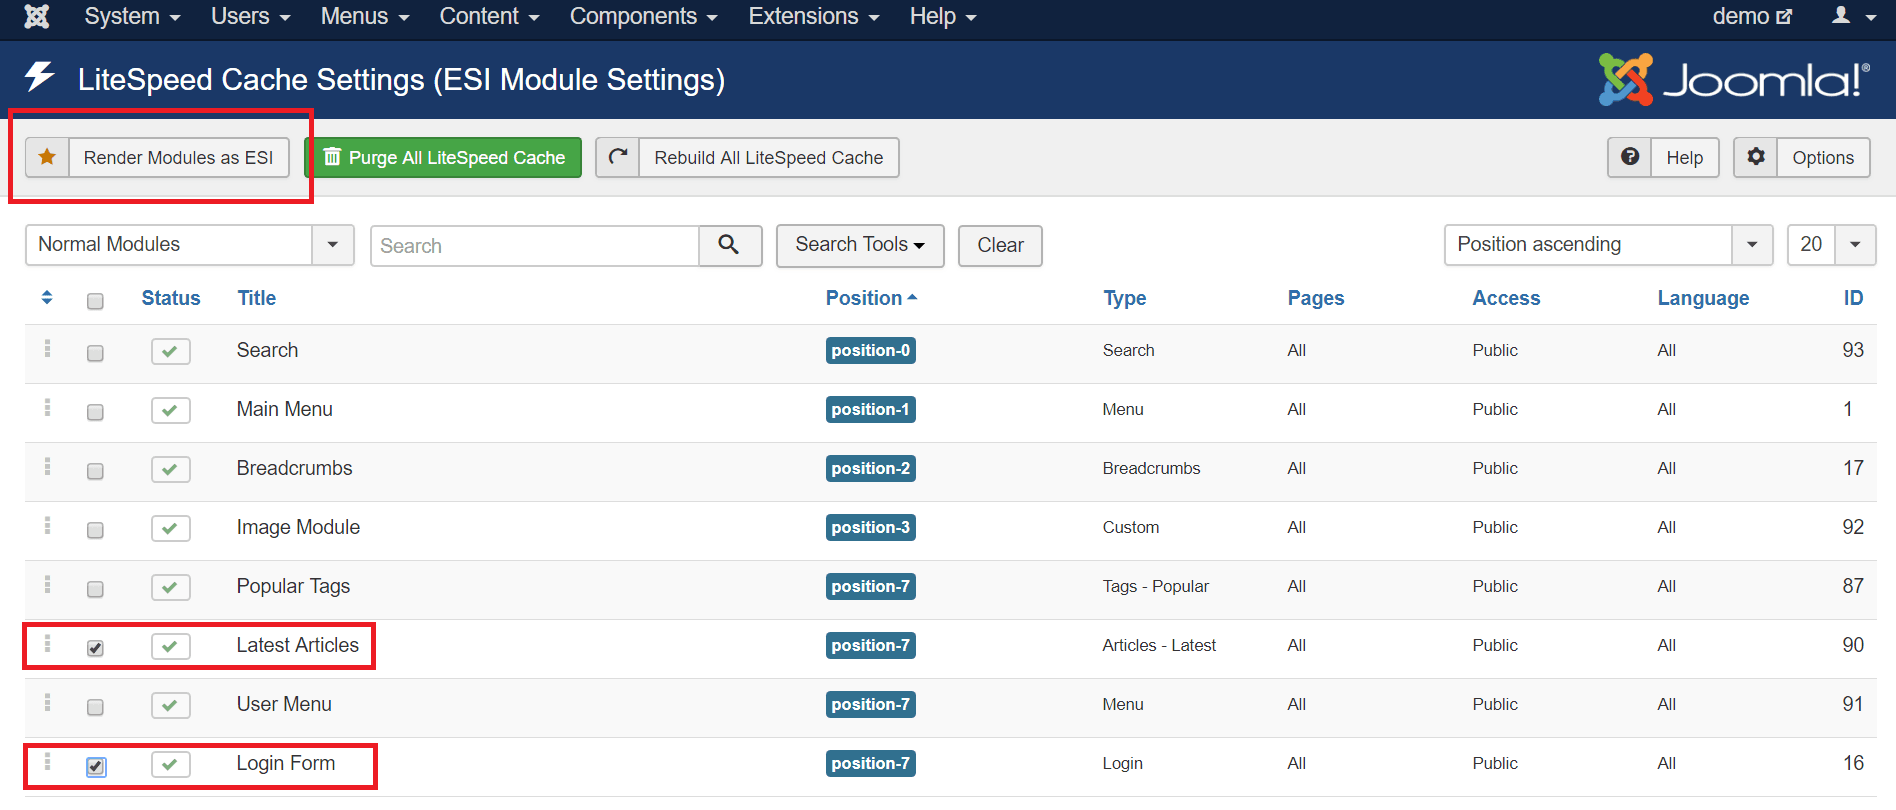
    Using ESI in Joomla: Module settings screen before

    Select the modules that you would like to render as ESI blocks. The following types of modules are good candidates for ESI:

    • Any module that displays personalized information
    • Any module that displays something different for logged in and logged out users
    • Modules whose content changes very frequently compared to the rest of the site

    In this example, we’ve chosen the Login Form and User Menu, but you can choose any modules that make sense for your particular installation.

    Press the Render Modules as ESI button.
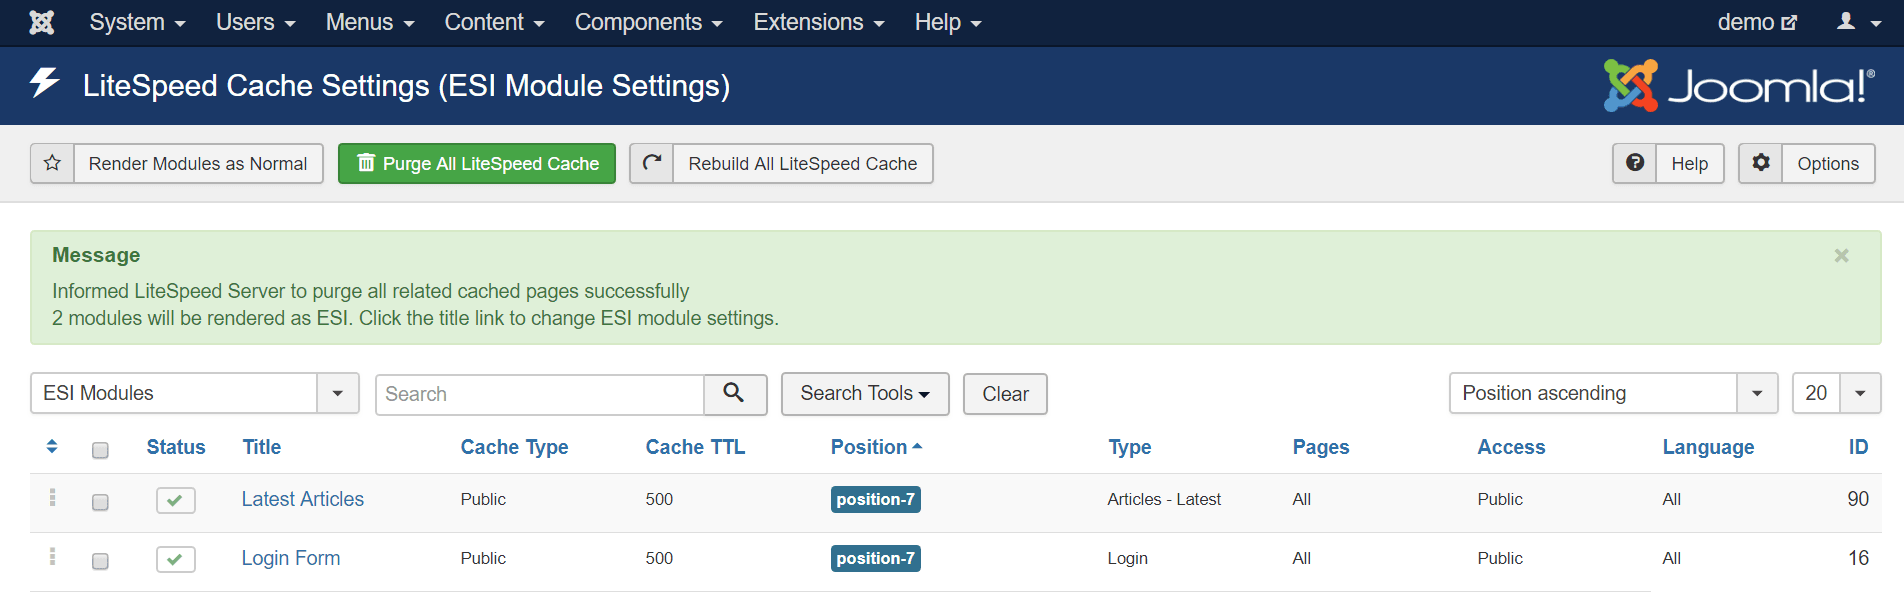
    Using ESI in Joomla: Module settings screen after

    The display will change to show only ESI Modules. At this point, you can click on a module name to configure the ESI settings for that module, like so:
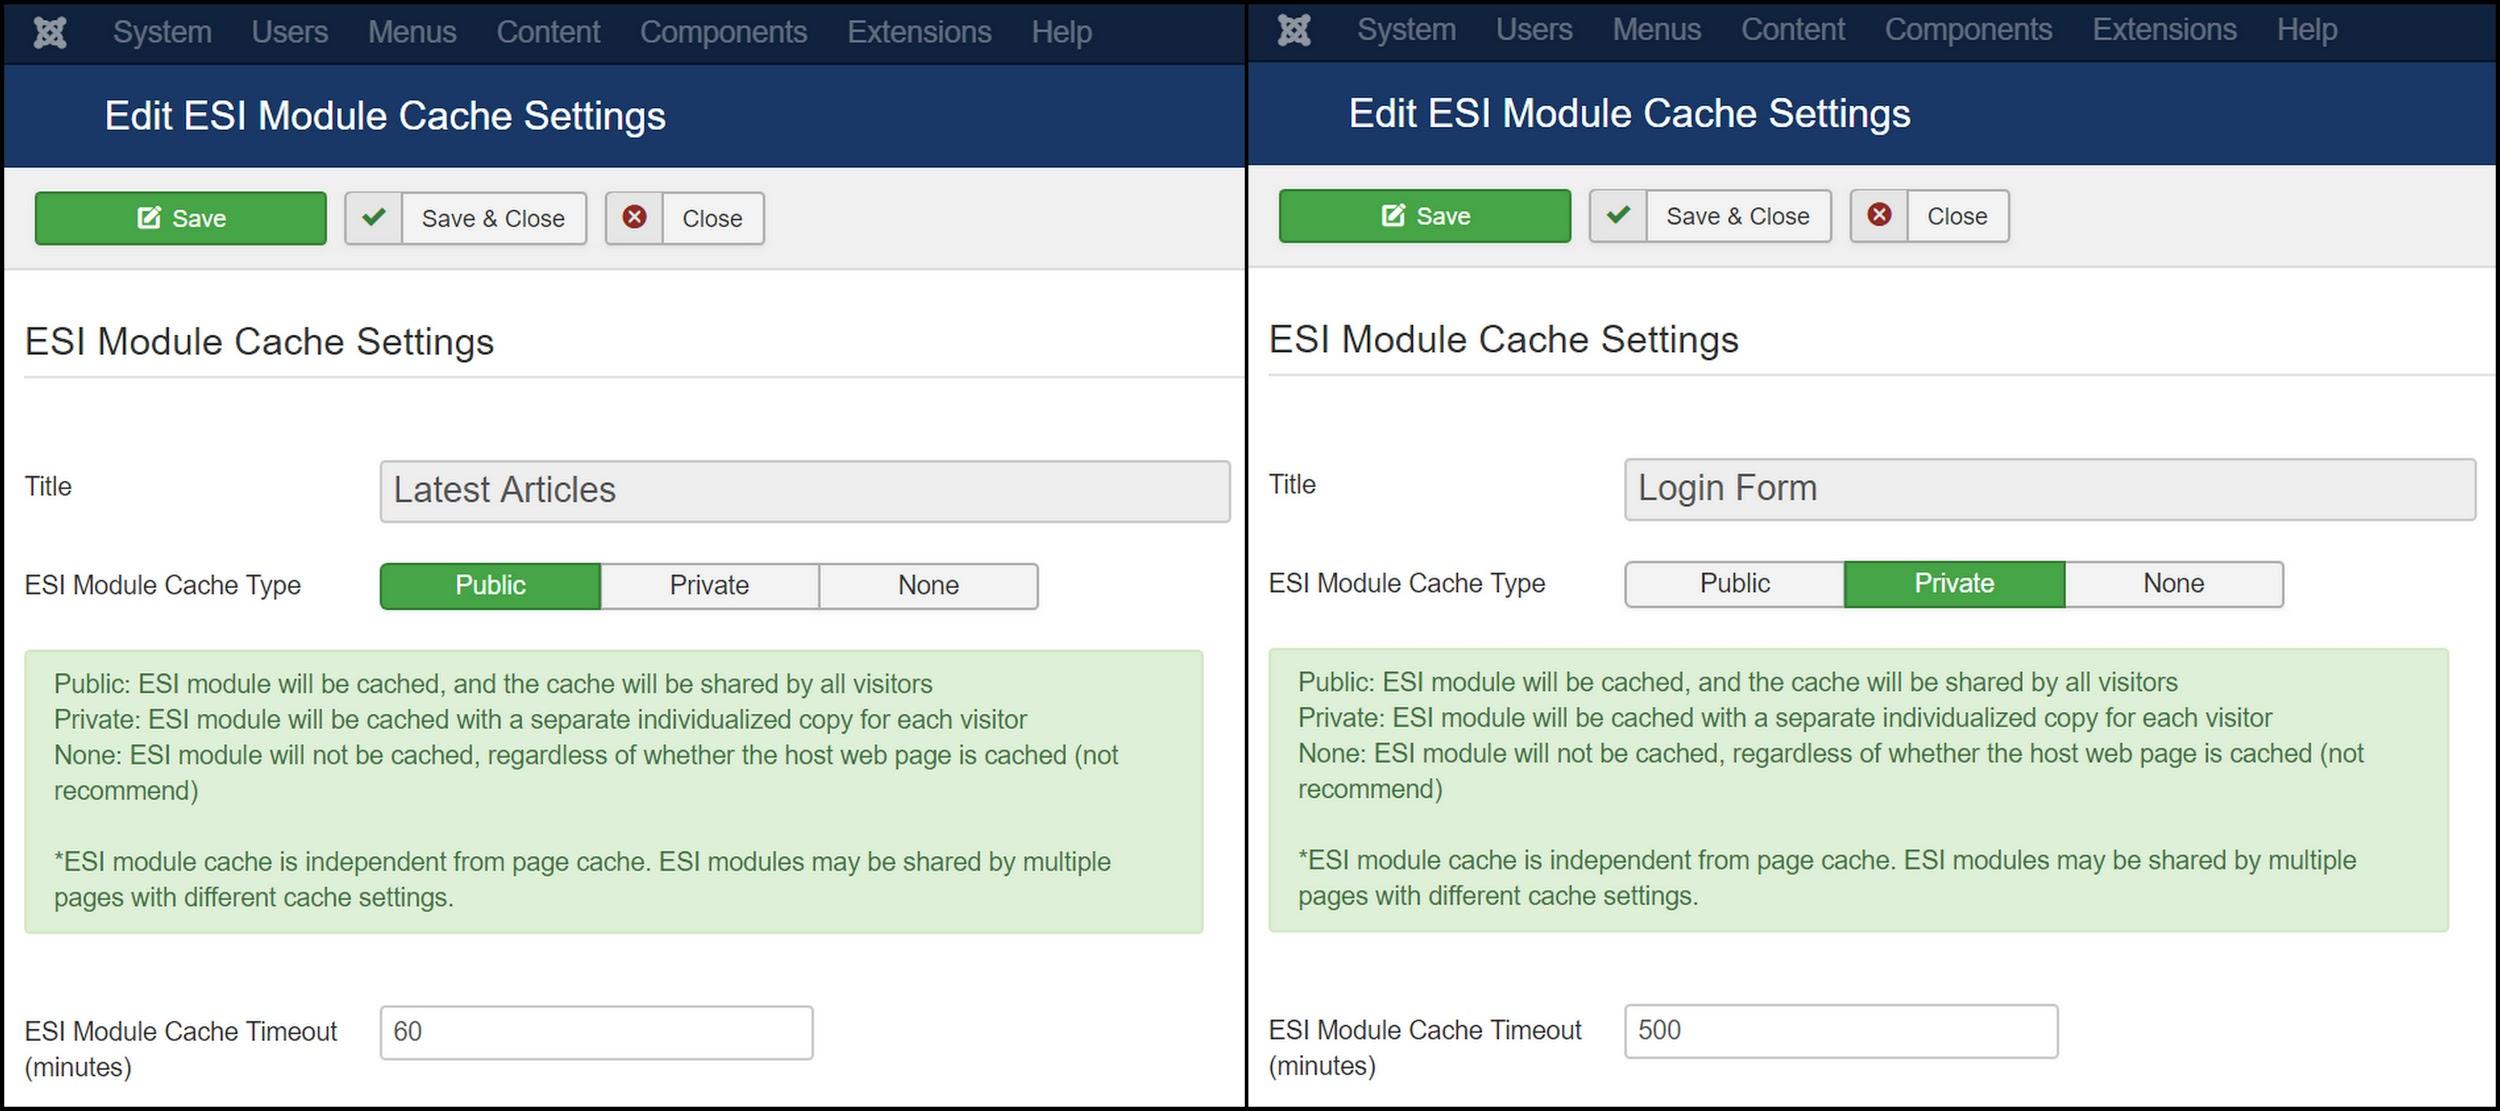
    Using ESI in Joomla: ESI Module cache settings

    The important fields here are ESI Module Cache Type and ESI Module Cache Timeout, and how you set them depends entirely on the function of the module.

    Let’s look at the two modules we are setting up. We’re using ESI with them for two completely different reasons, and so we will configure them differently. These are the same two modules from our previous examples.

    Using ESI for Frequently Changing Content

    We can use an ESI module to display frequently-changing content on pages that rarely change.

    The “Latest Articles” module always contains public content, so we can set the ESI Module Cache Type to Public. We want to use ESI for this module because we have an active site with new content being added every hour or so. We set ESI Module Cache Timeout to ‘60’ minutes, so that the module stays up to date with the more recently published articles.

    Now we are free to set the site’s Public Cache TTL to something more appropriate for a site with rarely-changing pages, like a week (or 10080 minutes).

    Using ESI for Private Content on a Public Page

    We can use an ESI module to punch a hole for private information on a public page.

    The “Login Form” module says one thing when the user is logged out, but contains personalized content when the user is logged in. For that reason, we should set the ESI Module Cache Type to Private. We can leave the other settings at their defaults.

    Then, when a user logs in, there is no need to serve them everything from private cache. We can serve all of the pages from public cache, and simply punch holes for the private content stored in the “Login Form” module.

    Conclusion

    So what do you think? Would you like to give ESI a try on your site?

    ESI allows you the flexibility to cache more of your site in a variety of complex situations. With pages that mix-and-match private/public cache or differing TTLs, you can serve cached content to a larger percentage of your users, and keep everything running quickly and smoothly.

    P.S. Want to know more technical details about ESI? Check out the official specs.

    Disclaimer: The information contained in this post is accurate for LSCJoomla v1.2.0 [release log]. If you are using a newer version of the plugin, some details may have changed. Please refer to our wiki for the latest!

    Have some of your own ideas for future Joomla Tips topics? Leave us a comment!

    While you’re waiting for the next installment, here are a few things you can do:

  • JT: Caching Logged-in Users in Joomla

    JT: Caching Logged-in Users in Joomla

    Joomla Tips: Caching Logged-in Users in Joomla

    Welcome to another installment of Joomla Tips!
    Today’s topic is: Caching for Logged-In Users in Joomla

    In our first issue of Joomla Tips, we introduced the LiteSpeed Cache for Joomla plugin, and explained how to easily configure the basic settings. These settings are perfectly sufficient for Joomla sites where there is no ecommerce, and the majority of visitors do not log in to the site.

    In such simple installations, a single cached copy of each page is sufficient, because all visitors will be seeing the same content anyway. But what about sites where there is a significant population of visitors with user accounts? Under the default configuration, logged-in users are not served from cache. This behavior is easy enough to change, and today we’ll show you how.

    Enabling Logged-in Caching

    In order for your logged-in users to also experience the same acceleration benefits as your logged-out visitors, you need to be able to serve them pages from the cache.

    Caching Logged-in Users in Joomla: Logged-in Users Configuration Screen

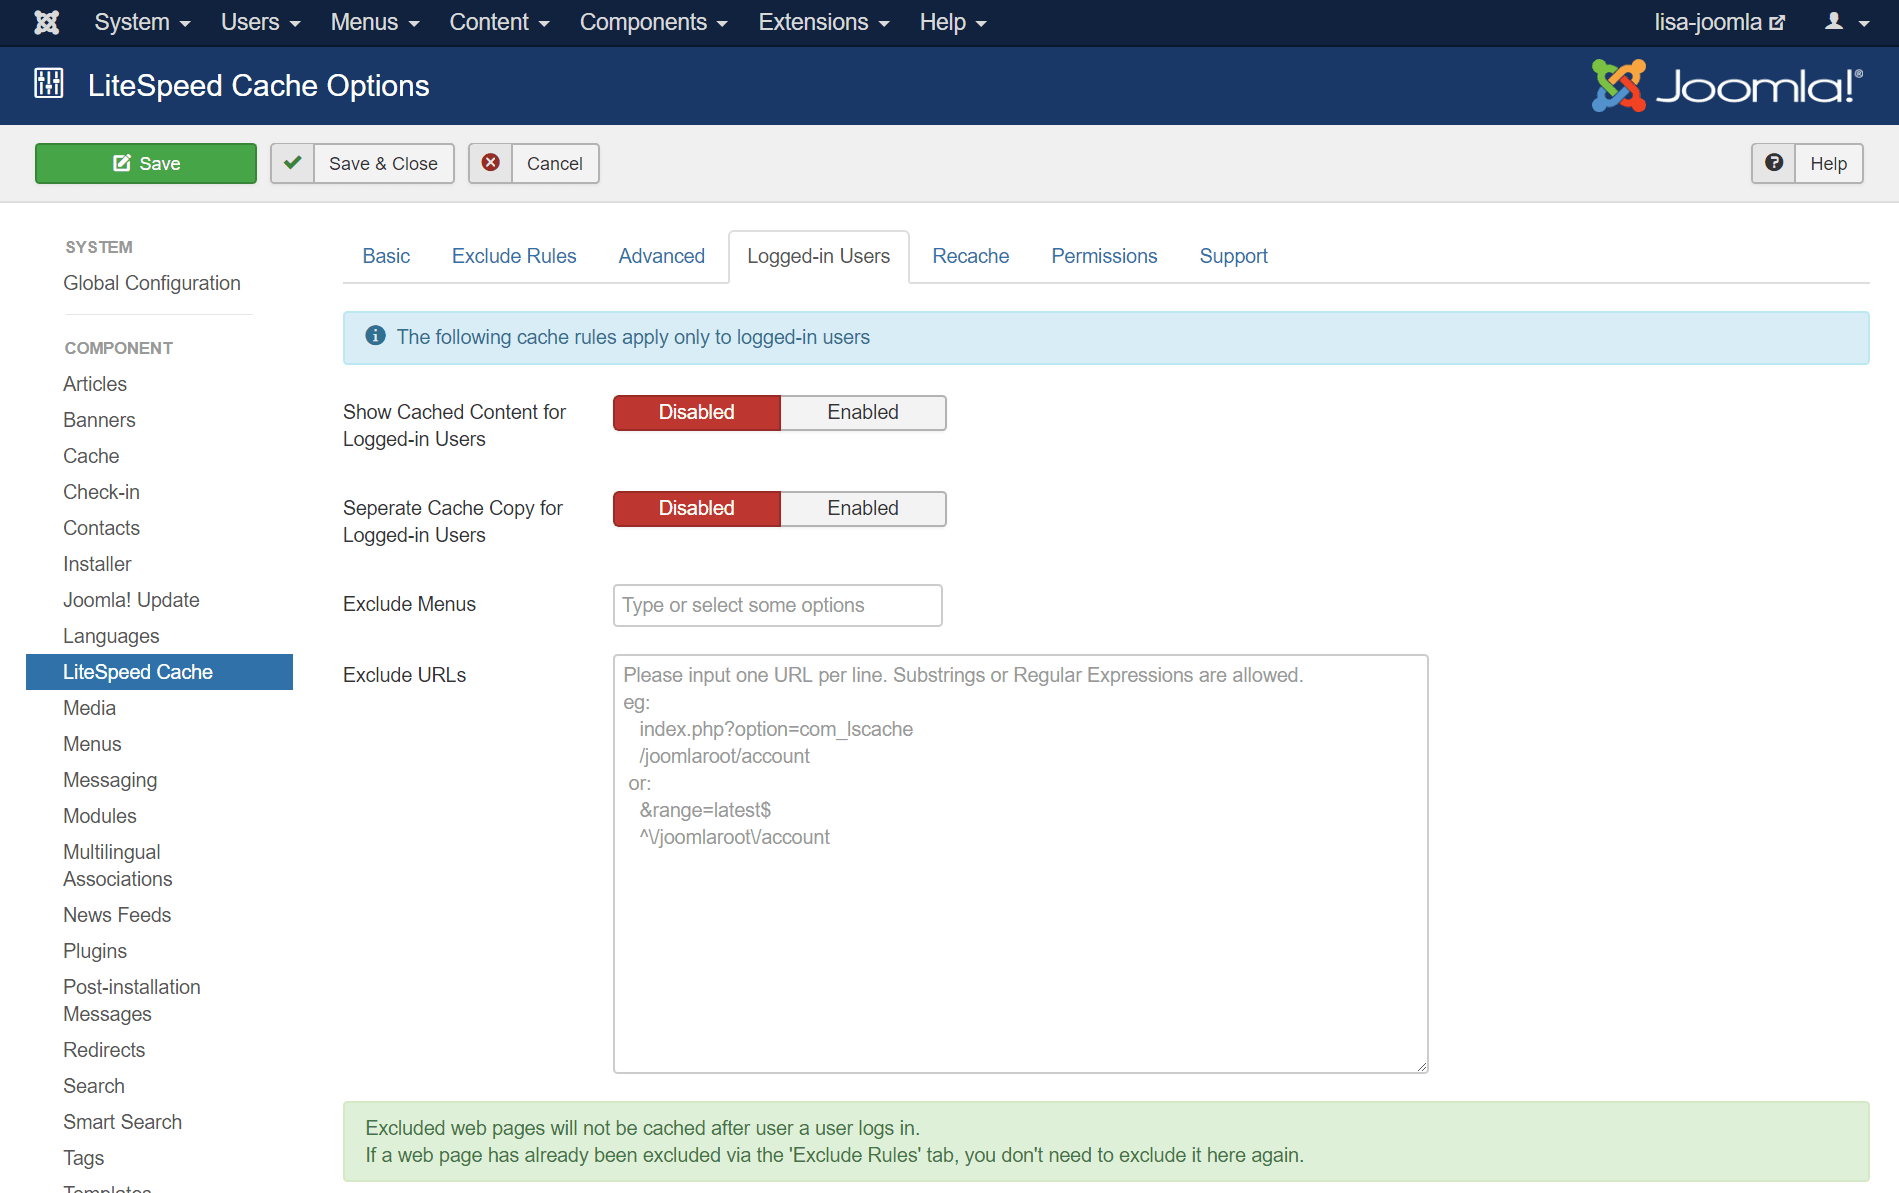
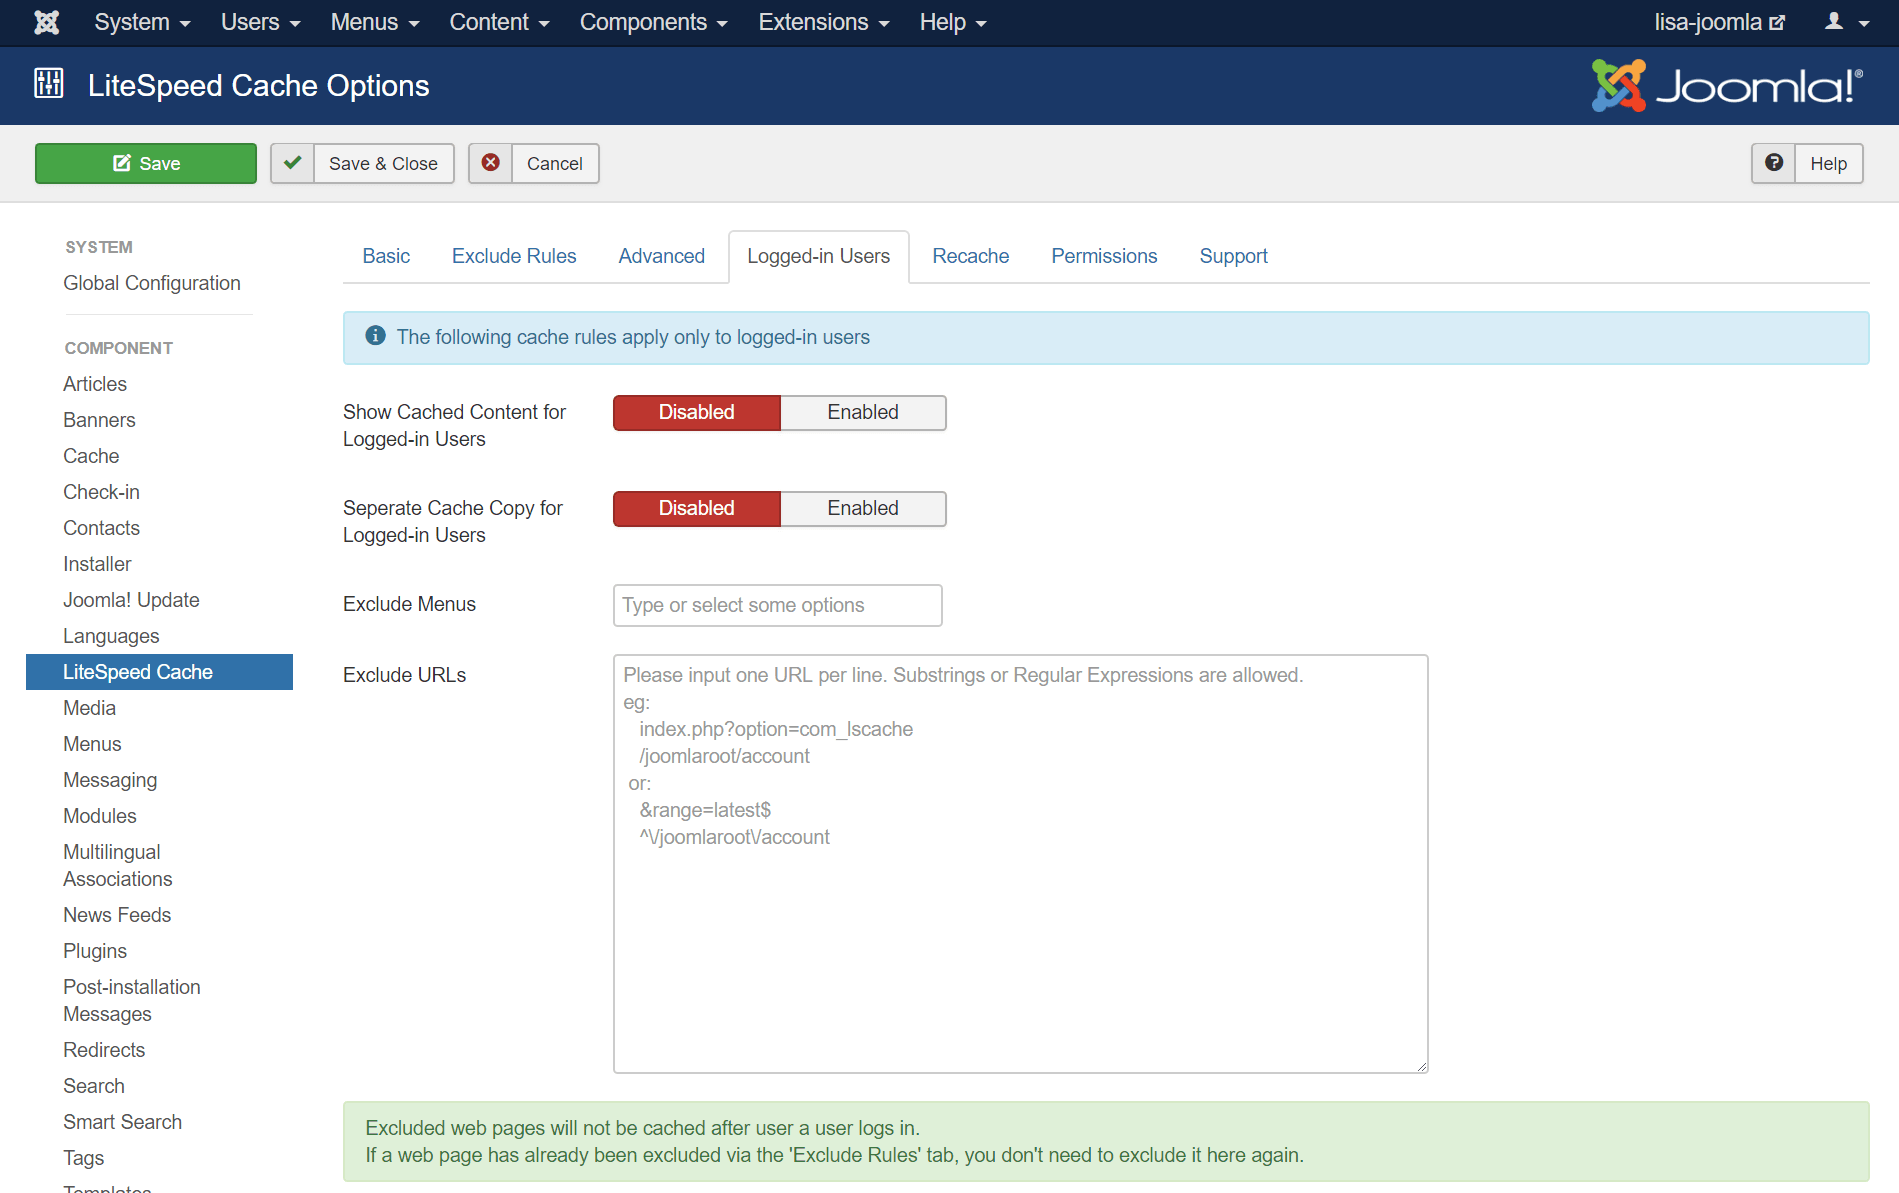
    Navigate to System > Global Configuration > LiteSpeed Cache and click the Logged-in Users tab. Set Show Cache Content for Logged-in Users to Enabled.

    If you save the settings here and purge the existing cache, you will indeed be serving all future logged-in visitors from cache. Just be aware that logged-in users will be getting the same publicly cached copies of pages as the non-logged-in users are getting. This may or may not be appropriate for your needs.

    If you need to cache individualized content for logged-in users, there are two ways of doing so:

    • Full pages served from private cache
    • ESI assembled pages where it’s mostly public, but holes are punched for private content

    Private Full Page Caching

    On the same configuration screen where you enabled cache for logged-in users, you can also enable private cache. Set Separate Cache Copy for Logged-in Users to Enabled, save the settings, and purge the cache.

    Once this setting is enabled, an individualized copy of any visited page is stored in private cache for each logged-in user that requests it. So, if there are 10 logged-in users, and 20 logged-out users looking at the home page, then there are 10 cached copies of the home page stored in private cache (an individualized copy for each logged-in user), and 1 copy of the home page stored in public cache for the logged-out users to share.

    Caching Logged-in Users in Joomla: Princeton Historical Society Please Come In

    How do you know whether to enable or disable this setting? Enable it when you have personalized content on a page, like a special blog post, or a shopping cart. You can safely leave this setting disabled if your logged in users don’t see any personalized content on the page, or if all personalized content appears within ESI modules.

    ESI

    With ESI (aka Edge Side Includes), you “punch holes” for private content in publicly cached pages. This makes sense if you have a site where nearly all of the content is public, but there is private content appearing within some of the modules. It’s also highly recommended for ecommerce sites.

    There is a lot we can say about ESI, so we’ll save it for its own post.

    Summary

    You can use the settings on the Logged-in Users configuration page to enable caching for logged-in users. For a site without personalized content, you can serve to them from public cache. And for a site where logged-in users see different content than those that are not logged in, you have the ability to serve to them from private cache.

    Next week we’ll talk about ESI, and how those settings can help you to be even more flexible, and allow you to accurately cache your entire site for all of your visitors!


    Disclaimer: The information contained in this post is accurate for LSCJoomla v1.2.0 [release log]. If you are using a newer version of the plugin, some details may have changed. Please refer to our wiki for the latest!

    Have some of your own ideas for future Joomla Tips topics? Leave us a comment!

    While you’re waiting for the next installment, here are a few things you can do:

  • JT: The Beginner’s Guide to LSCache for Joomla

    JT: The Beginner’s Guide to LSCache for Joomla

    Joomla Tips: Beginner's Guide to LiteSpeed Cache for Joomla

    Welcome to the first installment of LiteSpeed’s Joomla Tips!
    Today we are sharing a Beginner’s Guide to LiteSpeed Cache for Joomla!

    If your Joomla site is powered by LiteSpeed Web Server, you have a very powerful new tool at your disposal: the LiteSpeed Cache plugin for Joomla. LSCache is a high-performance, open source, user friendly cache plugin, and you don’t have to be a site optimization expert to use it.

    How it Works

    Joomla sites consist of dynamic pages that are built with PHP. The pages of a Joomla site don’t exist anywhere in the file system; they are constructed on demand through PHP, and then served to the visitor as HTML. This can be a resource-heavy process, and the LiteSpeed Cache for Joomla plugin is one way of dealing with it.

    When Joomla dynamically generates the static HTML page, LSCache communicates with LiteSpeed Web Server to store a copy of it. Once the static copy exists in the cache, then that copy can be served to future visitors, eliminating the expensive Joomla PHP process for all but the first visitor to request the page.

    When your site is cached, it requires much less involvement from the Joomla backend, which translates into a faster site and a better experience for your site’s visitors.

    Enable the Plugin

    We’re going to assume you (or your hosting provider) have already installed the plugin and configured LSCache at the server or virtual host level. If you need instructions for that, you can see our wiki. Don’t forget to deactivate all other full-page cache plugins, including “System – Page Cache” and “JotCache,” as well.

    NOTE: You can still use other types of cache (like object cache), but only one page cache can be used at a time, so you’ll need to disable the others, if you want to use LSCache.

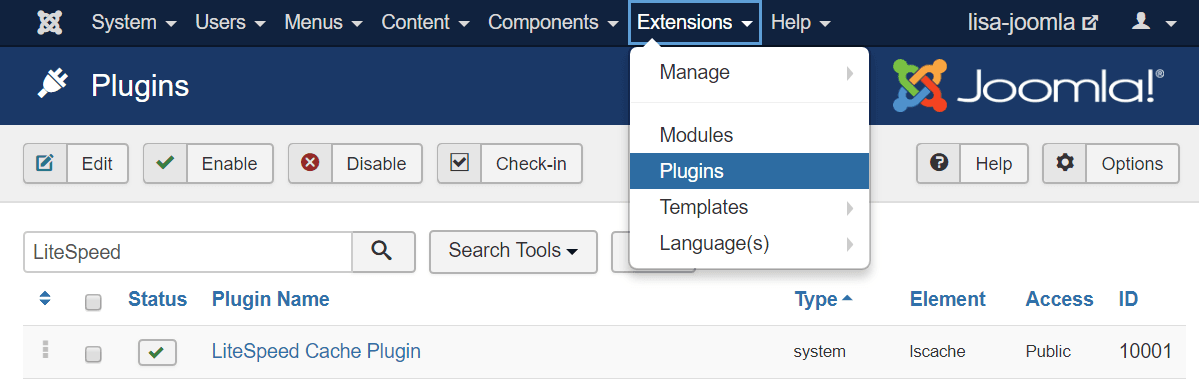
    From your Joomla Administrator menu, navigate to Extensions > Plugins. If you have a lot of plugins listed, type LiteSpeed into the search box to bring up the LiteSpeed Cache Plugin.

    Beginner's Guide to LiteSpeed Cache for Joomla: Enable the Plugin

    Look for the green check mark next to the plugin name. This indicates that the plugin is installed and enabled. If you see a red X instead, click the red X to enable the plugin. Once you’ve done that, the green check mark should appear, and you are good to go.

    Configure the Plugin

    Beginner's Guide to LiteSpeed Cache for Joomla: Cat in a Box

    LiteSpeed Cache works with most Joomla setups right out of the box. “Out of the box,” of course, is a figure of speech. Software rarely comes in a box anymore, which is great for the environment, but maybe not so great for your cat, who just loves cardboard boxes…

    The point, of course, is that LSCache for Joomla usually just works. It can often be enabled and ignored. There’s usually no need to play around with the settings, unless your site has atypical needs.

    Just the same, let’s go over some of those settings, so that you can use them if you want to.

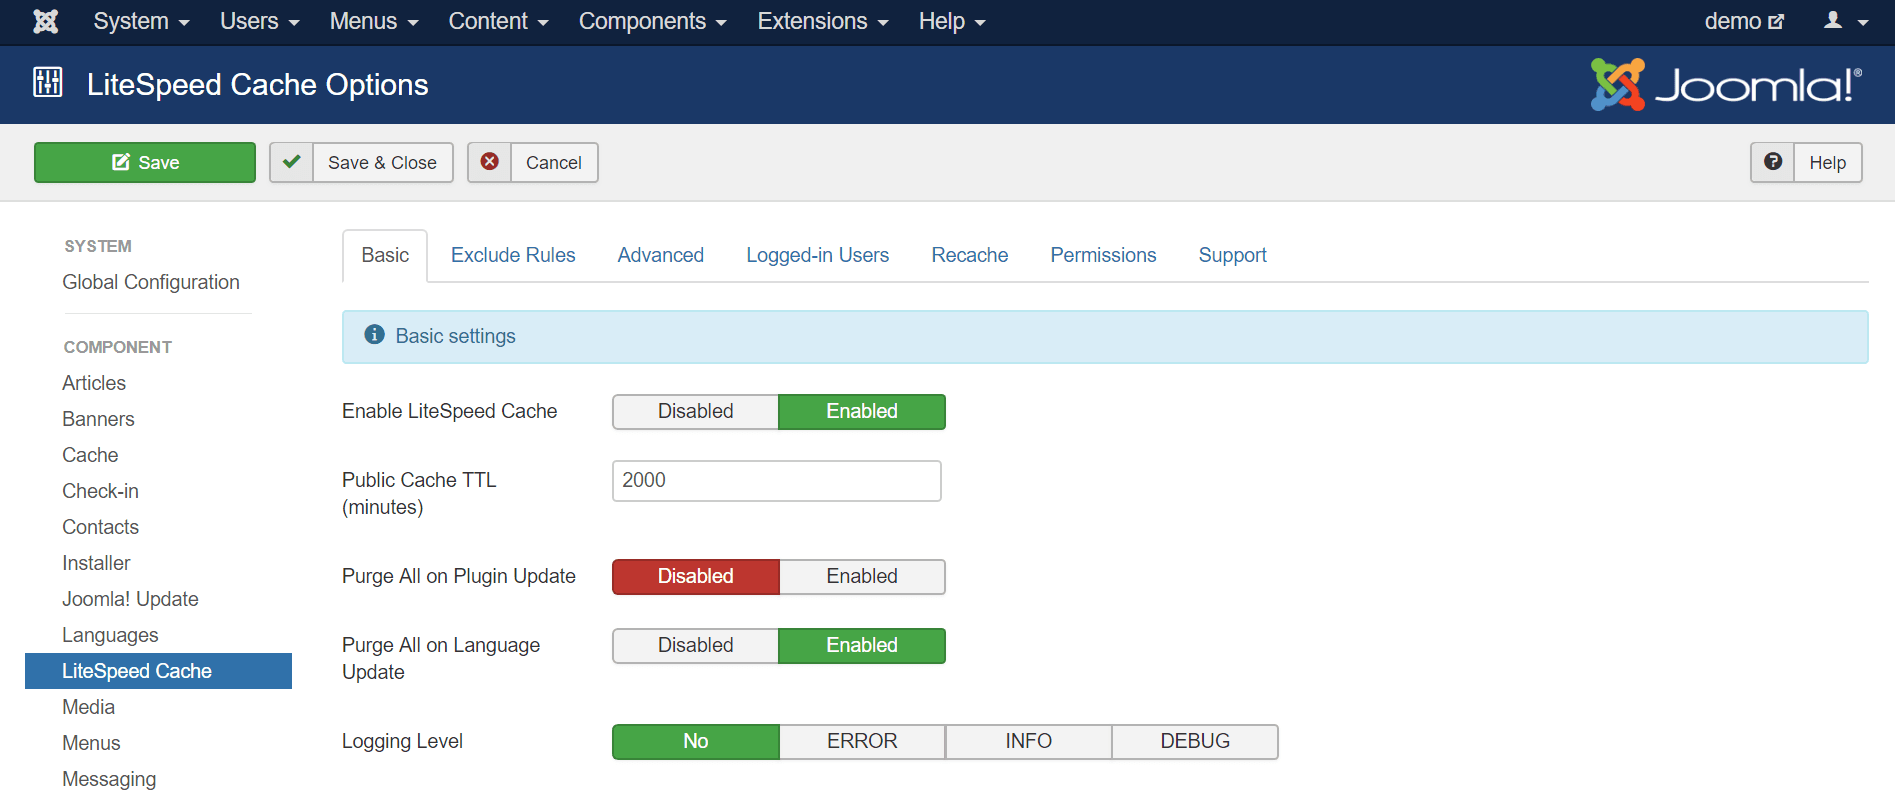
    Navigate to System > Global Configuration > LiteSpeed Cache to access the plugin’s settings. The first tab is for Basic settings.

    The Basic Tab

    Beginner's Guide to LiteSpeed Cache for Joomla: The Basic Tab

    Here is where you enable or disable the caching functionality of the plugin (not to be confused with enabling the plugin itself, which we did earlier), and set a few parameters for the way it should behave.

    Enable LiteSpeed Cache

    By default, caching is already enabled once you install and enable the plugin. If you need to stop caching your site for whatever reason, you can press Disable to turn it off. Simply press Enable to get it back up and running again.

    Public Cache TTL

    “TTL” stands for Time to Live, and it refers to the length of time a web page is valid within the cache. The default is 2000 minutes, but if you have a site that updates frequently, you might want to make that number smaller. Similarly, if you have a site that is fairly static and rarely changes, you can make that number much larger.

    Note: LSCache’s “smart purge” technology allows you to confidently set a high TTL, knowing that if content changes during that time, the cache will automatically be purged for any pages that are relevant to that change. We’ll explore that concept in more detail in a future Joomla Tips article.

    Purge All on Plugin Update

    If you are concerned that plugin updates are going to change some of the pages of your site (thereby causing the cached copies to become outdated), then you should enable this setting. It’s disabled by default, because usually plugin updates have minimal effect (if any) on the displayed content.

    Purge All on Language Update

    This is similar to the previous setting, except it refers to language updates, and it is enabled by default.

    Logging Level

    You can leave logging off in most cases. It’s handy to turn on logging when you are trying to diagnose a problem. If you’ve contacted our support team for help with an issue, chances are we’ll ask you to turn on logging and we’ll also tell you which level would be appropriate.

    Any time you turn on logging, it should be temporary, as logs can eat up disk space pretty quickly.

    All Other Tabs

    The other tabs may be ignored, unless you are feeling experimental, or you are using your Joomla installation for ecommerce. We’ll discuss them in detail in future issues of Joomla Tips. For now, here’s a short overview explaining the purpose of each tab.

    Exclude Rules

    Beginner's Guide to LiteSpeed Cache for Joomla: Exclude Rules

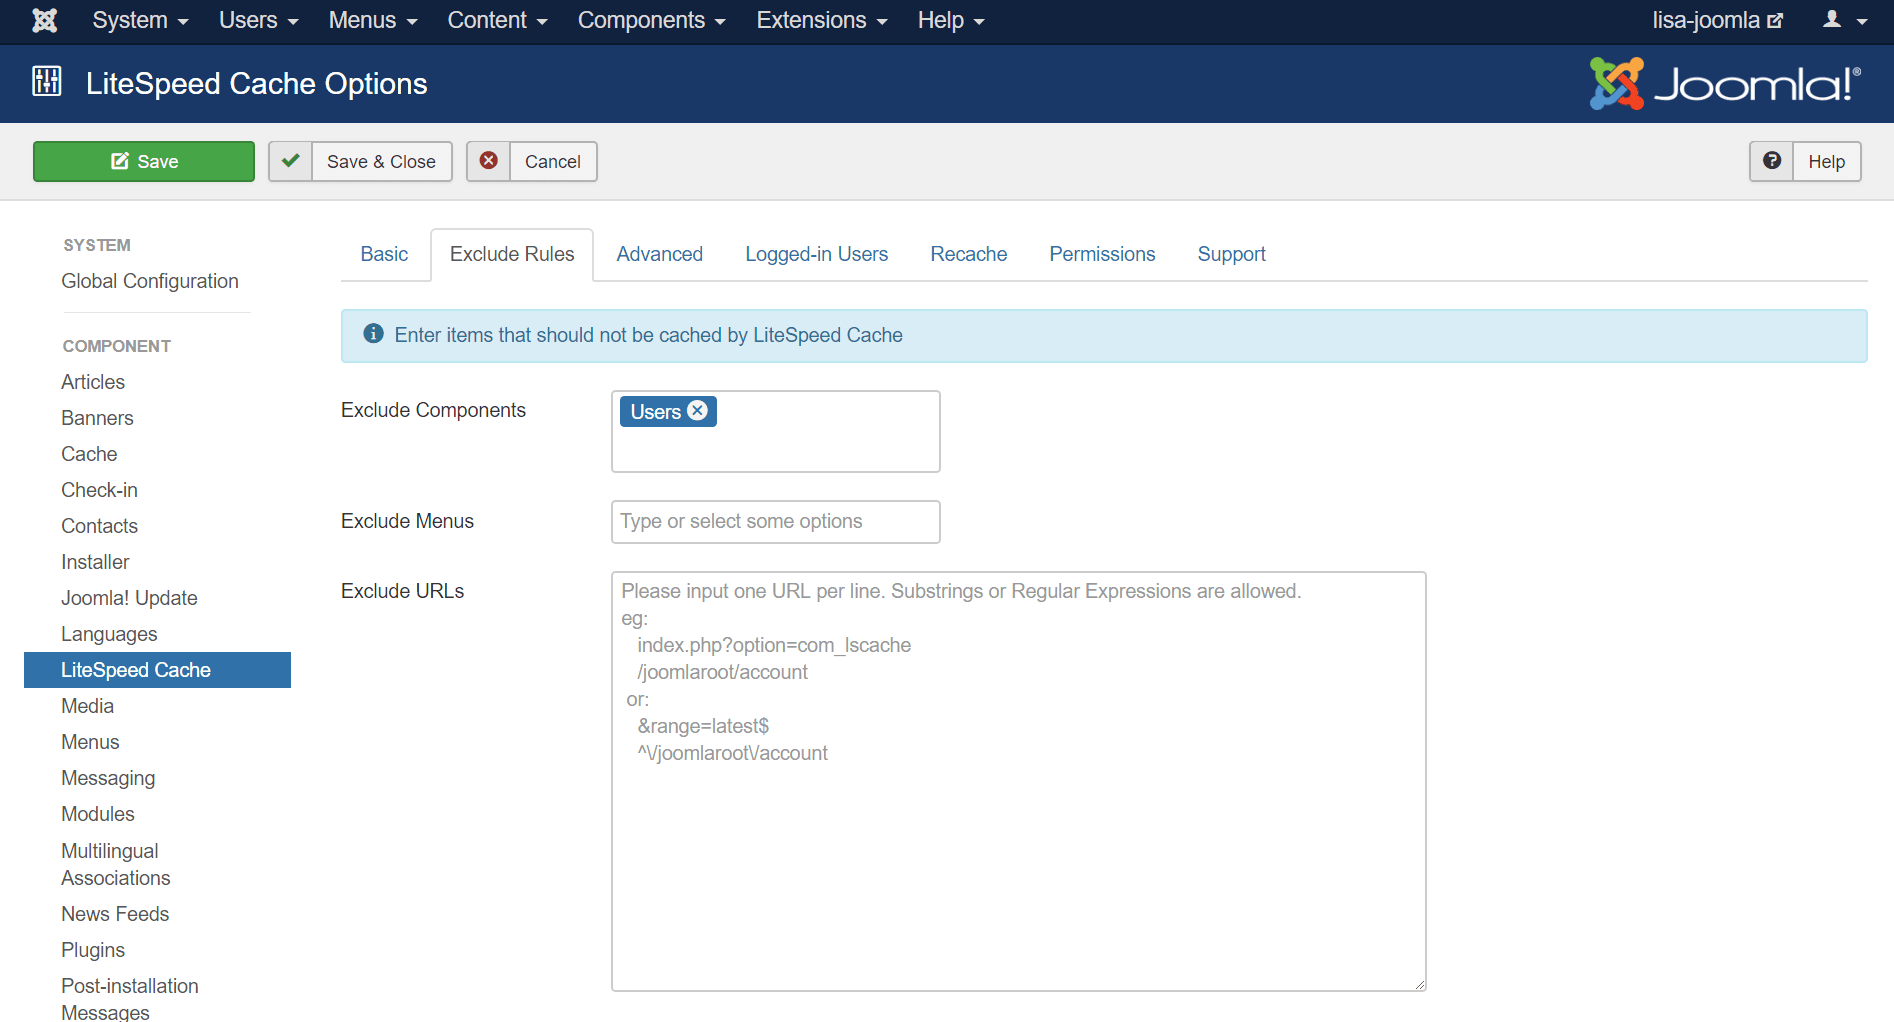
    This tab allows you to specify Joomla components, menus, and URLs that should not be cached.

    Advanced

    Beginner's Guide to LiteSpeed Cache for Joomla: Advanced Tab

    You can set up ESI here (a must if you are trying to cache an ecommerce site), give yourself the ability to clear the cache from a secure link outside of Admin, set a different TTL for the homepage, and set up LSCache to save separate views for mobile and desktop.

    Logged-in Users

    Beginner's Guide to LiteSpeed Cache for Joomla: Logged in Users Tab

    These settings pertain to caching for users who are logged in. By default caching for logged-in users is disabled.

    Recache

    Beginner's Guide to LiteSpeed Cache for Joomla: Recache Tab

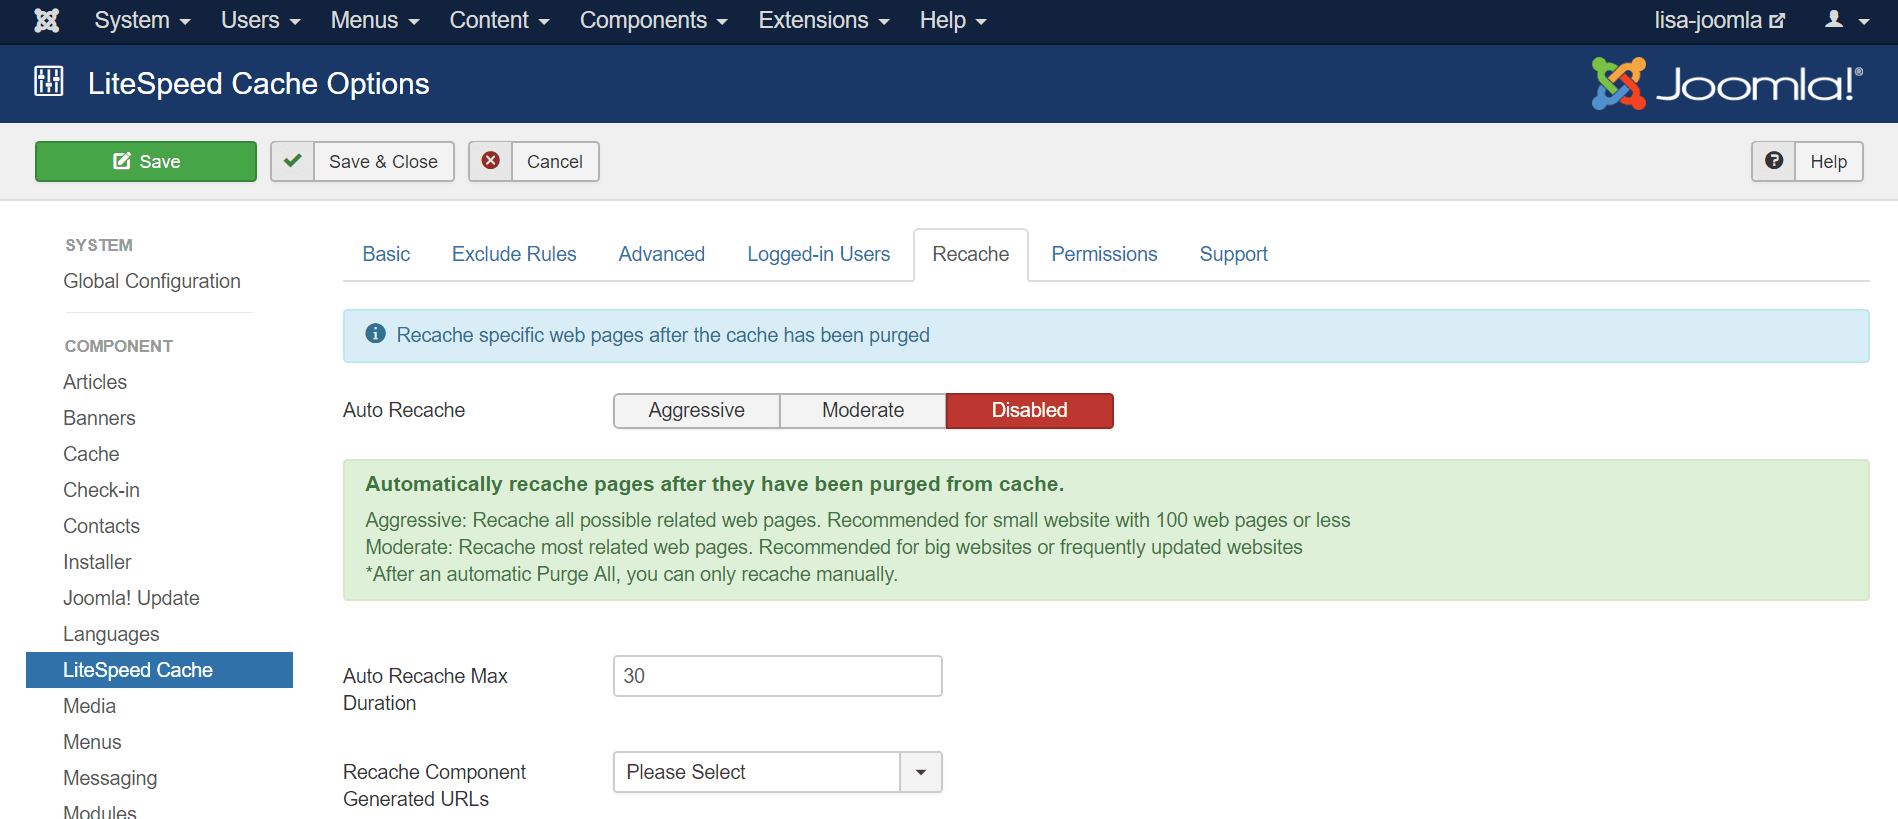
    Usually, when a page is purged from the cache, it remains uncached until a visitor comes along and requests the page. With Auto Recache enabled, LiteSpeed will automatically re-cache those purged pages, which means that your site’s visitors will have a lower chance of ever encountering uncached content.

    Permissions

    This is your standard Joomla permissions page, and every setting defaults to Inherited.

    Support

    You can refer to this page if you need support. It includes some handy links.

    Manual Purge

    In a perfect world, you could enable caching and never look at the plugin again. In the real world, though, things happen, and you might need to manually purge the cache now and then. Here’s how:

    Beginner's Guide to LiteSpeed Cache for Joomla: Manual Purge

    Navigate to Components > LiteSpeed Cache, and press the green Purge All LiteSpeed Cache button. All of the entries currently stored in the cache will be cleared.

    If you want to re-populate the cache after that, you can do so via the Rebuild All LiteSpeed Cache button.

    And that is all you need to know to use LSCache for Joomla successfully as a beginner! There may come a time when you would like to explore ESI, or Logged-in cache (both very powerful features, especially for ecommerce). We’ll be talking all about those options in a future Joomla Tips, so stay tuned!

    Disclaimer: The information contained in this post is accurate for LSCJoomla v1.2.0. If you are using a newer version of the plugin, some details may have changed. Please refer to our wiki for the latest!

    Have some of your own ideas for future Joomla Tips topics? Leave us a comment!

    While you’re waiting for the next installment, here are a few things you can do:

  • Joomla Benchmarks: LiteSpeed vs. Apache

    Joomla Benchmarks: LiteSpeed vs. Apache

    The LSCache for Joomla Module is one of our newest cache plugins. We recently teamed-up with Svend Gundestrup to generate a series of new benchmarks using one of his Joomla sites in Denmark. Svend takes a scientific approach to benchmarking, which we’ll discuss in detail after we show you the test results.

    We should mention that Svend performed all tests on his own, without any compensation from LiteSpeed, and using equipment he purchased himself.

    Benchmarks

    Return Load Tests were run using four different methods:

    • AB from within the test server
    • AB from an external server in the same region
    • Pingdom
    • GTMetrix

    Additionally, one set of Initial Load Tests was performed:

    • Pingdom

    Each type of test was run 20 times per server, making a total of 100 benchmarks for each server+cache setup. We’ll share the details in the Specifics of Testing section below.

    The goal was to compare performance between the following servers and cache solutions on a highly optimized Joomla website in a production environment, with a valid SSL certificate. We tested the following two servers+cache solutions:

    • Apache event MPM + php-FPM + Memcached + JotCache (memcached)
    • LiteSpeed Web Server + LSCache for Joomla

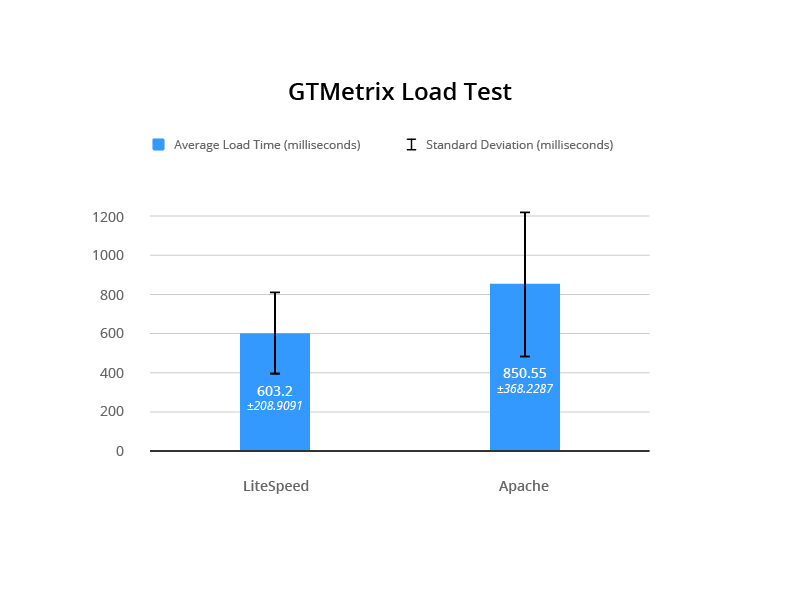
    Each results graph shows the average speed in milliseconds. Additionally, Svend has included some figures that help to evaluate the results from a statistical perspective: standard deviation (SD), F-test, and T-test. We’ll talk more about what those numbers mean in the Definitions section below.

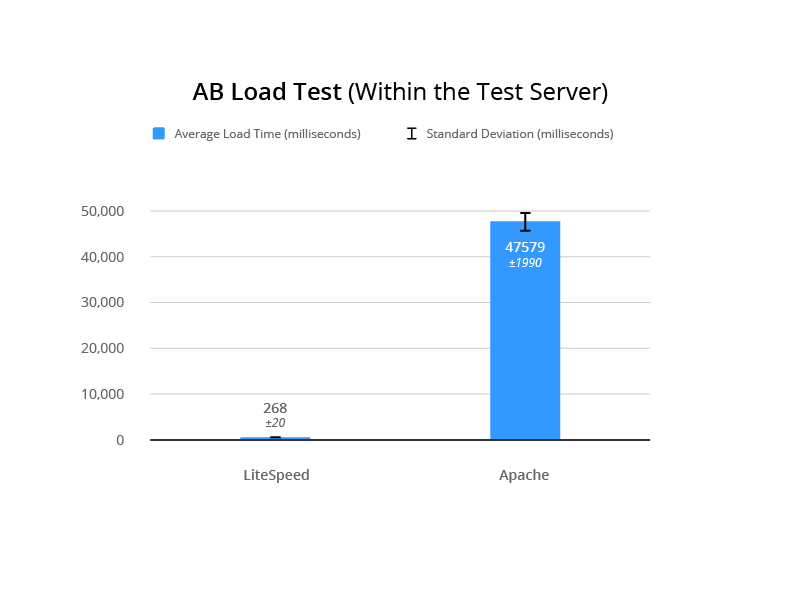
    AB Test #1 (within the test server)

    This AB load test was performed on the test server itself. The following command was used:

    ab -k -n 1000 -c 100 -H "Accept-Encoding: gzip,deflate" -l https://www.lite.lungekursus.dk/
    

    LSCache for Joomla Benchmarks: Internal AB Load Test
    F-Test 0

    T-Test 6.12E-49

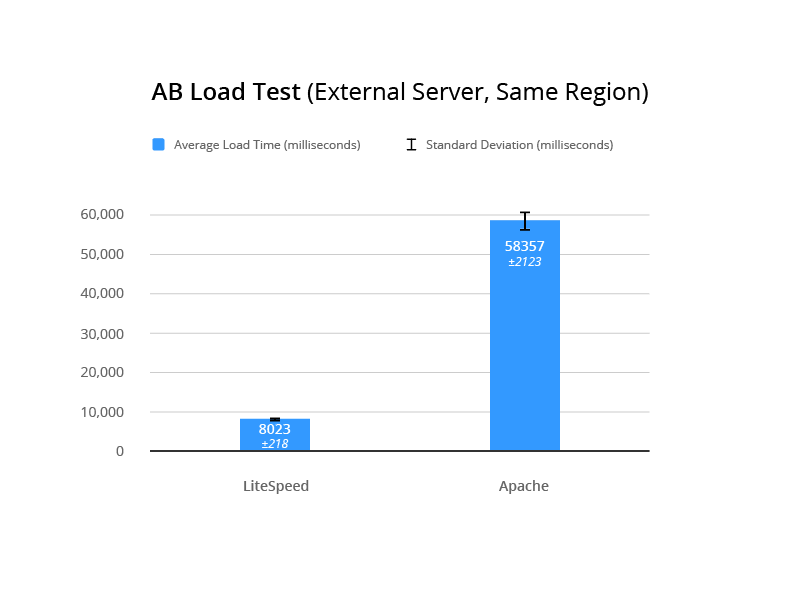
    AB Test #2 (external server, same region)

    This AB load test was performed from a server external to the test server. The following command was used:

    ab -k -n 1000 -c 100 -H "Accept-Encoding: gzip,deflate" -l https://www.lite.lungekursus.dk/
    

    LSCache for Joomla Benchmarks: External AB Load Test

    Pingdom Speed Test

    This test was run from Sweden to the test server in Amsterdam.

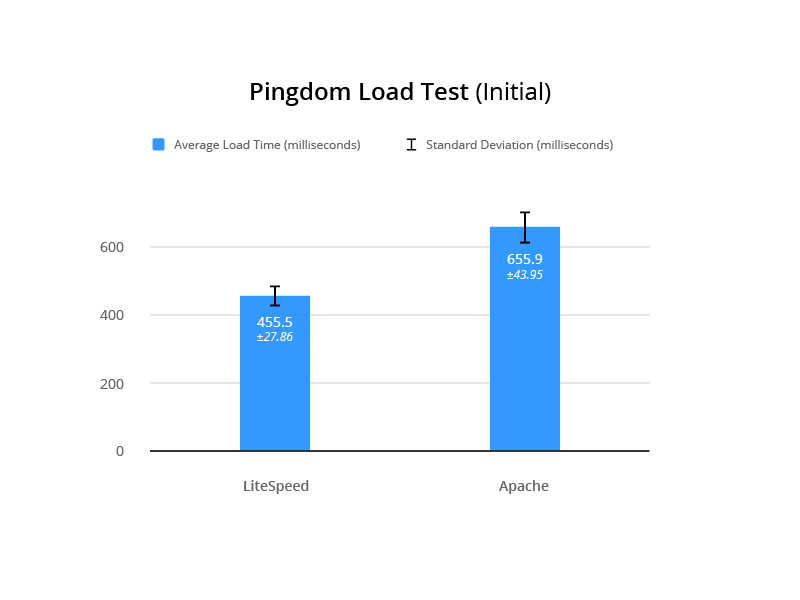
    For the Initial Load Testing, the following command was run:

    sudo /etc/init.d/php7.2-fpm restart && sudo /etc/init.d/apache2 restart
    

    For each iteration, Svend cleared the cache, restarted the server from the command line, and then verified that the cache was missed to prove that caching would have no effect on the results.
    LSCache for Joomla Benchmarks: Pingdom Initial Load Test
    F-Test 0.05369249473

    T-Test 7.63E-20

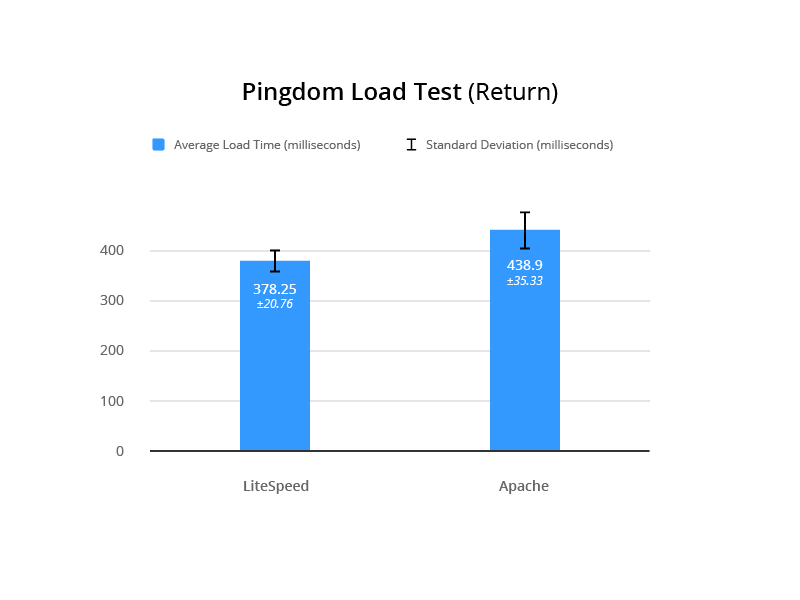
    For the Return Load Testing, the server was restarted once, all caching was cleared, and Svend loaded the website to verify a cache hit. The server was not reset in between tests.
    LSCache for Joomla Benchmarks: Pingdom Return Load Test
    F-Test 0.02524102277

    T-Test 4.05E-08

    GTmetrix

    Measuring time to fully load in the UK from the test server in Amsterdam.
    LSCache for Joomla Benchmarks: GTMetrix Load Test
    F-Test 0.01739569946

    T-Test 6.40E-03

    Test Environment

    Common To Both

    Digital Ocean server: 4GB, 80SSD, 2vCPU, based in Amsterdam, with a target audience in Denmark

    Config Server Firewall, IDS, Tripwire, MySQL, Fail2Ban

    Joomla 3.8.7, JCH Optimizer Pro, Joomla Admin (with security enabled), JA Builder template

    Apache

    Apache 2.4 with event MPM running

    PHP FPM 7.2.4.1

    Memcached

    JotCache (Memcached)

    LiteSpeed

    LiteSpeed Web Server 5.2.7

    LSCache for Joomla 1.1.1

    PHP 7.2.2-2+Xenial

    Specifics of Testing

    Each test was run as follows:

    1. service lsws stop
    2. ps -ef | grep httpd (to make sure LSWS is not running)
    3. service apache2 start
    4. ps -ef | grep apache2 (to make sure Apache is running)
    5. Enable JotCache (all plugins and dependencies)
    6. Run 20 iterations of each test
    7. service apache2 stop
    8. service lsws start
    9. Disable JotCache (and associated plugins)
    10. Enable LiteSpeed Cache
    11. Look for x-litespeed-cache: hit/miss response header to ensure LSCache is working.
    12. Run 20 iterations of each test

    Note: the .htaccess files remained unchanged during the testing

    Definitions

    Return Load Test: Load testing where the first load is discarded. This type of testing makes sense for evaluating a page cache, as the cache is not primed until the first page load triggers it.

    Initial Load Test: Load testing where the server is restarted after each test. The purpose is to test the initial first page load of the server without influence from memcached or lscache. It’s essentially the opposite of Return Load Testing, and measures the performance of the server and PHP.

    Standard Deviation: Abbreviated in our charts as SD, standard deviation measures the variation among individual test results from the mean result. A smaller standard deviation is preferable because it indicates some consistency in the test results. A higher SD indicates that the server speed is unstable. (Wikipedia)

    F-Test: Compares two sets of results and returns a number (p-value). If the p-value is high, there is not a significant difference between the two sets of results. So, for our testing, we want to see a low p-value, indicating that there is indeed a significant difference between the performance of the two servers. (Wikipedia | Google Sheets)

    T-Test: Determines if two sets of results are significantly different from each other. There are different types of T Tests, and which one you use is determined by the p-value returned by the f-test. We are looking for a low t-test value to indicate a strong probability that LiteSpeed is faster than Apache. (Wikipedia | Google Sheets)

    Why Standard Deviation?

    Svend performed all of these tests and made all of the calculations. He feels it is important to take a proper, statistically-sound approach to benchmarking. This approach involves comparing speed, loading, and repeated loading on a real website and a real server that handles IDS, security, and so on in an actual production environment.

    For each server tested, Svend calculated the standard deviation of the results. The SD indicates the stability of the test results. If you have a low SD, you are essentially saying “this server performs consistently in these tests.” A high SD means that the results for that server are erratic and inconsistent. In these tests, the SD calculated for LiteSpeed results was always much lower than that calculated for Apache results, leading to the conclusion that LiteSpeed Web Server is the more consistently performing server.

    Why F Tests and T Tests?

    Being more consistent doesn’t necessarily make it a better performer, however. And so Svend ran f-tests on most of the datasets above. The f-tests generated a p-value, which could be used to determine whether there was truly a significant difference between the two servers’ benchmark results. In every case, the p-value indicated that the test results of the two servers were significantly different from each other.

    Now that he knew that there was definitely a difference, he needed to calculate the probability that one server would outperform the other. He ran t-tests on the dataset. The tests returned low values in all cases, which indicated a strong possibility that LiteSpeed is faster than Apache.

    Why Follow This Process?

    You might be wondering if all of this is necessary. After all, you can simply look at the data and see that LiteSpeed’s numbers are always better than Apache’s. While that might be true, the statistical approach gives you a way to scientifically quantify the significance of the differences between the two servers.

    According to Svend, “I am tired of seeing ‘we did these 5 tests, on a completely blank system, that was not optimized for the system or the website prior to testing.’ It’s like testing a placebo to treat pneumonia. No wonder the antibiotics are working. It’s about testing and comparing, to find if the new antibiotic is better than the old (standard treatment). You need to do a lot more than 5 tests, both to be sure the results are correct, but also to see how much the test results differ over time.”

    These tests definitively show:

    • LiteSpeed is faster than Apache.
    • Speed varies much less with LiteSpeed than with Apache, meaning it is consistently faster.
    • Even in the initial load speed (where cache is not a factor) LiteSpeed outperforms Apache.

    Care to have a look at the original test results? Check out the Google Sheet.

    About Svend

    Svend Gundestrup is an MD in his last year to become a specialist in Pulmonology. He runs a specialized website for education within the pulmonology field in Denmark, catering to Danish pulmonologists and registered nurses. In addition to his medical duties, Svend runs a consultant firm that specializes in IT, IT security and IT development, and also EPIC healthcare in Danish Hospitals. His website audience requires speed, stability, and interoperability between desktop, laptop, tablet, and mobile phone.

    Svend is married with two kids, and has been playing with and building computers since the days of the 386 with coprocessor. Fluent in linux, OSX, and Windows, Svend has been creating websites as co-projects for many years, working with mambo and later Joomla.

    This blog post was a team effort. Thanks to Svend for executing the tests, providing an explanation of his process, and helping me proofread. And thanks to Mark Zou for the helpful graphics illustrating each test.
    –Lisa

    Want to try LSCache for Joomla for yourself? Download the module.

  • Cache all of the Things with LiteSpeed

    Cache all of the Things with LiteSpeed

    Cache all of the Things: A LiteSpeed Cache Roundup
    You may be a fan of our LiteMage cache extension for Magento, or super enthusiastic about our WordPress cache plugin, but did you know that there is more to our cache story? Indeed. Chances are there is a LiteSpeed Cache plugin for your other favorite web apps, too.

    LSCache plugins, in general

    LSCache is a server-based caching module that is built directly into LiteSpeed Web Server. It saves static versions of dynamically-generated HTML pages in order to speed up subsequent access to those pages. In the beginning, LSCache was set up entirely through rewrite rules and configuration files. It required users to know a little something about their server backend, or to contact their hosting provider to set up caching for them. But more importantly, rewrite-rule caching is inflexible. As such, site owners had no ability to purge on demand, which meant they could only cache for a few minutes at a time, if they wanted to avoid serving stale content.

    Enter LiteSpeed Cache Plugins.

    LiteSpeed Cache plugins take the server-based LSCache functionality and give it a familiar interface, whether that be the WordPress Dashboard or the XenForo Admin Control Panel. Additionally, an LSCache plugin lets you define rules for managing your app’s cache, and then automatically updates the configuration files and rewrite rules on your behalf.

    By putting the LSCache controls into the web apps that site owners use every day, LSCache has become far more accessible and flexible. Site owners may now cache pages for far longer than a few minutes, and they may manage their caches with greater precision.

    As of this writing, LSCache is available in seven flavors! You are probably aware of one or two of these plugins. You may even be a power user. But why stop there? If you’re running all of your web apps on a LiteSpeed server, then you should take advantage of as many of these plugins as you can!

    LSCache plugins, specifically

    Cache all of the Things: A LiteSpeed Cache Roundup
    Every LSCache plugin is a conduit to the cache module of a LiteSpeed server, whether that be LiteSpeed Enterprise, LiteSpeed Web ADC, or OpenLiteSpeed. The server’s module does all of the work, while the plugin provides a simple way for a site owner to tell the server what to do. Because of this, most of our cache plugins have the same abilities. When there are differences, they are usually down to the abilities of the web app itself, or complexities involved in implementing a particular feature for that web app.

    Speaking of the abilities of the web app, LSCache plugins are unique among cache solutions because they have a connection to both the server, and to the app. A plugin can use that relationship to provide features that other cache solutions (or simple rewrite rules) can’t duplicate. We alluded to a prime example of this earlier: tag-based purge.

    Tag-based purge is a cache management tool that takes purge cues from events that occur within the app. For example, when a new post is created in WordPress, LSCache for WordPress tells the server’s LSCache module to purge every page that would be affected by a new post (i.e. the relevant category and tag pages, the home page, etc.).

    All LSCache plugins are free and open source. To learn more about the specific features supported by each, click the name of the plugin.

    Magento

    All content can be assembled from cache, even per-user, private blocks. Multi-store, multi-currency, and multi-user-groups are supported. There are two different versions of LiteMage available: one for Magento 1.x and another for Magento 2.x.

    WordPress

    • Name: LSCache Plugin for WordPress
    • Download: from LiteSpeed
    • Works With: WordPress.org
    • Required Server: LSWS Enterprise, OpenLiteSpeed, or LiteSpeed Web ADC
    • Cache logged-in users? Yes
    • ESI supported? Yes, except on OpenLiteSpeed
    • Cache Crawler supported? Yes

    In addition to the cache functions, our WordPress plugin also includes several optimization features, which makes it a nice all-in-one option for WordPress acceleration. Compatible with WooCommerce.

    XenForo

    • Name: LSCache Add-on for XenForo
    • Download: from XenForo v1.x or v2.x
    • Works With: XenForo 1.x or XenForo 2.x
    • Required Server: LSWS Enterprise, OpenLiteSpeed, or LiteSpeed Web ADC
    • Cache logged-in users? No
    • ESI supported? No
    • Cache Crawler supported? No

    This is a simple XenForo add-on that speeds up your public forum pages for non-logged-in users. There are two different versions of LSCache for XenForo available: one for XenForo 1.x and another for XenForo 2.x.

    Please note that as of this writing, the XenForo 2 add-on only supports rewrite-rule-based caching. Tag-based caching is forthcoming.

    PrestaShop

    • Name: LSCache Module for PrestaShop
    • Download: from LiteSpeed
    • Works With: PrestaShop 1.6 & 1.7
    • Required Server: LSWS Enterprise, or LiteSpeed Web ADC
    • Cache logged-in users? Yes
    • ESI supported? Yes
    • Cache Crawler supported? No

    The PrestaShop module is one of our newer cache plugins. Introduced last year, it is highly-customizable on a global or per-store level. Tag-based smart purge keeps the cache from becoming stale when product details change.

    MediaWiki

    • Name: LSCache Extension for MediaWiki
    • Download: from GitHub
    • Works With: MediaWiki 1.25+
    • Required Server: LSWS Enterprise, OpenLiteSpeed, or LiteSpeed Web ADC
    • Cache logged-in users? Yes
    • ESI supported? No
    • Cache Crawler supported? No

    This one is a straightforward little plugin that speeds up your MediaWiki site for both logged-in and non-logged-in users.

    Drupal

    • Name: LSCache Module for Drupal
    • Download: from GitHub
    • Works With: Drupal 8.x
    • Required Server: LSWS Enterprise, OpenLiteSpeed, or LiteSpeed Web ADC
    • Cache logged-in users? Yes
    • ESI supported? No
    • Cache Crawler supported? No

    This one is hot off the presses! It’s comparable to most of the others, in that it supports public cache, private cache, and ESI, and it features tag-based cache purge.

    Joomla

    • Name: LSCache Module for Joomla
    • Download: from GitHub
    • Works With: Joomla 3.x
    • Required Server: LSWS Enterprise, OpenLiteSpeed, or LiteSpeed Web ADC
    • Cache logged-in users? Yes
    • ESI supported? Yes, except on OpenLiteSpeed
    • Cache Crawler supported? No

    The Joomla plugin is another brand new release, and contains many of the LiteSpeed Cache features you already know and love.

    Go forth and cache!

    Hopefully you have found something new to try among our cache plugins! If you have a favorite web app that is not represented here, leave a comment. You never know… it might end up being next on our list.

    The LiteSpeed wiki contains everything you need to know when it comes to installation and configuration, so be sure to check there if you get stuck.

    Also? We have a Slack community for LiteSpeed users. Join up, leave feedback, help us test new features in development, and connect with your fellow LSCache plugin users!

  • Benchmarking LSCache for Joomla

    Benchmarking LSCache for Joomla

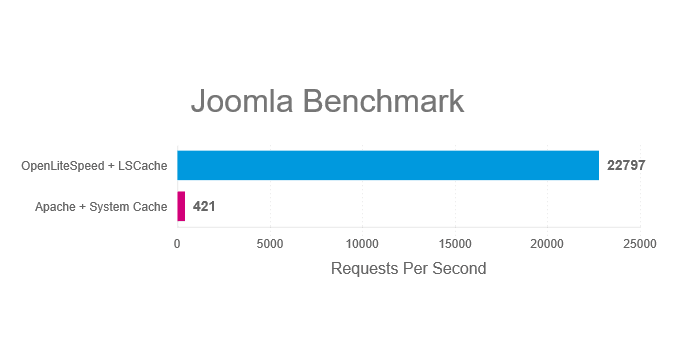
    We put our new LSCache extension for Joomla to the test, comparing OpenLiteSpeed and LSCache to Apache and Joomla System Page Cache. These are the results.

    Our testing consisted of burst tests simulating 10,000 requests over 100 concurrent users.

    The Results

    The following chart shows how many requests per second the two servers and cache solutions processed during our series of tests. The larger the number, the better.

    As you can see, OpenLiteSpeed + LSCache outperforms Apache + Joomla System Page Cache..

    Try it Yourself

    In the interest of transparency, we’re including the specs of our configuration and test environment below. Feel free to run the same benchmarks yourself and verify our results.

    This is the command we used in all tests (Replace example.com/path with the location of your test subjects):

    ab -n 10000 -k -H "Accept-Encoding: gzip,deflate" -c 100 example.com/path

    Each test was run five times, and the average result was used for our graphs.

    Web Server Configuration

    Common settings for both servers:

    • Keep-Alive
    • gzip
    • OPCache
    • PHP use socket
    • PHP version 7.1.2

    Additional OpenLiteSpeed settings:

    • Number of Workers 4
    • PHP_LSAPI_CHILDREN=20
    • LSAPI_AVOID_FORK=1

    Test Environment

    Software

    Web Server version:

    • OLS: v1.4.28
    • Apache: v2.4.6

    Server API version:

    • OLS: LSAPI v6.11
    • Apache: Apache 2.0 Handler

    Cache version:

    Hardware

    Both Client and Server specs:

    • Intel Xeon CPU E7- 4870 4 Core @ 2.40GHz
    • 4GB RAM
    • 120GB ZFS RAID-Z2 iSCSI Drive
    • CentOS 7

    Although we didn’t use one for our benchmarks, We recommend Solid State Drives (SSD) in production environments.

    Try LSCache for Joomla today, and tell us what you think!