

Tag: docker

  • Proxy n8n with LiteSpeed Web Server

    Proxy n8n with LiteSpeed Web Server

    n8n with LiteSpeed Web Server

    If you are running cPanel with LiteSpeed Enterprise and want to deploy a modern automation service such as n8n, the setup can be both straightforward and reliable.

    In this article, we will walk through a basic example of running n8n inside Docker on a cPanel server, then publishing it through LiteSpeed Enterprise using reverse proxy rules that support both normal HTTP traffic and WebSocket connections.

    Set up n8n

    Below is a n8n example docker-compose.yml used for the n8n.example.com domain:

    version: "3.8"
    
    services:
      n8n:
        image: docker.n8n.io/n8nio/n8n:latest
        container_name: n8n
    
        ports:
          - "127.0.0.1:5678:5678"
    
        environment:
          - TZ= America/Los_Angeles
          - N8N_HOST=n8n.example.com
          - N8N_PROTOCOL=https
          - N8N_PROXY_HOPS=1
          - WEBHOOK_URL=https://n8n.example.com/
          - N8N_EDITOR_BASE_URL=https://n8n.example.com/
          - N8N_ENFORCE_SETTINGS_FILE_PERMISSIONS=true
          - N8N_RUNNERS_ENABLED=true
        volumes:
          - n8n_data:/home/node/.n8n
    
        restart: unless-stopped
    
    volumes:
      n8n_data:


    A few points are worth highlighting here:

    • N8N_HOST, N8N_PROTOCOL, WEBHOOK_URL, and N8N_EDITOR_BASE_URL help n8n understand that it is being served behind HTTPS on the public domain.
    • N8N_PROXY_HOPS=1 is important when n8n is behind a reverse proxy, because it helps n8n trust the forwarded request information correctly.

    Learn more about n8n environment variables.

    Proxy Setup

    To support both HTTP requests and WebSocket traffic, we used Apache-style userdata include files in cPanel.

    We added the following:

    <IfModule mod_rewrite.c> 
    RewriteEngine on 
    RewriteRule (.*) http://localhost:5678/\$1 [P,L] 
    ProxyPass / ws://localhost:5678/ 
    </IfModule>
    

    to /etc/apache2/conf.d/userdata/ssl/2_4/n8examplecom/proxy.conf for the SSL configuration and to /etc/apache2/conf.d/userdata/std/2_4/n8examplecom/proxy.conf for the non-SSL configuration.

    This configuration allows the domain to proxy regular traffic to the n8n container on localhost:5678, while also passing WebSocket connections correctly.

    Note: The backend target is always plain HTTP because SSL termination happens at the web-server level.

    After saving the include files, we rebuilt and reloaded the web server configuration, like so:

    /scripts/buildhttpdconf
    systemctl restart lsws
    

    Domain access

    Once DNS, SSL, Docker, and proxy rules are all in place, you can visit the public domain at https://n8n.example.com.

    From there, register your account on the n8n instance and begin building workflows.

    Set up simple test workflow

    To confirm that the reverse proxy and application are working properly, create a simple test workflow:

    1. Receive a webhook request
    2. Make an HTTP request to api.ipify.org
    3. Return the detected IP address as JSON

    Webhook node

    Use these two URLs:

    • Test URL: https://n8n.example.com/webhook-test/test-api
    • Production URL: https://n8n.example.com/webhook/test-api

    Set the webhook response mode to Using "Respond to Webhook" node.

    HTTP Request node

    Create an HTTP Request node with:

    • Method: GET
    • URL: https://api.ipify.org?format=json

    This endpoint returns a simple JSON response containing the requester IP address.

    Respond to Webhook node

    Set the following:

    • Respond With: JSON
    • Response Body (Expression):
      {  
      "myIP": "{{$json.ip}}"  
      }  
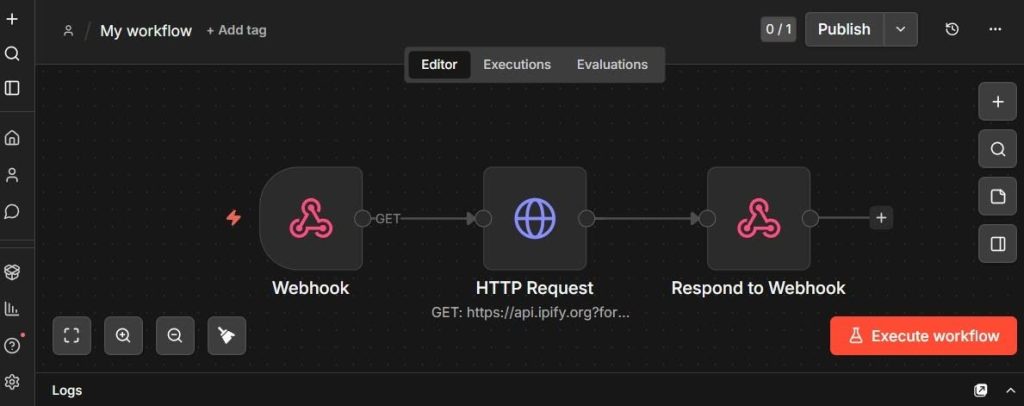
    

    n8n workflow
    The image above shows what the workflow looks like in the editor.

    Activate the workflow

    Activate the workflow to validate the webhook.
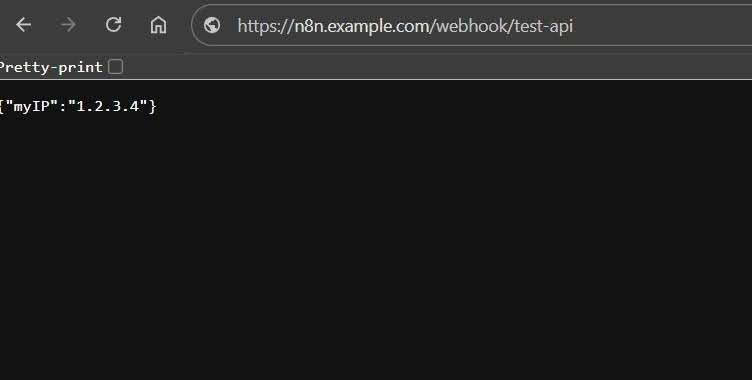
    n8n with LiteSpeed Web Server test output

    After activating the workflow, visiting the webhook URL in the browser should return a JSON response showing your IP address, like so:

    {"myIP": "192.0.2.0"}
    

    This is a simple but useful validation test, because it confirms:

    • the domain is reachable
    • HTTPS is working
    • the reverse proxy is forwarding requests correctly
    • n8n is processing the workflow
    • the response is being returned properly through LiteSpeed

    Conclusion

    Running n8n on cPanel with LiteSpeed Enterprise and Docker is practical. With the right proxy configuration, it is possible to support both standard HTTP traffic and WebSocket connections cleanly, while keeping the service accessible over HTTPS on its own domain.

    If you are looking for a clean way to publish n8n on a LiteSpeed Enterprise server, this is a solid approach.


  • LiteSpeed Offers Docker Solutions

    LiteSpeed Offers Docker Solutions

    LiteSpeed Docker

    OVERVIEW

    Docker is more popular than ever these days, and this year LiteSpeed Technologies has introduced Docker images for both LiteSpeed Enterprise and OpenLiteSpeed web servers. Additionally, we’ve made WordPress app bundles available in GitHub repos for each server image, along with a Magento app bundle for our Enterprise image. With LiteSpeed Docker solutions, you can easily set up High Performance WordPress or Magento with HTTP/3 protocol support, and developers can run on multiple platforms like Linux or Windows.

    Available Images

    We have made LiteSpeed Enterprise and OpenLiteSpeed Images available on Docker Hub.

    LiteSpeed Enterprise
    LiteSpeed Enterprise
    OpenLiteSpeed
    OpenLiteSpeed

    Deploy LiteSpeed

    You can deploy either of the LiteSpeed images on Docker in less than a minute.
    Here we’ll use OpenLiteSpeed as an example, and assume you already have Docker installed.

    Download the Image from Docker Hub

    docker pull litespeedtech/openlitespeed:latest

    Start a Container

    docker run -d --name openlitespeed -p 7080:7080 -p 80:80 -p 443:443 -it litespeedtech/openlitespeed:latest

    TIP: You can eliminate -p 7080:7080 from the command if you don’t need WebAdmin access.

    Add a sample page

    The server should start running successfully, and you should be able to log into the container. Add some files you want to display with the following command:

    docker exec -it openlitespeed bash

    Your default WORKDIR should be /var/www/vhosts/, since the default document root path is /var/www/vhosts/localhost/html. Simply add the following command to index.php, and then verify it from the browser with a public server IP address on both HTTP and HTTPS:

    echo '<?php phpinfo();' > localhost/html/index.php

    Deploy High-Performance WordPress with LiteSpeed

    To start a high-performance WordPress-with-LiteSpeed-Cache solution, you can choose to use one of the following containers:

    We’ll use WordPress + OpenLiteSpeed as an example, and assume you already have Docker and Docker Compose installed.

    Download the Open Source from GitHub

    Clone this repository or copy the files from this repository into a new folder:

    git clone https://github.com/litespeedtech/ols-docker-env.git

    Change the Default Values (Optional)

    Edit the .env file to update the demo site domain, default MySQL user, and password. Feel free to check the Docker Hub Tag page if you want to update the default LiteSpeed Enterprise, OpenLiteSpeed, or PHP versions.

    Start the Multicontainer

    Open a terminal, cd to the folder in which docker-compose.yml is saved, and run:

    docker-compose up -d

    Start Your First WordPress site

    After running the following command, you should be able to access the WordPress installation page with the configured domain. If there is no change in the .env file, then the default domain is https://localhost.

    bash bin/demosite.sh

    For more CLI usage information please check our documentation which covers:

    • Setting the WebAdmin Password
    • Creating a Domain and Virtual Host
    • Creating a Database
    • Installing a WordPress Site
    • Applying a Let’s Encrypt Certificate
    • Updating the Web Server
    • Applying OWASP ModSecurity

    Deploy High-Performance Magento with LiteMage

    To start a high-performance Magento-with-LiteMage-Cache solution, you can use the following container:

    We’ll assume you already have Docker and Docker Compose installed.
    As of version 2.4, Magento requires Elasticsearch to be the catalog search engine, we recommend you have 4GB RAM on the server. If you are using a system with less than 4GB, we recommend you create a swap file, otherwise your upgrade might fail.

    Download the Open Source from GitHub

    Clone this repository or copy the files from this repository into a new folder:

    git clone https://github.com/litespeedtech/lsws-magento-docker-env.git

    Change the Default Values (Optional)

    Edit the .env file to update the demo site domain, default MySQL user, and password. Feel free to check the Docker Hub Tag page if you want to update the default LiteSpeed Enterprise, or PHP versions.

    Start the Multicontainer

    Open a terminal, cd to the folder in which docker-compose.yml is saved, and run:

    docker-compose up -d

    Start Your First Magento site

    After running the following command, you should be able to access the Magento page with the configured domain. If there is no change in the .env file, then the default domain is https://localhost.

    bash bin/demosite.sh

    If you want to see Magento with sample data, simply add [-S, --sample] to apply:

    bash bin/demosite.sh -S

    Videos

    Customization

    Build Your Own Web Server Version

    Sometimes you may want to install more packages from the default image, or some other web server or PHP version which is not officially provided. You can build an image based on an existing image. Here’s how:

    1. Download the dockerfile project
    2. CD into the project directory
    3. Edit the Dockerfile if necessary
    4. Build, feeling free to substitute server and PHP versions to fit your needs

    For example:

    git clone https://github.com/litespeedtech/lsws-dockerfiles.git
    cd lsws-dockerfiles/template
    bash build.sh -L 5.4.9 -P lsphp74
    

    or

    git clone https://github.com/litespeedtech/ols-dockerfiles.git
    cd ols-dockerfiles/template
    bash build.sh -O 1.6.15 -P lsphp74
    

    Extend Existing Images

    If you want to customize the image by adding some packages, e.g. lsphp74-pspell, just extend it with a Dockerfile:

    FROM litespeedtech/openlitespeed:latest
    RUN apt-get update && apt-get install lsphp74-pspell -y
    

    Conclusions

    LiteSpeed Docker solutions allow you to start a pure LSWS or OLS web server on Docker, or start WP + LiteSpeed / Magento + LiteSpeed Docker solutions easily. You can also customize or extend the image whenever you need to. Our Docker solutions are still in a very early release stage, so feel free to raise an issue if you have any suggestions or problems. Contributions are always welcome.

    Special thanks to our friend Lars Hagen. Lars is a DevOps enthusiast, with a passion for Docker and everything in the cloud. He helped us lay out the foundation for building good, robust Docker images, which is why we now have these high-end Docker images to support and use today.